Create a Slider with AI is an exciting new approach that is revolutionizing the way sliders are designed and implemented. This innovative technique harnesses the power of artificial intelligence to generate sliders that are not only visually stunning but also highly functional. By combining the flexibility of sliders with the capabilities of AI, designers, and developers can now create dynamic and interactive sliders that adapt to user preferences and behavior. This cutting-edge technology opens up a world of possibilities for creating engaging and personalized user experiences.
How to Create Slider with AI Video Tutorial
How to Create AI Slider Under One Minute
What is AI and how can it affect your workflow?
Emerging from the field of machine learning, Artificial Intelligence (AI) has achieved a significant breakthrough. It can now not only learn and adapt but also generate entirely new creative formats, from captivating visuals to sophisticated written text. This represents a major paradigm shift within the creative industry, redefining the boundaries between computational power and human artistic expression.
AI workflows harness the power of artificial intelligence to streamline and enhance business processes that are often manual and repetitive. By automating these tasks, organizations can significantly improve overall productivity and efficiency. This shift frees up valuable employee time, allowing them to focus on more strategic and complex work.
The expansion of the web is no exception to this trend, and all those working in this field can somehow utilize AI to enhance and optimize their daily mechanisms and routines. AI WordPress plugins further empower users by offering advanced features, such as content generation, personalization, and analytics, seamlessly integrated into their websites. In this article, we will talk about the pros of using AI in slider world.
Benefits of using AI for making website sliders
Streamlined Design
With just a few clicks, AI tools can streamline the complex process of designing layouts and matching to design standards. This allows you to achieve the best possible outcome or the closest possible approximation for your slider, aligned with your website’s visual framework, in the shortest possible time. This eliminates the need for manual iteration and guesswork
Effortless Content Curation
Spend less time searching for visuals. AI can suggest royalty-free images and videos based on your chosen theme or keywords. This ensures your sliders are visually compelling and relevant to your audience.
A/B Testing Made Easy
AI streamlines A/B testing by automatically generating variations of your slider with different elements. Quickly identify the most effective design for your target audience.
Creating AI Slider with Depicter
The following video tutorial provides a comprehensive walkthrough of using AI in WordPress with the Depicter plugin. However, if you prefer more detailed text instructions for how to create a slider with AI, please refer to the steps outlined below:
To create and add a slider to your website using AI in WordPress, we will use the Depicter plugin.
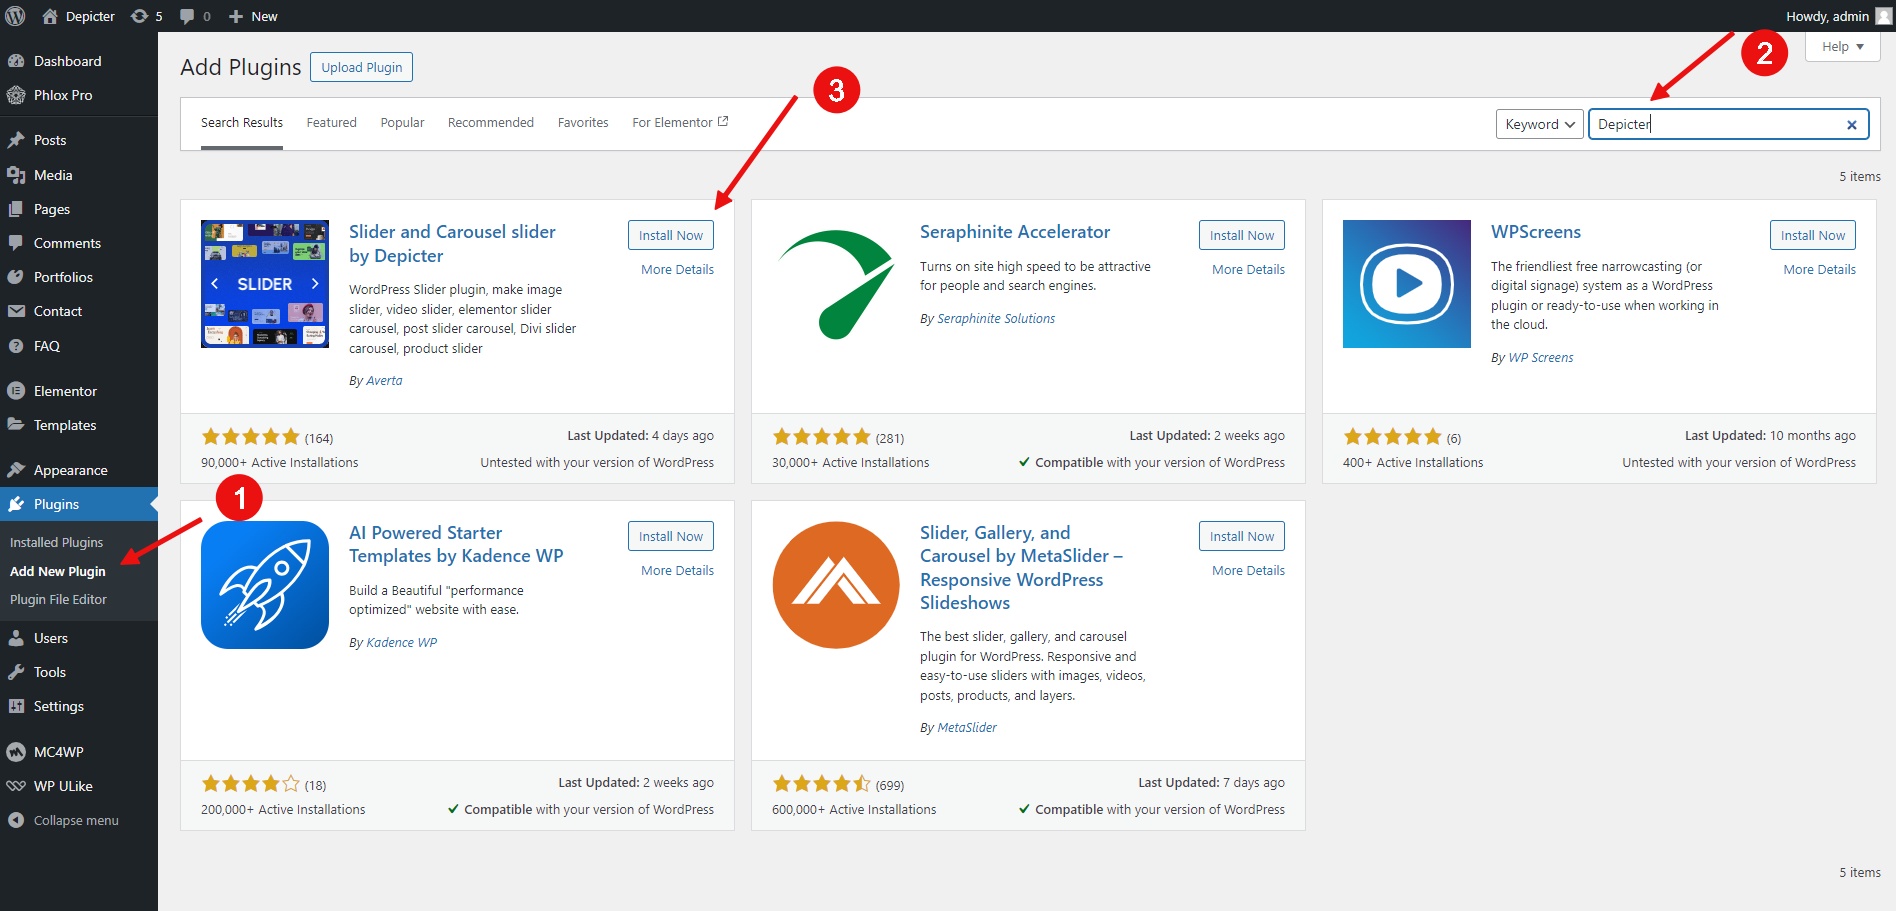
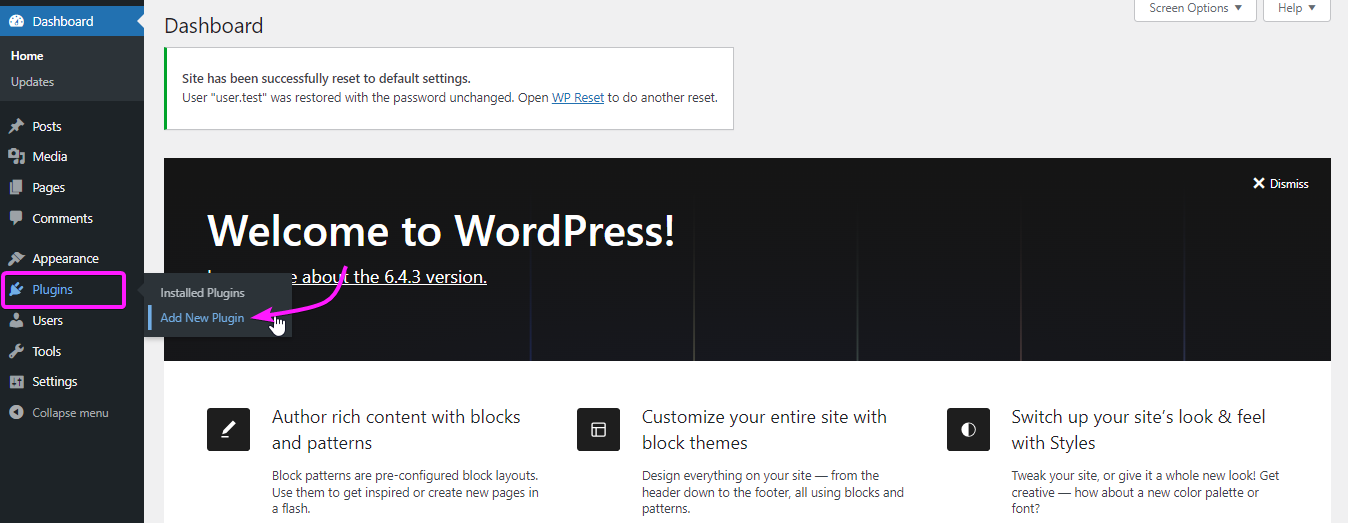
Install the Depicter plugin:
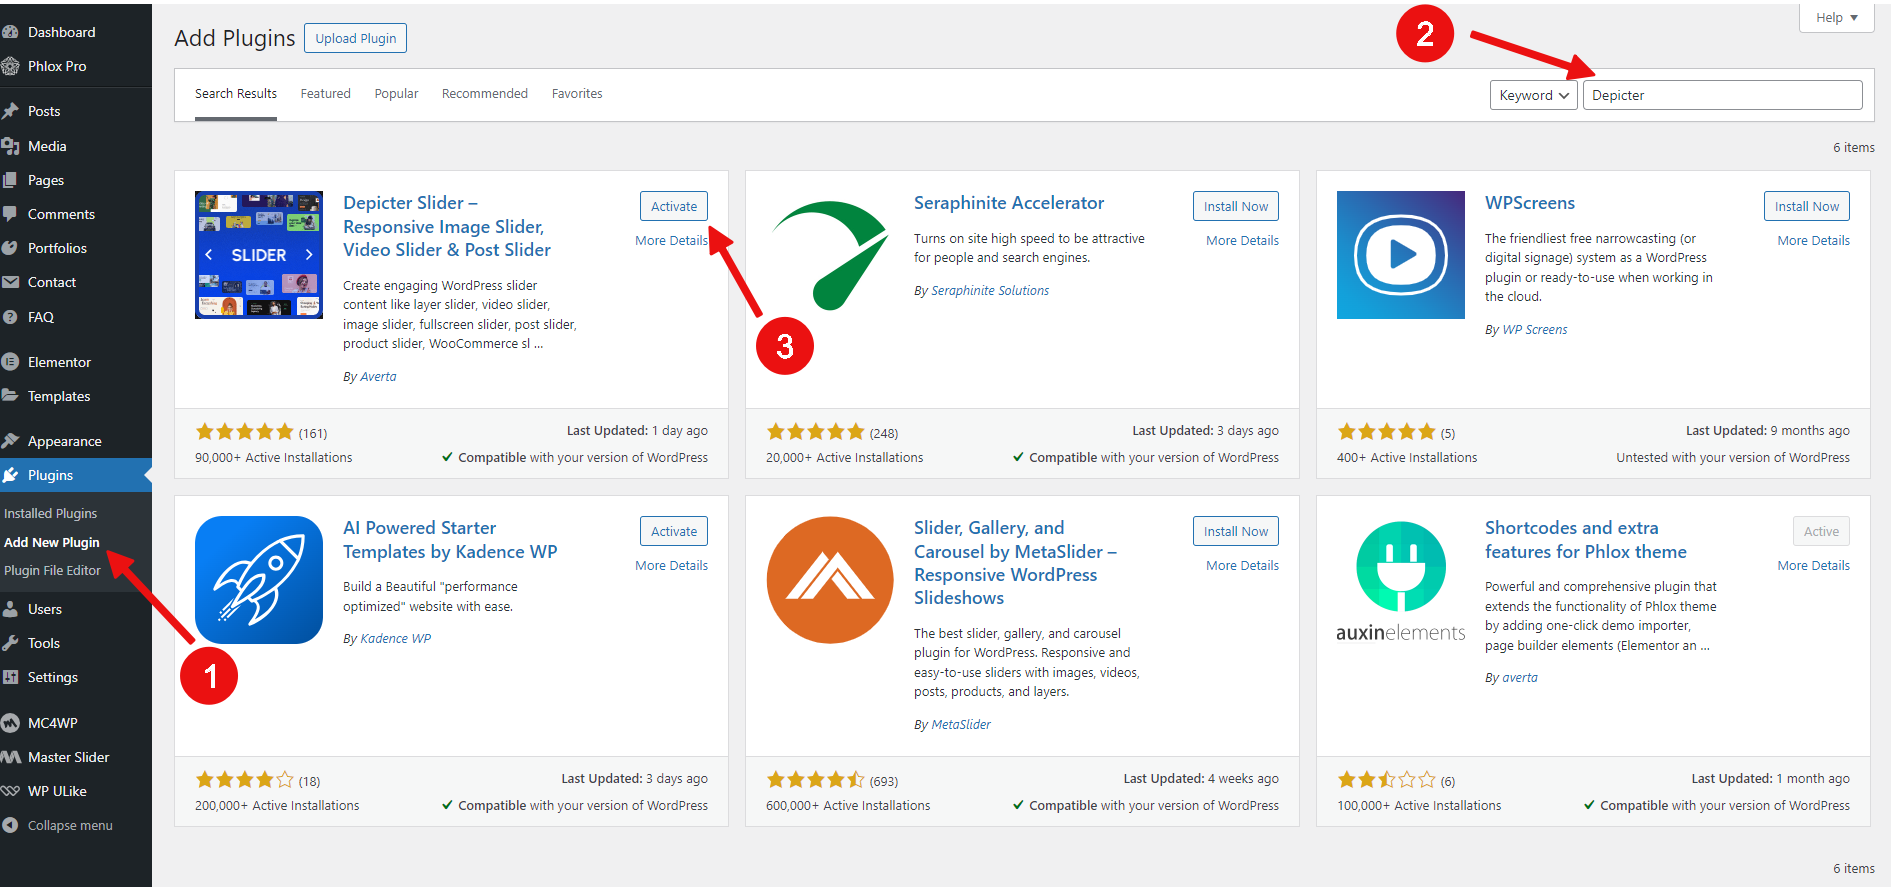
Go to the Plugins menu.
Click Add New Plugin.
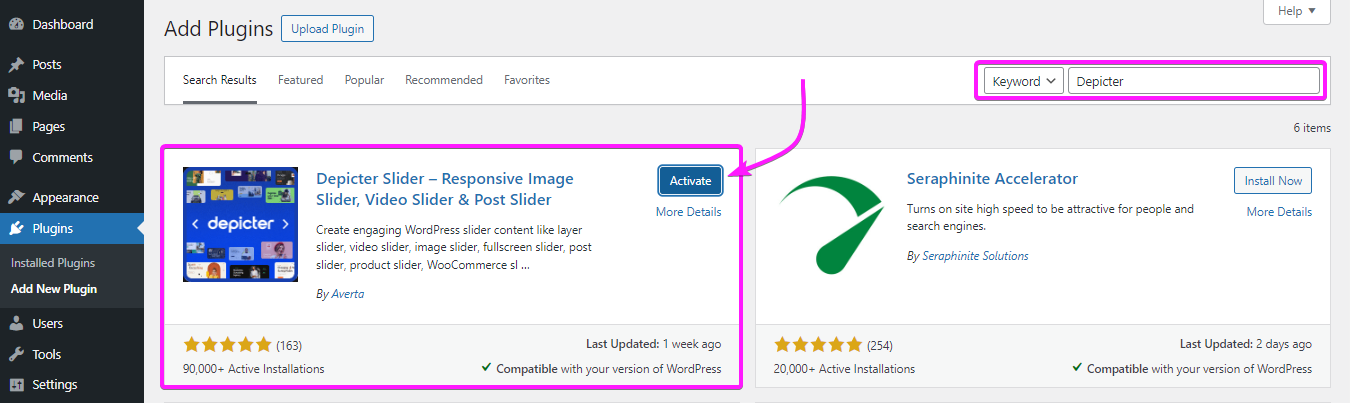
Search for Depicter.
Click Install and then Activate.
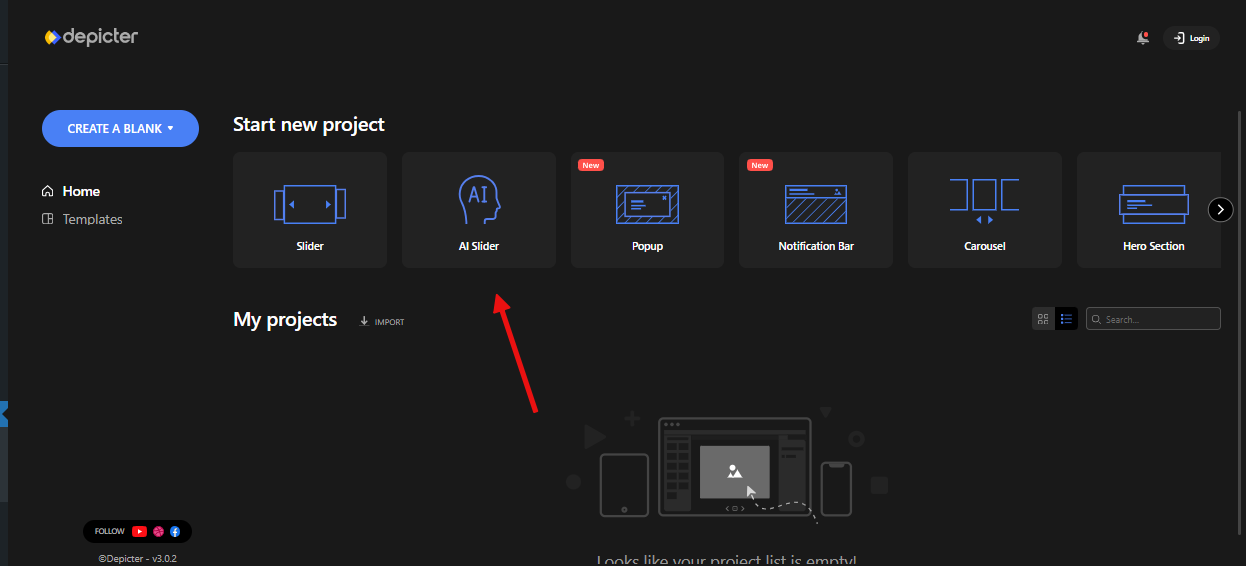
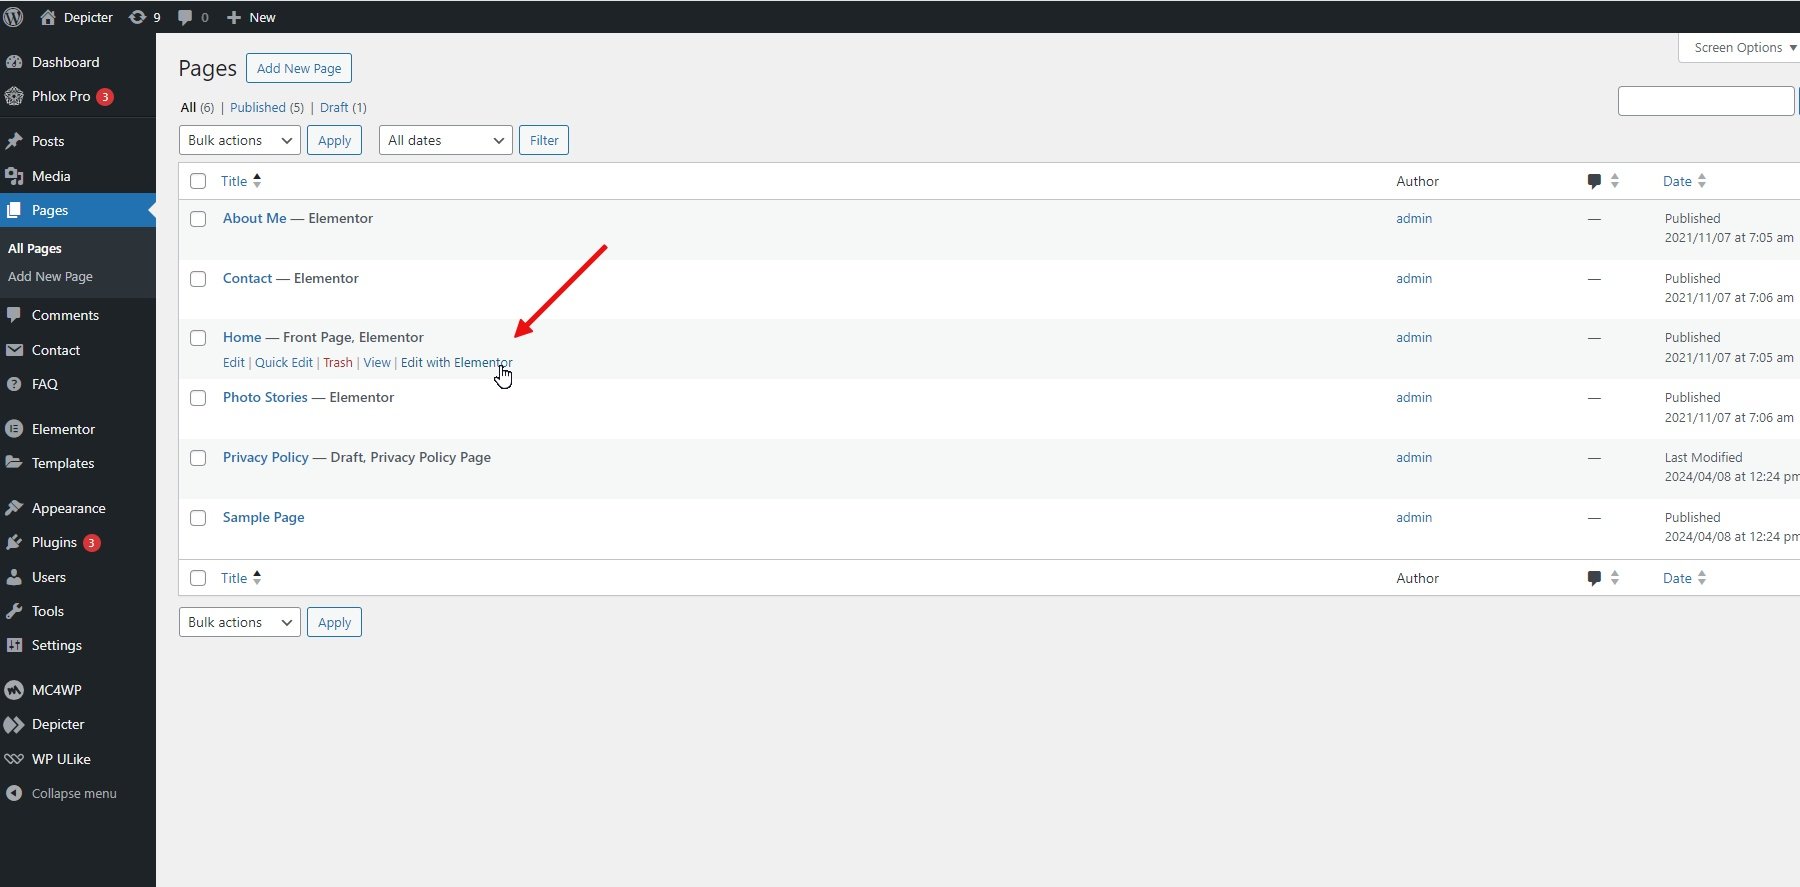
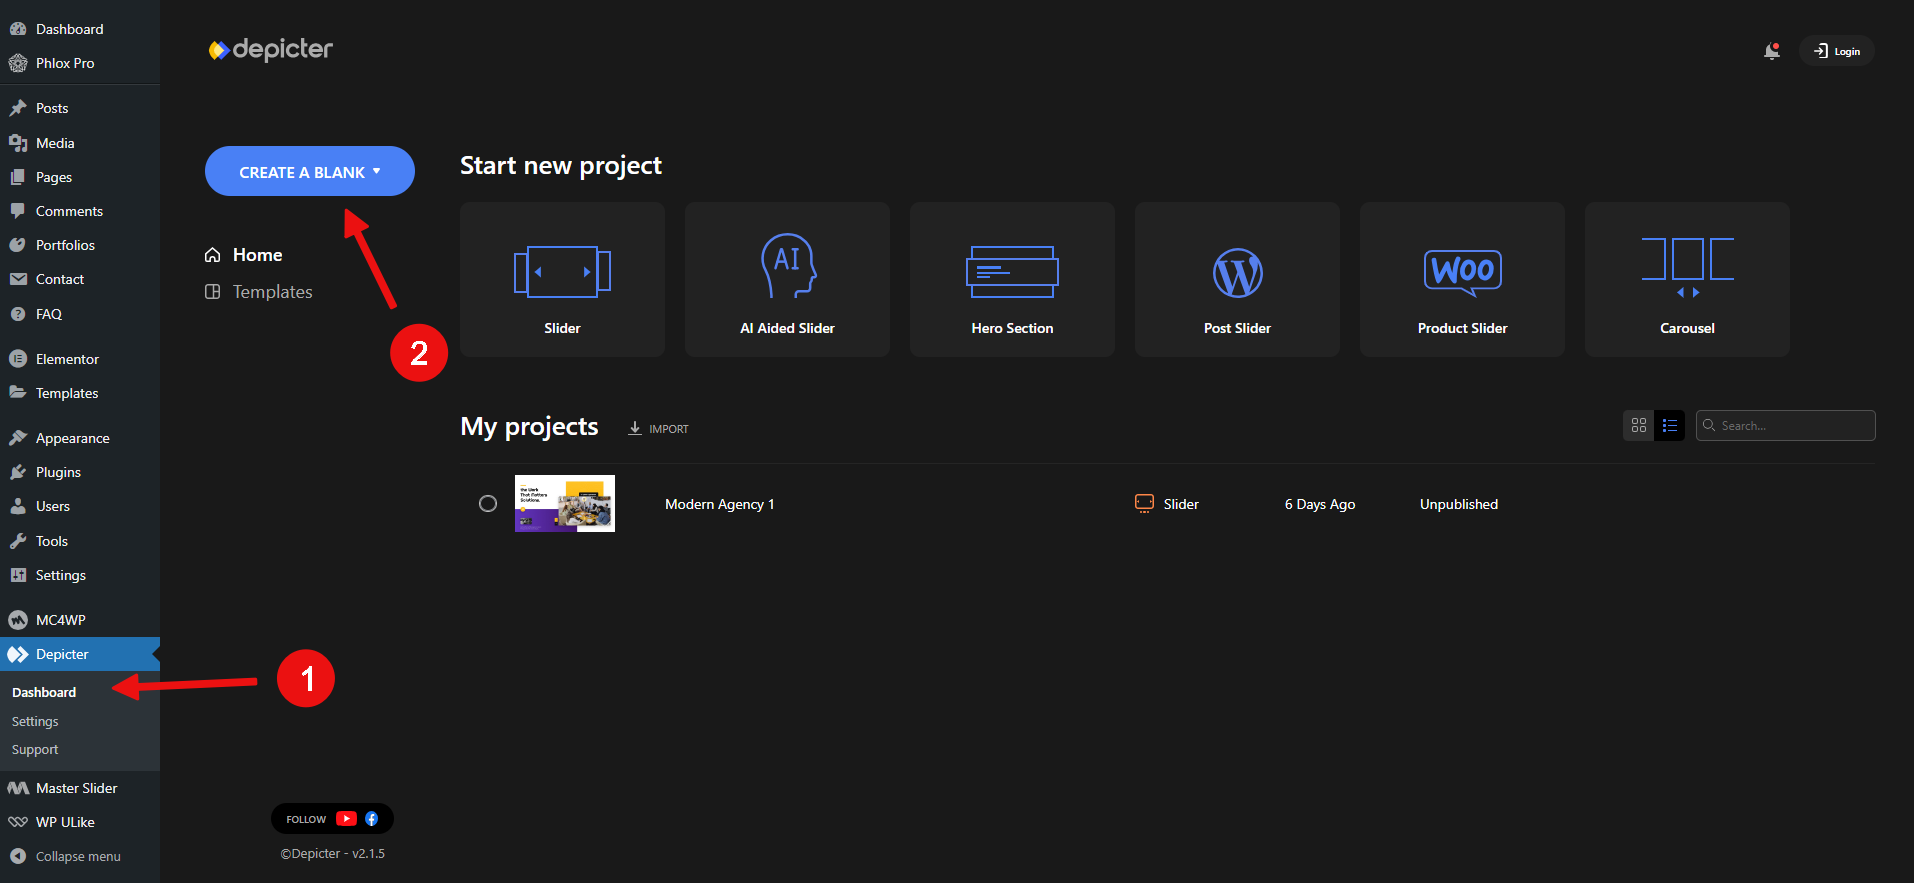
After entering the dashboard, navigate to the “AI Slider” section to initiate the process of creating an AI-powered slider.
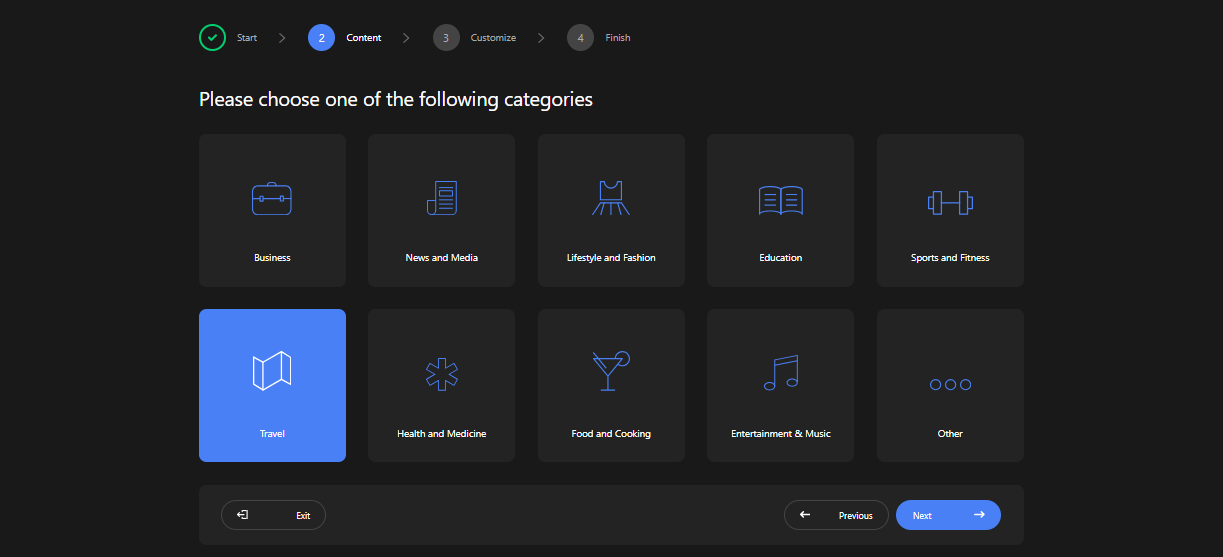
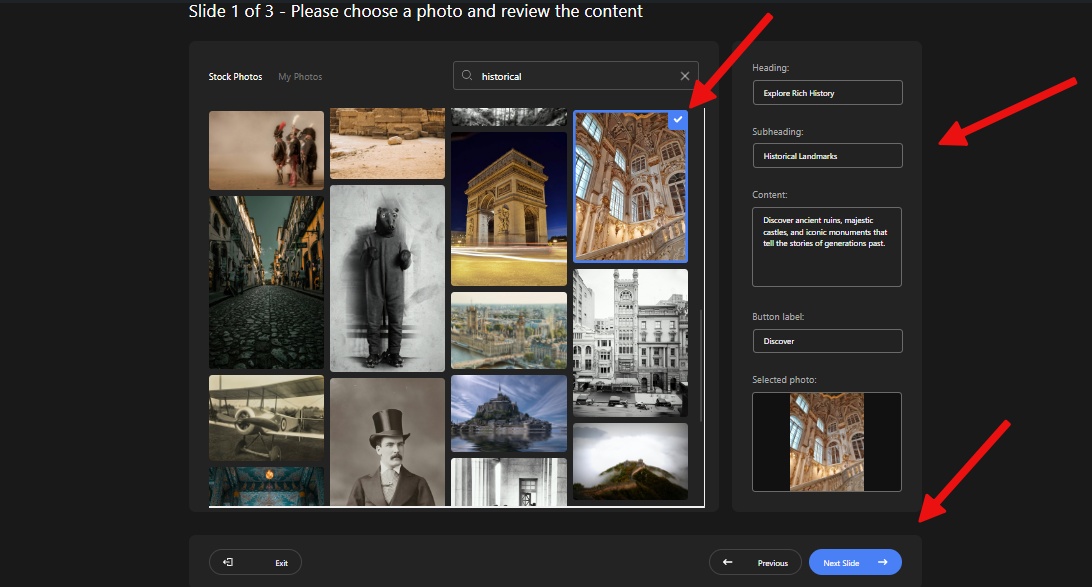
Category Selection: Begin by selecting the appropriate category for your slider’s topic.
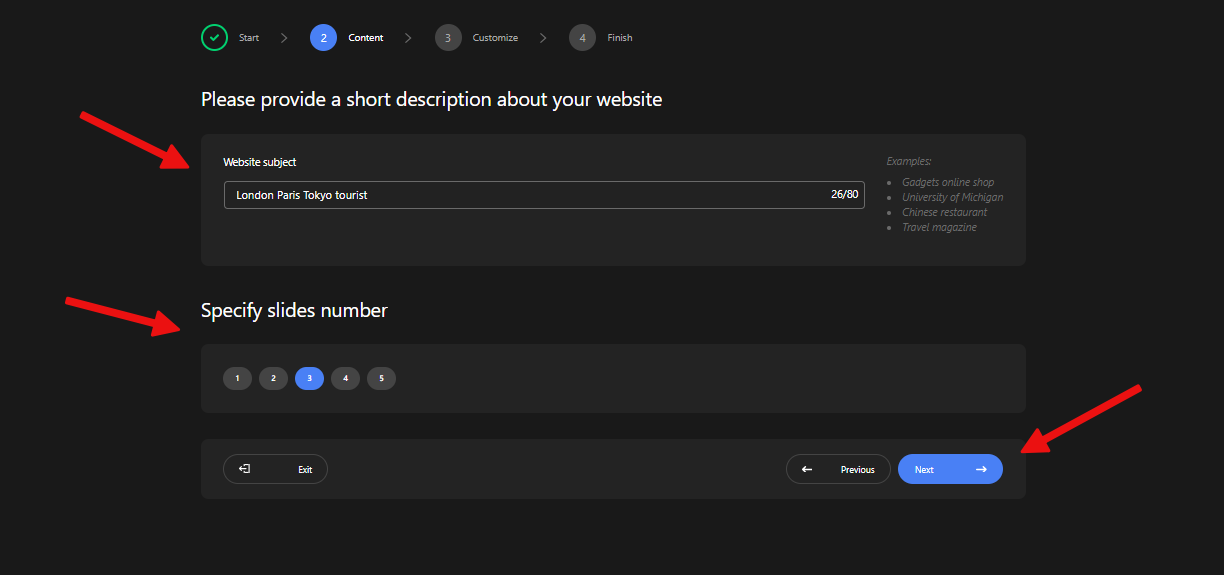
Keyword Input and Slide Count: Next, specify the slide topic using keywords and indicate the desired number of slides.
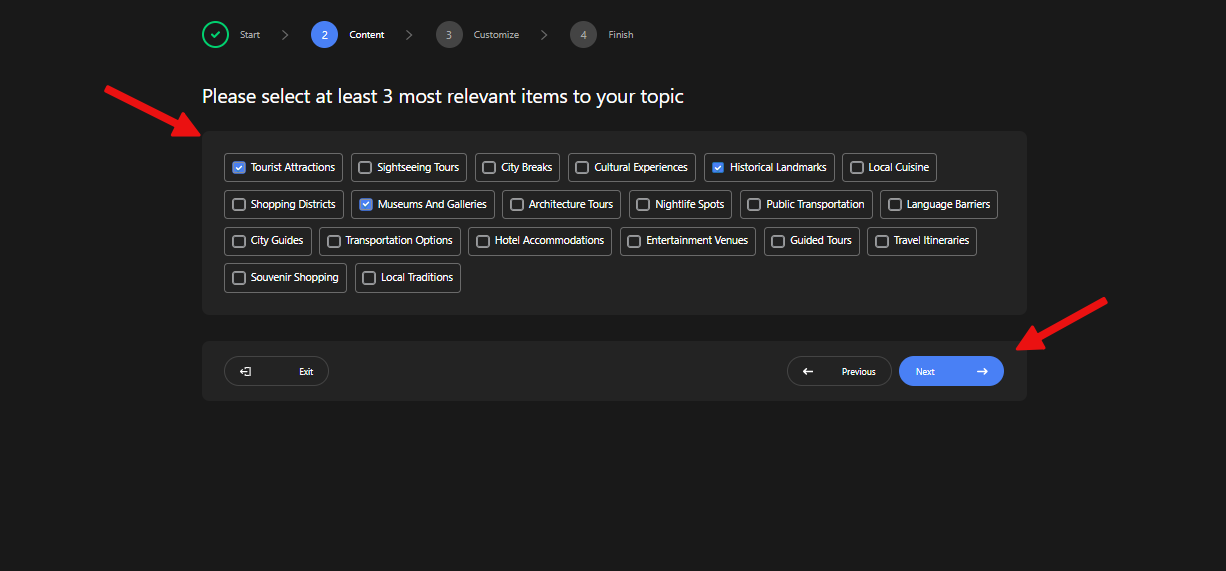
Topic Selection: Choose relevant topics for each slide from the list suggested based on the category selected in the previous step.
Content and Image Suggestions: For each slide select the most relevant image from the list generated using the information provided in the earlier steps.
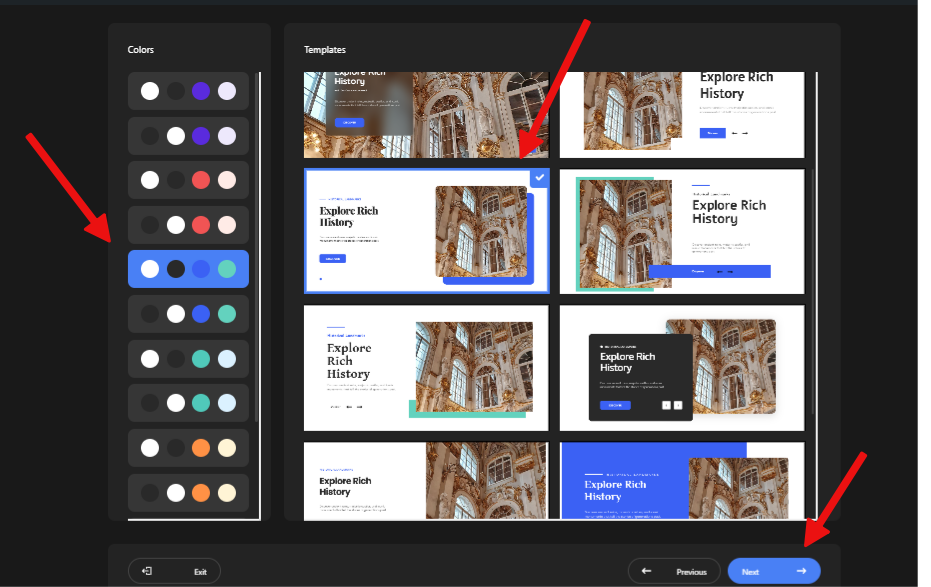
Color Scheme and Layout Selection: In the final step, choose your preferred color scheme and overall layout for the slider from the available options.
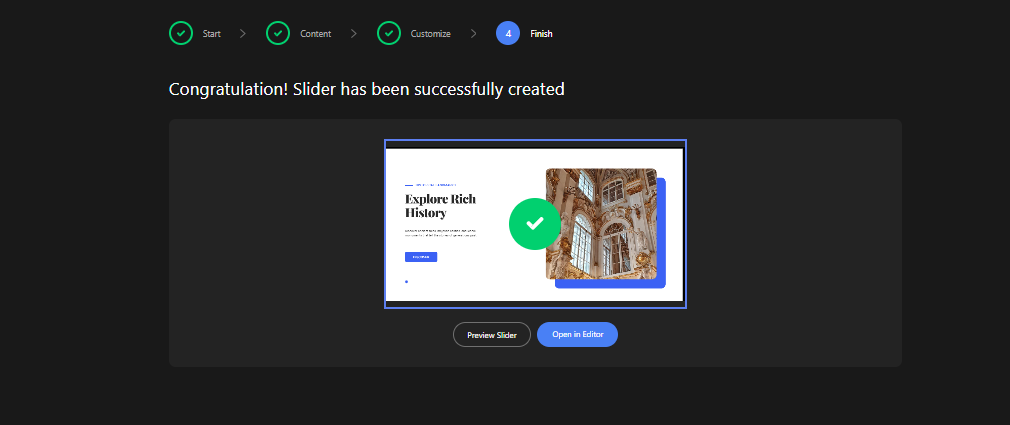
Once completed, your slider is ready for use.
And here it is, the whole process of creating a slider using AI in WordPress for your website via the Depicter plugin.
Conclusion
The world of web design is rapidly evolving with the integration of AI. AI-powered tools like Depicter empower users for using AI in WordPress to create professional-looking website sliders with minimal effort. These tools not only streamline the design process by suggesting layouts and content but also save valuable time by automating tedious tasks. If you’re looking to enhance your web presence and stay ahead of the curve, consider embracing the power of AI in web design.
FAQs
Do I need any design experience to use AI sliders?
No prior design experience is necessary! AI tools like Depicter offer user-friendly interfaces that guide you through the process. With simple keyword selection and image choices, you can create professional-looking sliders even if you’re a beginner.
Are AI-generated images original and copyright-free?
The article mentions Depicter suggests “royalty-free images” based on your chosen theme. This means you can use these images legally without copyright restrictions for your website.
Can I customize the AI-generated slider further?
Absolutely! While AI provides a strong foundation, you still have creative control. You can adjust the suggested layouts, color schemes, and text content to perfectly match your website’s unique style and brand.
WordPress Staging provides a safe environment to experiment with changes and updates for a live site without distorting the user’s experience.
You will be able to make changes without pressure as you will be doing it within a private space, and no one will see them except those who may be working on the changes with you.
So, we thought, why not tell you how to experiment with various sliders and help improve your design workflow?
Dive into the world of sliders and learn how to experiment with them effectively in your staging environment. Let’s explore together and unlock new possibilities for your website design!
What is Staging?
WordPress Staging is a feature that allows you to create a duplicate version of your website where you can test changes, updates, and new features before making them live on your actual site.
In web development, especially for live sites, using this crucial safety measure will save you tons of headaches.
You can make mistakes, break things, or even delete it and start over. No matter what happens, your live site will remain completely unaffected.
WordPress Staging also allows you to test new plugins and themes without adding the load to your existing database size. This load may remain and bloat your database size even after you decide not to use the tested product again.
Why test slider functionality on a staging site?
Staging sites offer a secure space to test changes and updates intended for a live site without affecting user experience. You can view these changes from the perspective of users who regularly visit the live site.
WordPress websites commonly use design elements known as WordPress sliders or slideshows. These elements are intended to showcase multiple images, videos, or text snippets in a rotating format.
When well-crafted, even a free WordPress slider can be a powerful tool for capturing visitors’ attention and keeping them engaged, highlighting important information, and encouraging visitors to explore various sections of your website.
However, creating sliders on pages is a clear change that can’t be missed. So, it’s best to test your pages with sliders underground by doing it in a staging environment.
Doing this keeps your activities low and allows you to see how the sliders will look and function on your website without affecting the live site.
Using WordPress Staging, you can experiment with different slider designs, settings, and placements to ensure they enhance your website’s aesthetics and user experience.
How to Experiment with Sliders Using InstaWP?
It takes a bit of experimenting and time to master the art of slider creation, and this is necessary because the effectiveness of WordPress sliders depends on how they are designed and utilized. That’s why you need to experiment on a staging environment like InstaWP.
Your slider must showcase a range of content, such as product photos, special promotions, or even videos, directly on your page while highlighting important information and encouraging visitors to explore various sections of your website.
To experiment with sliders, you can easily create a staging site with InstaWP and install Depicter, a powerful WordPress slider tool available in InstaWP’s utility category when setting up a site from scratch.
Depicter is a free WordPress slider plugin that offers a user-friendly interface and a wide range of customization options to create stunning sliders for your website. All the excellent slider features packed into this free plugin will amaze you.
With the InstaWP staging environment and Depicter, you can experiment with as many sliders as you can for as long as you want. When you’ve got the perfect sliders, you can then implement them on your live site.
Best Practices for Including Sliders on Your Site
When incorporating sliders on your website, here are some best practices to consider:
Limit the Number of Slides:
Keep the number of slides to a minimum to avoid overwhelming visitors. Your website visitors may tire of scrolling through sliders, ignoring them, or leaving your site. Make use of 3-5 slides and nothing more.
Use High-Quality Images:
Ensure that the images used in the sliders are high-resolution and visually appealing. Sliders are meant to occupy the entire screen or at least a significant portion. Therefore, use pictures that won’t be distorted on smaller or larger screen sizes.
Optimize for Performance:
Optimize the slider for speed and performance to prevent slow loading times. Using fewer slides, taking out some transitions, and using lossless compressed images are good practices to increase performance.
Include Clear Call-to-Actions:
Each slide should have a clear call-to-action to guide visitors on what to do next. Use a vibrant background for your CTA buttons to stand out from the overlay images or video.
Mobile Responsiveness:
Ensure the slider is responsive and displays well on various devices, including mobile phones and tablets.
Test Different Designs:
Experiment with slider designs to see what works best for your website and audience. If the content breaks out of the screen or is hidden on mobile devices, you lose out on effectively grabbing your website visitor’s attention and irritating them.
Monitor Performance:
Track the slider’s performance using analytics to see how effectively it engages visitors.
Regularly Update Content:
Keep the slider content fresh and relevant to maintain visitor interest. If you track the performance of your slides and CTAs using tools like Google Analytics, you can modify or update the slides for better performance.
Accessibility:
Ensure the slider is accessible to all users, including those with disabilities. Add intuitive and straightforward navigation arrows and buttons to assist visitors in better interacting with the slider.
These best practices will guide you in creating effective sliders on your site that will continue to attract and engage your website visitors.
Using Depicter for Creating Stunning Sliders
Depicter is a versatile and powerful WordPress slider plugin that allows you to easily create as many eye-catching sliders as you desire in WordPress.
With features like drag-and-drop functionality, customizable animations, and transition effects, Depicter empowers you to design sliders that grab users’ attention and enhance your website’s overall look.
Depicter can elevate your website’s visual appeal and engage your audience with captivating slider content.
Let’s see how you can create a staging site with InstaWP and use the staging site and Depicter to create stunning sliders.
How do you install Depicter on your staging site?
The following video provides a step-by-step guide on how to set up a staging Depicter website using InstaWP for free. After watching this video, you should be able to easily perform the setup. However, if you prefer more detailed text instructions, please continue reading this article.
Step 1: Log into InstaWP
You need to create an account on InstaWP to create a free staging site to experiment with and test your sliders with the Depicter Slider plugin.
After creating your account, you can log in to your dashboard.
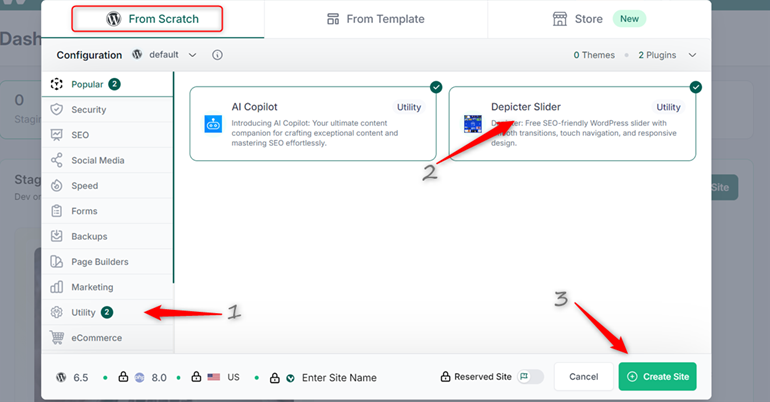
Step 2: Create Staging Site
Click Create Staging from your dashboard to start the staging site creation process. From the popup, select the From Scratch tab. Then, navigate to the Utility category when setting up your site and select the Depicter Slider plugin.
Then click the Create Site button, and your free staging site will be created within seconds.
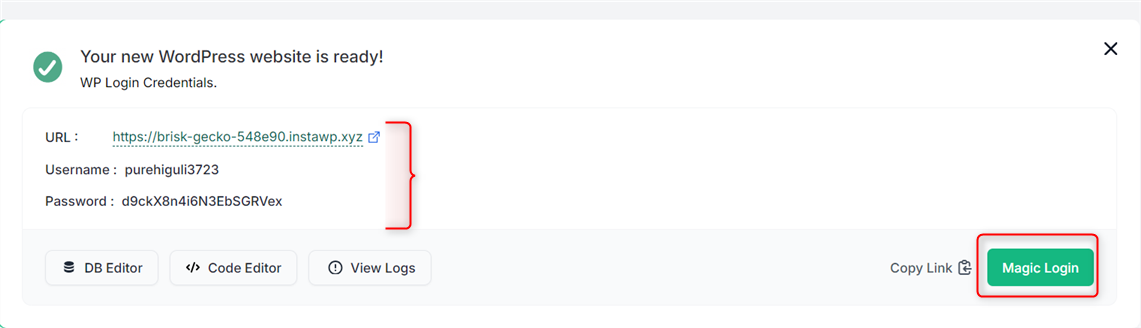
Step 3: Login to Your Staging Site
Simply click the Magic Login button to proceed to the WordPress Admin panel of your newly created staging site.
You will notice that the Depicter plugin has already been activated on your staging site.
Step 4: Create your Slider with Depicter
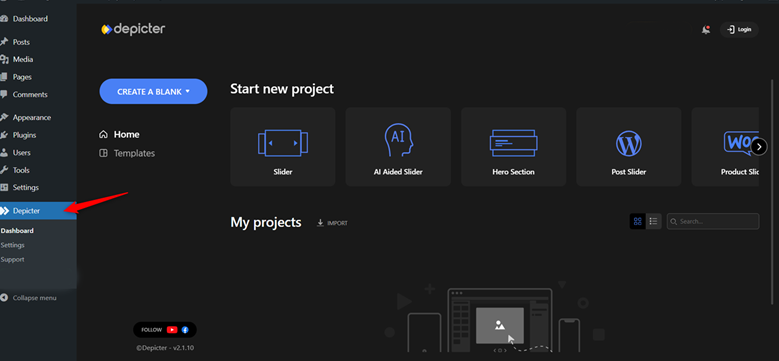
Select Depicter from the left sidebar navigation, and you will be taken to the Depicter dashboard.
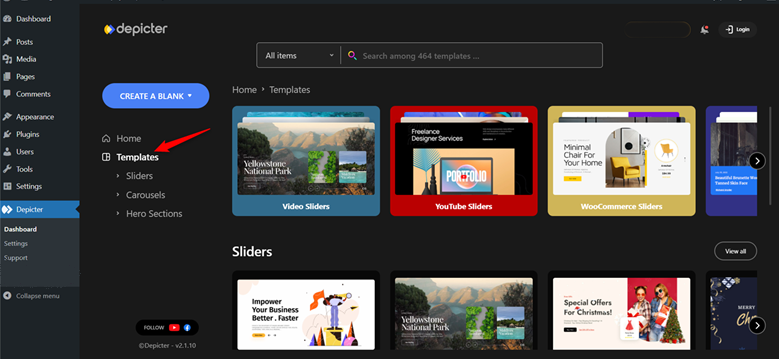
One fantastic feature of Depicter is its templates for those who don’t want to start building from scratch. There are tons of unique free templates that you can select from and integrate seamlessly into your website design.
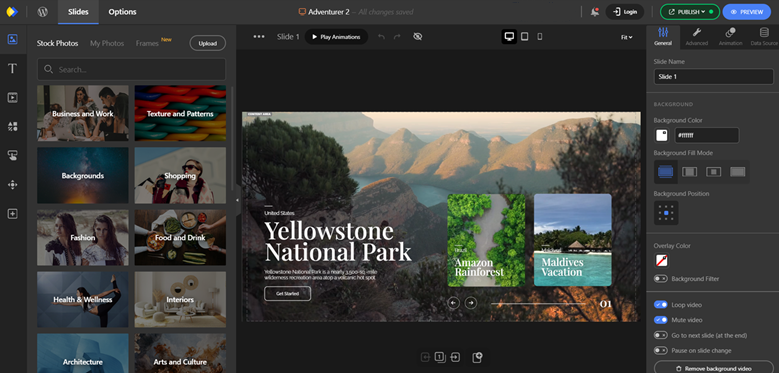
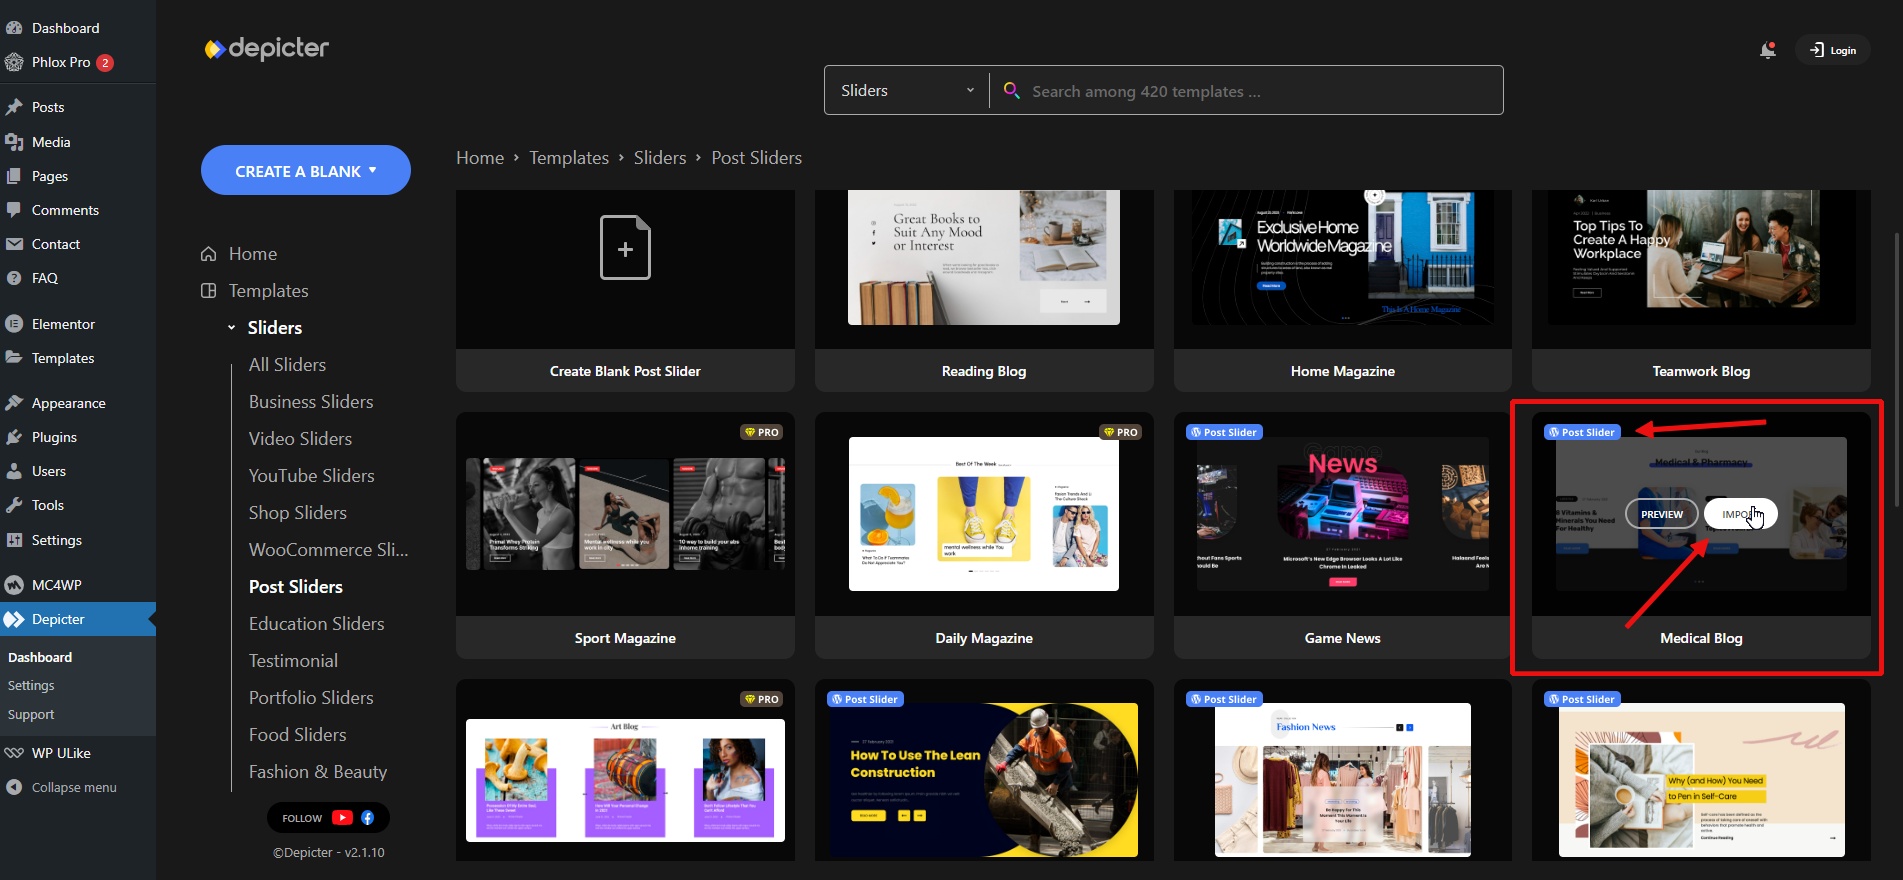
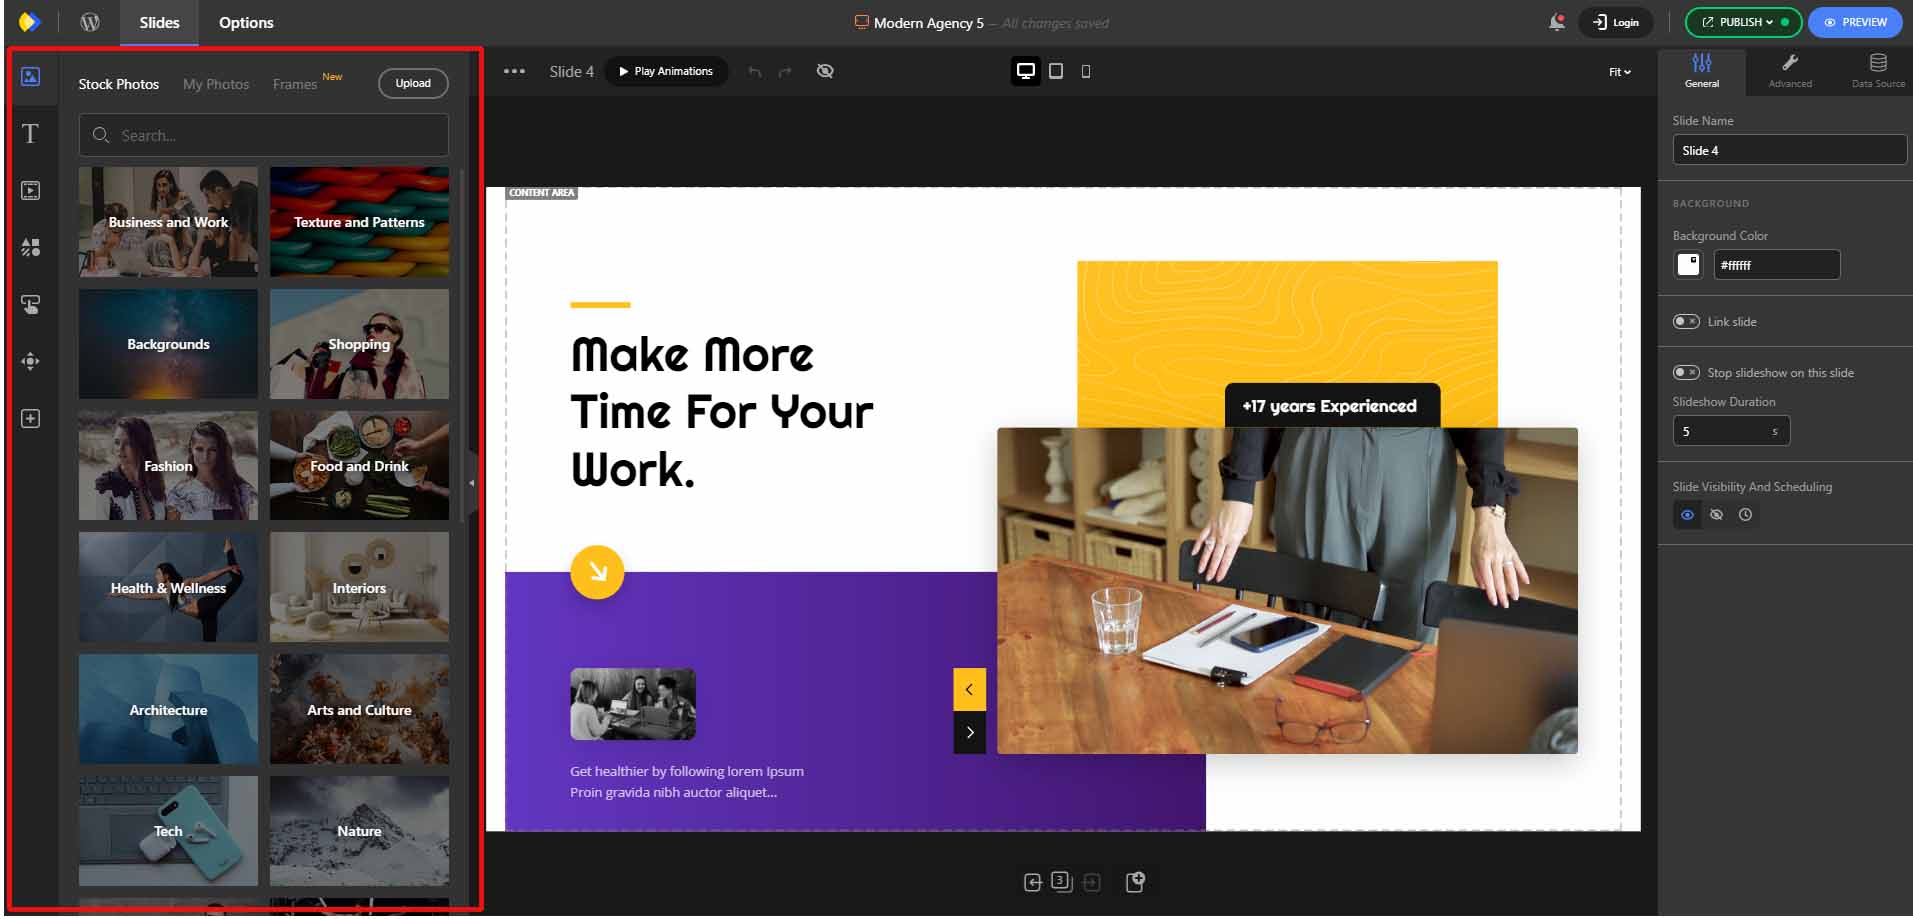
To build a slider from the available templates, simply hover over a template that is more suitable to your appeal and click the Import button to import the template to your Depicter canvas.
After importing the template, you can modify it to your taste. You can edit the existing text and captions, replace the images and videos with yours, and customize the slider’s settings, such as the animation, palette, CTAs, type of navigation controls, etc.
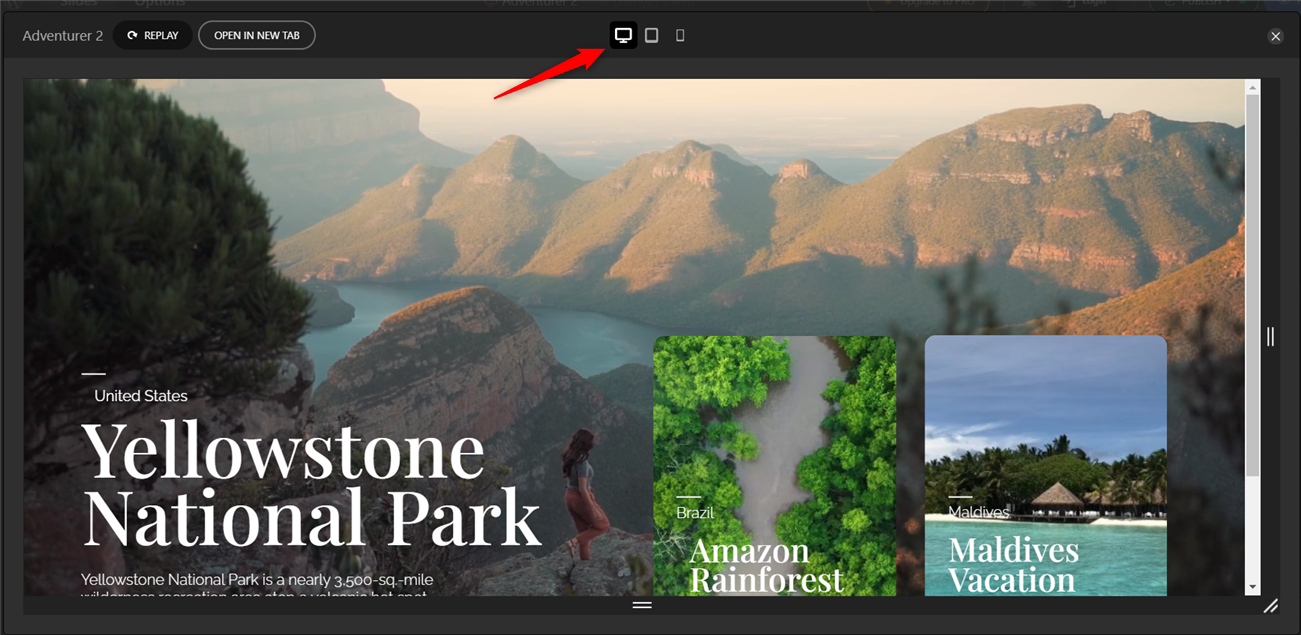
Another advantage of using Depicter Slider is the ability to preview your slider’s responsiveness across various screen sizes while still designing your slides.
Once you have completed all of your customizations for your slider, you are ready to publish it. Adding the slider to your page is very easy because Depicter supports all of the most popular WordPress page builders, such as Elementor, Gutenberg, Divi Builder, and Beaver Builder. Of course, Depicter also supports traditional WordPress methods, such as using shortcodes or PHP code.
Why use Depicter for your Sliders?
While it may be impossible to list all of the reasons why adding a slider to your website via the Depicter is an excellent choice, we will briefly introduce you to the advantages of Depicter in this article to give you a better understanding of this topic.
Depicter is a powerful WordPress slider choice for creating sliders due to its user-friendly interface, extensive customization options, and compatibility with WordPress staging environments.
Here’s a list of features that make Depicter the best WordPress slider plugin:
Simplicity: Depicter is an intuitive drag-and-drop slider builder that is very easy to use.
Responsive Design: Sliders built with Depicter look good on all devices and screen sizes.
Customization options: Depicter offers various customization settings for colors, palettes, fonts, animations, navigation, etc.
Transition effects: Depicter is packed with different smooth and attractive transition effects that can be applied between slides.
Slider controls: Depicter doesn’t slack in the slider controls department. It offers easy-to-use navigation controls for users to interact with the slider.
Image and video support: Depicter Slider supports various media types, such as images, gifs, and videos.
Light Weight: The Depicter Slider is lightweight and optimized for speed, and it doesn’t slow down your website.
Compatibility: Depicter Slider is compatible with other WordPress plugins, different hosting platforms, and WordPress staging environments.
It would be unfair not to mention Depicter’s unique and new features, namely Popup Builder and Notification bar Builder. As you explore these two features, you’ll quickly realize that Depicter is the ultimate solution for all your website’s slider needs and more.
Conclusion
To achieve professional results, we must use professional methods. One such method is utilizing WordPress staging capabilities. Sliders are a crucial visual tool for websites, and creating and optimizing sliders in a WordPress staging environment can elevate your results from subpar to exceptional.
In this article, we briefly introduced InstaWP and Depicter and explored how combining these two tools can create a WordPress staging website for producing professional sliders.
Looking to build trust and credibility for your website? Learn how to create powerful testimonials that resonate with your audience and highlight the value of your products or services. With the right approach, you can gather authentic and compelling testimonials that will make a lasting impression on your website visitors.
One of the most common examples of providing social proof on your website is using testimonials from previous customers, and one of the best ways to display this is using a tool called testimonial slider.
A testimonial is typically a section of your website that showcases comments from satisfied customers who have used your service or purchased your product. This section often presents information in a rotating slider format to maximize horizontal space.
Why should you consider a testimonial on your website?
One of the most influential options in content marketing is the opinions of previous customers.
This has a psychological reason because when a potential customer enters your website, before anything else, they look for the credibility of the experience of past users and buyers.
Therefore, the good experience of past customers and the quality of your service together will create a center of accumulated credit for you.
Having your users authentically express the quality of your service can be a winning card for attracting new customers. That’s why adding a testimonial section to your website is a smart choice.
How to add a testimonial to your WordPress website using the Depicter?
The video below provides two detailed examples of creating and adding testimonials to a website using ready-made templates.
If you would like more step-by-step details, please read the instructions below.
This is our website before adding a testimonial slider. The section where we want the testimonial is highlighted.
Step 1: Install the Depicter plugin
Go to the Plugins menu.
Click Add New Plugin.
Search for Depicter.
Click Install and then Activate.
Step 2: Importing a testimonial template
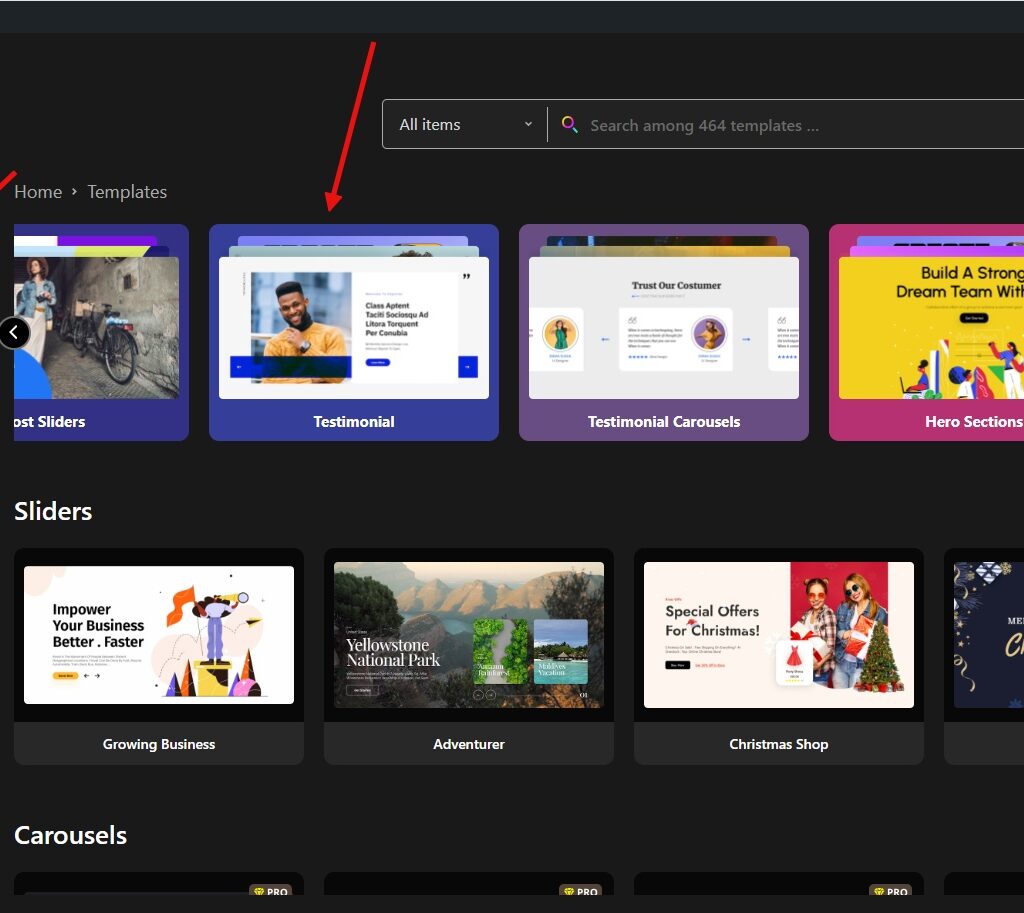
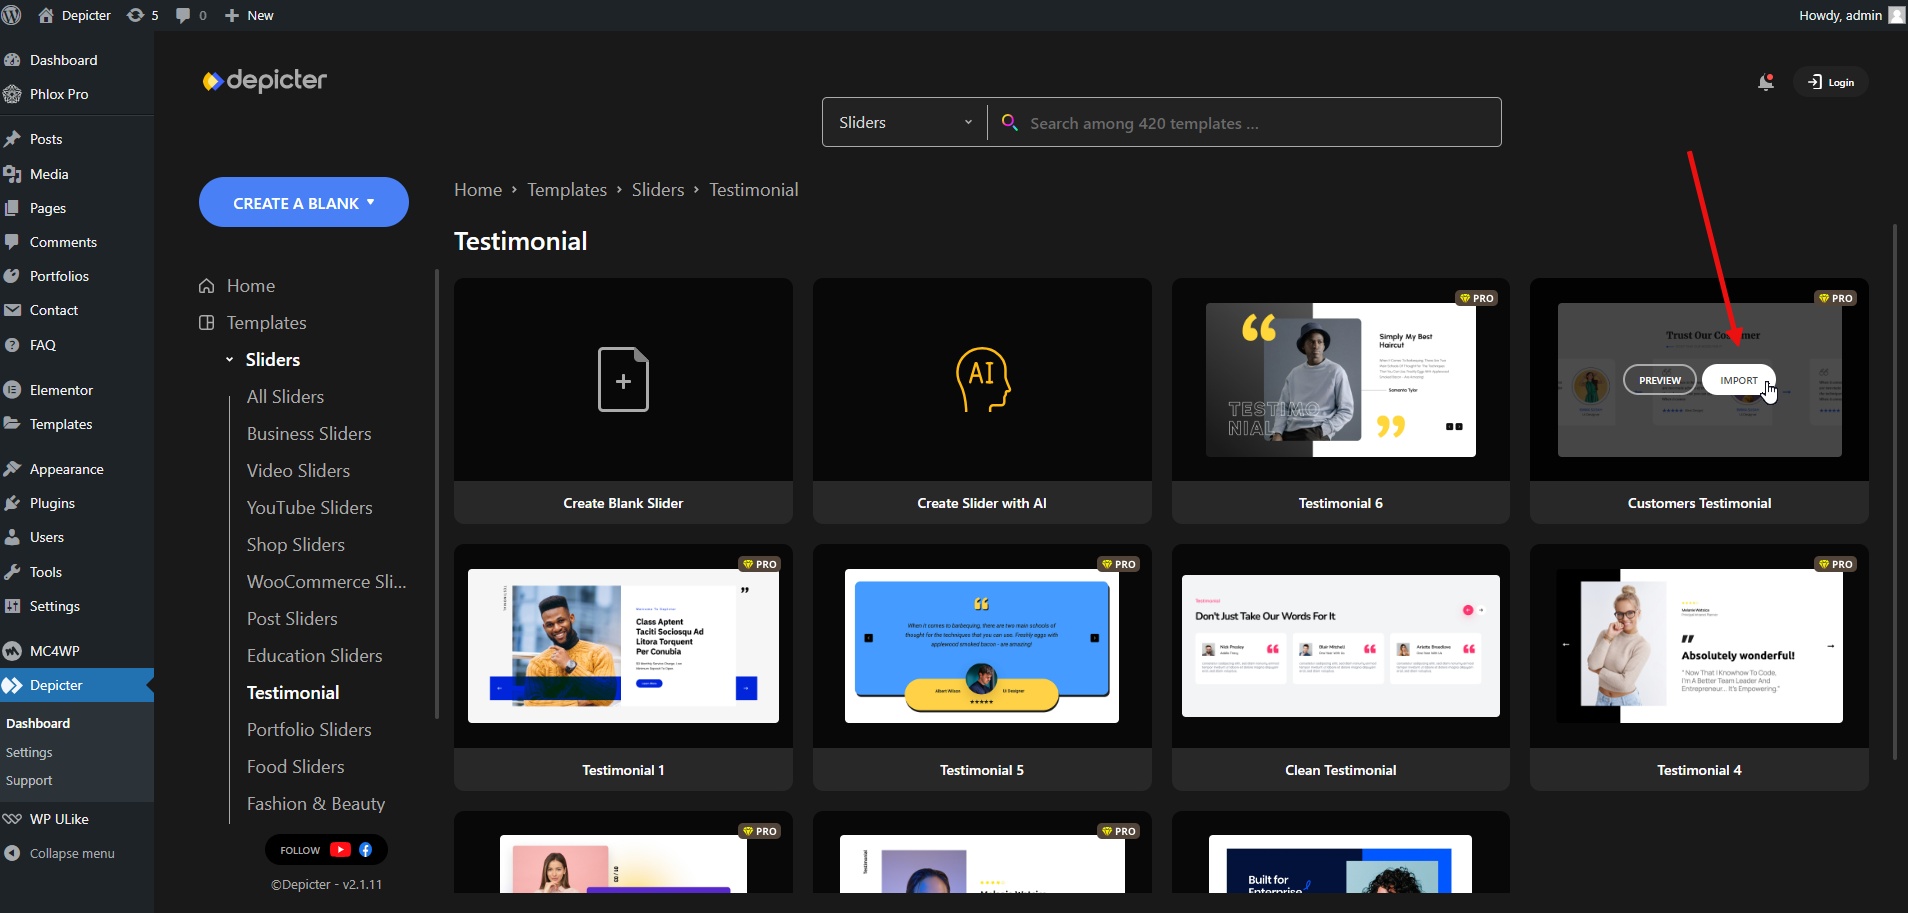
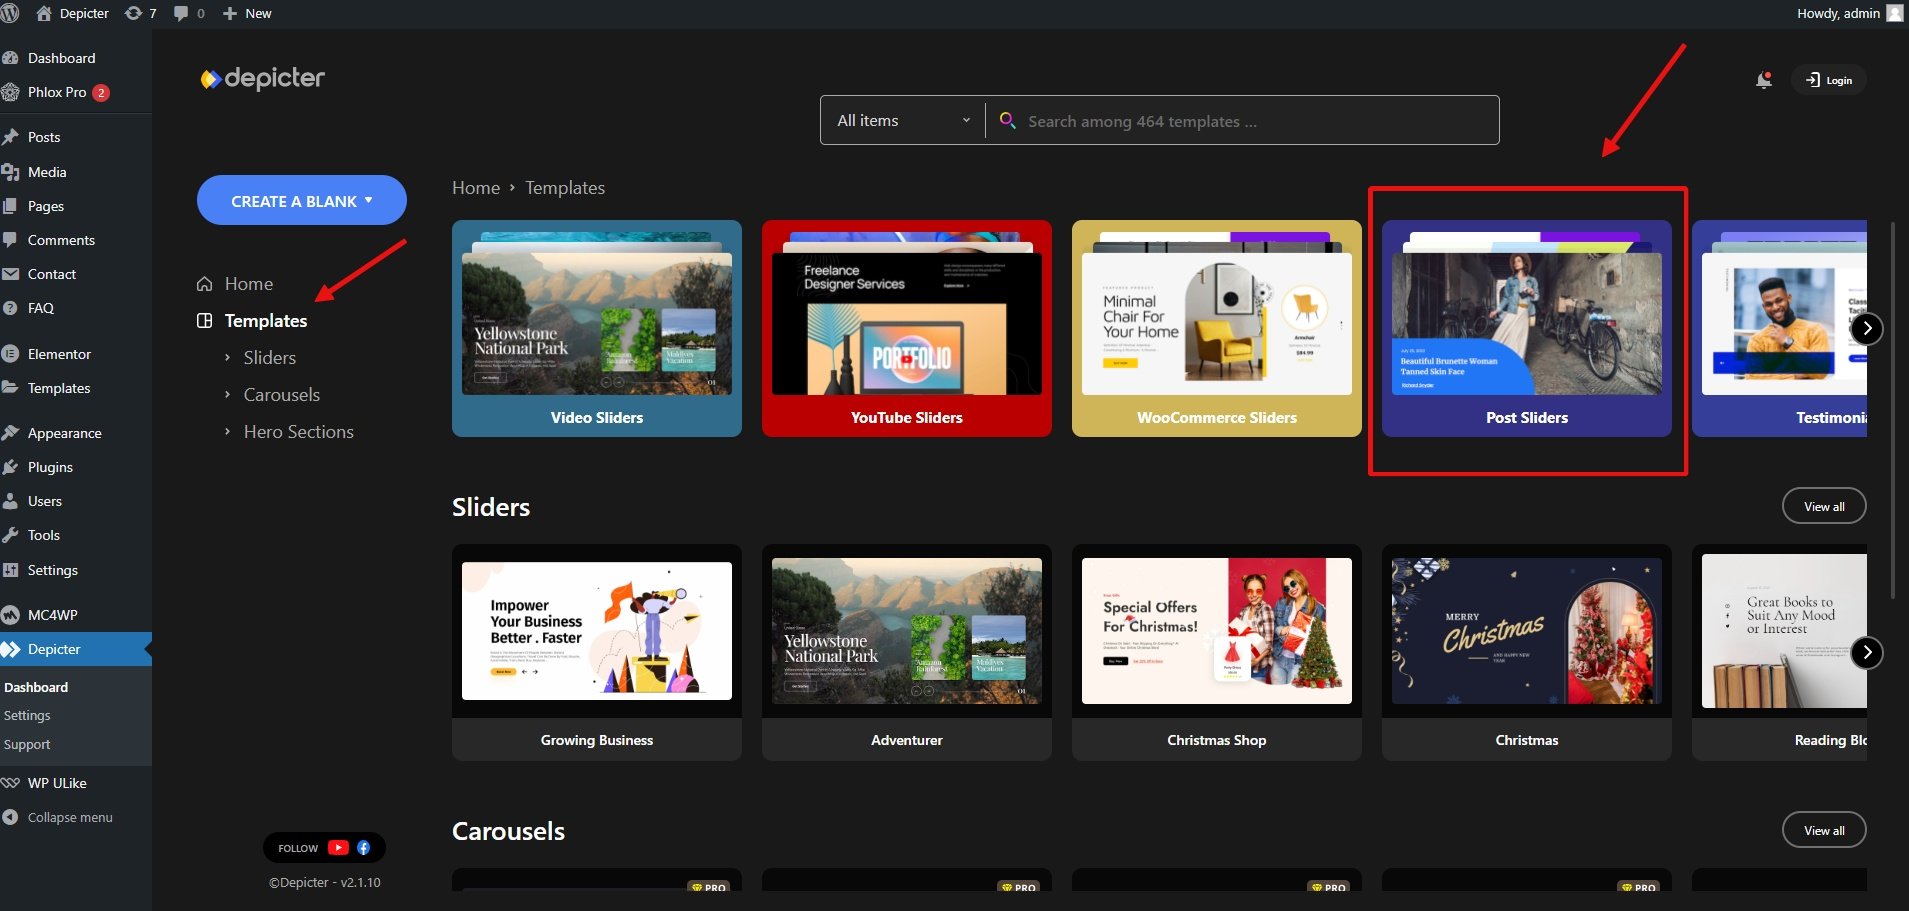
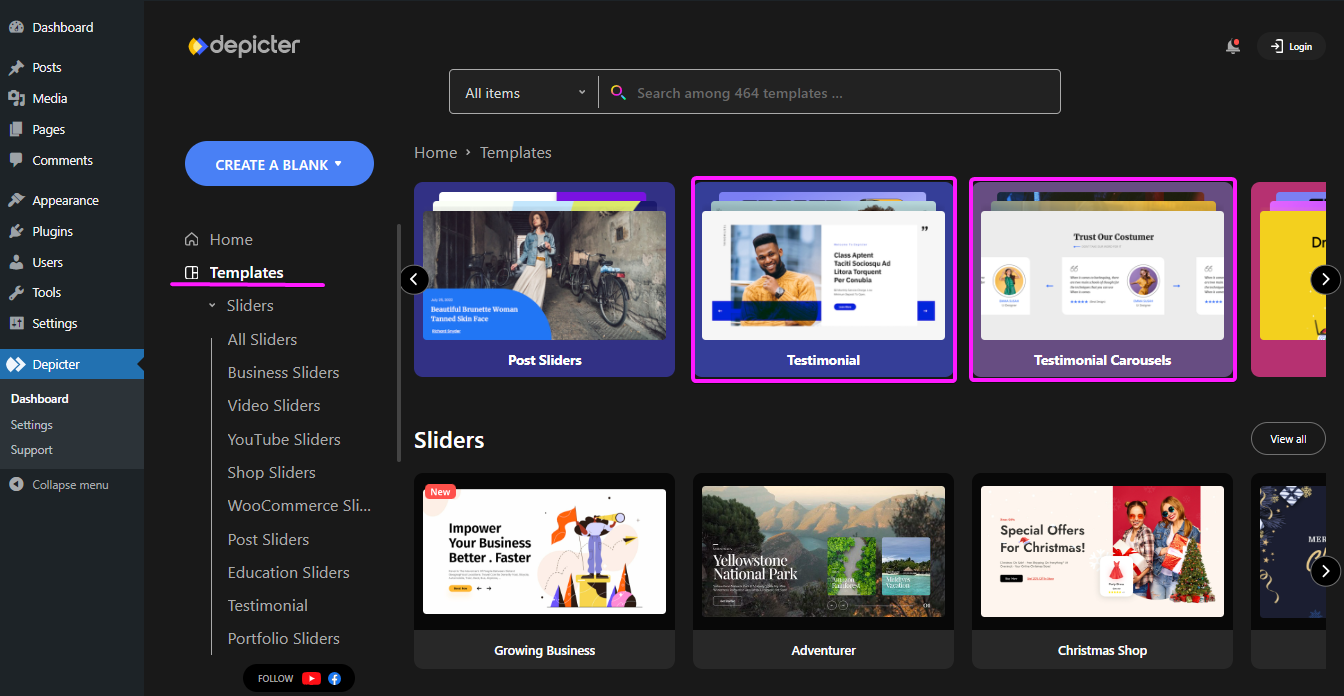
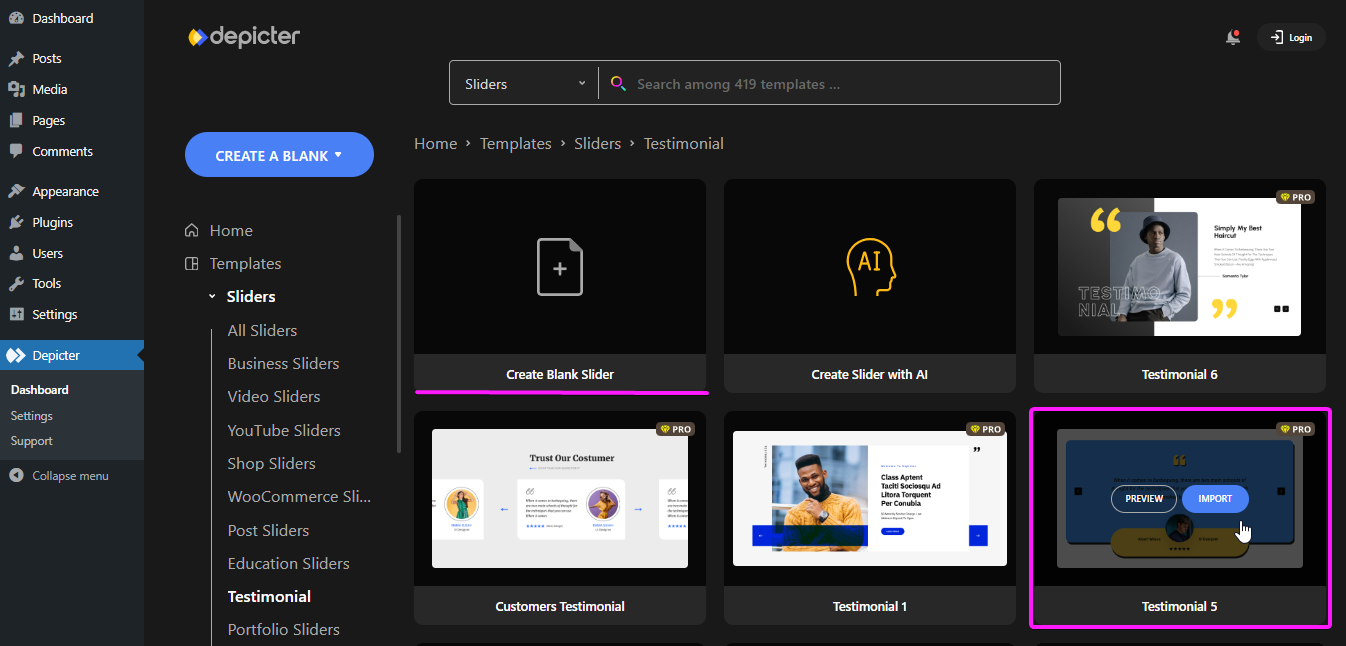
Go to Templates > Testimonial
Many beautiful and professionally crafted premium and free testimonial slider templates are available to import here.
Choose a template from the available options.
Click Import.
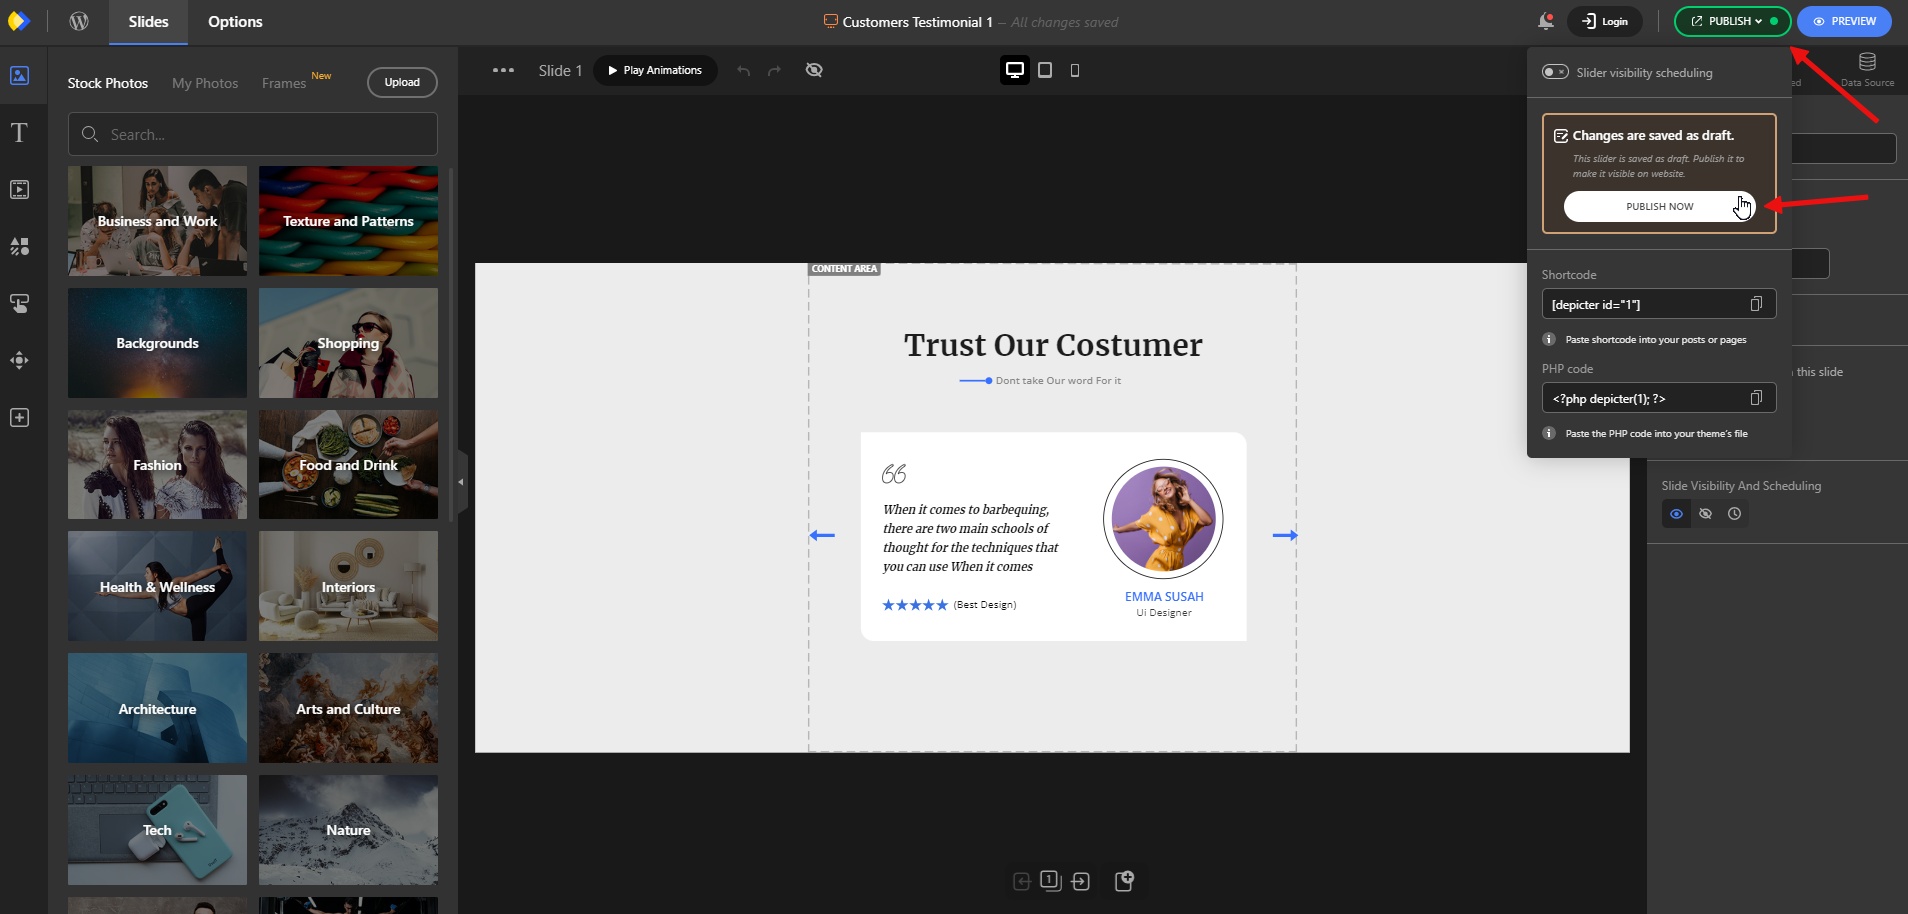
The imported testimonial template will be ready for customization.
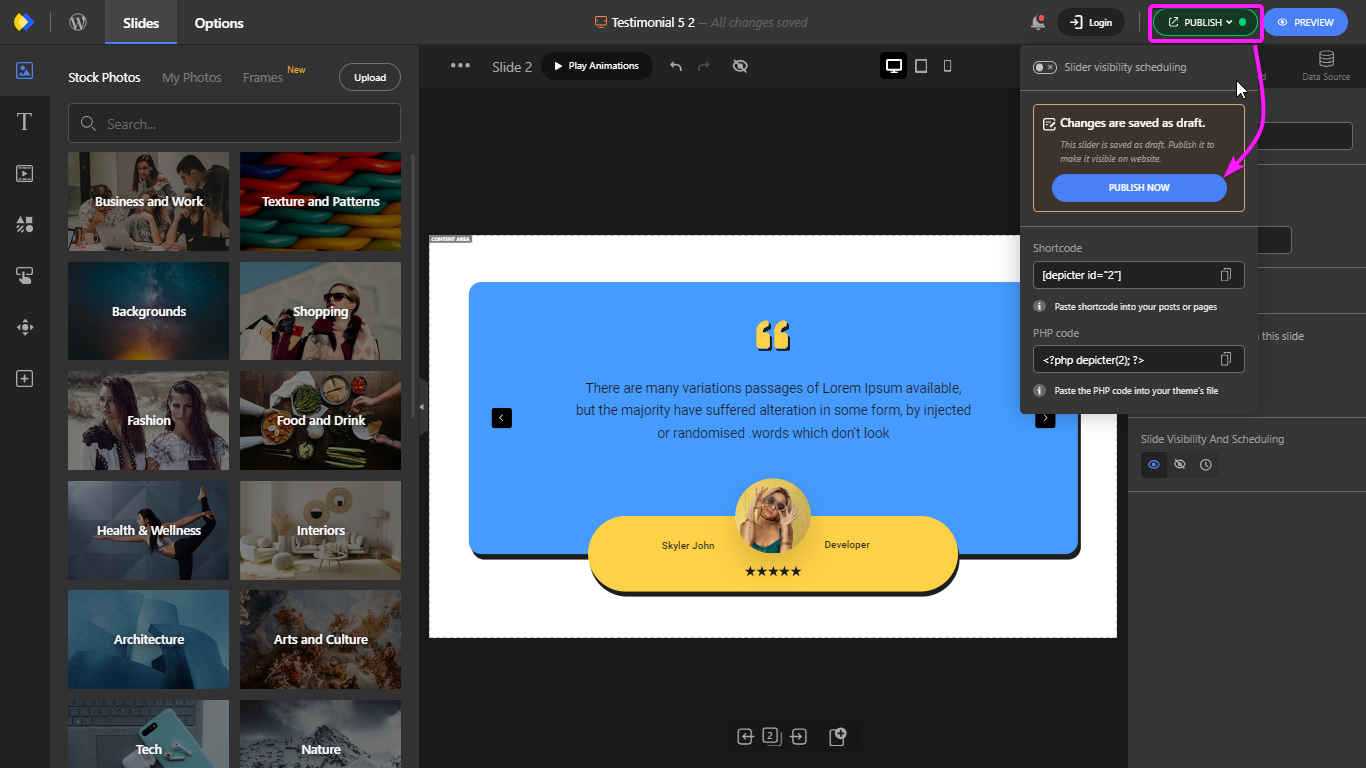
Step 3: Customize the content
Customize the content: For example reposition the elements or change the colors and typography
Click Publish.
Now you can add your testimonial to your website.
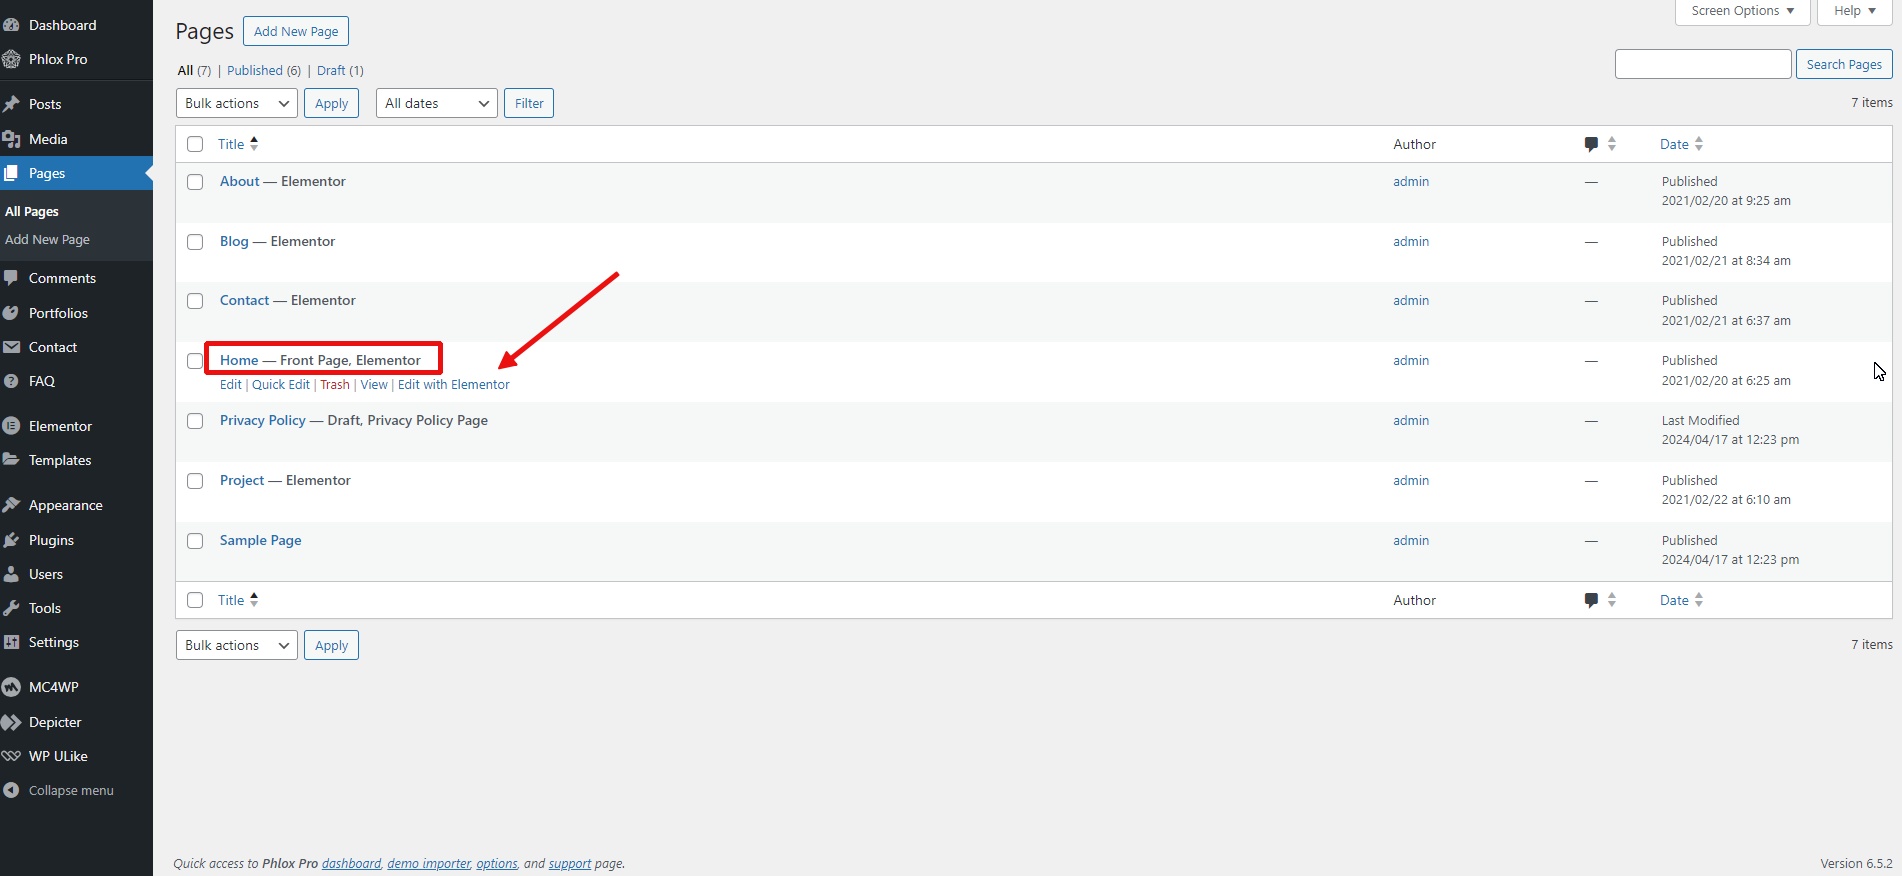
Step 4: Add the testimonial to your website
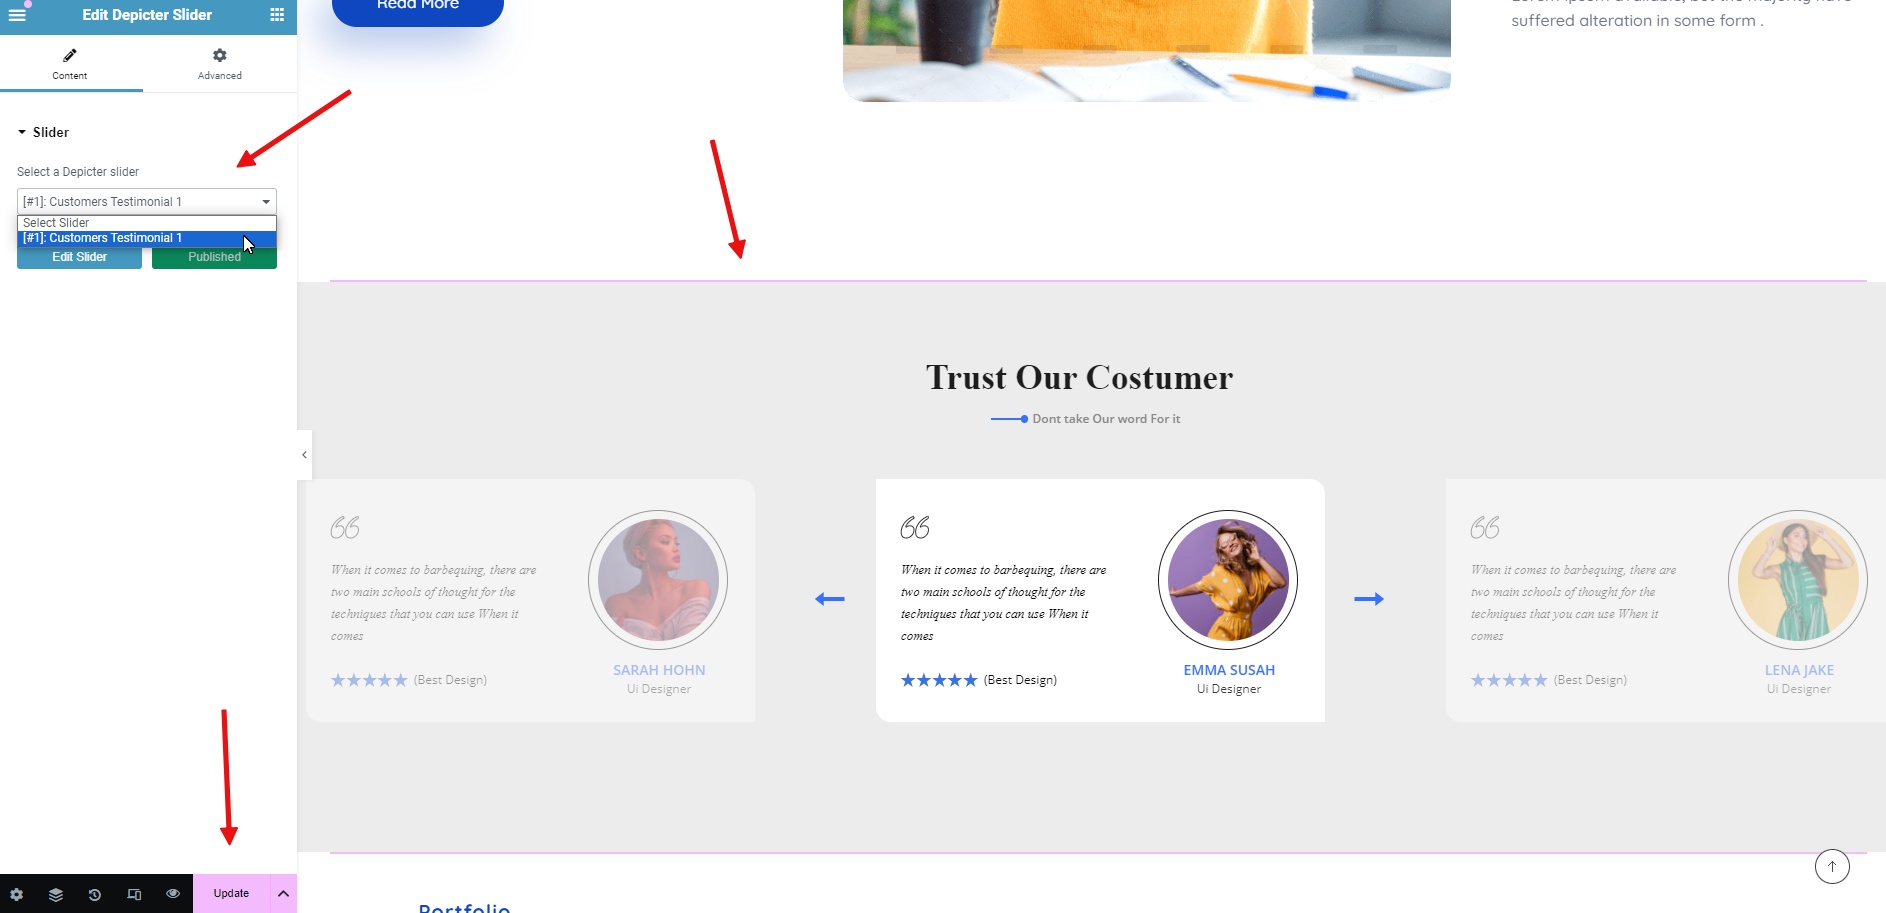
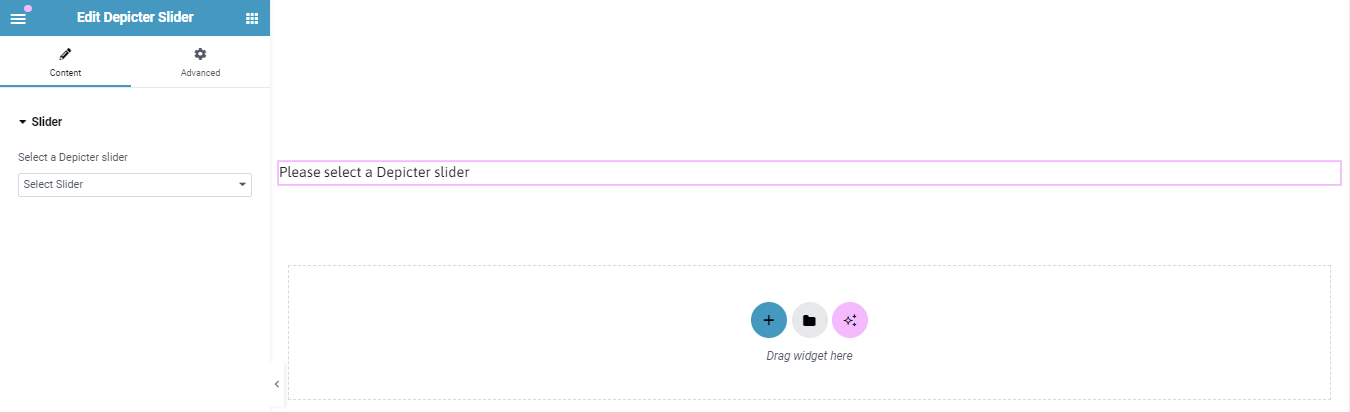
Edit the page where you want to add the testimonial.
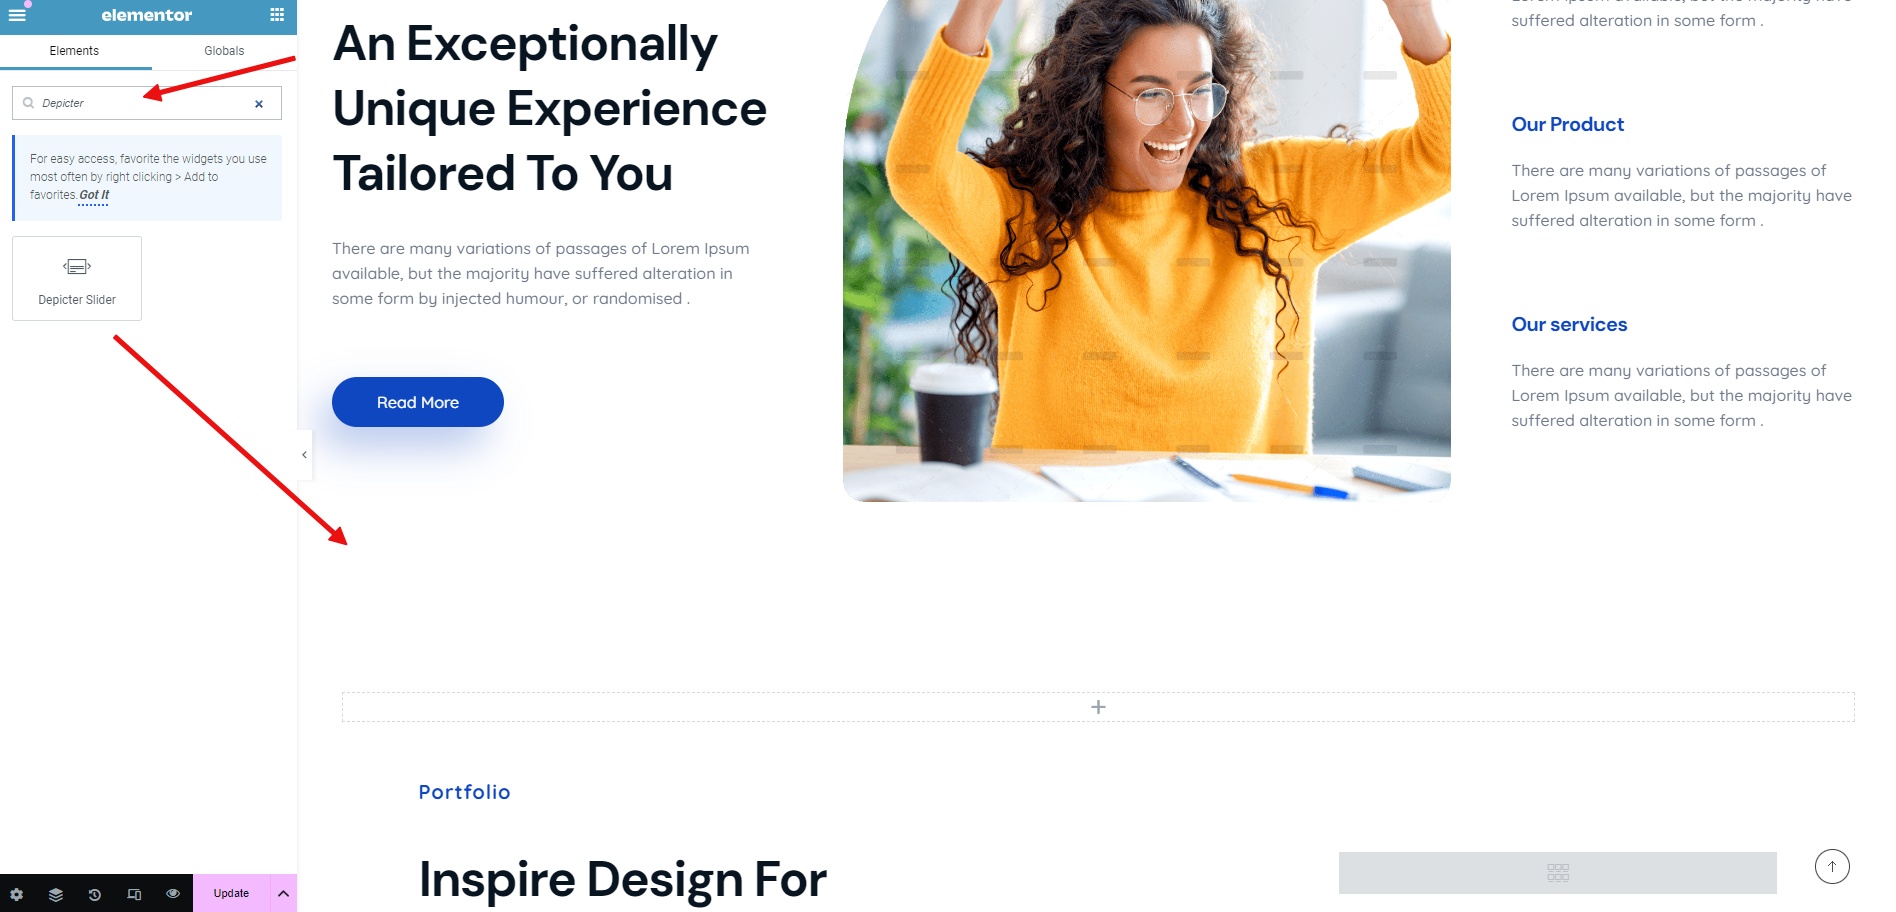
We have built our page with the Elementor page builder, and now we’re adding an Elementor testimonial slider to it.
Select the location where you want to add the testimonial.
From the list of widgets, select the Depicter widget and drag it into the section.
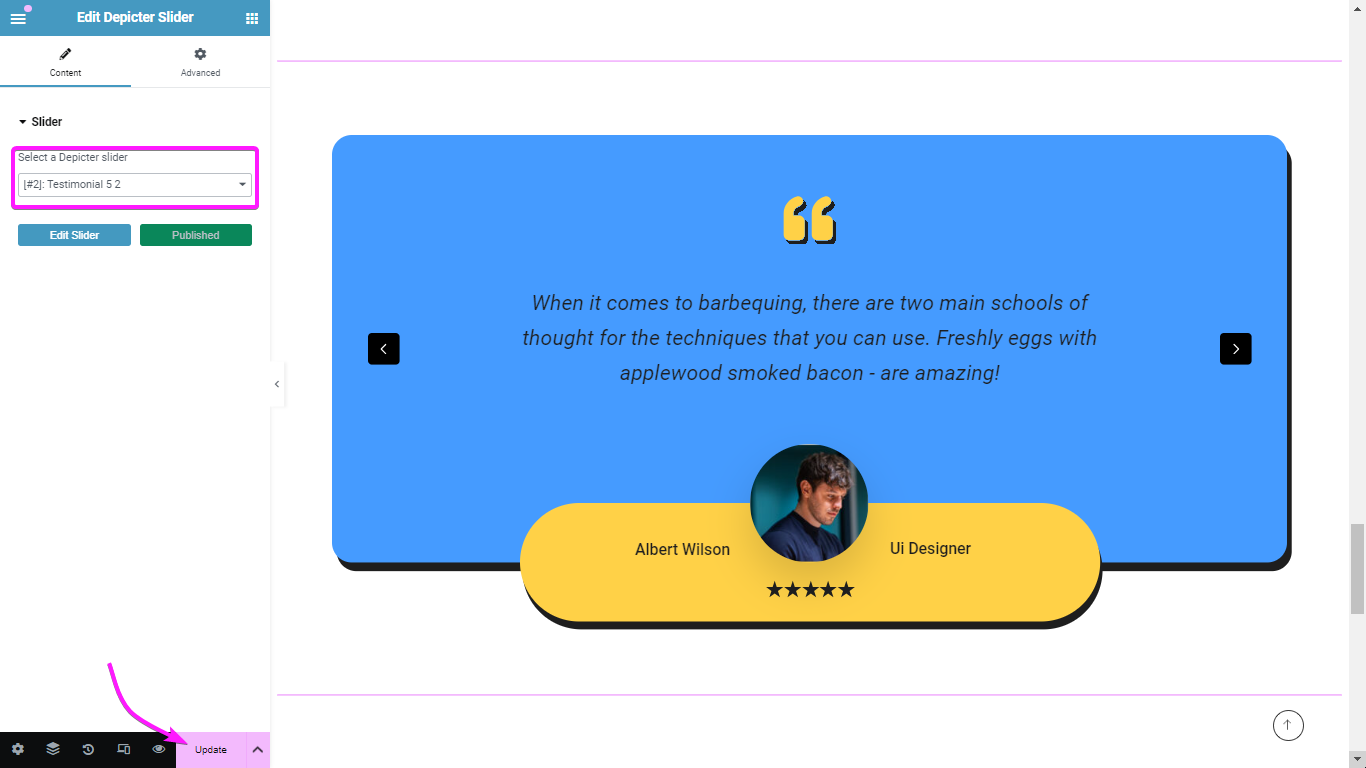
From the list of sliders, select your slider. Your testimonial will be displayed.
Update the changes and you’re done.
The final result will look like this:
Conclusion
In this article, we discussed what testimonials are, how to Create Testimonials, and how they can positively impact your website by increasing social proof for your new customers by adding a carousel testimonial slider via a WordPress testimonial plugin that is the Depicter.
This article explained testimonials and how they can build trust (social proof) for new visitors to your website. We explored using a WordPress testimonial plugin, the Depicter, to create a carousel slider that showcases these testimonials.
We went through the process of creating and customizing testimonials in the Depicter plugin step by step, and finally, we placed the final Elementor testimonial slider on our website.
I hope this article has been useful for you and can be a starting point and a good resource for creating and adding testimonials to your website.
FAQs
How many testimonials should I include?
Try to maintain a balance in this section. Too many or too few will be damaging to you and will not achieve your main goal. However, a few quality comments from people who can be tracked on social media will have a positive impact.
Where should I place the testimonial section on my website?
Testimonials are not usually the first section displayed on a website, but they can be placed below the first section on pages such as the homepage, landing page, product page, or even the “About Us” page, which is related to the introduction of your product or service.
A content slider is a type of dynamic slider that is placed on your website and displays parts or sections of content on your page. These sections are usually related to a source on your website, such as your blog or a product on your online shop. In this tutorial, we will explore how to add a content slider in WordPress, enabling you to effectively highlight your featured content and capture the attention of your website visitors.
For example, you can use content sliders to display the latest products or news on your website, or to showcase selected pieces of information about them.
An important feature that a WordPress content slider gives you is that it automatically update the latest, newest, or most important content from your chosen source, which can be your blog posts, your products, or even a custom post type, on your slider.
Why should you consider a content slider on your website?
Using a content slider has many benefits, especially if you have a news, magazine, or e-commerce website.
For example, you can always have your discounted products at the top of your website without having to edit the slider yourself. Across the web, it’s also called a featured slider.
Or, you can always have a section of your website updated with the latest breaking news from your blog.
In fact, you configure a content slider once to specify the category of content that will be displayed, and then the slider will automatically update as you add that content to your website.
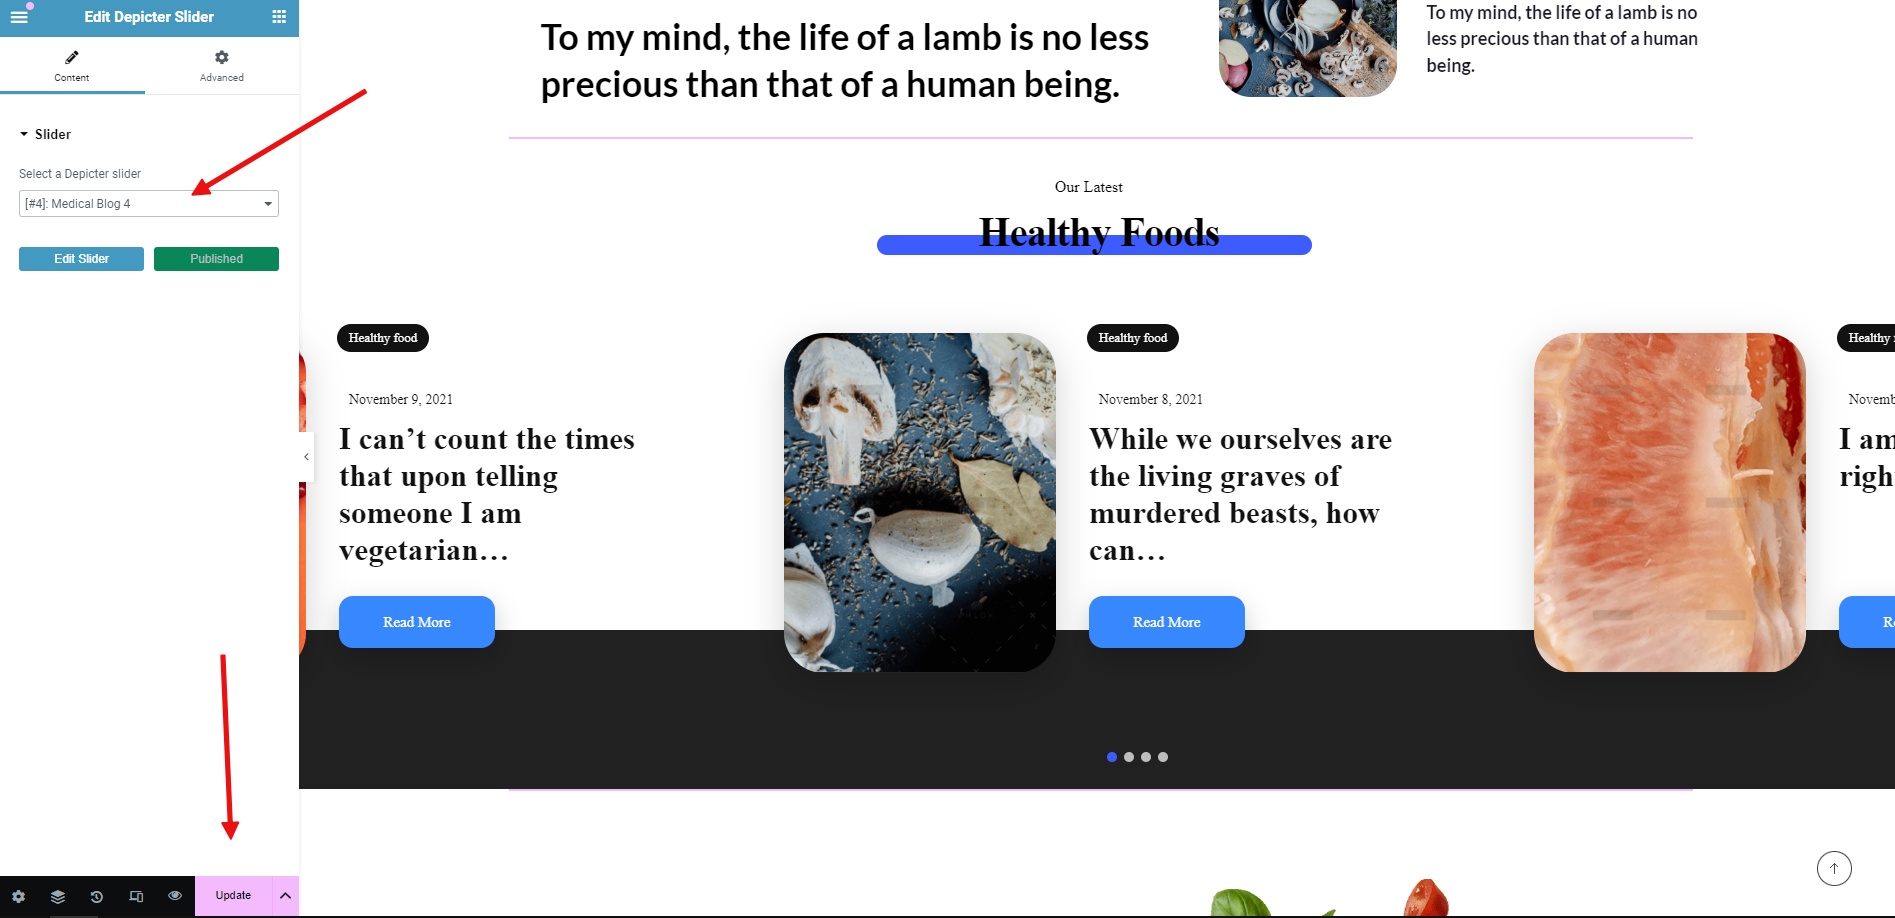
How to add a content slider on your website with the Depicter?
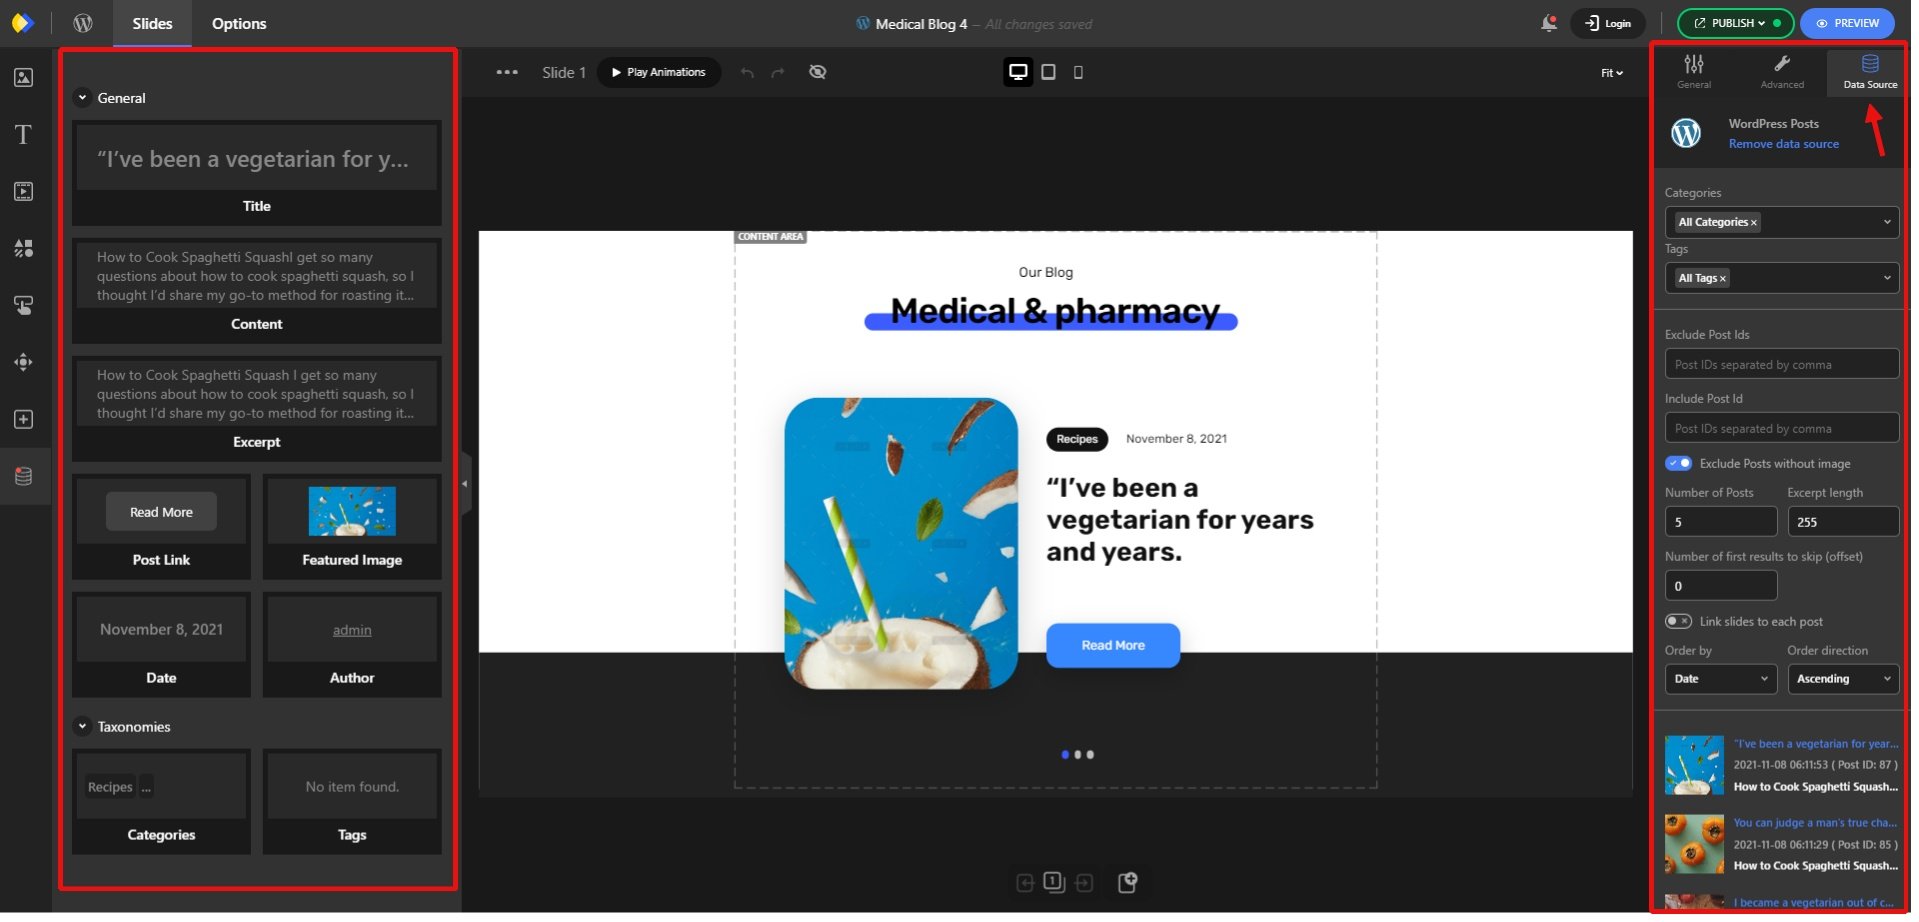
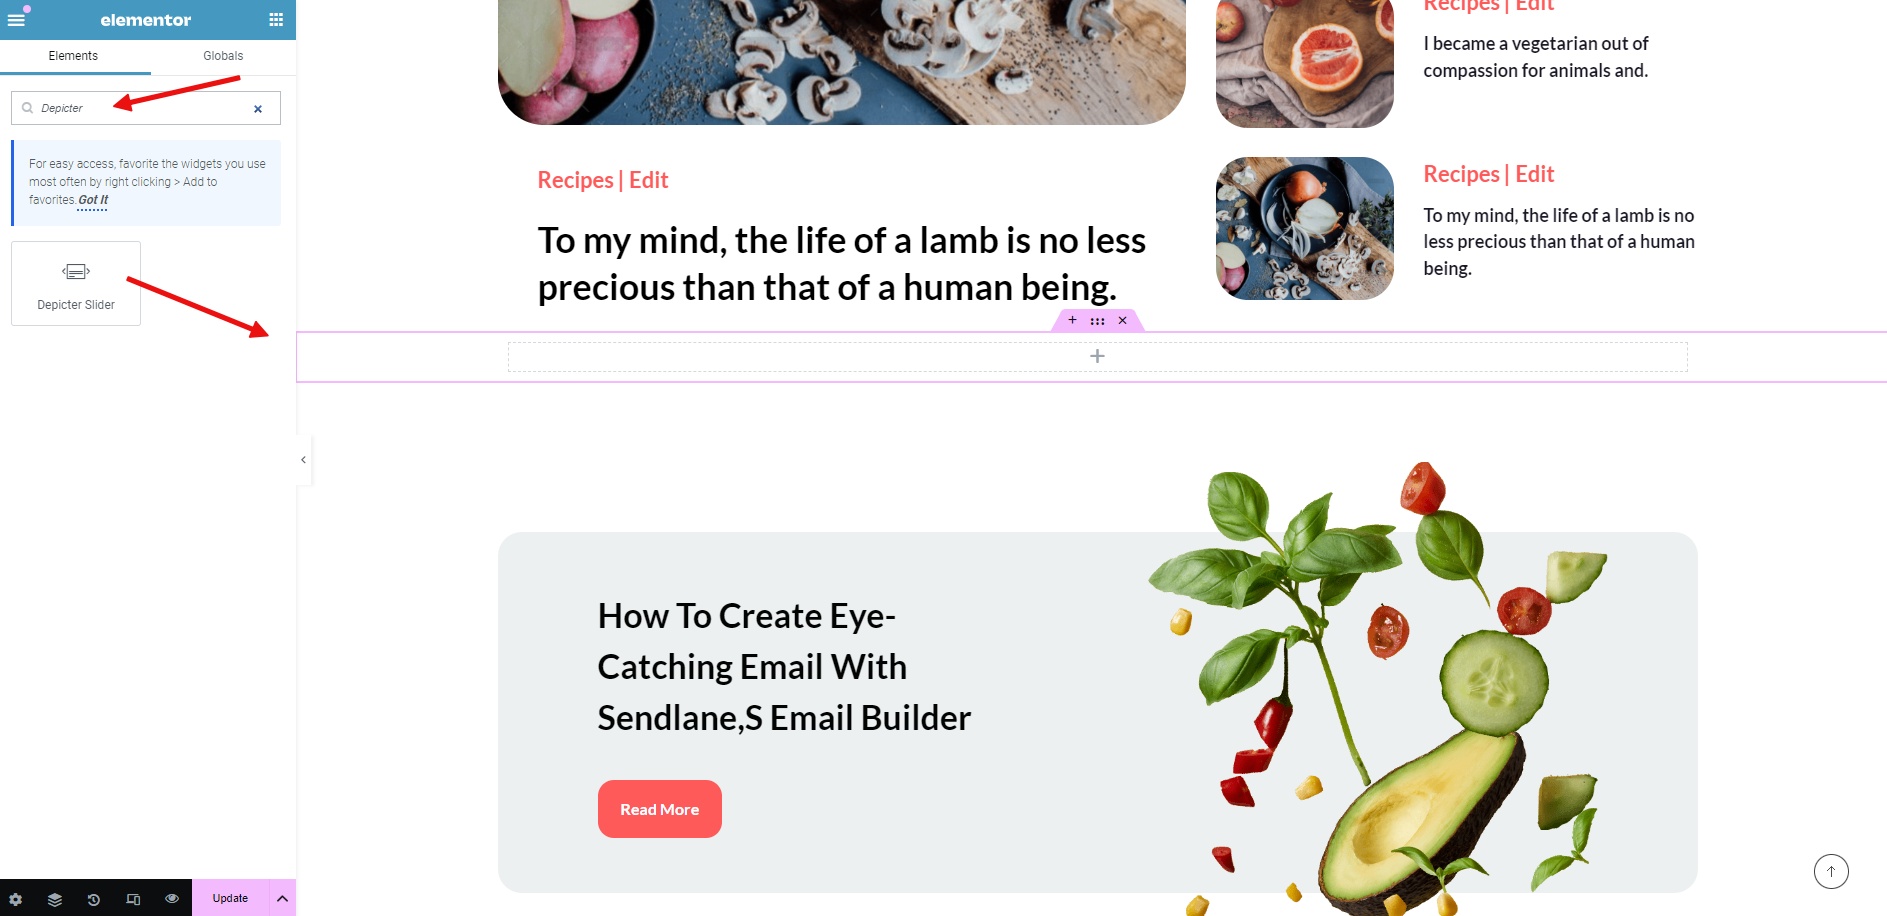
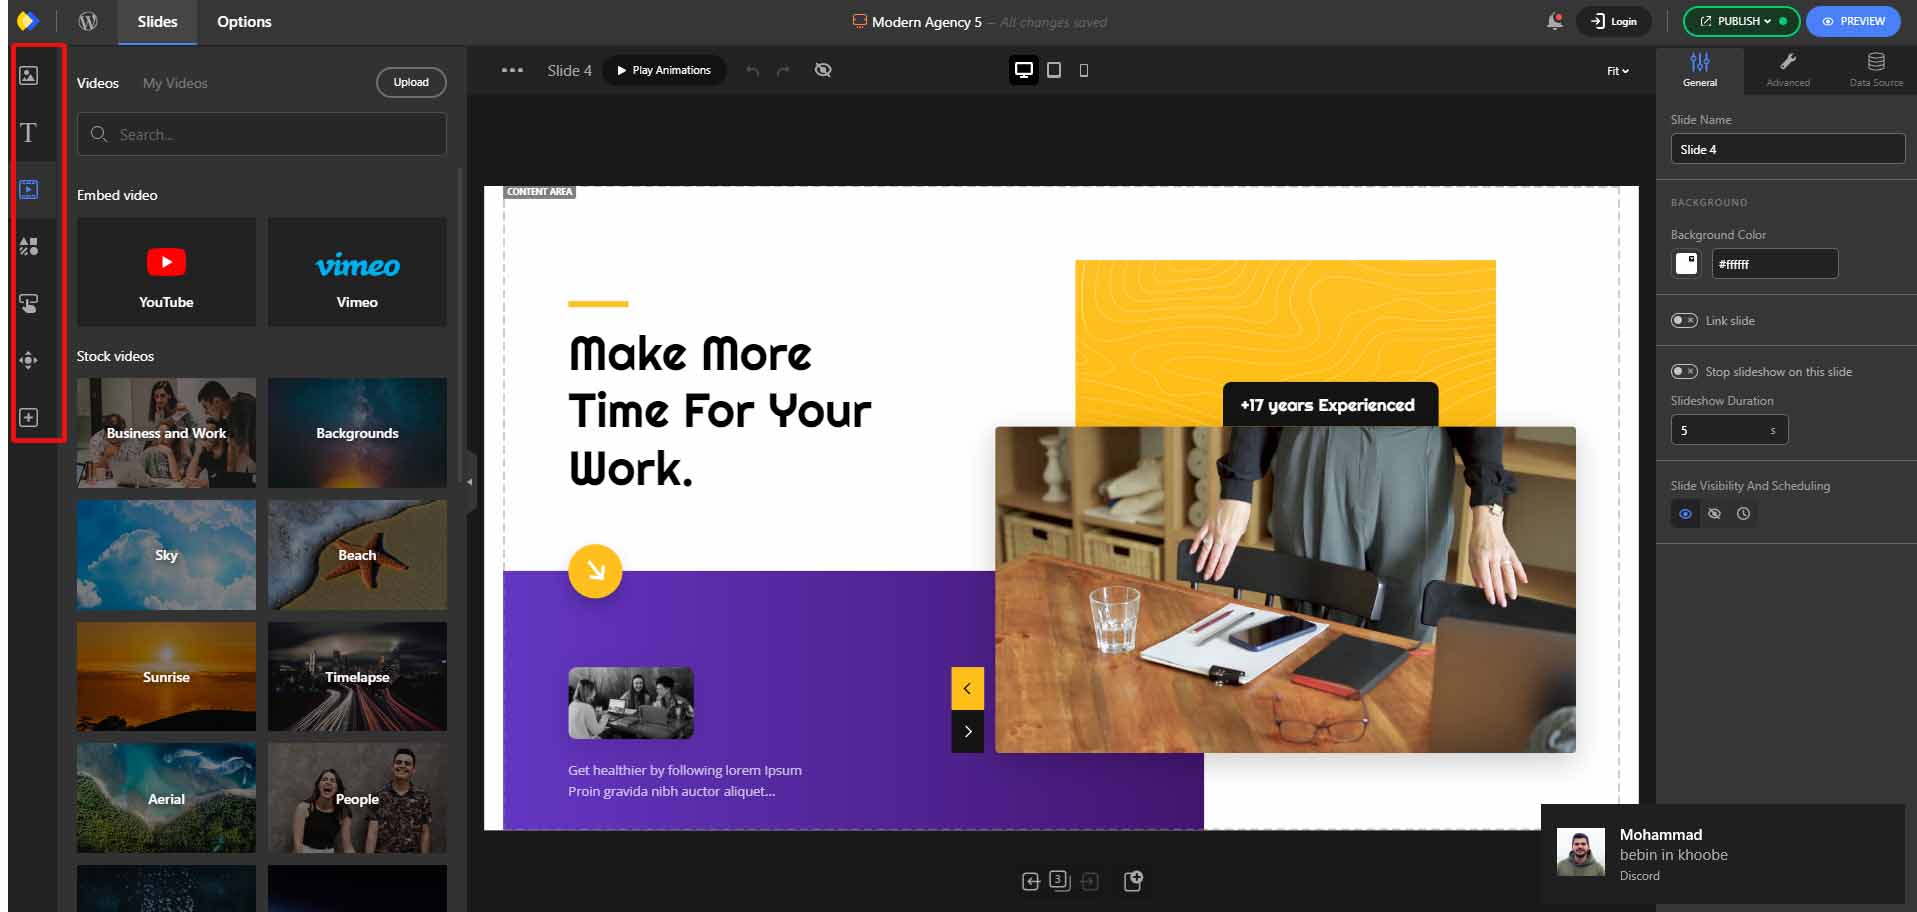
In the left-hand panel, you have access to dynamic elements that you can add to your slider. Each element displays information from one of your posts in the slider.
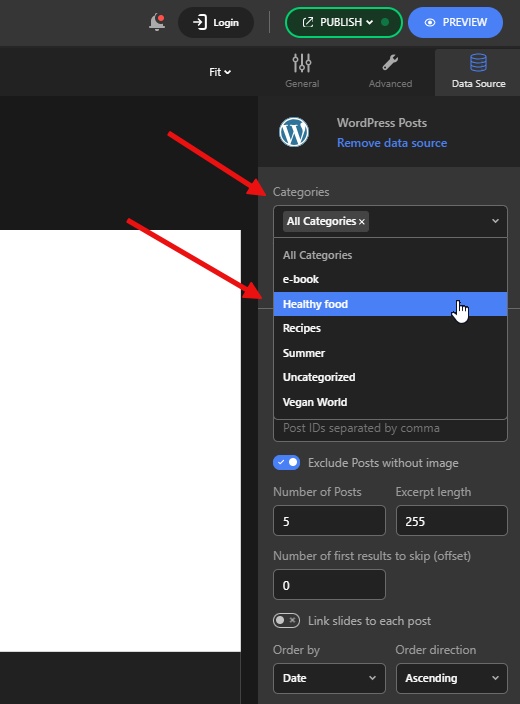
Additionally, in the right-hand panel and under the “Data Source” section, there are options for filtering and displaying your posts.
For example, you can choose which categories of posts to load and display in your slider.
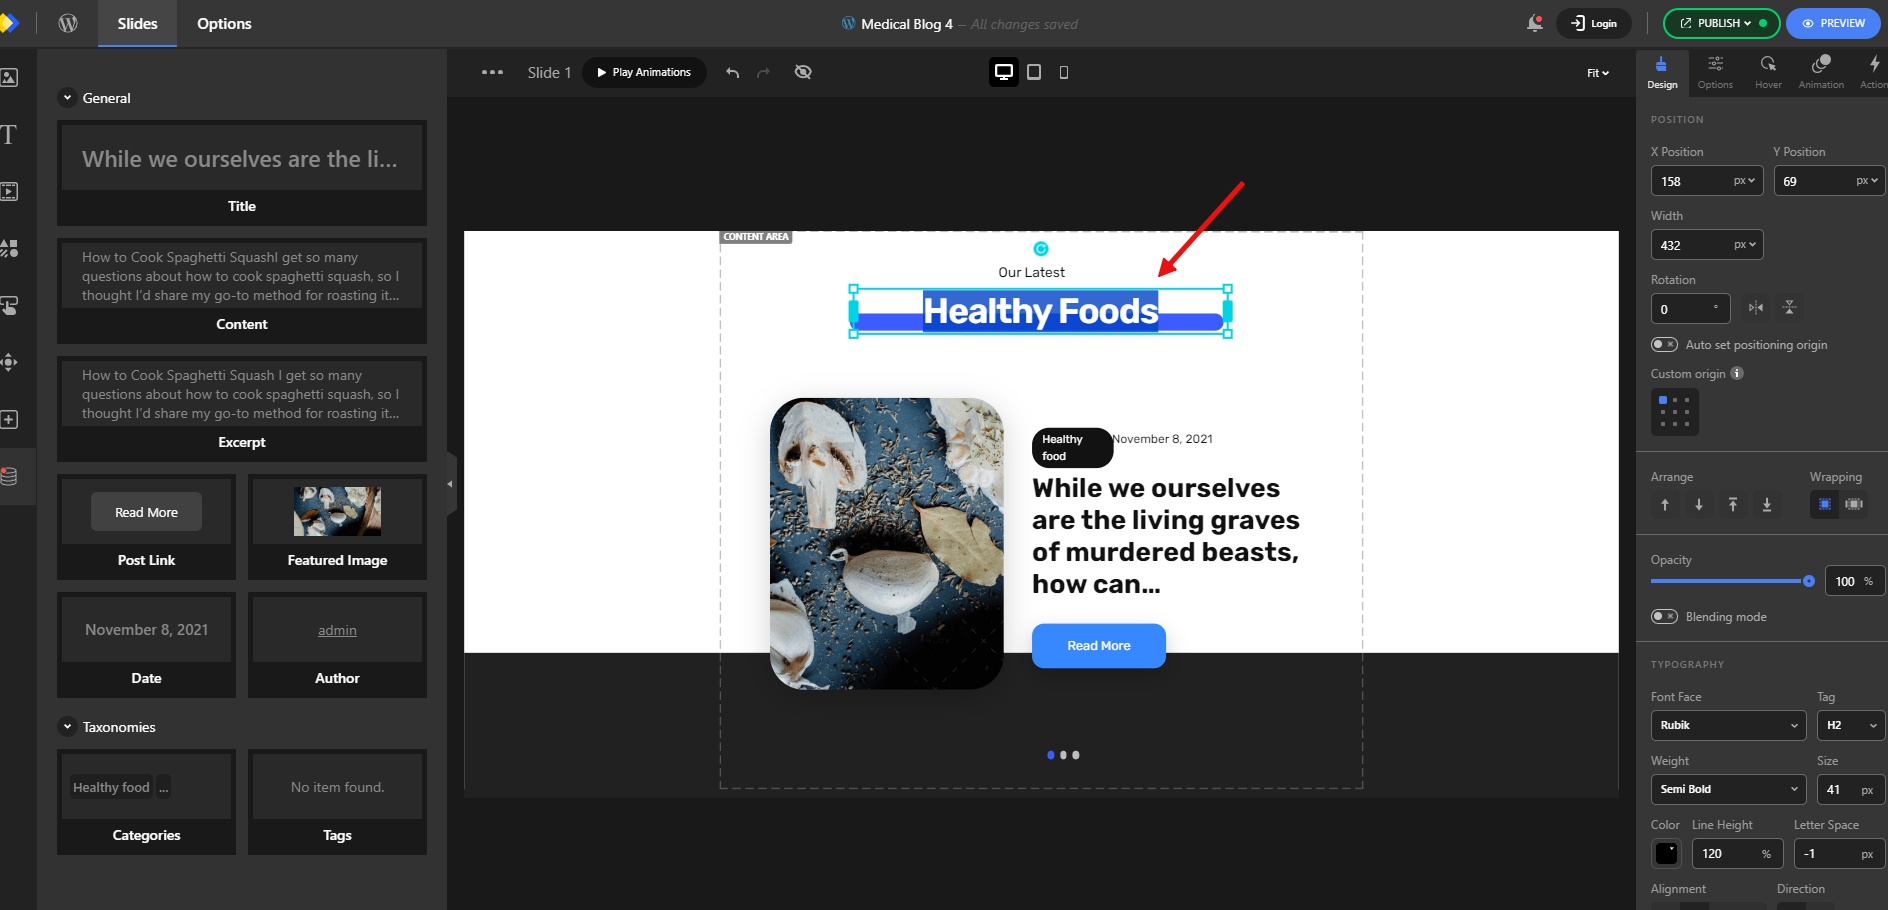
Customize the content: Such as repositioning the elements or changing the colors and typography
Typically, after importing a template, you may need to make some small adjustments to get the final slider exactly as you want it.
In this case, we will make some minor edits to the imported template, which will involve changing a few words and resizing a few elements.
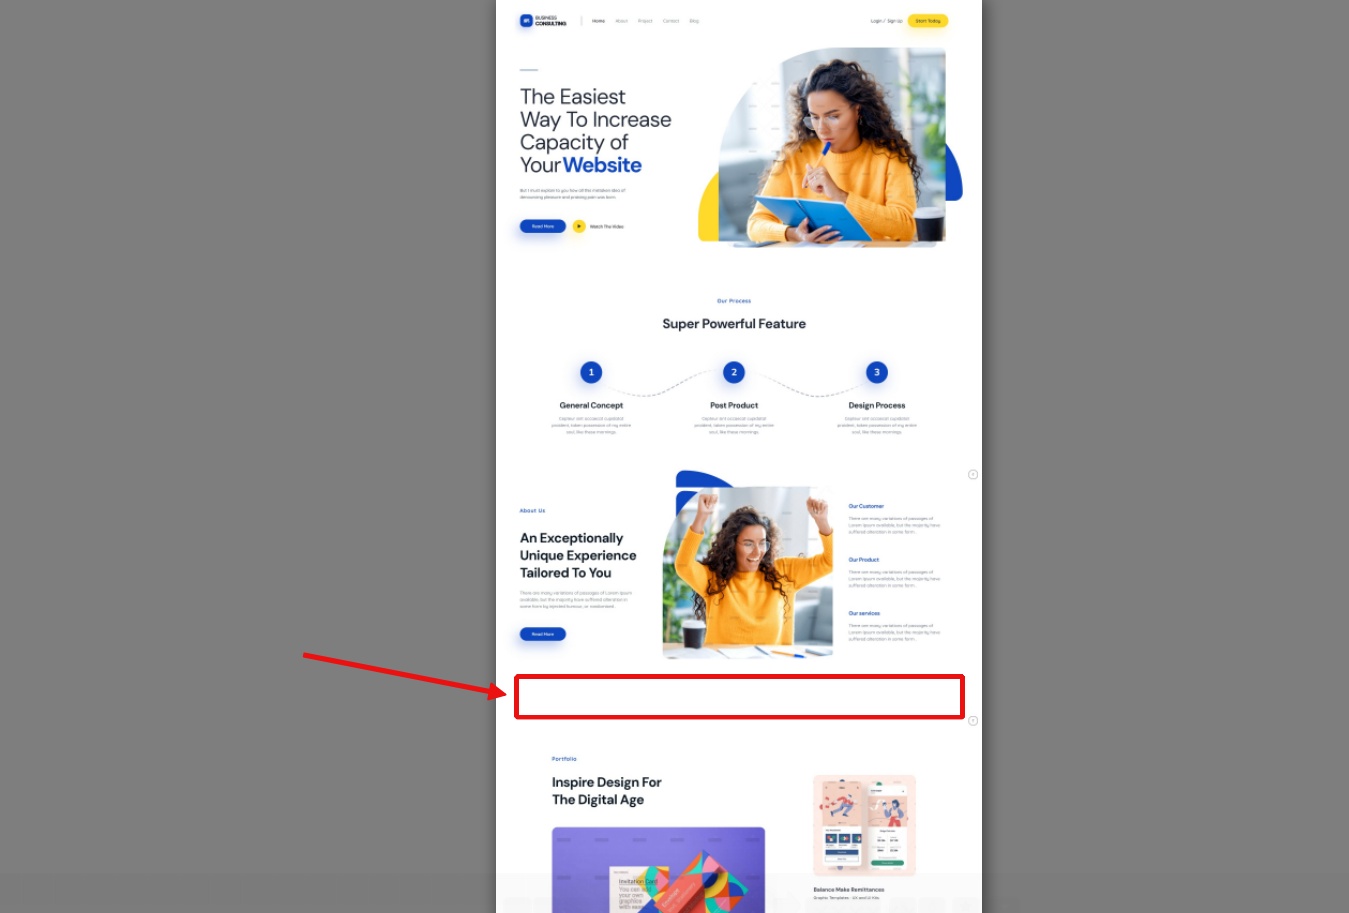
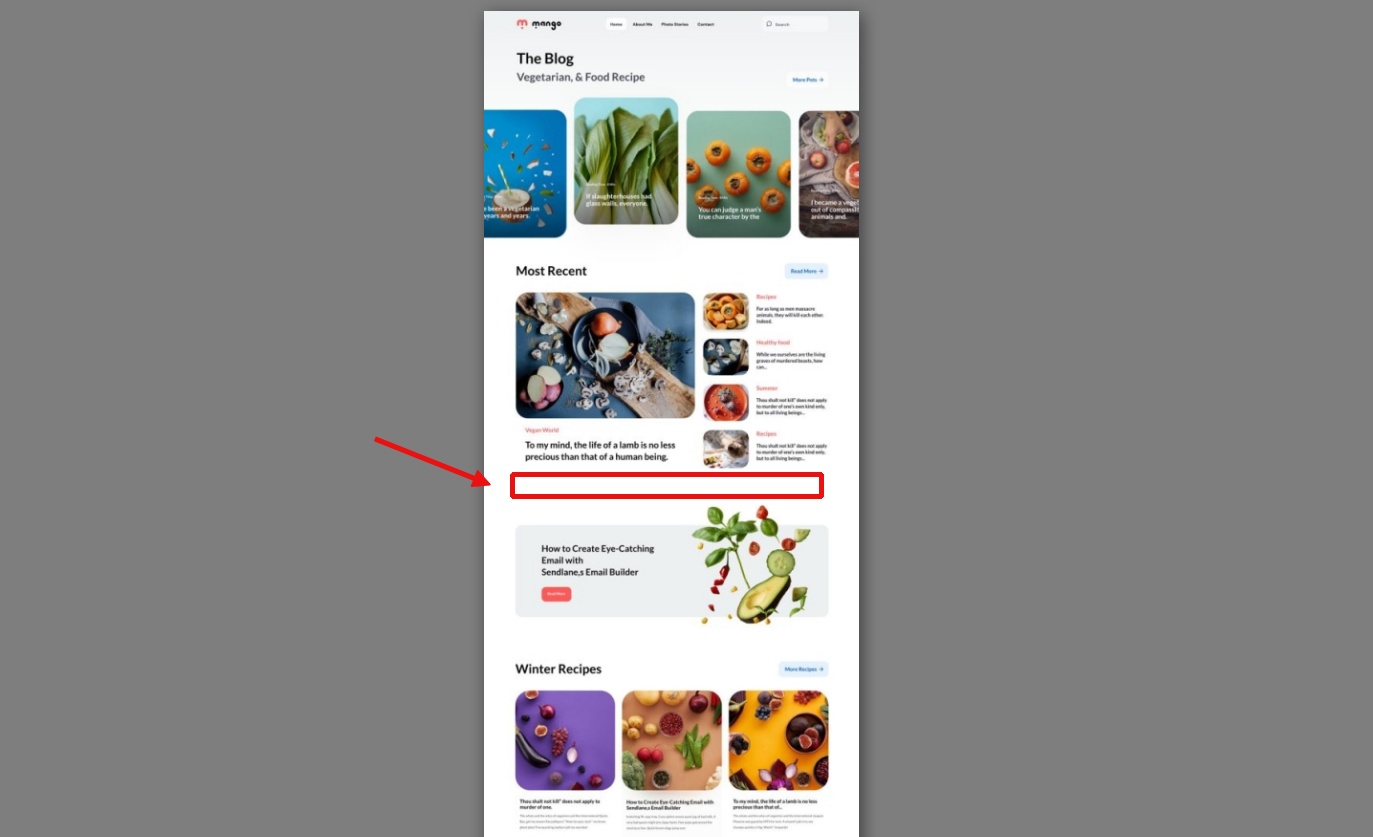
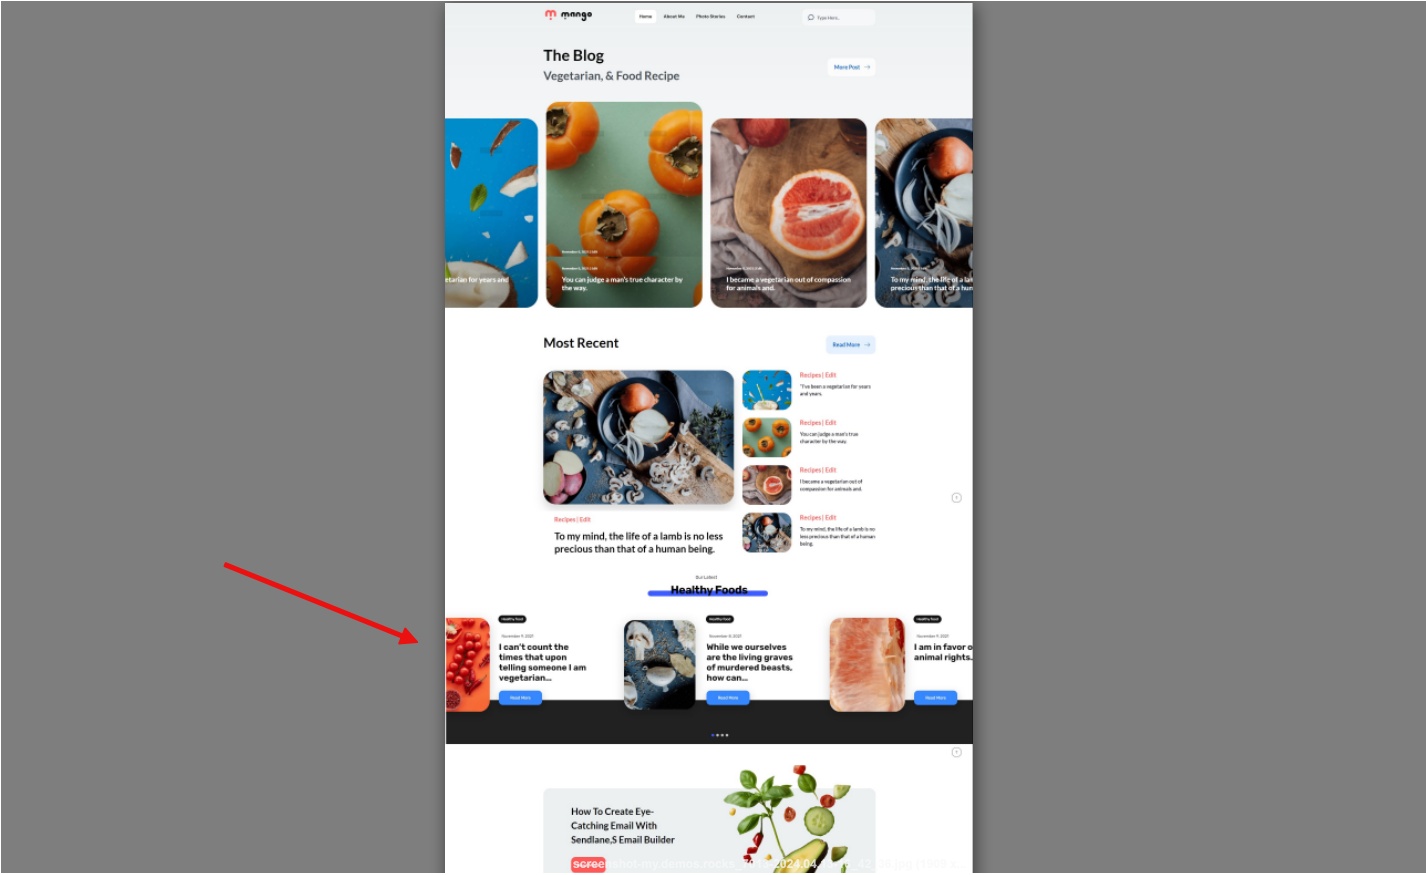
This is our website before adding our content slider and this is where we want to have it:
Edit the page where you want to add the content slider. Our pages utilize the Elementor page builder, and we’re incorporating an Elementor post slider into our page.
Select the location where you want to add the content slider.
From the list of widgets, select the Depicter widget and drag it into the section.
From the list of sliders, select your slider. Your content slider will appear on the website.
Update the changes and you’re done.
The final result will look like this:
The slider section on our website, created with Depicter, always displays the latest posts from the “Healthy Food” category. This means that whenever a new post is added to this category, it will automatically appear on our website.
Conclusion
If used correctly, content sliders can add extra dynamism to your website. In this article, we explored what a content slider is, why you should use it on your website, and how to create and add a WordPress post carousel using the Depicter plugin.
I hope you found this article helpful.
FAQs
Can I use dynamic sliders to display different types of content?
Yes, the Depicter plugin works by identifying all the different post types on your website, and you can create a content slider based on each one.
Can I use dynamic sliders to display content from custom post types?
Yes, the Depicter plugin is fully compatible with the popular ACF plugin.
This means that any custom post types and taxonomies created using ACF will be available for use within Depicter content sliders.
Are all the editor features for regular sliders also available for content sliders?
Yes, all the options, features, and functionalities that you have when working with regular sliders are also available for content sliders.
Have you ever wondered what are testimonials on website? Well you’ve come to the right place to find your answer.
Imagine you’re shopping online for a new fitness program. There are tons of options, all promising amazing results. But how do you know which one to trust? This is where website testimonials come in.
Customer testimonials are short snippets from real people sharing their positive experiences with a product or service.
Think of them like mini-recommendations from people who’ve been there, done that. furthermore they play a powerful role in convincing website visitors that your business is reliable and delivers on its promises.
This guide dives deep into website testimonials, exploring what they are, how they work, and finally answer your question “how to display testimonials on website” to turn happy customers into website heroes who convince others to join the fan club!
Get ready to learn about the types of testimonials, see real-world testimonials on website examples and discover how to leverage their power to boost your website’s credibility and conversions.
Creating a Testimonial for Your Website Video Tutorial
Craving a deeper dive into the world of creating compelling testimonials? This comprehensive video goes beyond the basics, offering a step-by-step guide on how to create powerful testimonials that resonate with your audience.
How to create a Testimonial for Your Website
Are Testimonials and Reviews the Same?
When it comes to hearing from your customers, there are two main ways: reviews and testimonials.
Reviews: These are quick snapshots of a customer’s experience. They’re often anonymous and include star ratings (like 1-5 stars on Google or Yelp).
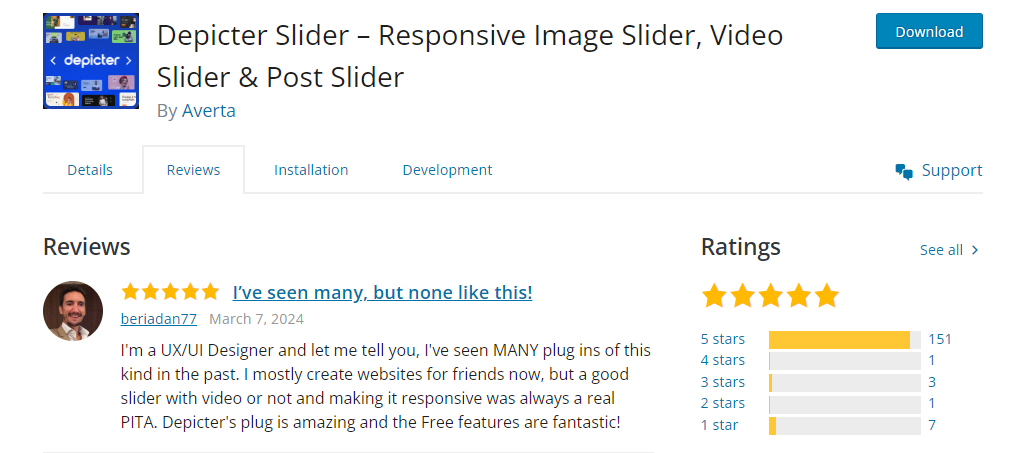
Notice how, in this example, a satisfied user has sung Depicter’s praises with a perfect 5-star rating. This unsolicited positive review speaks volumes about the plugin’s user-friendliness.
Reviews can be positive or negative, but both offer valuable insights to help you improve your business.
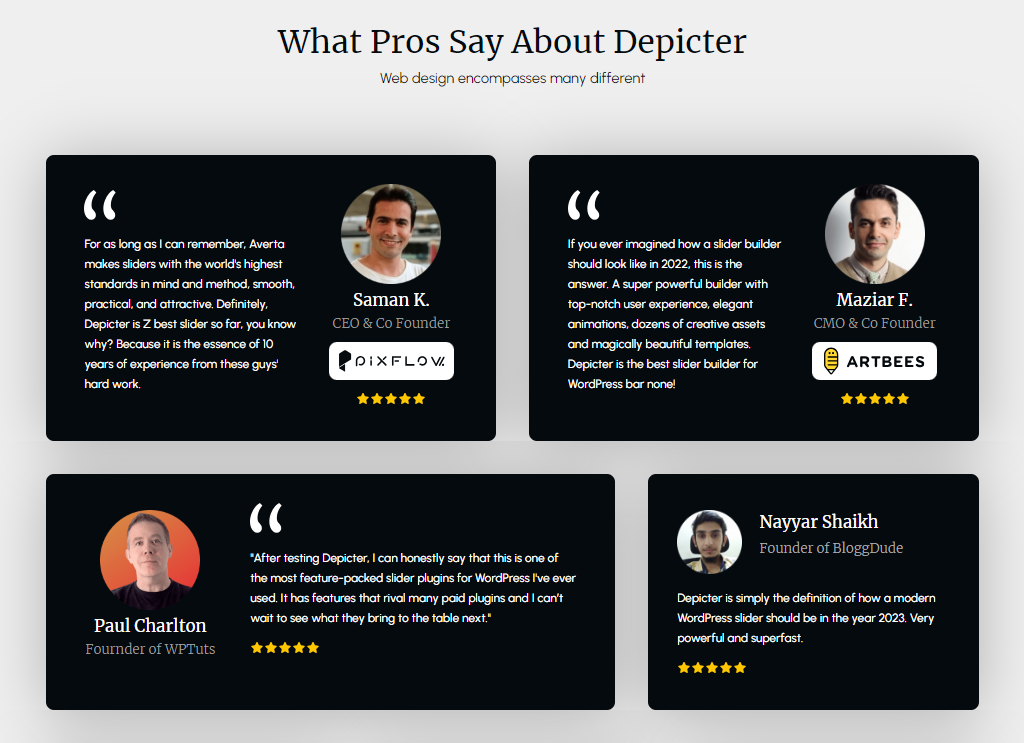
Testimonials: Think of testimonials as detailed recommendations from happy customers. Unlike reviews, testimonials are usually longer and identify the person by name, title, or even include a picture.
For reference, the testimonials above showcase what Depicter users have said about the plugin.
They focus on specific results the customer achieved and aim to give potential customers a real-life perspective of what it’s like to do business with you.
Testimonials are often used in marketing materials and displayed prominently on websites to build trust with potential customers.
In short, reviews are quick and factual, while testimonials are more personal and in-depth. Both play a valuable role in understanding your customers and building trust with potential ones.
Types of Testimonials on Website + Testimonial Examples
Customer reviews are powerful tools, but there’s more than one way to showcase them! Let’s explore some popular types of testimonials and how they can benefit your brand.
1. The Social Buzz: Testimonials from Everyday Fans
Imagine a happy customer raving about your product on Facebook or Twitter. That’s the magic of social media testimonials! These authentic endorsements feel natural and show real people enjoying your product.
Example: various customers on Dior’s Forever Glow Star Filter Facebook post love the product and consequently offer to write their reviews – all on their own! This highlights the power of genuine product quality.
2. Industry Insiders: Trusted Experts Weigh In
Imagine a respected professional in your field recommending your product. In fact industry insider testimonials combine the power of a regular review with the added weight of an expert’s opinion.
This is perfect for B2B companies, showing that well-known names trust your brand.
Example:Elementor WordPress website builder showcases a testimonial from a satisfied customer. While mentioning the person’s job title, the focus is on their positive experience, making it relatable to anyone who might need similar software.
3. The Classic Satisfied Customer: Putting a Face to the Name
This is a familiar format: a quote from a happy customer, their picture, and their name. It’s simple but undoubtedly effective!
Tip: Adding a customer photo builds trust. People connect better with real faces, making the testimonial more impactful.
Example:Hostinger web hosting company includes testimonials with the customer’s picture and how long they’ve been using the service. This shows potential customers Hostinger’s long-term customer satisfaction.
4. Lights, Camera, Action! The Power of Video Testimonials on Website
Video testimonials on website take things to the next level! While they require more effort to produce, they can be incredibly effective.
Example: Kevin’s Dream Studio course empowers students to design their ideal creative spaces. In order to highlight their achievements, he features video testimonials from satisfied students across his website.
Curious about video sliders? Read this article to find out all you need to know about them!
Why are videos great?
They’re more engaging than text.
They show how customers actually use your product.
They allow viewers to connect with the person giving the testimonial on a more personal level.
By using different testimonial formats, you can showcase the positive experiences of your customers and convince potential buyers that your brand is the right choice for them.
Landing Pages: Targeted landing pages are prime real estate for testimonials specific to the product or service being offered. They provide social proof and address potential customer concerns right when they’re most interested in converting.
Product Pages: Showcase testimonials directly on product pages to build trust and highlight how the product benefits users in real-world scenarios.
“About Us” Page: Testimonials on your “About Us” page build trust and credibility, demonstrating your value proposition to potential customers.
Testimonial Design Considerations
A clean and visually appealing presentation can elevate the impact of your testimonials. Here are some design tips:
Clean Layout: Use a clear and easy-to-read format. Consider quotation marks to highlight the customer’s voice and bullet points for key benefits.
Calls to Action: Don’t leave website visitors hanging! Include a clear call to action (CTA) below your testimonials, encouraging them to learn more, make a purchase, or contact you.
While having a plethora of testimonials might seem ideal, quality trumps quantity. Focus on showcasing a curated selection of powerful and impactful testimonials that truly resonate with your target audience.
How to Add Testimonials to Website
Up to this point in the article, you already know what a testimonial on a website is and how to make the best of it.
Now it’s time to learn how you can add a testimonial slider and testimonial carousel to your website that shows how amazing your customer thinks you are.
The best part? You don’t need coding skills to achieve this! In this guide, we’ll walk you through the easiest method possible: using theDepicter plugin for WordPress.
If you’re looking to work with an easy to use, testimonial WordPress plugin with various beautiful ready-made templates, Depicter is the right plugin for you.
How to Add Testimonial Slider in WordPress?
Once you decide where you want to put the testimonial slider on your website (in this example, to our homepage), the first thing you have to do is adding the Depicter Pugin to your WordPress.
To do that, in your WordPress dashboard, go to “plugins”, then Click on “Add New Plugin.”
Search for Depicter in the search bar, and install and activate the plugin.
Head to Depicter in your WordPress dashboard. Depicter has implemented various ways for you to find the right template. In this case, you can either choose the “Slider” category in home, Go to “Templates” and find the “Testimonial Slider” and “Testimonial Carousel” category or simply Search for “Testimonial” in the search bar once you’re in “Templates”.
Choose whether you want to see the “testimonial carousel” or the “testimonial slider” templates and once decided, choose a template and import it. In this example we’re choosing the “testimonial slider” category.
Remember, you can always choose to create a slider (or carousel) from scratch, by choosing the “create a blank” option.
Choose a template and import it.
Once imported, you’ll be taken to Depicter’s editor; there you can customize your slider to your liking. It is here where you can change the texts, images, fonts, colors and more, to match the look of your website.
Once done with customization, hit publish and the slider is ready to show off wherever you want it to be.
Adding the slider to your home page or testimonial page:
All you have to do is go to your main page and click on “Edit with Elementor”.
Add a section, and place the Depicter widget in it.
The last but not the least thing left to do is choose the slider that you created and hit Update.
Well, that’s pretty much it!. As you can see, adding a testimonial to your website can get very easy if you use the right tools at hand.
Final Word: Tips to Create a Compelling Testimonials on Website
Remember, testimonials are all about showcasing the real-world impact of your product or service. By incorporating these key elements:
Positive Results: Let your customers shine! Focus on the concrete improvements they’ve achieved thanks to your product or service. Numbers, increased sales, or improved efficiency all add weight to a testimonial.
Specifics: Vague statements like “great product” lack impact. Instead, encourage customers to mention specific features or benefits that resonated with them. This shows a genuine understanding of your offering.
Customer Voice: Testimonials are most believable when they come straight from the horse’s mouth. Use the customer’s own words and avoid overly promotional language.
4. Including Visuals: Headshots and Logos for Added Credibility
A picture is worth a thousand words, and that holds true for testimonials too. Including headshots of your customers adds a human touch and builds trust. People connect better with faces!
For B2B testimonials, consider incorporating company logos alongside the customer’s information. This establishes credibility by showcasing partnerships with reputable brands.
5. The Power of Storytelling: Testimonials that Captivate
The best testimonials don’t just list benefits – they tell a story. Encourage your customers to share their journey: the challenges they faced, how your product or service helped them overcome those obstacles, and the positive impact it’s had on their business or life.
Storytelling creates an emotional connection with potential customers, making your testimonials more memorable and persuasive.
By following these tips and leveraging the ease of Depicter, you can transform customer raves into website magnets, boosting trust and conversions like never before!
Looking to make your WordPress website more dynamic and engaging? Adding a slider can be a great way to showcase your content and grab your visitors’ attention. In this tutorial, We’ll walk you through the step-by-step process of adding a slider to your WordPress website in 2024.
Sliders remain powerful tools for space optimization. By consolidating multiple content pieces into a single carousel, they allow you to showcase more information without overwhelming visitors. This is especially valuable on landing pages, where you aim to deliver a strong visual storytelling impact within a limited space. In the competitive landscape of web development, concise and engaging content presentation is crucial, and sliders can help you achieve it.
In addition to functionality, sliders are also great at showcasing your best work. If your website relies heavily on visual content like photography, design, or art, sliders can act as a captivating showcase right from the moment visitors arrive. They can even be themed around specific events or product launches, creating a targeted and impactful presentation. In 2024, with attention spans shrinking, grabbing visitors’ interest quickly is vital, and sliders can be your secret weapon.
Ultimately, WordPress sliders offer a blend of flexibility and interactivity. They can be customized to match your brand aesthetic and accommodate different media types, making them suitable for a wide range of websites and stores. By utilizing their space-saving capabilities, user engagement potential, and visual storytelling power, you can harness sliders to enhance both the functionality and visual appeal of your website. If you are looking to add a slider to your WordPress website, this article is for you.
How can you add a slider to your WordPress website?
Add a custom-coded slider to your website
If you don’t have experience with coding, creating a customized slider means you might have to hire a developer, which can add extra expenses and time to the process. This may not be the most feasible option for everyone, particularly if you have a specific design in mind that can be achieved with existing plugins.
For most scenarios, the convenience and flexibility of plugins make them a smarter choice.
Add a slider to your website using the page builder
Some page builders allow you to create sliders directly within your website’s pages, without installing a separate plugin. However, it’s important to keep a few things in mind when using this approach:
Slider blocks are often only available in the premium versions of page builders. This means you might need to upgrade to a paid plan to access this feature. The Slides widget of the Elementor is an example of this. You may have limited customization options. Built-in slider blocks may not offer the same level of customization as dedicated slider plugins. You may miss out on advanced features. Some slider plugins provide advanced features such as animation effects, responsive design, and integration with other plugins. If you’re looking for a basic slider and don’t want to install an additional plugin, using your page builder’s built-in slider block can be a convenient option. However, if you require more customization options or advanced features, using a dedicated slider plugin may be a better option.
Add a WordPress slider to your Website Using a Plugin (Depicter)
There are many plugins in the WordPress slider category, each with different features and capabilities. Here are 5 of the best sliders in 2024:
It’s clear that we could write a detailed review for each of these WordPress slider plugins, as their functionality and features are diverse and extensive. Here, we’ll take a closer look at one of the best, Depicter.
Step 1: Install Depicter
Go to your WordPress dashboard and navigate to the Plugins menu.
In the Search Plugins field, enter Depicter.
Click the Install Now button.
After the plugin has been installed, click the Activate button.
Step 2: Creating a slider
To create a blank slider:
Go to the Depicter menu in your WordPress dashboard.
Click the Create a Blank button.
Enter a name for your slider and click the Create button.
Step 1: Install Depicter
Go to your WordPress dashboard and navigate to the Plugins menu.
In the Search Plugins field, enter Depicter.
Click the Install Now button.
After the plugin has been installed, click the Activate button.
Once Depicter is installed, you can start creating sliders.
Step 2: Creating a slider
To create a blank slider:
Go to the Depicter menu in your WordPress dashboard.
Click the Create a Blank button.
Enter a name for your slider and click the Create button.
To use a pre-made template:
Go to the Depicter menu in your WordPress dashboard.
Click the Templates tab.
Browse the available templates and select one that you like.
Click the Import button.
After creating or importing a slider, you can begin customizing it.
Depicter’s interface is entirely drag-and-drop, and by selecting any element, you will have access to all the options related to it.
Depicter’s top features
As you work with Depicter, you will realize that it offers a wide range of professional features. These include:
Drag-and-drop editor:
This makes it easy to create and modify sliders without any coding knowledge. Just drag and drop the elements you want to use onto the canvas, and then adjust their properties as needed.
Asset panel:
This provides access to a variety of pre-made assets, such as images, videos, and icons, which can save you time and effort when creating your sliders.
Image, video, text, shape, button, and navigation control elements:
These allow you to create a wide variety of sliders. You can use images to showcase your products or services, videos to tell a story, text to provide information, shapes to add interest, buttons to call to action, and navigation controls to help users navigate your slider.
Animations:
You can add animations to any element in your slider. This can help you to make your slider more engaging and visually appealing.
Dedicated options:
Each element in Depicter has its own dedicated options. This allows you to fine-tune the appearance and behavior of each element.
Once you’ve finished customizing your slider with images, text, colors, and other changes, you can then add it to your page. The method for doing this will vary depending on the page builder you are using.
There are two common ways to add a slider: using a shortcode or adding a dedicated slider element for your page builder. The latter is the recommended method.
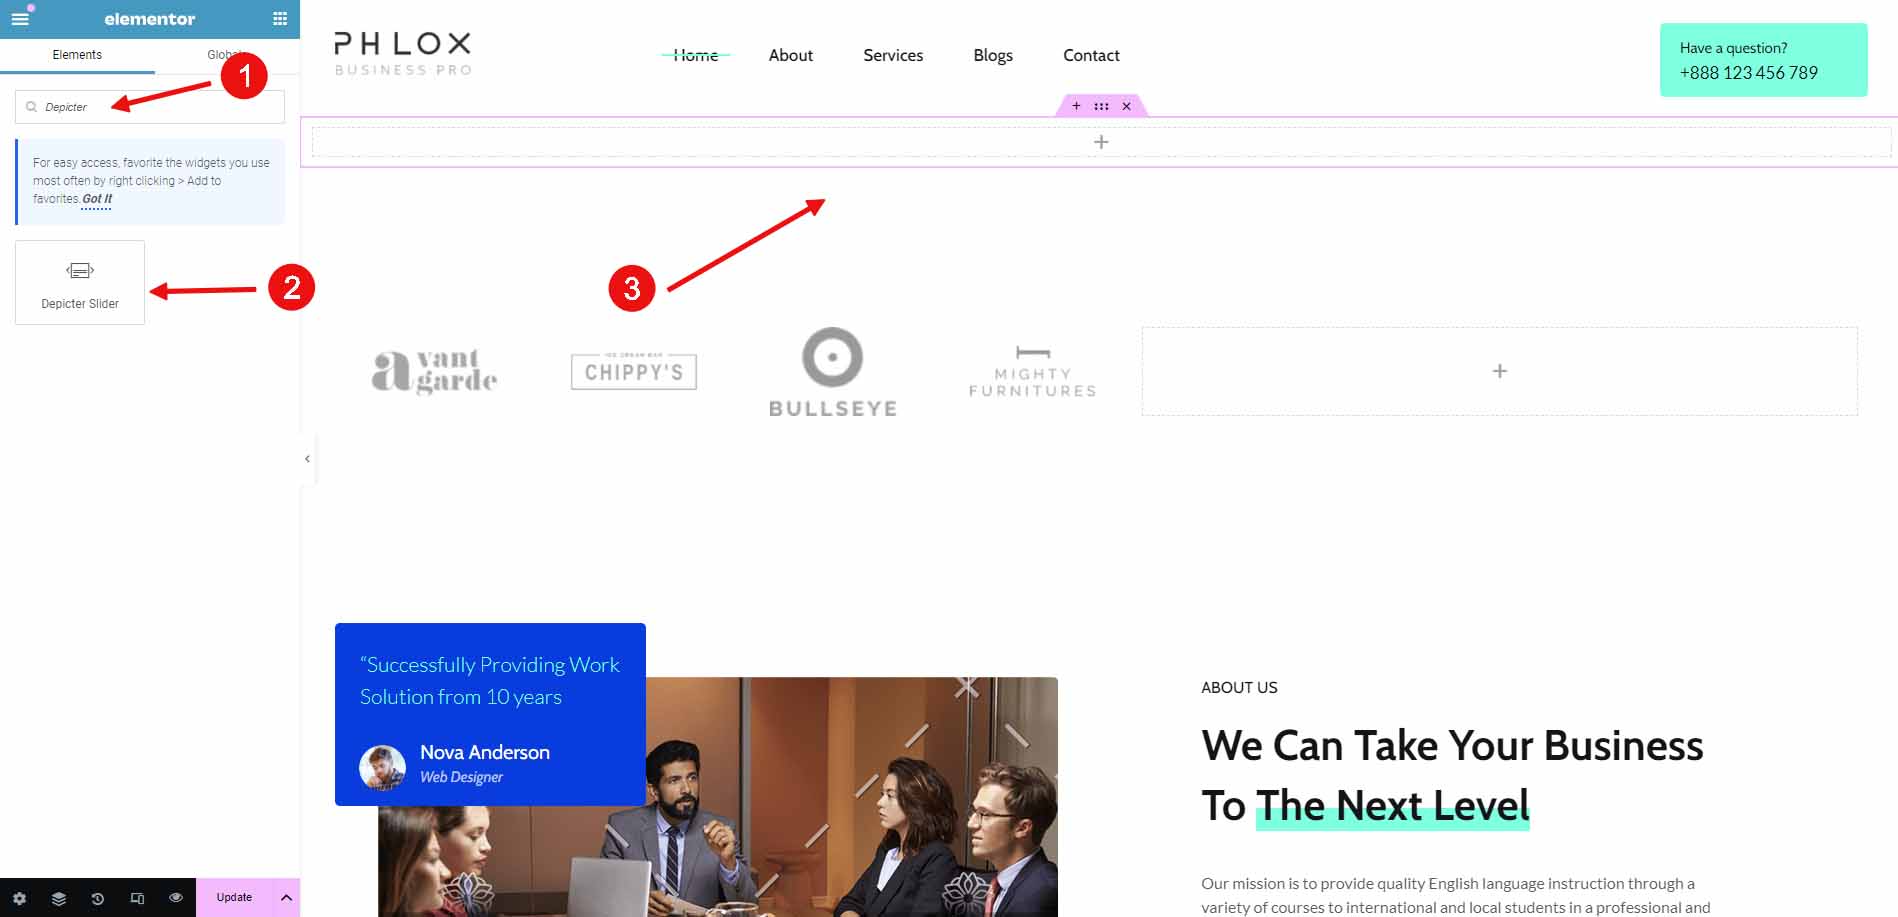
Fortunately, Depicter has elements dedicated to all popular page builders, which makes this process much easier. Here, we’ll go through an example using Elementor.
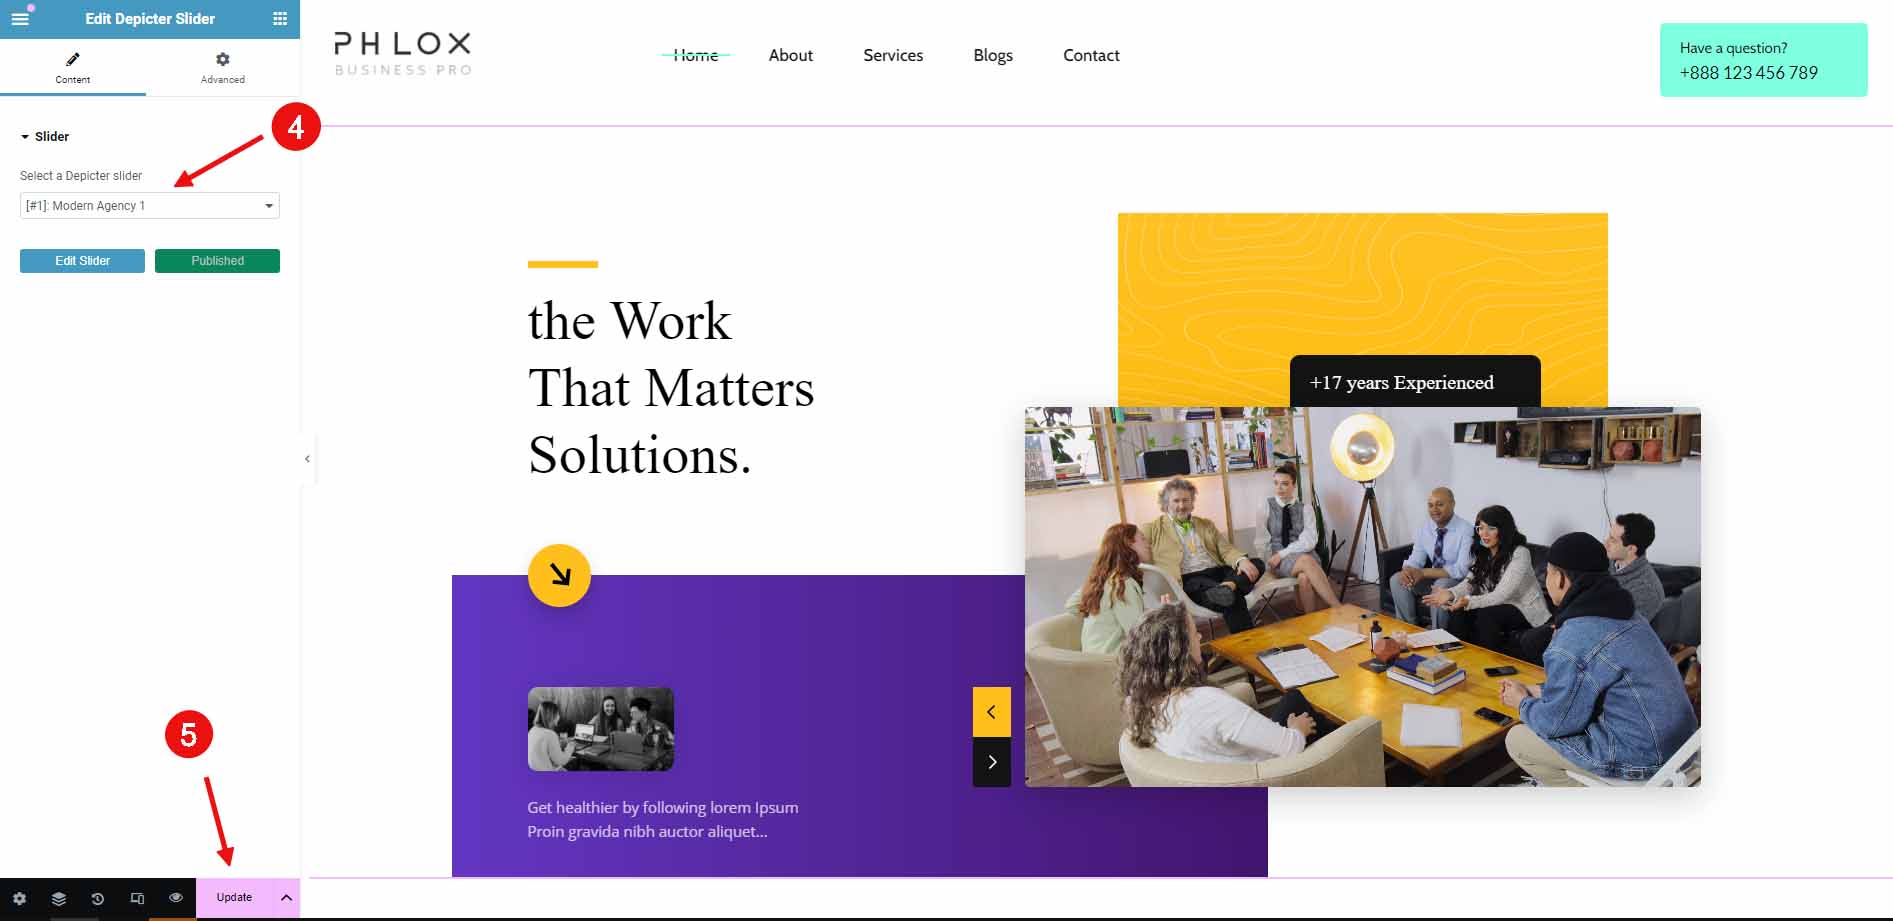
After opening the page in Elementor for editing, simply search for “Depicter Slider” in the list of widgets. Drag and drop it onto the page, then select your slider from the list of available sliders.
“what a website slider is,” imagine scrolling through a website, and instead of just seeing one big image at the top, it cycles through several cool pictures or even short videos.