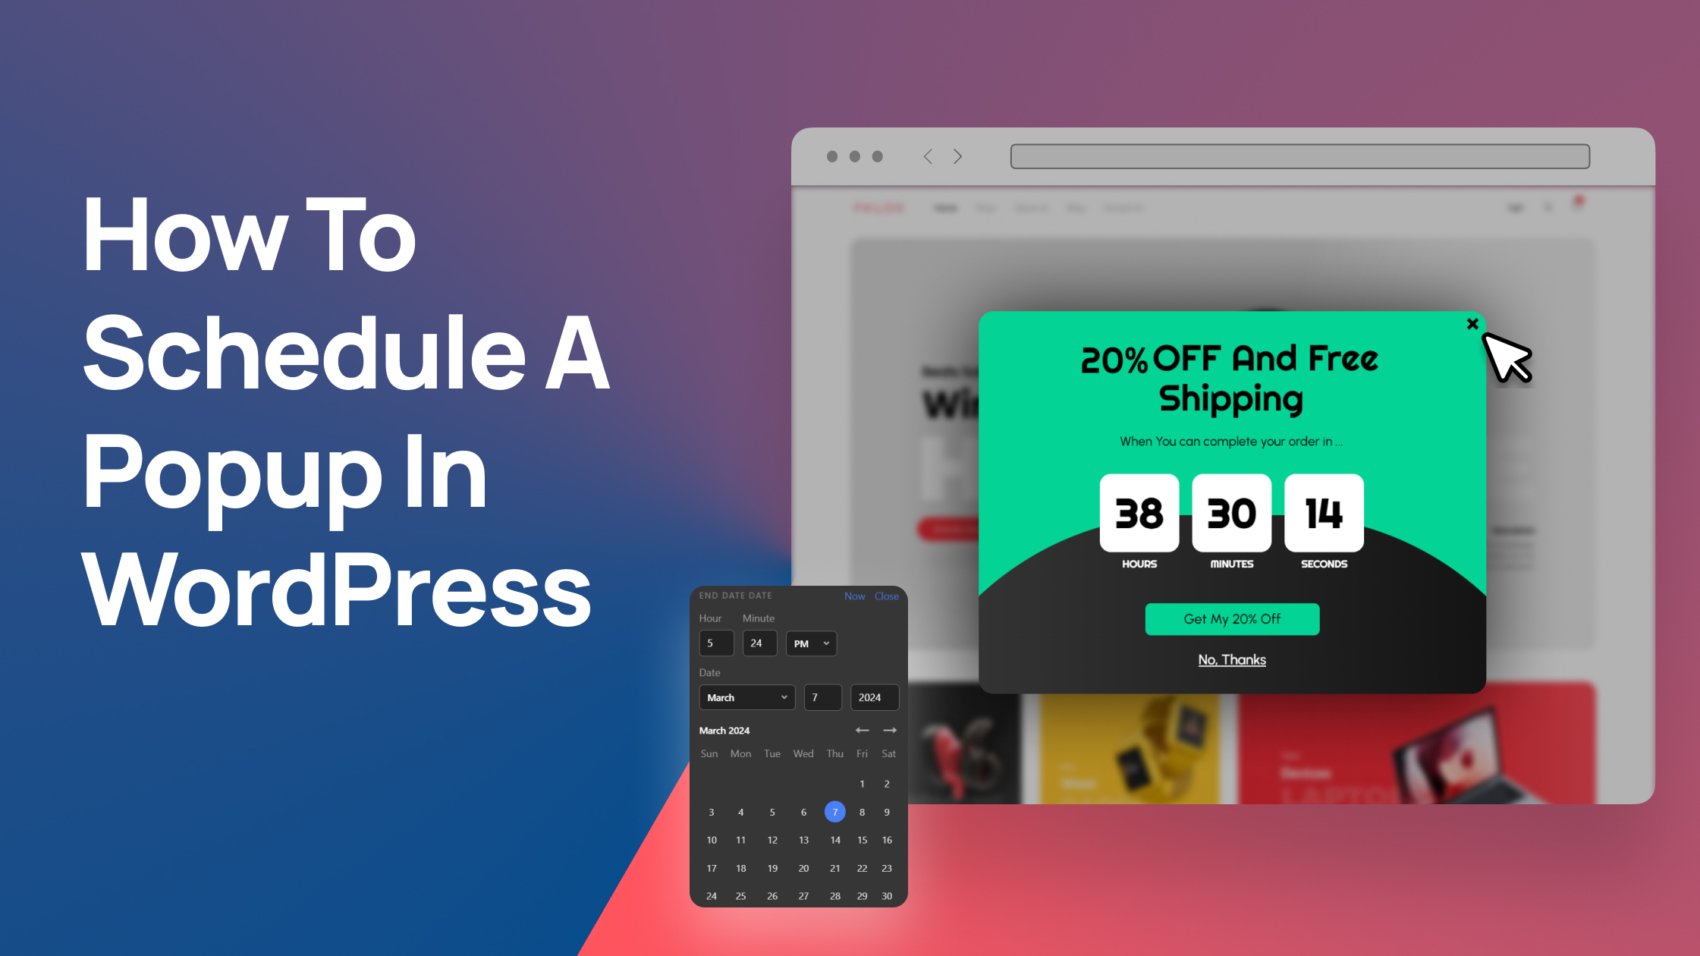
Are you looking for information on How to Schedule a Popup in WordPress? In today’s digital landscape, effective marketing requires strategic engagement with your audience. One powerful tool for capturing attention and driving conversions is scheduled popups. By strategically timing the appearance of popups, you can deliver targeted messages to your visitors at the optimal moment, increasing the likelihood of action.
In this guide, we’ll walk you through the steps of scheduling a popup using Depicter, empowering you to leverage this effective marketing tool for your WordPress website.
Why Schedule a Popup in WordPress?
Scheduling popups on your website can be a powerful option for targeted marketing and improved user experience. By strategically timing the appearance of popups, you can create limited-time offers that generate urgency and excitement among your audience, promote products or services relevant to specific holidays or seasons, and ultimately drive conversions and improve your overall user experience.
How to Schedule a Popup in WordPress with Depicter
Depicter is a versatile WordPress popup builder plugin that empowers you to create and schedule stunning, high-converting popups for your website. With its intuitive drag-and-drop interface and extensive customization options, Depicter makes it easy to design popups that capture attention and drive results.
Installing Depicter
Installing Depicter is a breeze. Simply navigate to the “Plugins” menu in your WordPress dashboard, click “Add New,” and search for “Depicter.” Once you find the plugin, click “Install Now” and then “Activate.” That’s it! Depicter is now ready for you to create and customize your popups.
Creating a Scheduled Popup
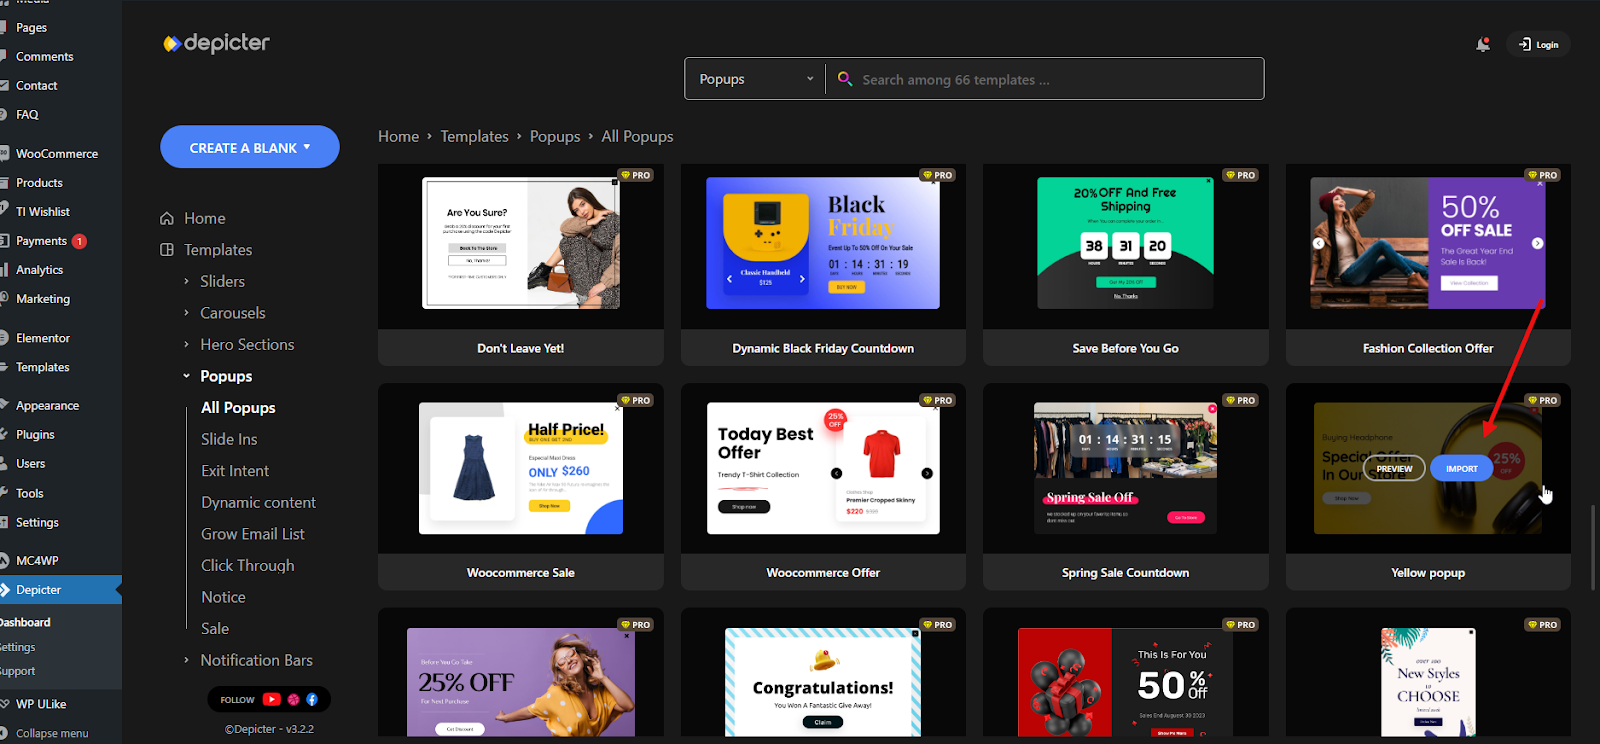
After installing Depicter, go to the “Popup” menu in your dashboard to access the collection of ready-made templates.
Choose one of the available options and simply click the ‘Import’ button. After a few seconds, the popup will be imported for you and you will be redirected to the Depicter editor.
Here, you can fully customize all the details of your popup using Depicter’s completely drag-and-drop editor. To learn more about creating a popup from scratch, you can watch the following video.
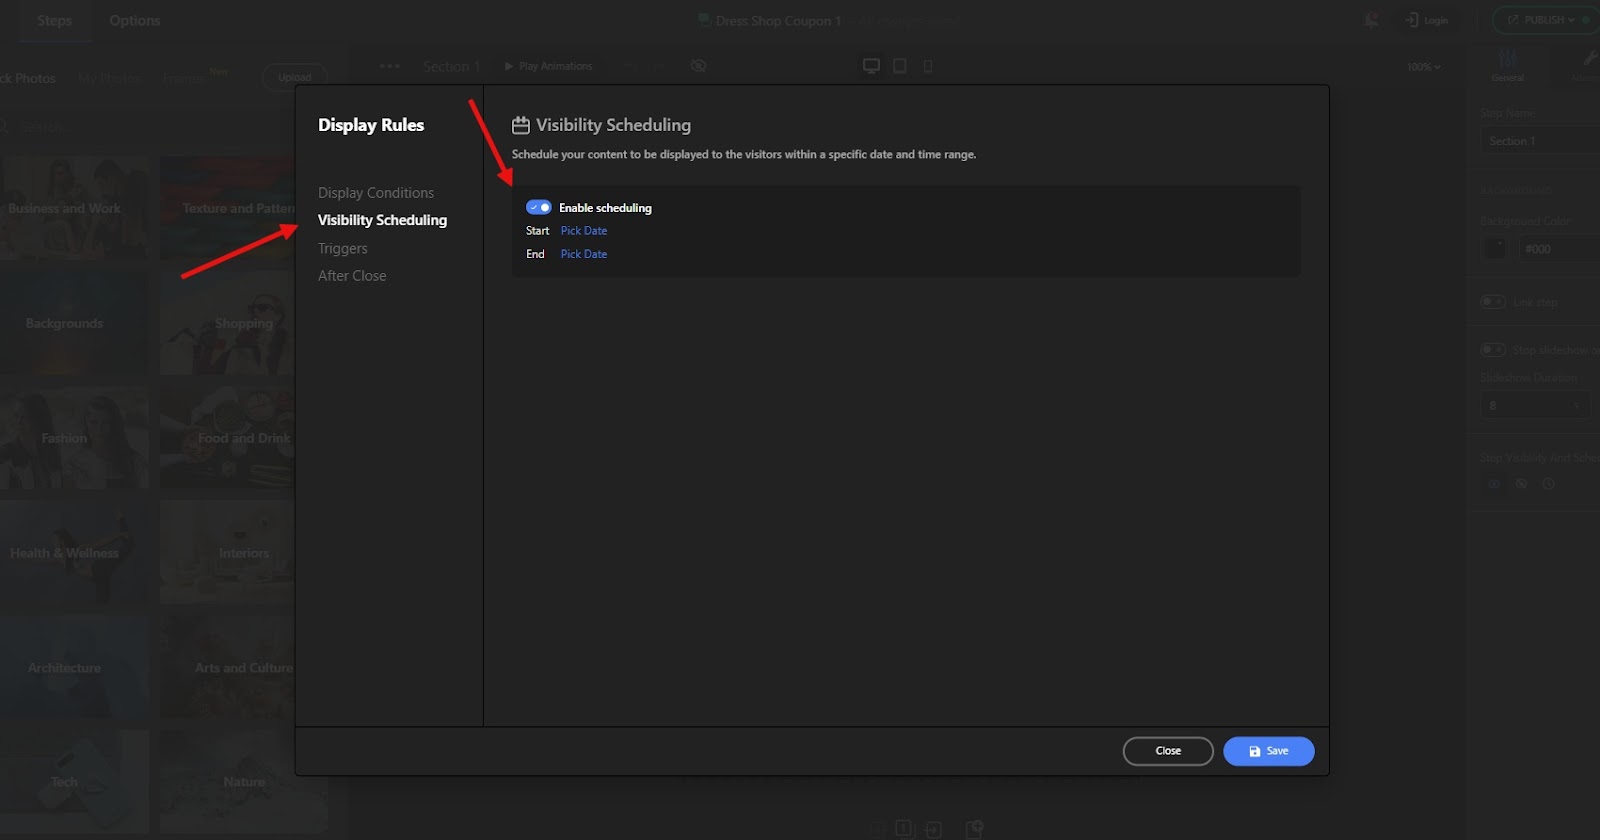
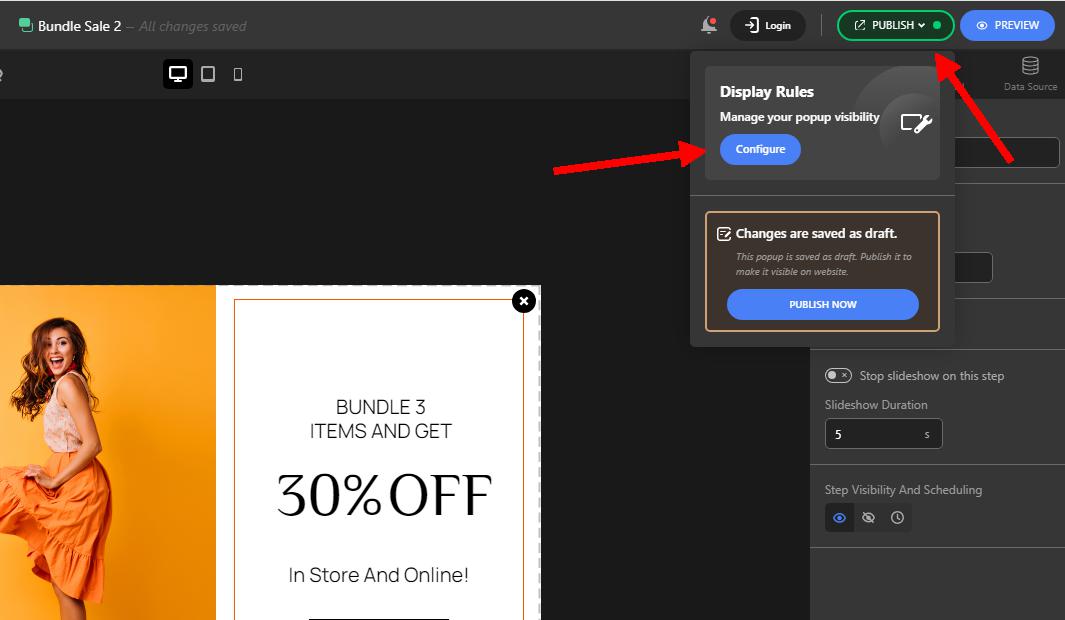
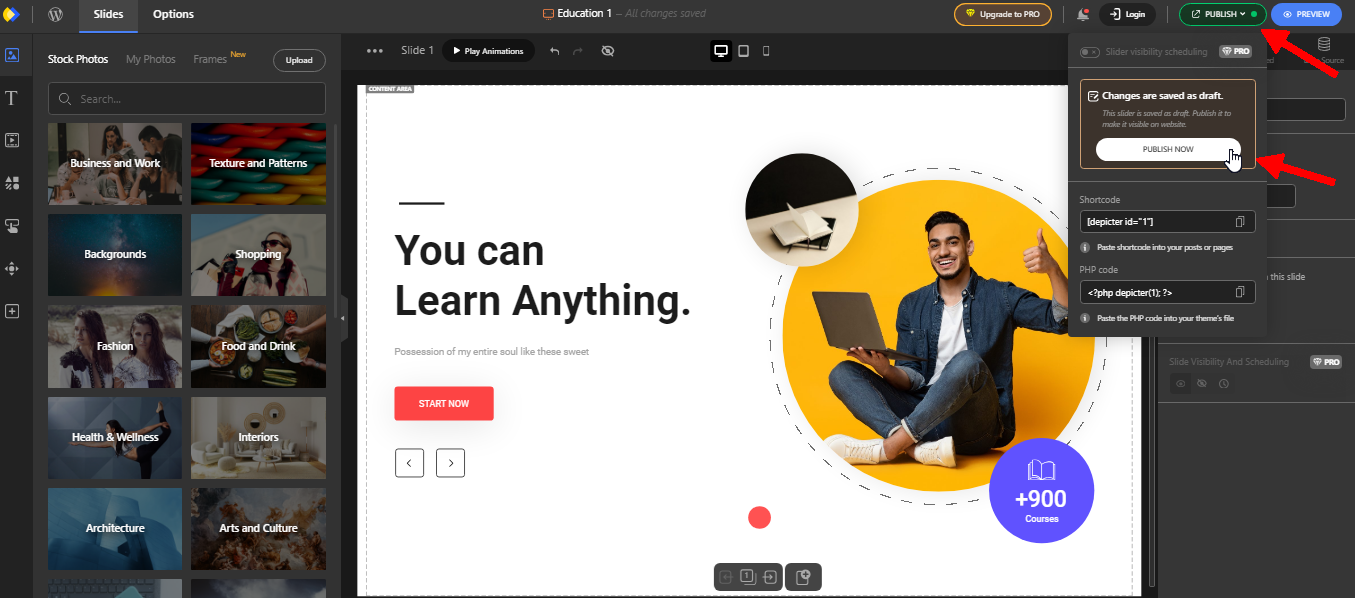
After confirming your popup, click on the ‘Configure’ option in the ‘Publish’ menu to set up the display rules.
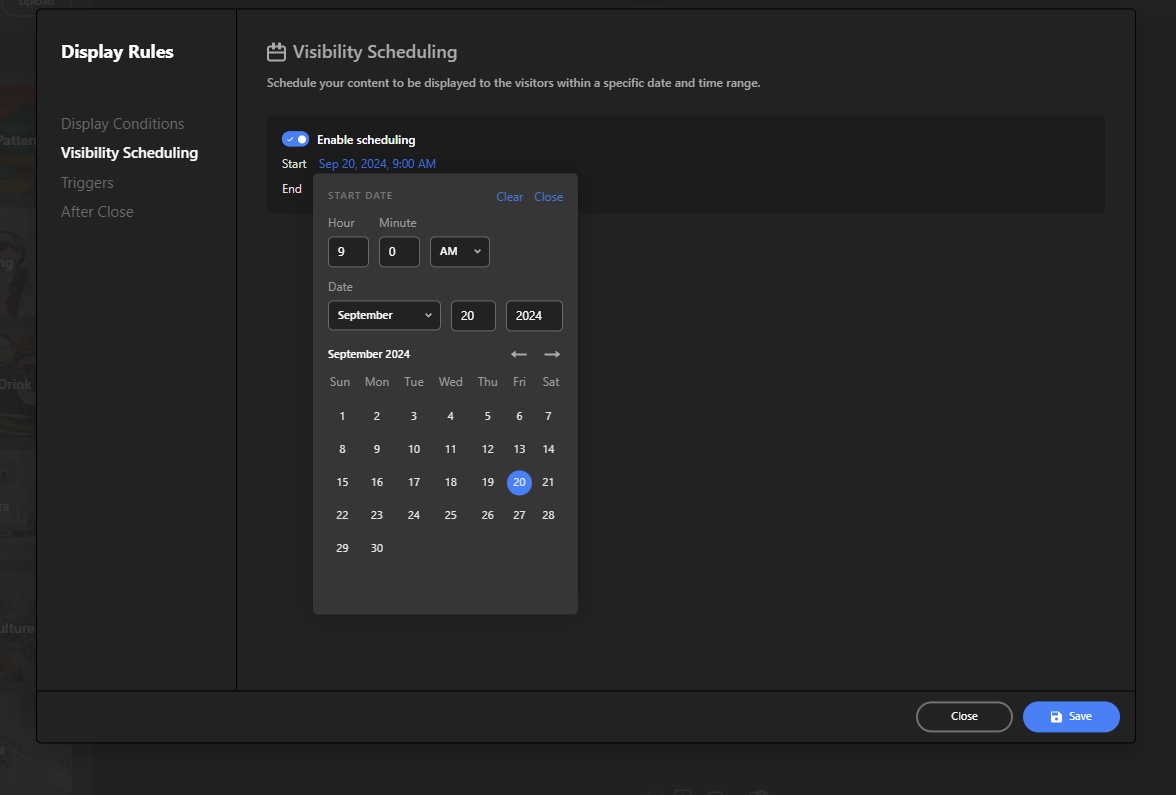
To schedule your popup to appear at specific times, go to the ‘Visibility Scheduling’ menu and check the ‘Enable Scheduling’ box. This will allow you to set a start date and end date for when the popup will be visible to your visitors.
For full control over the popup’s display, you can specify an exact start and end date and time. This allows you to schedule the popup to appear at any moment you choose.
Your popup is now ready to go! Click ‘Save’ to store your changes, and then ‘Publish’ to make it live. The popup will be displayed on your website at the precise start and end times you’ve set.
Conclusion
You’ve gained the knowledge to create and schedule effective popups using Depicter. With the ability to target your audience, and deliver timely messages, scheduled popups can significantly enhance your website’s engagement and conversions.
Remember, the key to successful popup marketing lies in creating relevant and non-intrusive experiences for your visitors. Plan your popup’s content, design, and timing carefully and you will build stronger relationships with your audience and drive meaningful results.
Staying connected with your audience is important, right? One of the most effective ways to ensure timely and direct communication is through SMS.
Whether you want to send order confirmations, notifications, or marketing messages, having the right SMS plugin is crucial.
In this article, we’ll dive into the top 3 WordPress SMS plugins in 2024, helping you choose the best one for your needs.
What to Look for in a WordPress SMS Plugin?
When choosing an SMS plugin for WordPress, it’s essential to consider the features it offers. Look for plugins that provide:
Easy integration with your WordPress site
Automated messaging capabilities
Customizable templates
Scheduling options
Delivery reports and analytics
Top 3 WordPress SMS Plugins in 2024
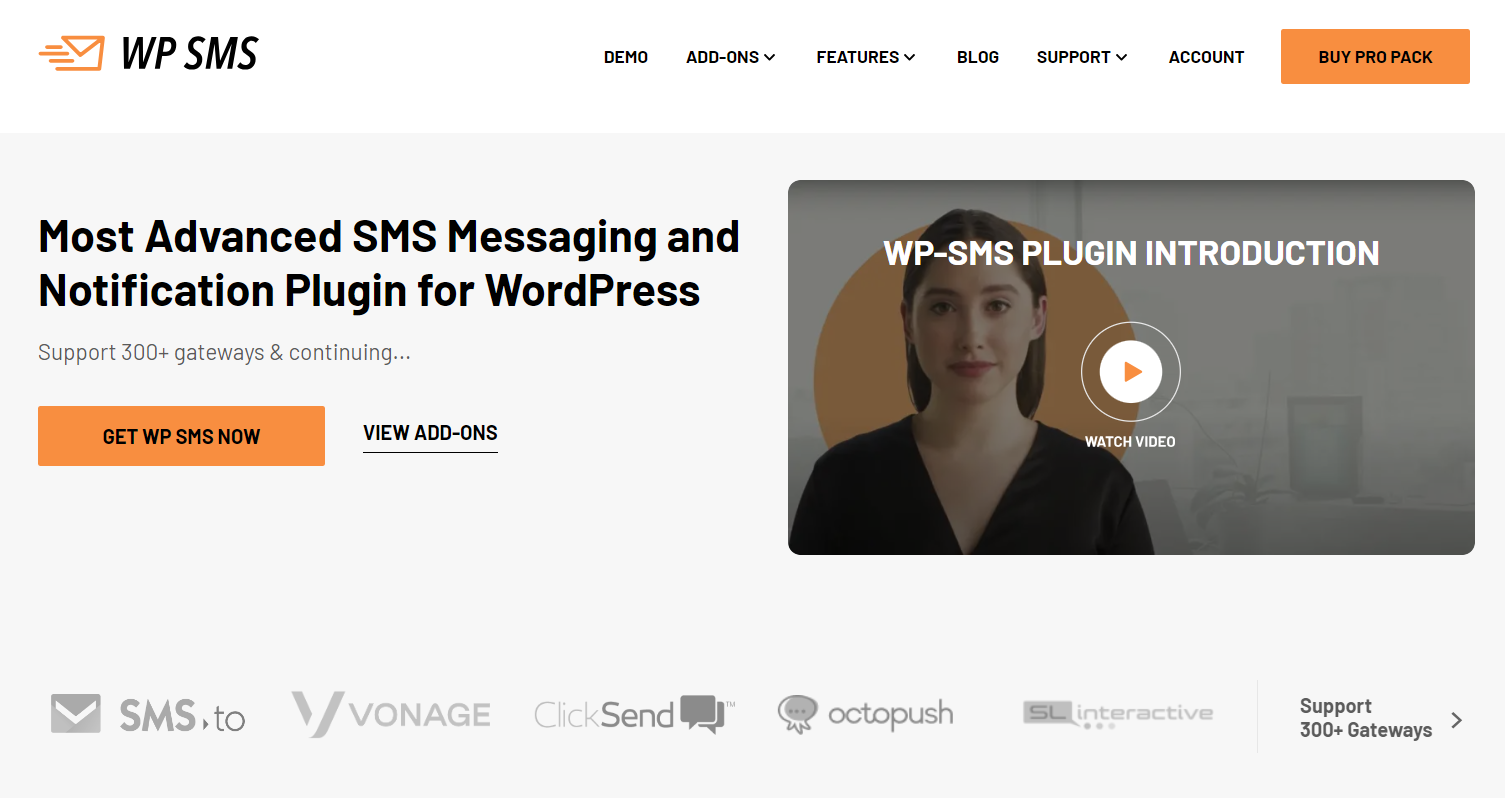
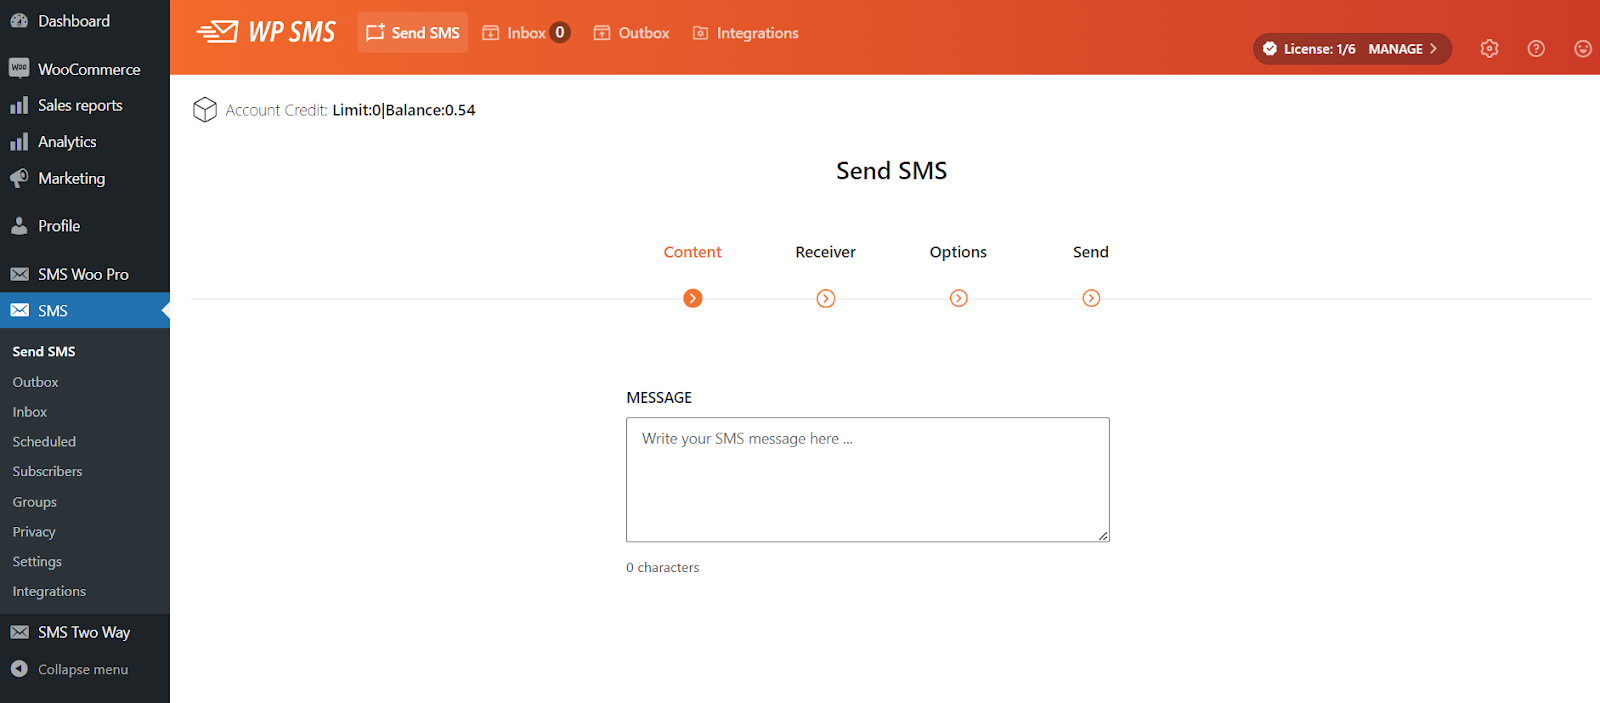
1. WP SMS
WP SMS is a highly popular plugin known for its ease of use and versatility. Through more than 300 SMS gateways including Twilio, Plivo, Clickatell, BulkSMS, and Infobip, you can effortlessly send messages to your users, subscribers, and WooCommerce customers. Whether you need to notify users about new posts, products, or order updates, WP SMS is the solution to your communication needs.
Key Features of WP SMS
Supports over 300 SMS gateways
Complies with GDPR
Easy integration with WooCommerce and Contact Form 7
SMS scheduling and bulk messaging
Delivery reports and analytics
Messaging Button
Pros and Cons of WP SMS
Pros:
Highly customizable
Extensive gateway support
User-friendly interface
Cons:
Some advanced features require a premium subscription.
Pricing Structure of WP SMS
The plugin is free to use with the premium version starting from $39/year.
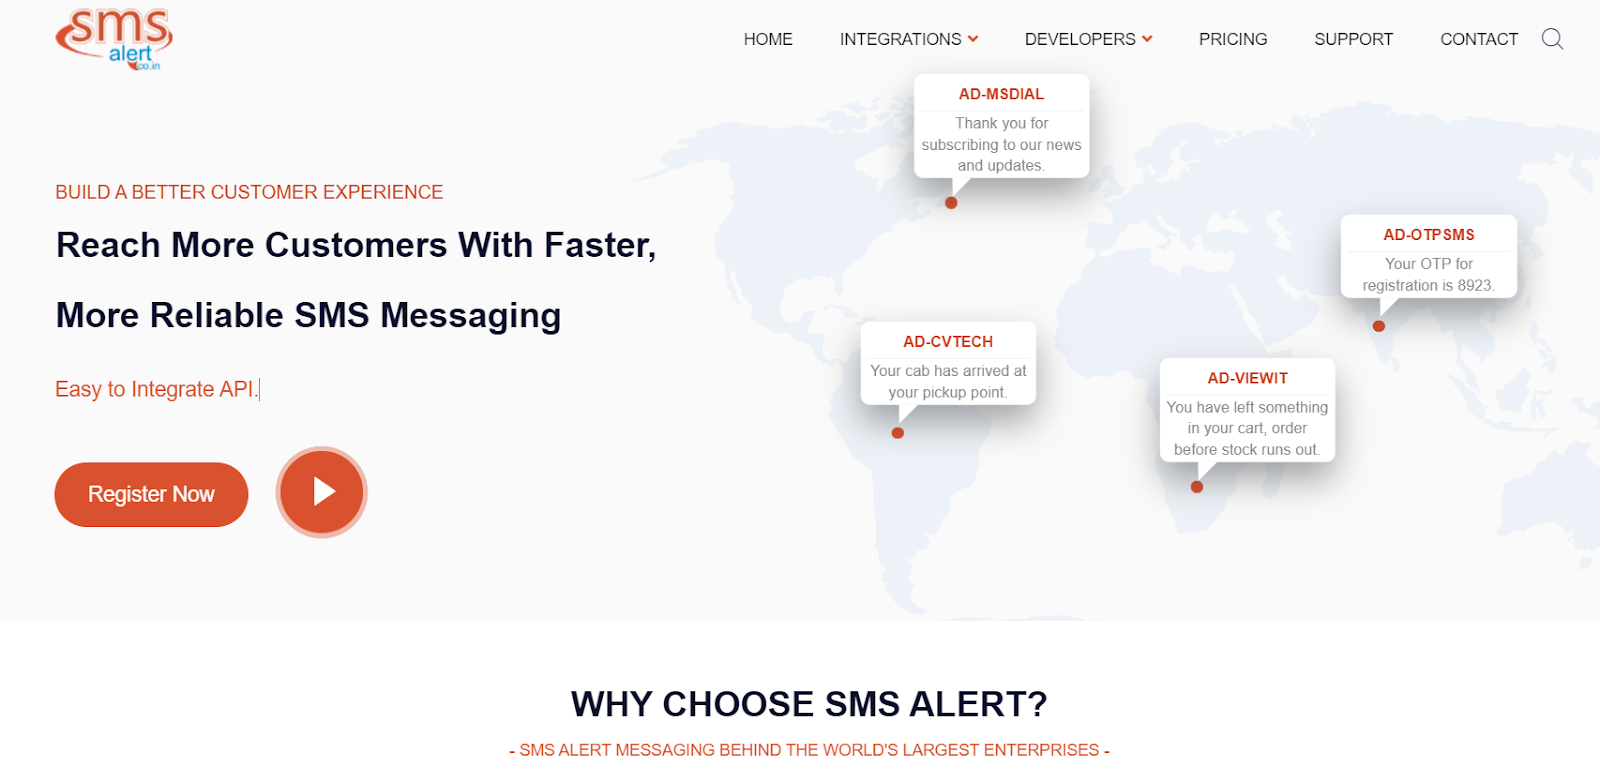
2. SMS Alert
Alt: SMS Alert website
The SMS Alert Plugin for WooCommerce is designed specifically to enhance communication for e-commerce businesses.
By integrating this plugin into your WooCommerce store, you can send instant SMS notifications, ensuring that both customers and administrators stay informed about order statuses, transactions, and more.
Key Features of SMS Alert
Order notifications for customers and admins
OTP verification
Customizable SMS templates
Delivery reports
Bulk SMS Capability
Pros and Cons of SMS Alert
Pros:
Excellent for WooCommerce users
Easy to set up and use
Reliable delivery and reporting
Cons:
Limited to WooCommerce-related features.
Requires a subscription for advanced features.
Pricing Structure of SMS Alert
The plugin is available for free with basic features and offers a premium version with advanced functionalities
3. ClickSend
ClickSend plugin is designed to enhance your communication strategy by integrating SMS, email, and voice messaging capabilities directly into your website.
It could be a good option for businesses seeking an all-in-one solution for sending notifications, marketing messages, and more.
Key Features of ClickSend
SMS, email, and voice messaging
API integration
Detailed analytics and reporting
Scheduling and automation features
Two-Way Messaging
Pros and Cons of ClickSend
Pros:
Multi-channel messaging support
API for custom integrations
Reliable and fast delivery
Cons:
Complex setup
Higher cost for multi-channel messaging
Pricing Structure of ClickSend
The ClickSend SMS plugin operates on a pay-as-you-go pricing model.
How to Install and Set Up a WordPress SMS Plugin?
Choose Your Plugin
Select the SMS plugin that best fits your needs.
Install the Plugin
Navigate to your WordPress dashboard, go to Plugins > Add New, and search for your chosen plugin. Click “Install Now” and then “Activate”.
Configure Settings
Follow the plugin’s setup wizard to configure settings such as API keys, gateway integration, and messaging templates.
Test the Plugin
Send a test SMS to ensure everything is working correctly.
Go Live
Once configured and tested, start using the plugin for your SMS needs.
What Are the Benefits of Using SMS Plugins for WordPress?
Enhanced Communication
SMS provides a direct and immediate way to reach your audience, ensuring important messages are seen quickly.
Increased Engagement
Personalized SMS messages can significantly increase customer engagement and response rates compared to emails.
Improved Customer Support
Use SMS for order updates, appointment reminders, and customer support notifications to enhance the overall customer experience.
Best Practices for Using SMS Plugins on WordPress
Compliance with Regulations
Ensure your SMS campaigns comply with local regulations, such as obtaining consent from recipients and providing opt-out options.
Crafting Effective SMS Messages
Keep messages concise and to the point. Personalize where possible and include a clear call-to-action.
Monitoring and Analytics
Regularly review delivery reports and analytics to gauge the effectiveness of your SMS campaigns and make necessary adjustments.
Conclusion
Whether you need simple notification services or a comprehensive marketing tool, there’s a plugin to fit your needs. WP SMS, SMS Alert, and ClickSend each offer unique features and benefits.
Evaluate your requirements, compare the options, and select the best plugin to achieve your communication goals in 2024.
FAQs
What is a WordPress SMS plugin?
A WordPress SMS plugin integrates SMS messaging capabilities into your WordPress site, allowing you to send notifications, alerts, and marketing messages directly to users’ mobile phones.
Are SMS plugins secure?
Yes, most SMS plugins implement security measures to protect your data and ensure secure messaging. Always choose plugins from trusted developers and regularly update them.
Can I use multiple SMS plugins on my website?
While it is possible, using multiple SMS plugins can complicate your setup and lead to conflicts. It’s generally best to choose one comprehensive plugin that meets all your needs.
How do I choose the right SMS plugin for my needs?
Consider your specific requirements, such as the type of messages you want to send, integration needs, budget, and user reviews. Compare features and pricing plans before making a decision.
Do SMS plugins support international messaging?
Many SMS plugins support international messaging through various gateways. Check the plugin’s documentation to ensure it supports the regions you need to reach.
If you have an online shop it’s essential to know how to increase your sales by reducing cart abandonment Abandoned cart recovery is a powerful strategy for boosting sales and revenue. The average cart abandonment rate is around 69.57%, meaning nearly seven out of ten customers leave their carts without completing the purchase. This represents a significant opportunity for businesses to reclaim lost sales. By implementing effective abandoned cart recovery strategies, you can re-engage customers, provide additional information or incentives, and ultimately convert abandoned carts into completed orders. This process offers benefits beyond recouping lost sales. By analyzing abandoned cart data, valuable insights into customer behavior, preferences, and purchasing challenges can be uncovered. This information can be used to optimize product offerings, improve the checkout process, and enhance overall customer experience. Furthermore, abandoned cart recovery strategies can foster customer loyalty by showcasing your dedication to exceptional service and meeting customer needs.
Reasons for Shopping Cart Abandonment
Cart abandonment is a significant challenge for online retailers, with a substantial portion of shopping carts left unfinished. Understanding the reasons behind this behavior is crucial for optimizing the checkout process and increasing conversions. Several factors contribute to cart abandonment, impacting businesses across various industries. By identifying and addressing these issues, retailers can improve customer satisfaction and drive sales.
Surprise shipping costs. If you tack on a shipping cost at the end of the checkout process, expect a higher cart abandonment rate. Generally, customers like transparency, so it’s important that you provide an accurate figure. If an unexpected charge is added at the end, it’s definitely going to affect your cart abandonment rate.
Price comparisons. This one’s fairly obvious: if a customer finds the same product being sold at a cheaper price elsewhere, they’ll probably abandon their carts and buy from another place.
Change of mind. A customer may have a mood shift midway through their purchase. If they decide against buying, they will simply abandon their carts and close the website.
Lack of payment options. Another reason why customers may abandon their carts is if you fail to provide them with a suitable payment option. Payment options should be shown prominently on your website instead of on the last checkout screen.
Overly complicated checkout. This one’s equally important. You have to ensure that the checkout page is not overly complicated, otherwise you risk disillusioning customers.
How to Reduce Abandoned Cart Sales
To reduce abandoned cart sales, focus on understanding and addressing the root causes of this issue. Here are key strategies:
Optimize the Checkout Process
Simplify the checkout: Reduce the number of steps and fields required to complete a purchase.
Offer multiple payment options: Provide various payment methods to accommodate customer preferences.
Display total costs upfront: Clearly communicate all costs, including shipping and taxes, before checkout.
Ensure website speed and reliability: A slow or error-prone website can frustrate customers and lead to abandonment.
Build Trust and Confidence
Display trust badges and security seals: Assure customers that their information is safe.
Offer clear return and refund policies: Build customer confidence by outlining your policies clearly.
Provide Excellent Customer Experience
Offer outstanding customer support: Be available to assist customers with any questions or concerns.
Personalize the shopping experience: Tailor recommendations and offers to individual customers.
Implement effective abandoned cart recovery strategies: Re-engage customers with targeted emails or messages.
Understand and Address Customer Concerns
Analyze abandoned cart data: Identify common reasons for abandonment, such as unexpected costs or product availability issues.
Offer incentives: Provide discounts, free shipping, or other incentives to encourage completion of the purchase.
Address price concerns: Highlight product value or offer competitive pricing to overcome price objections.
Utilize Exit-Intent Popups
Exit-intent popups are a powerful tool for recovering potential customers on the brink of leaving your website. When visitors indicate an intent to leave, strategically timed popups can effectively capture their attention and provide a compelling reason to stay.
Key benefits of using exit-intent popups:
Recover abandoned carts: Remind customers about items left in their cart with a personalized offer or discount.
Capture email addresses: Offer valuable content or exclusive deals in exchange for email sign-ups.
Conduct exit surveys: Gather valuable feedback from departing visitors to improve your website and products.
Promote specific offers: Highlight limited-time promotions or new products to entice customers to stay.
Best practices for effective exit-intent popups:
Timing is crucial: Ensure popups appear only when a visitor is about to leave, avoiding interruptions.
Offer value: Provide incentives or information that genuinely benefits the visitor.
Keep it simple: Use clear and concise messaging to avoid overwhelming the user.
Test and optimize: Experiment with different popup designs, offers, and triggers to find what works best.
How to add Exit-Intent Popups to your online shop to Reduce Cart Abandonment with Depicter
Installing Depicter
To learn how to install Depicter, check out this video:
The following video helps you get started with the Depicter Popup Builder. It gives a good overview of how it works. While there’s a lot more to learn about the builder, this video will give you a solid foundation:
Importing a template
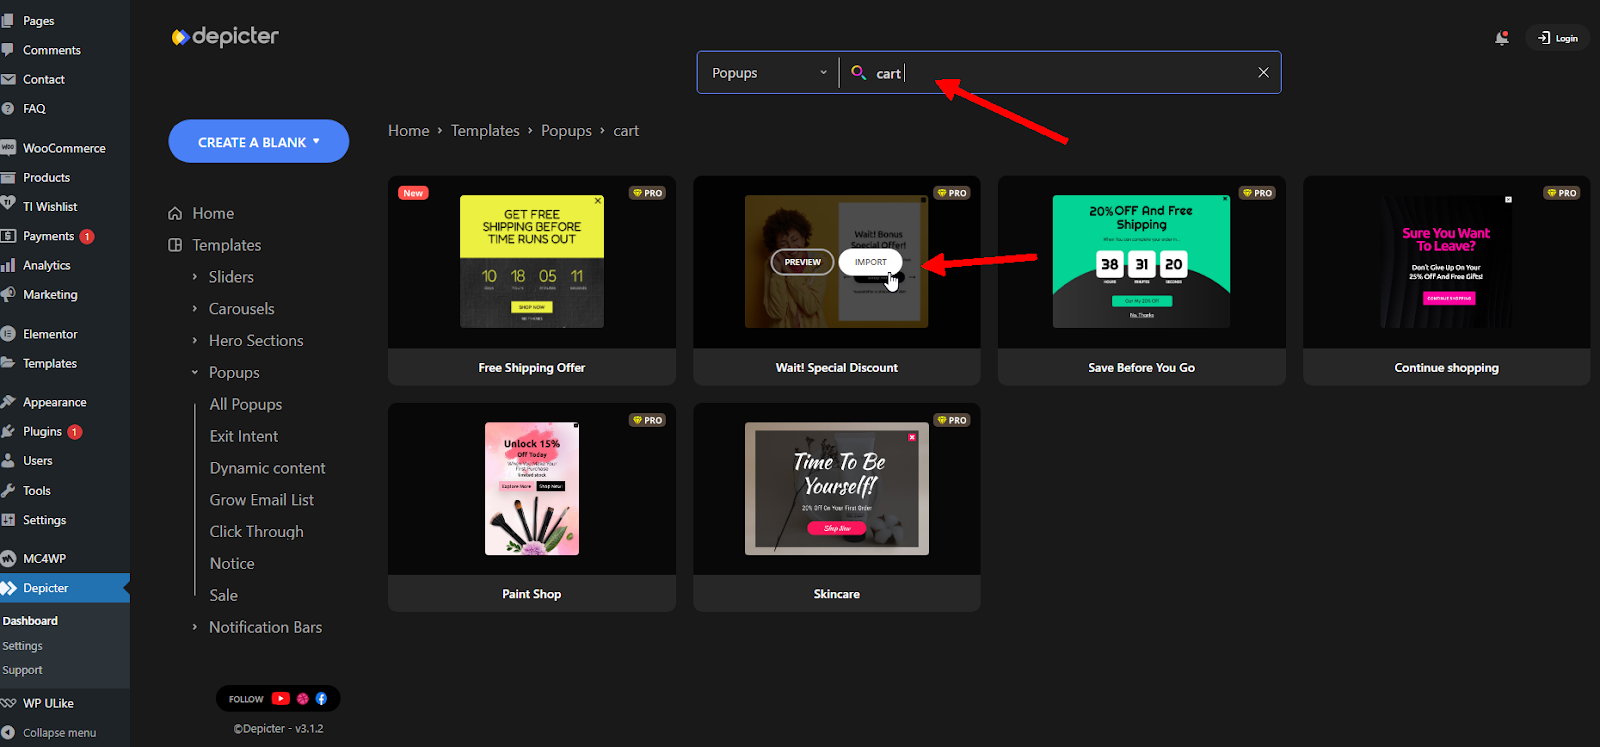
Depicter offers a comprehensive library of pre-configured popup templates that are pre-designed and optimized for your online shop. These templates provide a solid foundation for rapid development, eliminating the need to build popups from scratch. To access these templates, navigate to the dedicated popup section within the dashboard.
For instance, by searching for the term ‘Cart’, we can specifically list pre-designed templates tailored for exit-intent popups. From there, we can select a template and import it with a single click.
The next step is to configure the Display Rules and Trigger settings. For Display Rules, we simply need to specify that our popup should only be shown on either the Cart page or the Checkout page.
Next, we activate the ‘Exit Intent’ trigger from the Triggers menu. This means that with the settings we’ve configured, our popup will appear on either the Cart or Checkout page as soon as the user attempts to leave the page. Our goal is to recapture the user’s attention by displaying a special offer, such as a discount before they abandon their purchase. By using Depicter and following these steps, we can easily achieve that.
Here is the final result:
Conclusion
By understanding the reasons behind cart abandonment and implementing effective recovery strategies, online retailers can significantly boost sales and improve customer satisfaction. Recovering abandoned carts is not only about reclaiming lost revenue but also about gaining valuable insights into customer behavior and preferences. Depicter Popup Buidler is the ultimate option for streamlining the process of creating and managing effective popups, helping you recover more abandoned carts and increase overall sales.
FAQs
Why is cart abandonment a problem?
Cart abandonment represents lost sales and revenue for online businesses.
How can I reduce cart abandonment?
By implementing a combination of strategies, such as optimizing the checkout process, building trust, and using exit-intent popups, you can effectively reduce cart abandonment.
What is an exit-intent popup?
An exit-intent popup is a message that appears when a visitor is about to leave a website.
How can I use exit-intent popups to recover abandoned carts?
Offer incentives or reminders about abandoned items through exit-intent popups to encourage customers to complete their purchases.
Scroll popups, or display popups after page scroll, offer a strategic approach to engaging website visitors at the optimal moment. By strategically timing the appearance of a popup scroll as a user navigates through your content, you can deliver highly targeted messages and calls to action that resonate with their interests. This technique not only enhances user experience but also drives conversions, email sign-ups, and overall website engagement. When implemented effectively, scroll popups can significantly boost lead generation and increase customer satisfaction.
What is a Scroll Popup?
Unlike traditional popups that appear immediately upon a website visitor’s arrival, scroll popups are designed to display at a specific point during the scrolling journey. Often called scroll advertising, this targeted approach ensures your message reaches visitors who are already engaged with your content, increasing its relevance and effectiveness.
Here’s how it works: Imagine a website visitor is reading a blog post about healthy recipes. As they scroll down and reach the section with dessert options, a popup offering a free e-book on healthy desserts appears. This targeted message is more likely to capture the visitor’s attention and encourage them to sign up compared to a generic popup that showed up upon arrival.
Benefits of using Scroll Popups
Scroll popups offer several advantages over traditional popups that appear immediately upon a website visit. They are less disruptive and respect the user’s experience. By appearing after a user has engaged with content, scroll popups are perceived as less interruptive, increasing their acceptance rate.
Scroll popups allow for highly targeted messaging. A scroll trigger mechanism based on your strategy makes it possible to control when the popup appears based on the user’s scrolling behavior, you can deliver offers and content that directly relate to what the user is interested in. Imagine an online clothing store. As a visitor scrolls past a section showcasing summer dresses, a scroll popup might appear offering a 15% discount on sundresses. This timely offer capitalizes on the user’s interest in the product category and increases the likelihood of a purchase.
On a blog about healthy living, a scroll popup could be triggered after a reader finishes an article about the benefits of meditation. The popup could then offer a free meditation guide or invite the reader to subscribe to a wellness newsletter, providing additional value and encouraging engagement.
This relevancy significantly boosts conversion rates, a critical factor for the success of any online shop or service.
Finally, scroll popups can improve lead generation efforts. By capturing user interest at a specific point in their website journey, you increase the likelihood of them converting into a lead or customer.
Key differences between scroll popups and normal popups:
Timing: Scroll popups appear at a specific point in the user’s scrolling journey, while normal popups appear immediately upon arrival.
Disruption: Scroll popups are generally perceived as less disruptive to the user experience.
Conversion rates: Scroll popups often have higher conversion rates due to their relevance and timing.
How to Create a Scroll Popup with Depicter Popup Builder?
We’ve included a video to help you get started with the Depicter Popup Builder. It gives a good overview of how it works. While there’s a lot more to learn about the builder, this video will give you a solid foundation:
Design a WordPress Popup From Scratch with Depicter
Installing Depicter
To learn how to install Depicter, check out this handy video:
This video will guide you through the installation process step by step. It’s a great way to get started with Depicter and start creating your own popups:
How to Install Depicter Slider on WordPress
Exploring Trigger Options for Depicter
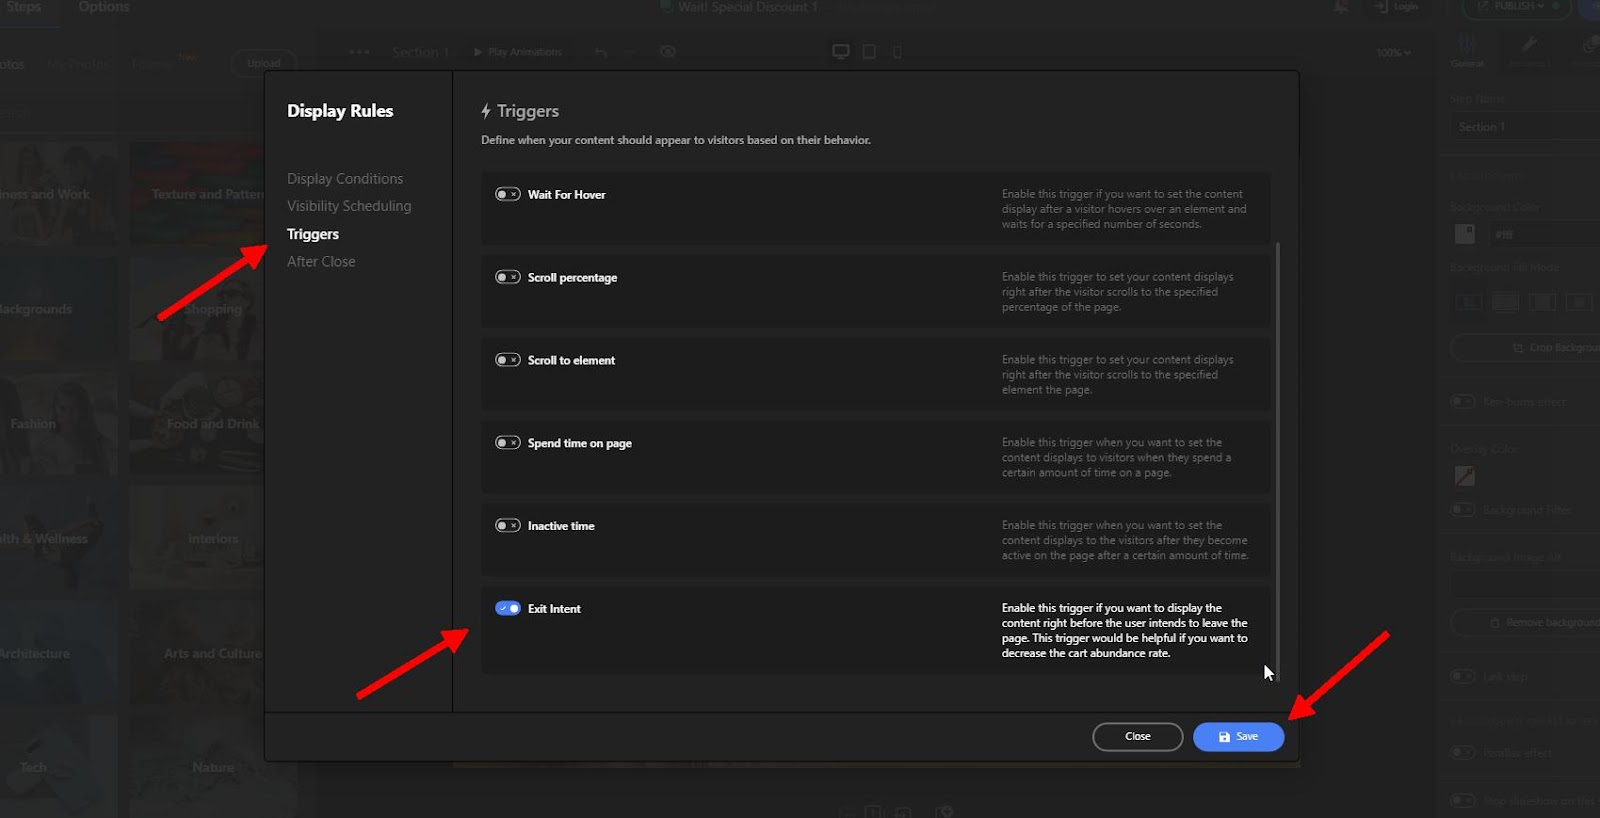
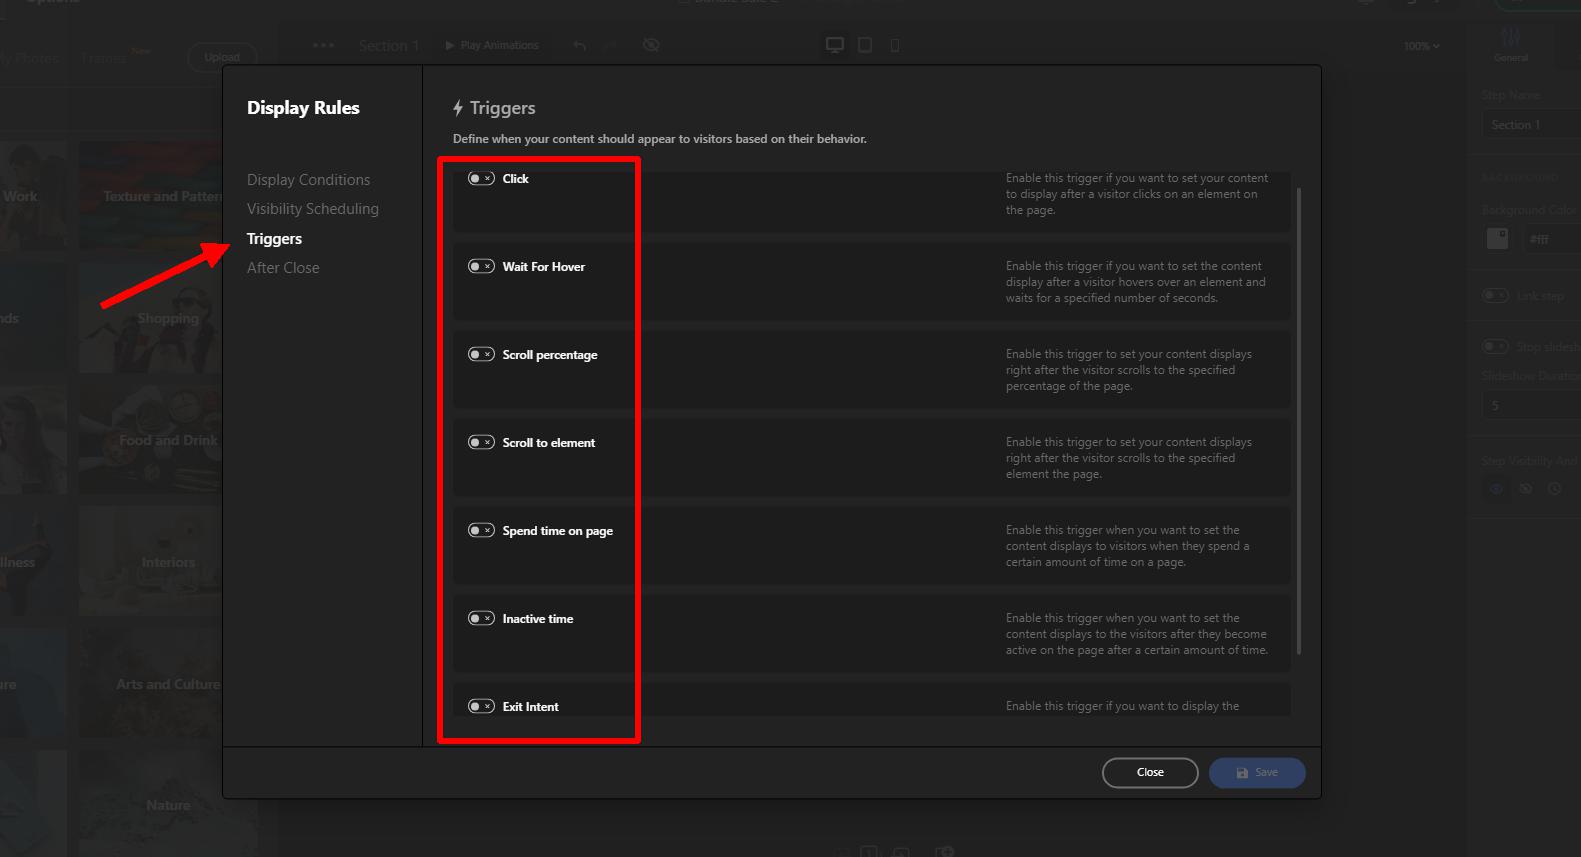
Out of the seven options available for triggering Depicter popups, five can be utilized to activate scroll popups. In this section, we will delve into the first option in detail and provide a general overview of the remaining four. A comprehensive explanation of each option would need a separate, in-depth article.
To access the Display Rules section for configuring popup visibility settings:
Click the “Publish” button.
Click the “Configure” button associated with the popup you want to modify.
From the dropdown menu, select the “Triggers” section.
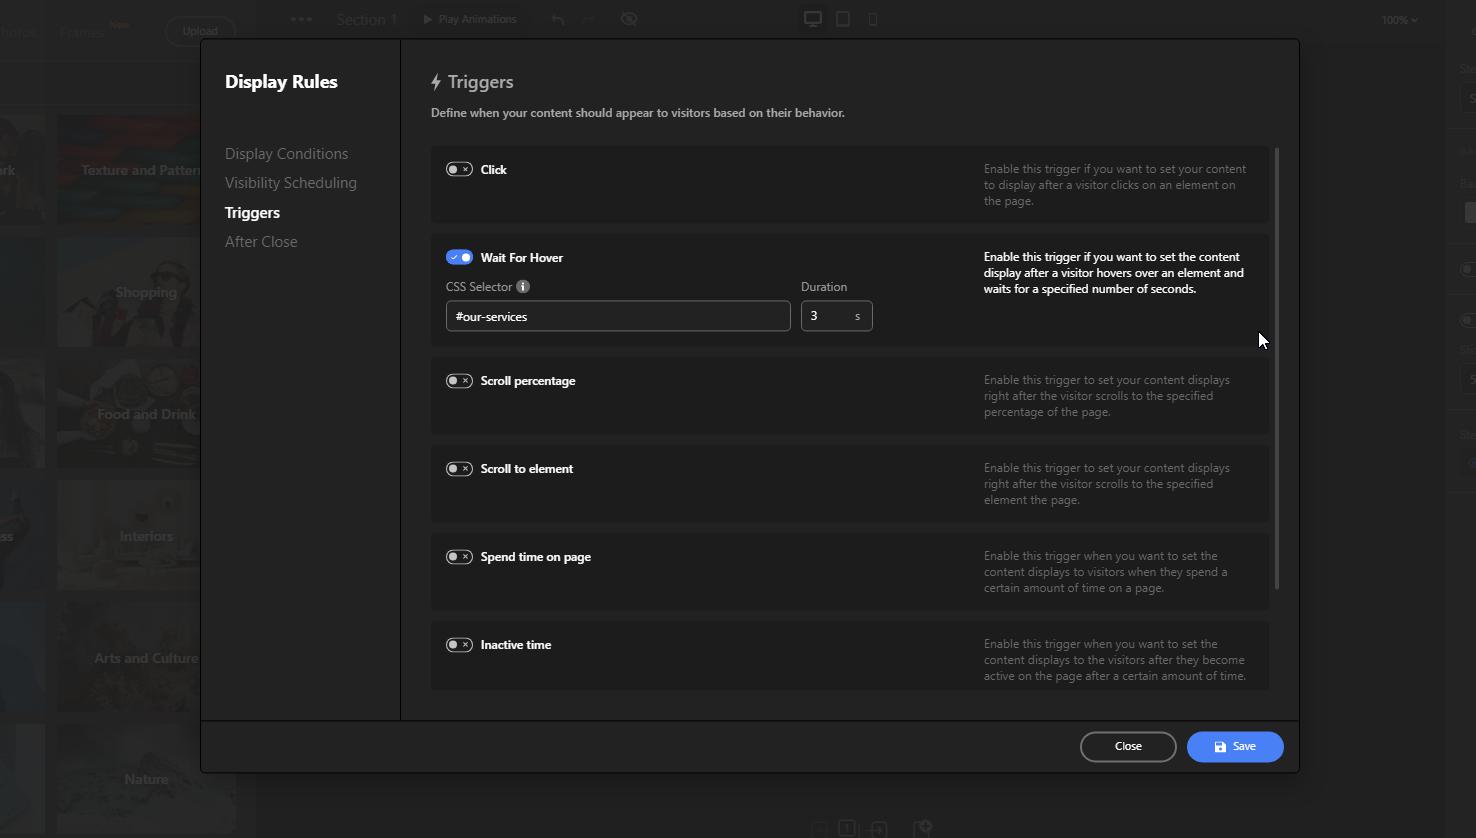
Wait for Hover
Enable this trigger if you want to set the content display after a visitor hovers over an element and waits for a specified number of seconds.
To display a popup on scroll page as soon as a user hovers over a specific section on your website:
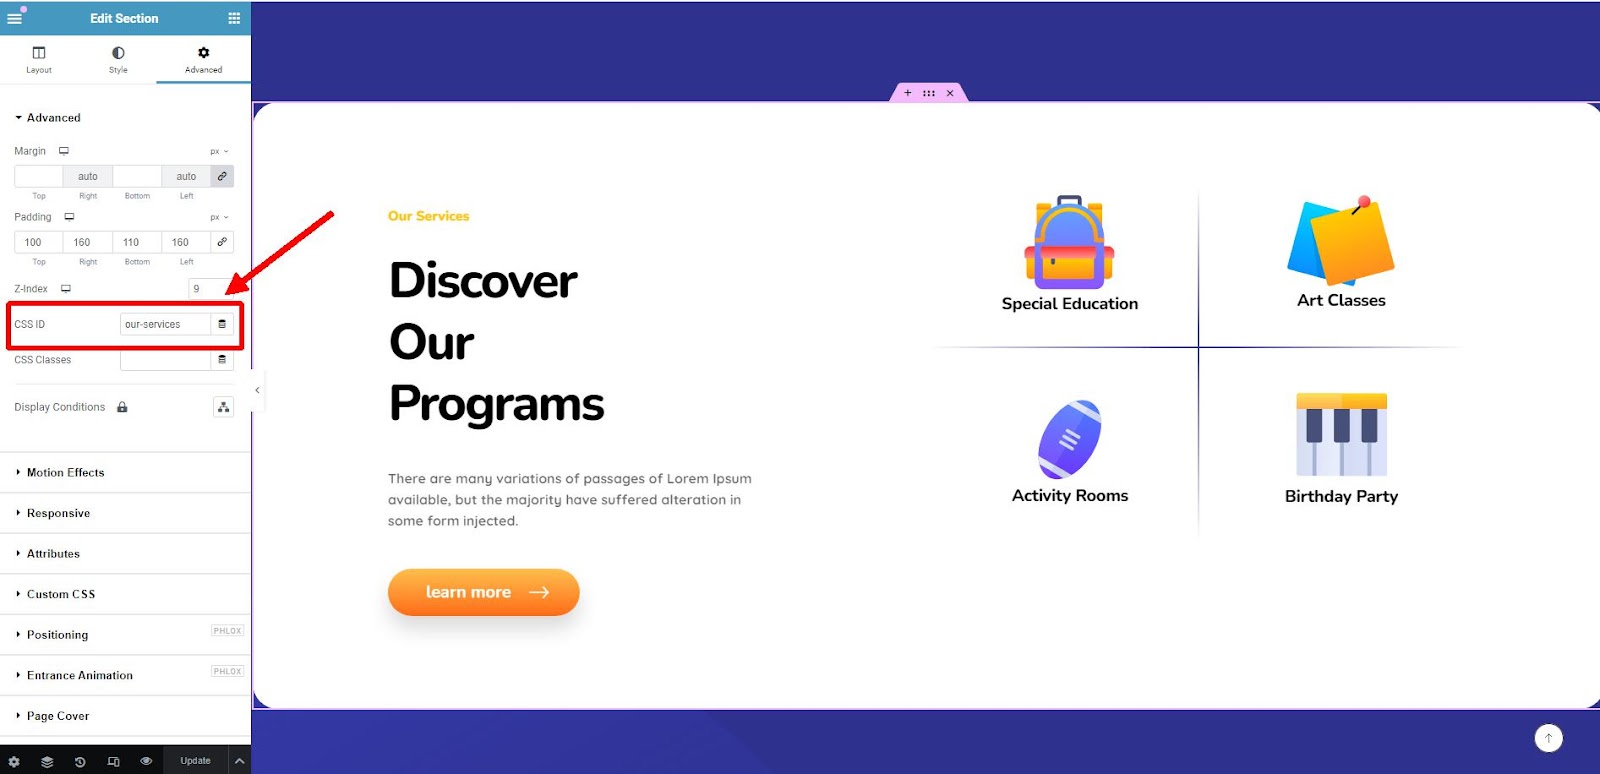
Assign a unique CSS selector to the section:
In your Elementor Page Builder, while editing the page, select the relevant section.
From the available options, assign a unique ID to the section.
By assigning a unique ID to the section and using it as the CSS selector in Depicter, you instruct Depicter to display the popup when the user hovers over that specific section. This ensures that the popup appears only when the user interacts with the intended area of the webpage.
Set the CSS Selector trigger in Depicter:
In the Depicter triggers section, locate the “CSS Selector” field.
Enter the ID you assigned to the section in the previous step.
Save the settings.:
By assigning a unique ID to the section and using it as the CSS selector in Depicter, you instruct Depicter to display the popup when the user hovers over that specific section. This ensures that the popup appears only when the user interacts with the intended area of the webpage.
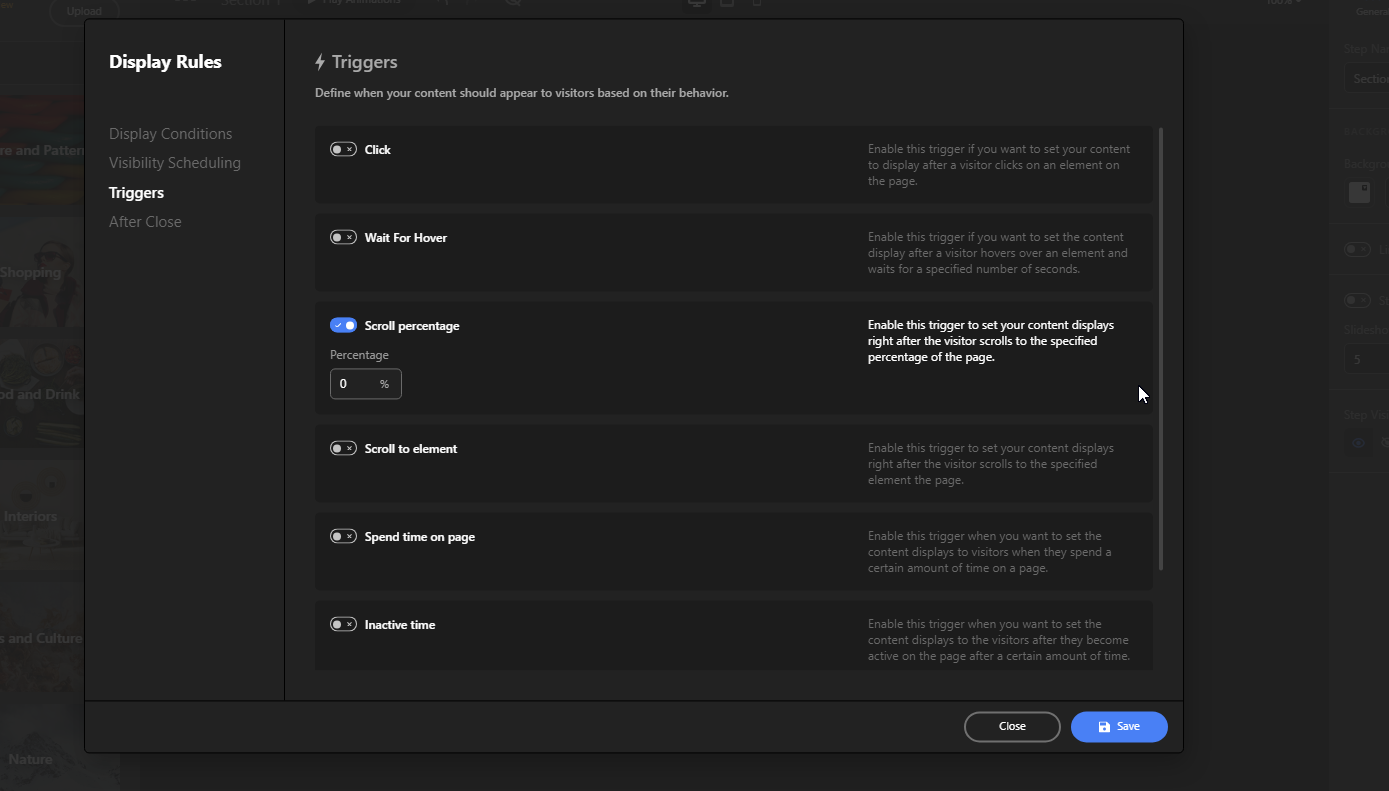
Scroll percentage
Enable this trigger to set your content displays right after the visitor scrolls to the specified percentage of the page.
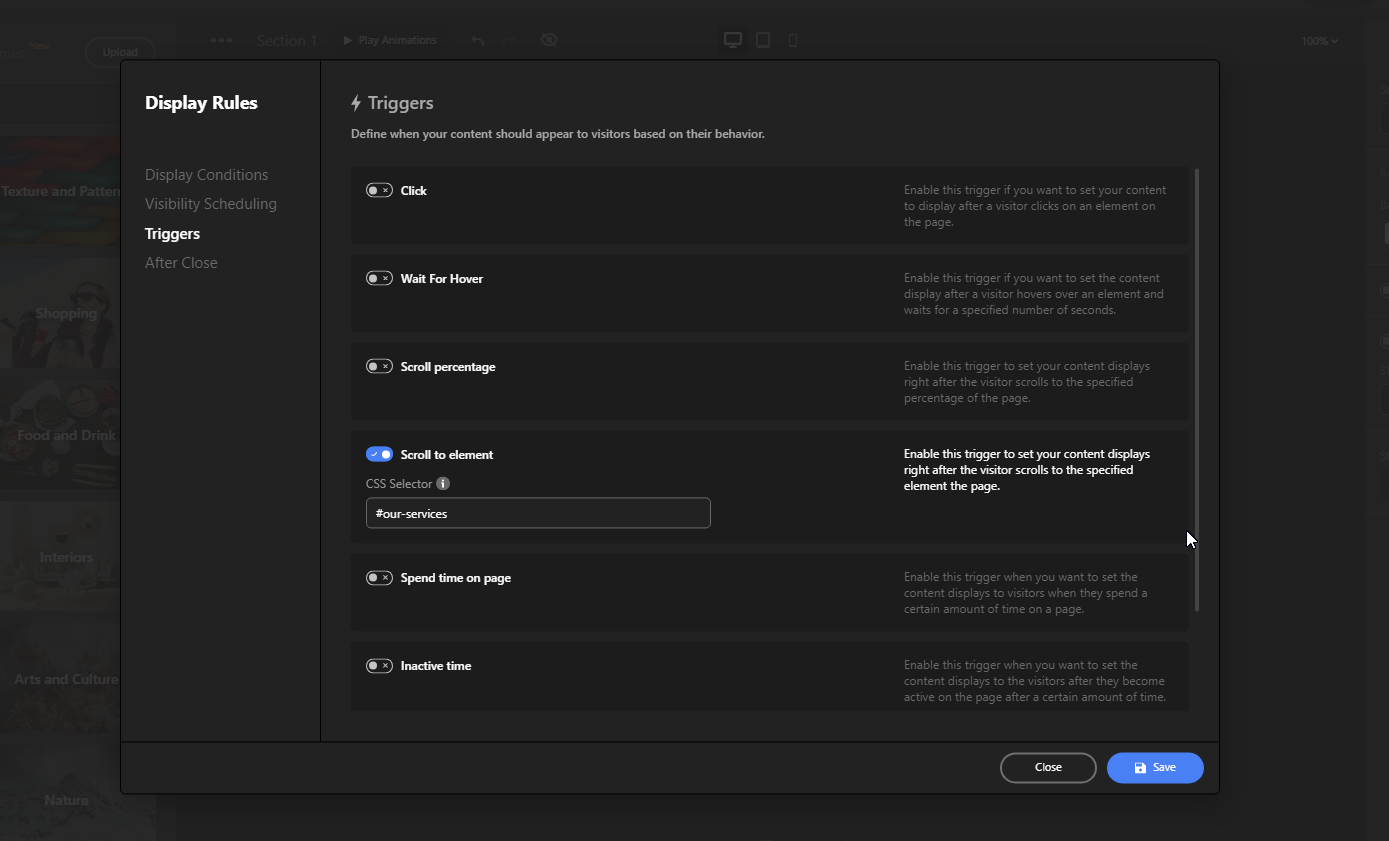
Scroll to element
Enable this trigger to set your content displays right after the visitor scrolls to the specified element the page.
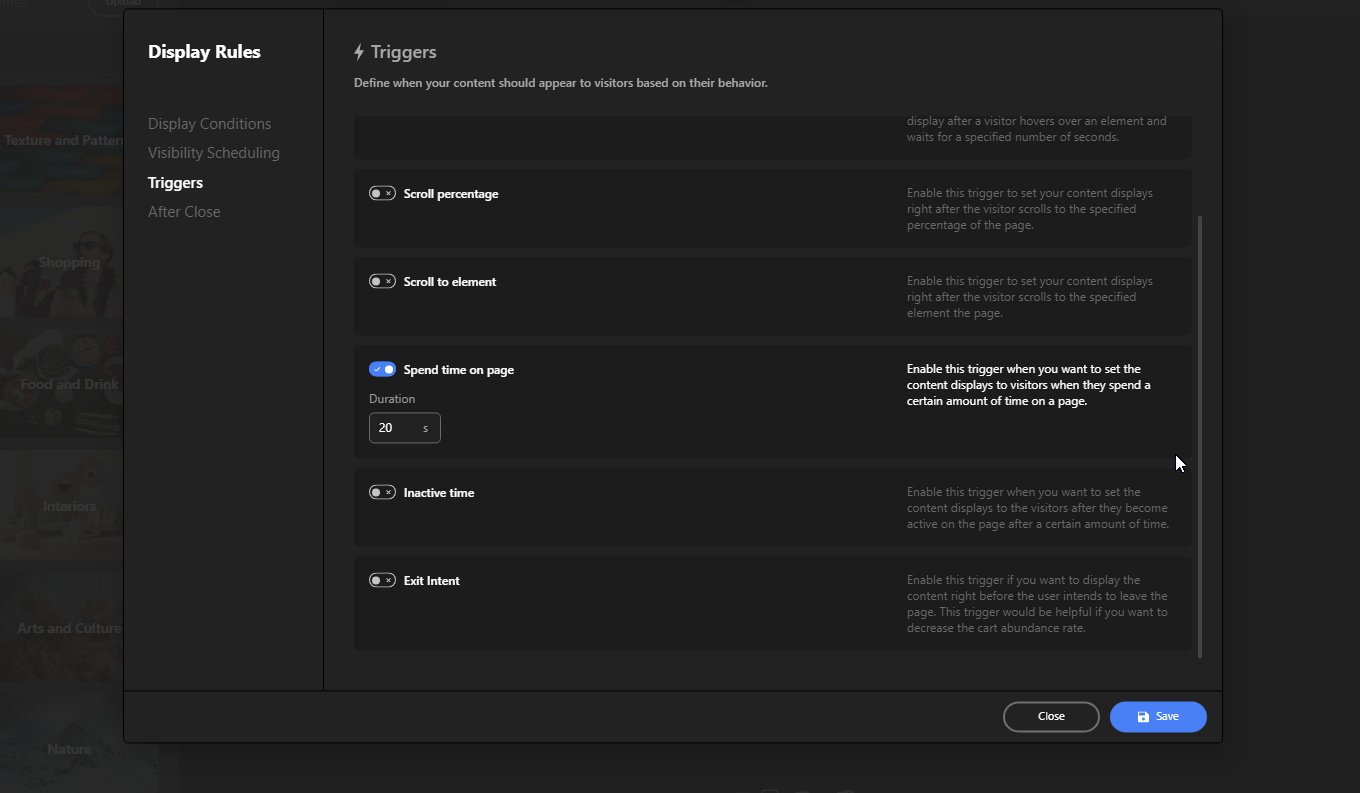
Spend time on page
Enable this trigger when you want to set the content displays to visitors when they spend a certain amount of time on a page.
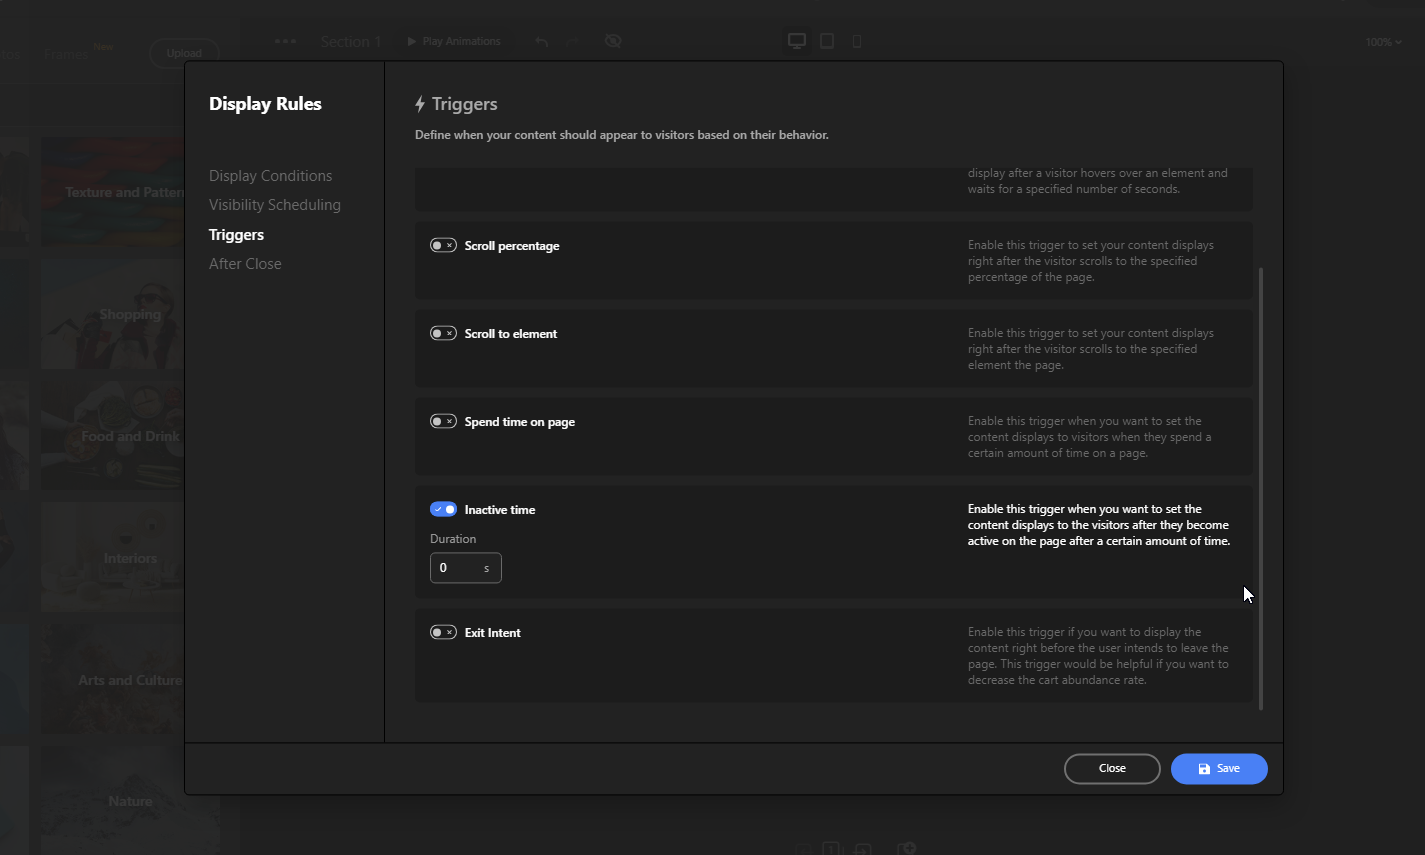
Inactive time
Enable this trigger when you want to set the content displays to the visitors after they become active on the page after a certain amount of time.
Conclusion
Scroll popups represent a powerful tool for enhancing website engagement and driving conversions. By strategically timing of your message for the popup scroll with page, you can deliver a more relevant and impactful user experience. Scroll popups can dramatically boost your bottom line by capturing more leads, expanding your email list, and driving overall business growth when implemented effectively.
While there are various types of scroll popups possible with the Depicter Popup Builder, understanding the core benefits and implementation strategies is crucial for maximizing their potential. Experiment with different triggers, design elements, and call-to-actions to find the optimal approach for your audience.
FAQs
What is the difference between a scroll popup and a regular popup?
Scroll popups appear after a visitor has scrolled down a specific portion of a webpage, while regular popups appear immediately upon arrival. Scroll popups are generally less intrusive and have higher conversion rates due to their targeted nature.
How do I know where to place my scroll popup?
The ideal placement of a scroll popup depends on your website’s content and goals. Consider where your target audience is most likely to be engaged and receptive to your message. Experiment with different scroll percentages or specific elements to find the optimal position.
Can I use scroll popups on mobile devices?
Yes, scroll popups are responsive and can be effectively used on mobile devices. However, it’s essential to consider the smaller screen size and adjust the popup design accordingly.
What are some best practices for creating effective scroll popups?
Keep the popup design simple and focused.
Use clear and compelling call-to-actions.
Offer valuable content or incentives to encourage conversions.
Test different popup positions and triggers to optimize performance.
Ensure the popup is mobile-friendly.
Can I use multiple scroll popups on a single page?
Yes, you can use multiple scroll popups on a page, but it’s essential to avoid overwhelming users. Consider the timing and relevance of each popup to ensure a positive user experience.
Are you looking to enhance your WooCommerce store with useful plugins? Look no further! In this guide, we will explore a variety of WooCommerce plugins that you may need to take your online store to the next level. Whether you are seeking to streamline your inventory management, improve customer experience, or optimize your marketing efforts, the right combination of WooCommerce plugins can make a world of difference.
Let’s start with an evolutionary WordPress slider plugin designed to enhance the visual appeal and performance of your online store. Depicter offers a comprehensive suite of features, including dynamic product sliders, engaging popups, and informative notification bars, seamlessly integrated with WordPress and WooCommerce. With over 600 ready-to-use templates and a user-friendly interface, Depicter empowers anyone to create stunning visual elements without the need for coding expertise. Now, let’s take a look at some of Depicter’s top features.
Top Features:
Dynamic Shop Slider: Showcase products from your online store in an interactive and visually appealing slider format.
Popup and Notification Bar Builder: Create engaging popups and notification bars to boost conversion and lead generation.
Interactive Visual Elements: Craft various modern visual elements such as hero sections, testimonials, carousels, and call-to-action capabilities to elevate user experience.
Performance and SEO-Optimized: Ensure the best visual experience for users with maximum speed and minimal impact on website performance while adhering to SEO best practices.
High Compatibility with WordPress: Seamlessly integrate Depicter with popular plugins such as WooCommerce, Elementor, and Divi Builder for enhanced functionality.
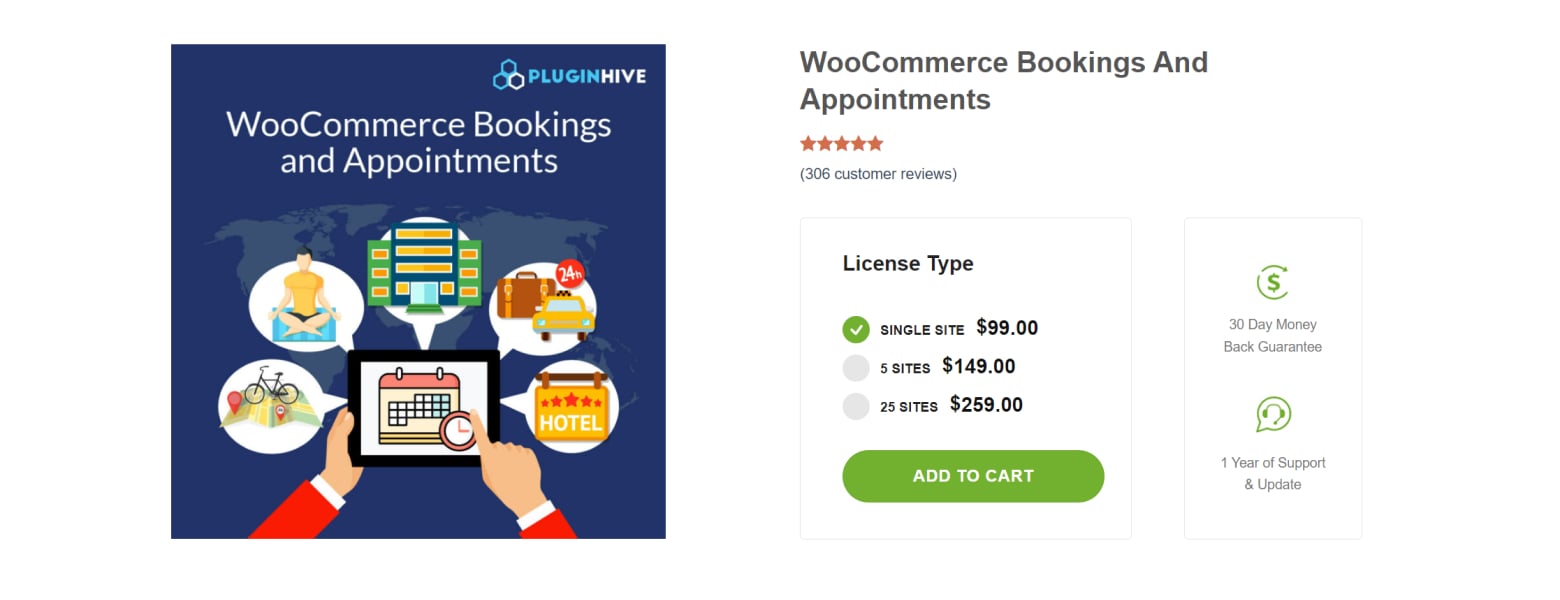
WooCommerce Bookings and Appointments is the ultimate solution for businesses looking to streamline their booking processes. This powerful plugin allows you to convert your time, products, or services into easily bookable resources, empowering service providers and businesses of all types with a simple and efficient booking system. Whether you need to offer single-day bookings, flexible bookings with start and end dates, or recurring bookings, this plugin covers you. With a wide range of features including email notifications, 2-way Google Calendar sync, and the ability to set up buffer times between bookings, WooCommerce Bookings and Appointments provides everything you need to manage your bookings with ease.
Top Features:
Single-day, multiple days, and flexible booking options
Recurring bookings and multiple non-adjacent bookings
Customizable pricing rules based on factors such as number of days, number of people, and specific dates
Flexible staff management with individual cost calculation rules
Email notifications and reminders for booking confirmations and cancellations
2-way Google Calendar sync for seamless integration
Partial payment and deposit acceptance for bookings
Complete control over bookings with customizable restrictions and time limits
Global asset creation and synchronization for bookable products
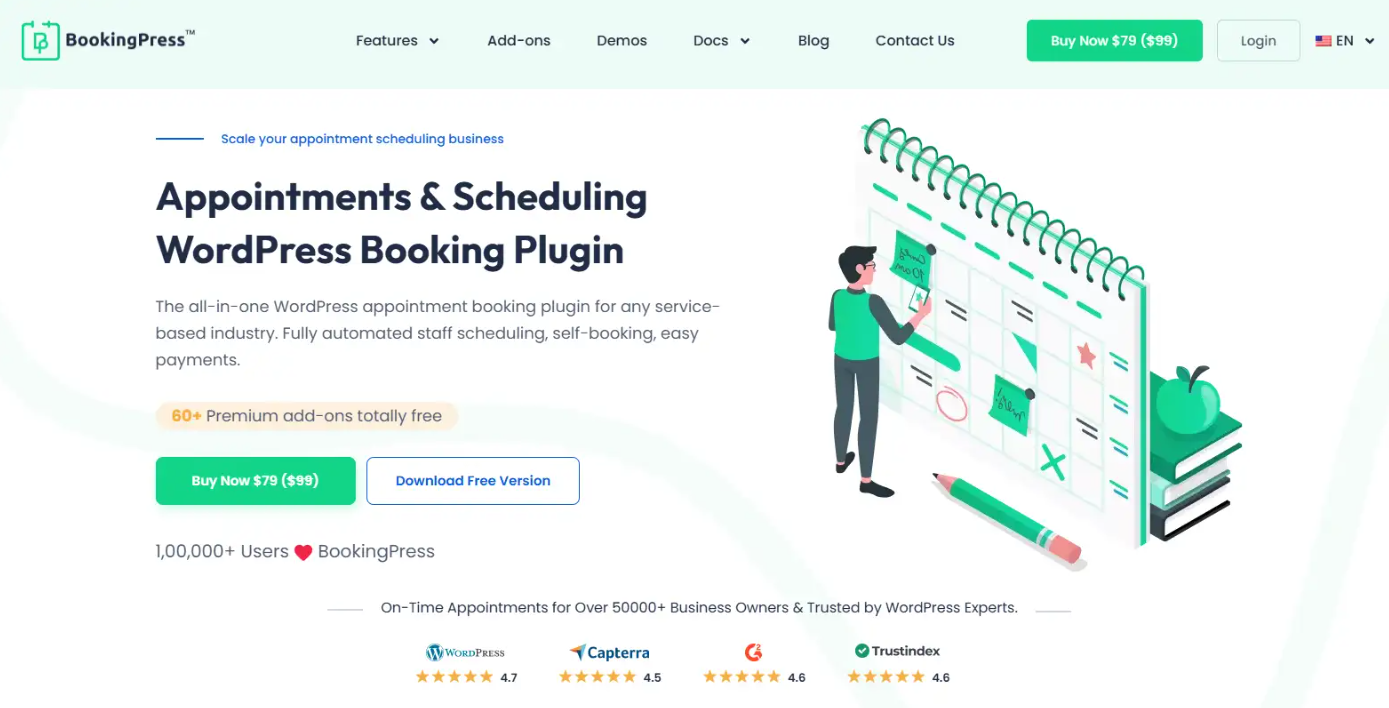
BookingPress is a feature rich and user friendly WordPress plugin designed to help businesses manage appointments and bookings effortlessly. As WooCommerce store owners, you can streamline your complete booking process, reduce no shows, and improve customer experience. You can create custom booking forms to take easy bookings 24/7 right from your online store site.
With BookingPress, you can sync your bookings to always stay on time with Apple, Google, and Outlook calendars with ease. Moreover, you can create packages of multiple services, send automated notifications, and automate your staff workflow too. In simple words, BookingPress covers all the features for being the best WooCommerce booking plugin.
Top Features:
Comes with built-in WooCommerce support and POS system alongside 20+ payment gateways
Smooth two way sync with popular calendars like Apple, Google and Outlook
Send automated reminders and notifications via Email, SMS, WhatsApp and Telegram
Centralized analytics dashboard with reports
Allows group bookings and multiple bookings at once
Manage, add, and automate unlimited staff members
Allow clients to schedule recurring appointments in a single session
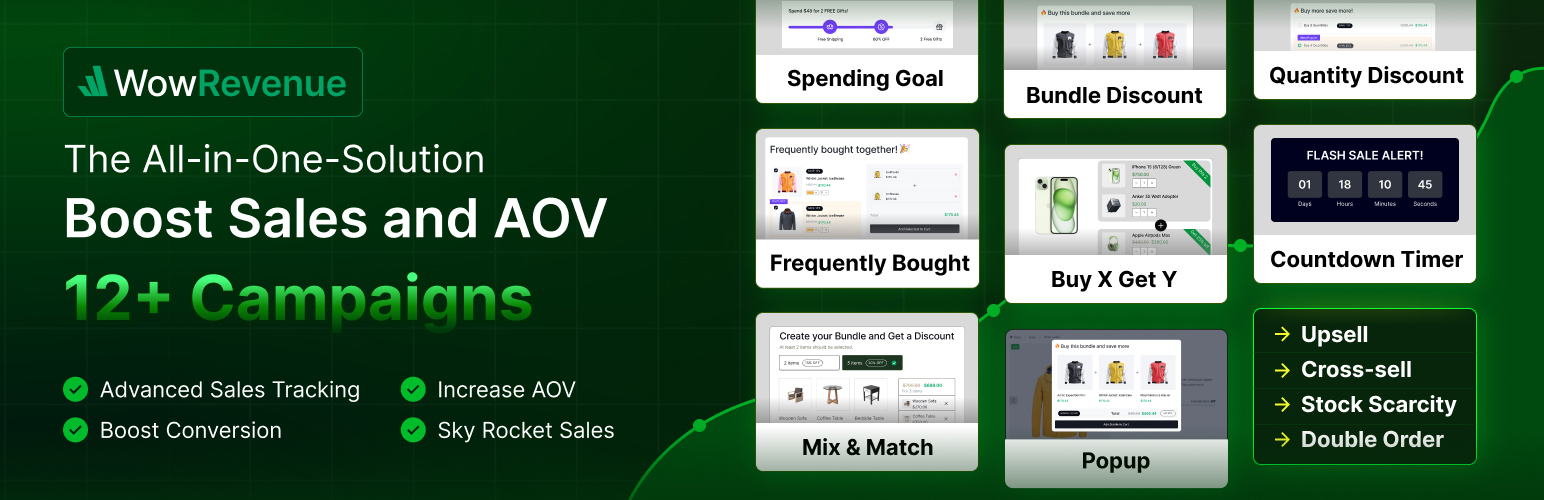
WowRevenue is a powerful product bundle and discount plugin for WooCommerce that helps store owners boost sales and increase their average order value without relying on additional traffic. It allows you to create smart bundle offers, flexible discounts, and upsell strategies that motivate customers to buy more.
What makes WowRevenue stand out is its versatility. Whether you’re running a small boutique shop or a large online store, the plugin helps you build personalized campaigns like Buy X Get Y, mix-and-match bundles, and frequently bought-together deals. It’s the perfect tool for WooCommerce users who want to drive conversions and maximize revenue from existing customers.
Top Features
Create and manage product bundles, quantity discounts, and various upsell/cross-sell offers
Run unlimited promotional campaigns from a single dashboard
Display deals on product, cart, checkout, or thank-you pages
Add urgency with countdown timers and low-stock notifications
Track conversions and performance through built-in analytics
Set free shipping thresholds to encourage larger orders
Fully customizable designs to match your store’s branding
Lightweight and optimized for speed to ensure smooth performance
Academy LMSis a powerful, user-friendly WordPress Learning Management System designed to help you create and manage a complete eLearning platform with ease.
With Academy LMS, instructors can build highly engaging courses using videos, lessons, quizzes, assignments, and even live classes. Students can enroll in free or paid courses, track their learning progress, submit assignments, complete quizzes, and earn professional, customizable certificates.
For website admins and business owners, Academy LMS offers full control over multi-instructor management, course monetization, subscriptions, and course bundles. It also integrates seamlessly with popular payment solutions like WooCommerce, StoreEngine, SureCart, Paid Membership Pro, and more.
The built-in analytics and reporting system makes it easy to monitor sales, revenue, and student performance. Whether you’re launching an online school, training center, or full eLearning marketplace, Academy LMS provides all the tools you need to grow and succeed.
Top Features:
Advanced Course Builder – Videos, lessons, quizzes, assignments, live classes.
Multi-Instructor Support – Manage multiple instructors and commissions.
Course Monetization – Sell individual courses, subscriptions, or bundles.
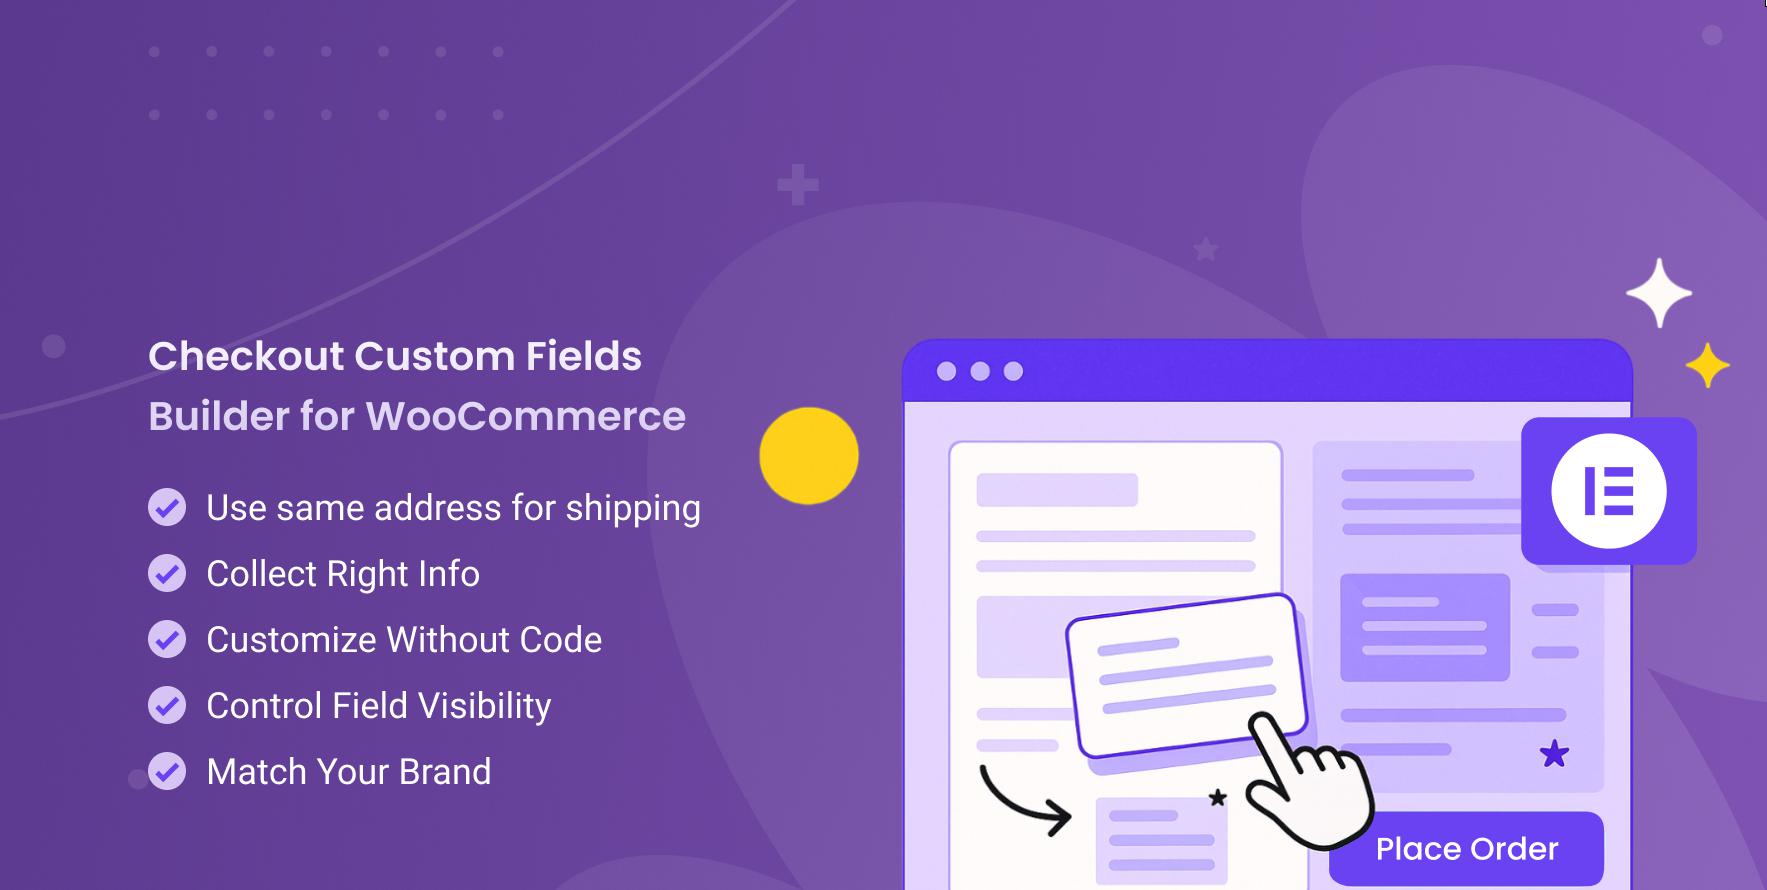
The Checkout Custom Fields Builder for WooCommerce (CCFBW) is a powerful and user-friendly WordPress plugin that lets you fully customize your WooCommerce checkout experience. With its intuitive drag-and-drop builder, you can easily add, arrange, and personalize fields to create a checkout form that fits your store’s needs perfectly.
Easily customize your WooCommerce checkout by rearranging or removing fields, adding custom ones, and creating a smoother, faster experience for customers. Upgrade to a modern, high-converting design that works with the new block-based checkout, make only key fields required to boost conversions, and style everything with Elementor to match your brand perfectly.
Top features:
Drag-and-Drop Checkout Field Editor – create, edit, and rearrange checkout fields, including custom types like dropdowns, checkboxes, and date pickers.
Complete Checkout Takeover with Elementor – Replace the default WooCommerce checkout with your customized, high-converting layout.
Field Visibility Controls – Remove unnecessary fields like phone numbers or address lines to create a cleaner, faster checkout.
Want to turn your WooCommerce site into a full marketplace like Amazon or Etsy? Dokan makes that simple. It gives your vendors their own dashboard to manage products, orders, and earnings — all from the frontend.
You can have unlimited vendors selling everything from physical to digital products. You set the commission rates, and Dokan handles the rest. It also supports automated payouts, flexible withdrawal options, and even reverse withdrawals if needed.
Need extra features? Dokan has modules for bookings, subscriptions, auctions, vendor reviews, and more. Customers can follow their favorite stores, leave reviews, and even create wishlists.
It also works great with Stripe Connect, PayPal, and other popular gateways, so vendors can get paid on time. Plus, the AI product description tool is a nice touch for busy sellers.
If you want to run a professional marketplace without coding, Dokan is one of the best tools to get started.
Top Features
Full frontend dashboard for vendors to manage products, orders, and earnings
Unlimited vendors and products with no usage limits
Flexible commission setup — flat rate, percentage, or both
Supports automated payouts, manual withdrawals, and reverse withdrawals
Extra modules for bookings, subscriptions, auctions, reviews, and more
Per-vendor shipping settings with zones and custom rules
Works with Stripe Connect, PayPal, and other major gateways
Customers can leave reviews, follow vendors, and create wishlists
AI tool for quick product title and description generation
Compatible with Elementor and popular WooCommerce themes
WooCommerce PDF Invoices & Packing Slips by WebToffee is a powerful, user-friendly solution designed to help you automatically generate, customize, and manage professional PDF documents for your WooCommerce store with ease.
With this plugin, store owners can automatically create PDF invoices, packing slips, and credit notes for every order, attach them to WooCommerce email notifications, print them in bulk, and customize them to match their store branding. Customers can download or print documents anytime from their account pages.
For store admins and business owners, the plugin delivers seamless document automation, flexible invoice numbering, tax compliance, and full multilingual and RTL compatibility. It’s available in both premium and free versions, making it suitable for everything from small online shops to large global stores—providing all the essential tools to manage WooCommerce order documents professionally and efficiently.
Top Features:
Auto-generate and attach professional PDF invoices, packing slips, and credit notes to WooCommerce emails.
Use ready-made templates and customize layout, fonts, colors, logos, headers, and footers.
Control invoice numbers with custom prefixes, suffixes, sequences, and auto-reset options.
Bulk export and print invoices and packing slips by date, order status, or customer.
Generate tax-compliant invoices with VAT, GST, ABN, and legal formatting support.
Add “Pay Now” links to invoices for direct payment of pending orders.
Support multiple languages and RTL layouts with WPML compatibility.
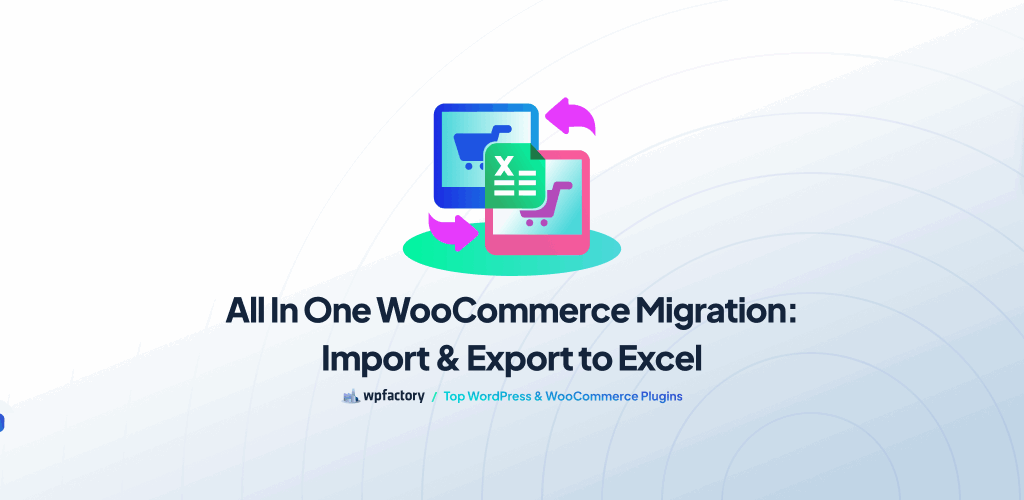
All In One WooCommerce Migration: Import & Export to Excel is the ultimate solution for managing your WooCommerce store data with ease. No more messy CSVs or complicated formats this plugin lets you seamlessly import and export everything using clean and simple Excel files.
Top Features:
Import or export products (simple, variable, or grouped) for fast bulk edits.
Transfer customer details like names, emails, and roles without duplicates.
Move orders between stores or systems with complete accuracy.
Manage WooCommerce Subscriptions, updating plans and renewal dates in bulk.
Edit, back up, or reassign product reviews in one go.
Organize and import coupons for your marketing campaigns effortlessly.
Elevate your WooCommerce store’s checkout experience with this powerful plugin. Tailor your checkout fields to match your specific business needs, capturing valuable customer data while streamlining the purchasing process. Easily add, edit, and rearrange custom fields, apply conditional logic to display fields based on customer input, and enhance the overall checkout experience for your customers. Whether you need to collect additional information, upsell products, or customize the checkout process, our plugin offers the flexibility and control you need.
Top Features:
Choose from 15 different field types.
Create custom checkout fields.
Edit default checkout fields.
Add/edit field labels and placeholders.
Assign custom checkout fields to specific products or categories.
Assign additional checkout fields to specific user roles.
Hide custom fields based on user roles.
Add price for any checkout field to charge an extra fee.
Apply conditional logic and create dependencies among fields.
Rearrange fields.
Display additional fields in the invoice email, the order page, and my account page.
WP Ultimate CSV Importer is a versatile plugin designed to simplify the import and export of WooCommerce products, orders, coupons, reviews, and custom data fields. Whether you’re migrating your store, updating inventory, or managing bulk data, this plugin is your go-to solution for efficiency and precision. With an intuitive drag-and-drop interface, scheduling features, backup options, and compatibility with popular plugins, WP Ultimate CSV Importer empowers WooCommerce store owners to save time and avoid manual data handling.
Top Features
Bulk Product Import/Export: Add or update thousands of WooCommerce products, including variations and custom fields, in one go.
Order Management: Import and export WooCommerce orders, complete with metadata, payment statuses, and custom fields.
Product Reviews Handling: Migrate or manage product reviews effortlessly, including ratings, comments, and user details.
Scheduled Imports & Exports: Automate data updates and backups with scheduled imports and exports, reducing manual effort.
Multilingual Compatibility: Seamlessly handle multilingual data with support for WPML and Polylang integration.
Comprehensive Plugin Integration: Fully compatible with WooCommerce, Yoast SEO, ACF, JetEngine, and more.
WooCommerce Extensions Support: Compatible with extensions like Product Bundles, YITH Order Tracking, Chained Products, YITH Barcodes, YITH Cost of Goods, PPOM, and others.
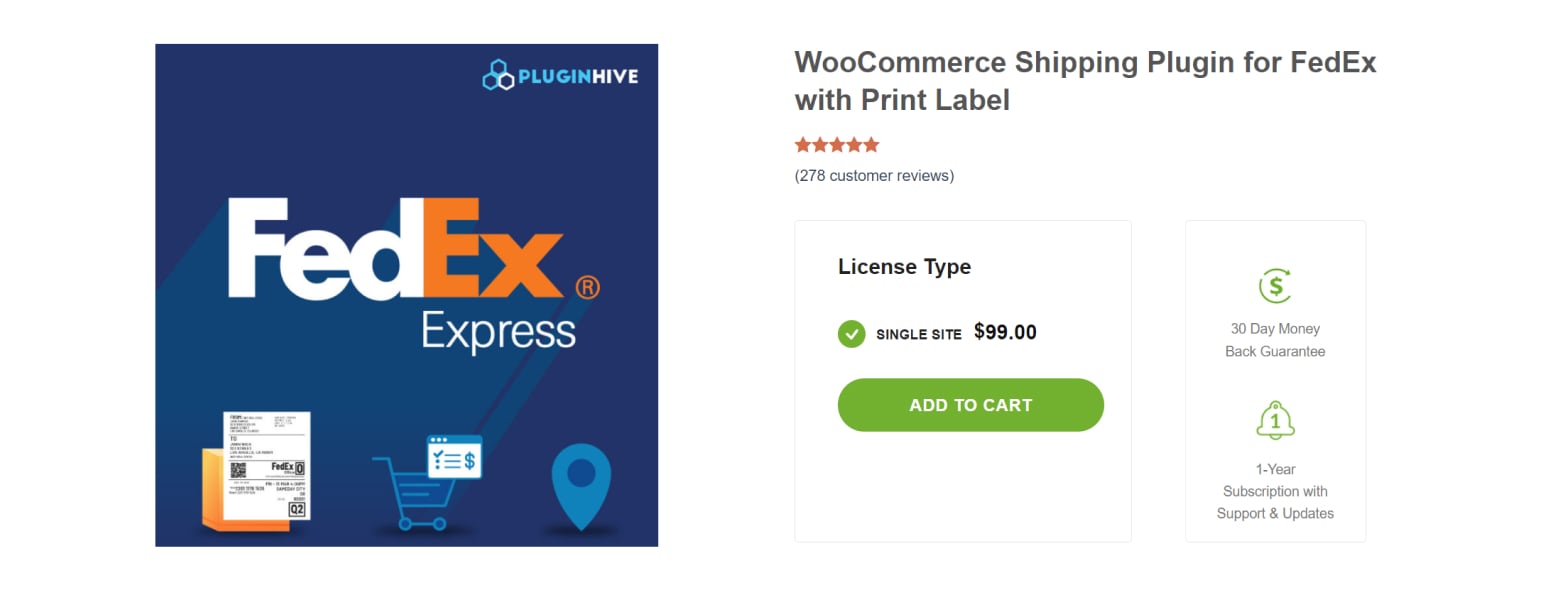
The WooCommerce Shipping Plugin for FedEx with Print Label – is a top choice for seamless shipping and label printing within your WooCommerce store. This powerful plugin empowers you to effortlessly integrate FedEx shipping services into your online store, streamlining the shipping process and giving your customers a reliable and efficient shipping experience. With features designed to enhance convenience and productivity, this plugin is a must-have for any WooCommerce store owner looking to optimize their shipping operations. From real-time FedEx shipping rates to easy label generation, the WooCommerce Shipping Plugin for FedEx with Print Label is your key to unlocking efficient shipping management.
Top Features:
Real-time FedEx shipping rates calculation
Ability to print FedEx shipping labels directly from your WooCommerce store
Seamless integration with WooCommerce platform
Customizable shipping options and settings
Automatic tracking information updates for customers
Support for various FedEx services and shipping options
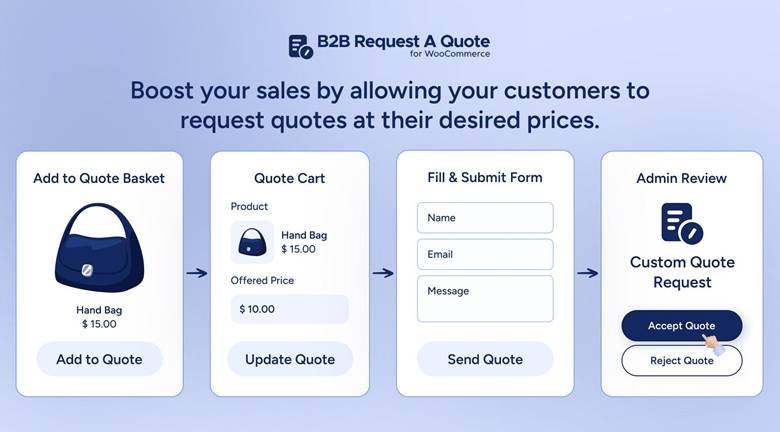
B2B Request a Quote for WooCommerce allows your customers to easily request quotes for their desired prices, boosting your sales. It comes with easy-to-use and superb features like a customizable Quote form, hiding product prices, and generating professional PDF quotes.
With this powerful Quote extension, you let your customers add any product to the quote basket by adding Add to Quote buttons to your shop, product, and cart pages
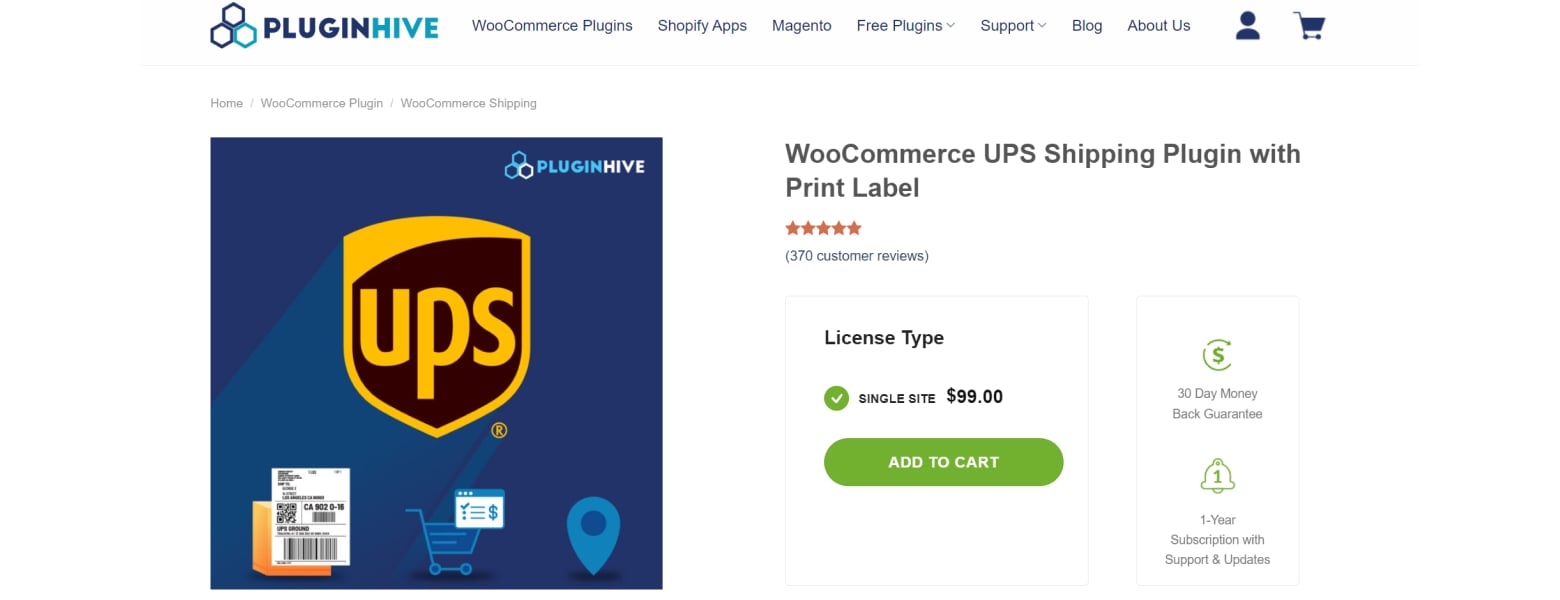
WooCommerce UPS Shipping Plugin with Print Label is a comprehensive solution designed to streamline the shipping process for WooCommerce stores utilizing UPS services. This plugin automates various shipping tasks, including real-time rate calculation, label printing, and tracking updates, saving you time and effort. By seamlessly integrating with WooCommerce, it offers merchants a convenient way to manage UPS shipments directly from their online store, enhancing efficiency and customer satisfaction.
Top Features:
Real-Time UPS Shipping Rates
Label Printing and Bulk Shipments
Automatic Tracking Updates
Flexible Packing Options with various packing methods to optimize shipping costs
Comprehensive Shipping Services with Support for a wide range of domestic and international UPS shipping services
Enhanced Customer Experience that provides customers with estimated delivery dates, tracking information
Paymattic is a powerful WordPress payment plugin for e-commerce platforms simplifying payment processing for online stores. It is designed with simplicity and flexibility in mind, allowing you to create a payment form in just minutes and start receiving payments right away.
It integrates smoothly with e-commerce platforms, offering features like multiple payment gateways, subscription support, multi-currency compatibility, and detailed reporting, all while ensuring top-notch security for your transactions.
Top Features:
Subscription Payments: Automate recurring payments with ease.
Customer Dashboard: Enable customers to manage their payment activities conveniently.
Currency Switcher: Provide flexibility with multi-currency options.
13 Payment Gateways: Smoothly integrate with Stipe, PayPal, Square and 10 other popular payment solutions.
135+ Currency Support: Cater to a global audience with extensive currency options.
Reporting Dashboard: Track and analyze transaction data effectively.
Multi-layer Layer Security: Ensure secure transactions with ReCaptcha, Turnstile, and Honeypot advanced protection.
All-in-One SEO is a powerful and user-friendly WordPress plugin designed to optimize your website for search engines and improve its online visibility. With over 2 million active installations, All in One SEO has established itself as a go-to solution for website owners and developers looking to enhance their site’s SEO performance. This comprehensive plugin offers a wide range of features, allowing you to easily manage and optimize key aspects of your website’s SEO strategy without requiring extensive technical knowledge. Whether you’re a seasoned SEO professional or just starting out, All in One SEO provides the tools and functionalities necessary to boost your site’s search engine rankings and attract more organic traffic.
Top Features:
XML Sitemap support for all major search engines
Advanced canonical URLs
Automated optimization and social media integration
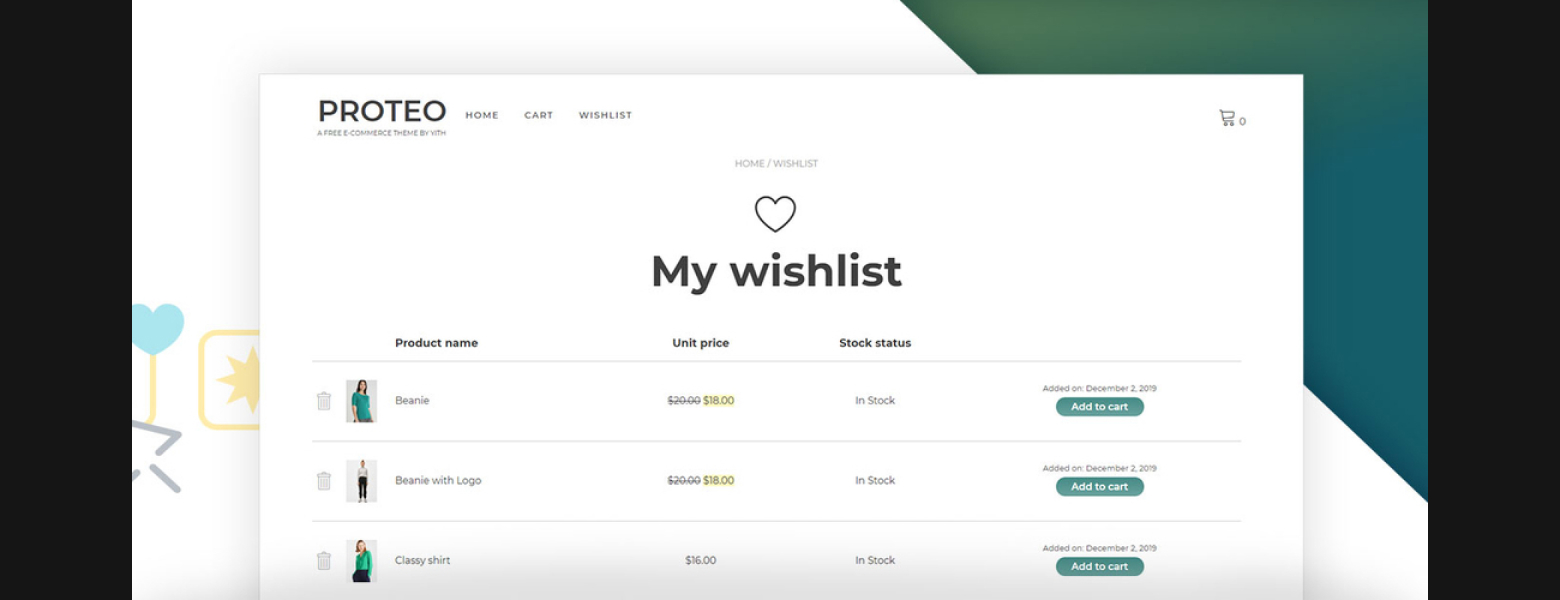
The YITH WooCommerce Wishlist plugin, is a powerful tool designed to enhance the shopping experience on your WooCommerce store. This feature-packed plugin allows customers to create and manage their own wishlists, making it easier for them to save and track their favorite products. With its seamless integration with WooCommerce, the YITH Wishlist plugin offers a user-friendly interface and a host of customizable options, making it an essential addition for any online store seeking to improve customer engagement and drive sales.
Top Features
Easy wishlist creation and management for customers.
Seamless integration with WooCommerce platform.
Customization options to fit the look and feel of your store.
Promotional tools to encourage sales through wishlists.
A powerful plugin designed to enhance the functionality of your WooCommerce store. Whether you’re a small business or a large enterprise, Booster for WooCommerce offers a comprehensive set of features to help you optimize and streamline your online sales platform. From currency exchange rates to customizable checkout options, this plugin empowers you to take control of your e-commerce operations. With Booster for WooCommerce, you can unlock new levels of customization and efficiency, ultimately elevating the shopping experience for your customers.
Top Features
PDF Invoicing and Packing Slips: Generate professional-looking PDF invoices and packing slips for your orders, adding a touch of professionalism to your transactions.
Prices and Currencies by Country: Set up different prices and currencies based on your customers’ locations, creating a personalized shopping experience tailored to their regions.
Checkout Customization: Customize your checkout fields and options to fit your specific business needs, making the buying process seamless and relevant to your customers.
Product Input Fields: Add custom input fields to your products, allowing customers to provide additional information or customization requests during the ordering process.
Emails and Additional Tools: Access a variety of email and additional tools to streamline communication with customers, manage orders, and improve the overall efficiency of your e-commerce operations.
The LiveChat – WooCommerce Chat Plugin is the ultimate solution for adding real-time chat support to your WooCommerce store. This powerful plugin enables you to engage with your website visitors. With this, you can answer their queries promptly, and guide them through their purchasing decisions. Seamlessly integrated into your WooCommerce interface, LiveChat offers a comprehensive set of features to enhance your customer support experience. From visitor tracking to chat triggers and feedback management. Designed to streamline your interactions with online shoppers, LiveChat aims to boost customer satisfaction and ultimately drive sales.
Top Features:
Offline messages, chat transcripts, predefined messages, and chat routing
Typing indicators, file sharing, and automated chat invites
Creation of AI chatbots and provision of video chat to customers
Tracking and reporting feature for chat volume, agent performance, and customer satisfaction assurance
Are you looking to customize your WooCommerce site without delving into complex technical coding? Look no further than the WooCommerce Customizer plugin. This powerful tool opens up a world of visual editing settings, making advanced customization accessible even to users with limited coding knowledge. With the WooCommerce Customizer, you can effortlessly modify button text, labels, colors, and a wide range of other elements without the need for extensive PHP coding. This plugin eliminates the hassle of custom coding, providing a user-friendly interface for implementing changes. Additionally, it offers a variety of free extensions to further enhance your site’s functionality. Explore the top features of the WooCommerce Customizer below to see how it can revolutionize your WooCommerce site.
Top Features:
Visual editing settings for seamless customization without coding knowledge.
Modify sales badges, Add to Cart text, and checkout page coupons effortlessly.
Numerous free extensions, including MailChimp and WooCommerce Memberships, available for maximizing functionality.
Simplifies customizations for small elements, such as the Create Account button, without the need for expert development skills.
The WooCommerce Checkout Field Editor (Checkout Manager) Plugin is a powerful tool that enables you to customize and enhance the checkout experience for your WooCommerce store. This plugin allows you to effortlessly add, edit, and remove checkout fields, rearrange their order, validate entries, and add custom CSS classes. Its user-friendly interface simplifies the checkout process, delivering a seamless experience for your customers. Now, let’s explore some of the top features of this versatile plugin.
Top Features:
Add and customize up to 20 different types of custom checkout fields
Edit, hide, and delete default checkout fields
Rearrange checkout fields with a drag-and-drop interface
Validate checkout fields to ensure accurate information
Incorporate custom CSS classes for a personalized look and feel
Affordable premium version with additional themes and field types
Easy-to-use interface for editing fields without any coding knowledge
Seamless integration with WooCommerce for enhanced versatility in checkout customization
AffiliateWP is a powerful WordPress plugin designed to help website owners easily set up and manage an affiliate marketing program. With this plugin, you can track affiliate referrals efficiently, manage affiliate accounts, and make timely commission payments. Its seamless integration with popular eCommerce and membership plugins makes it a versatile choice for businesses of all sizes. Whether you’re an individual blogger or a seasoned online retailer, AffiliateWP provides a user-friendly solution to boost your sales through affiliate marketing.
Top Features
Real-time reporting and analytics
Integration with popular eCommerce and membership plugins
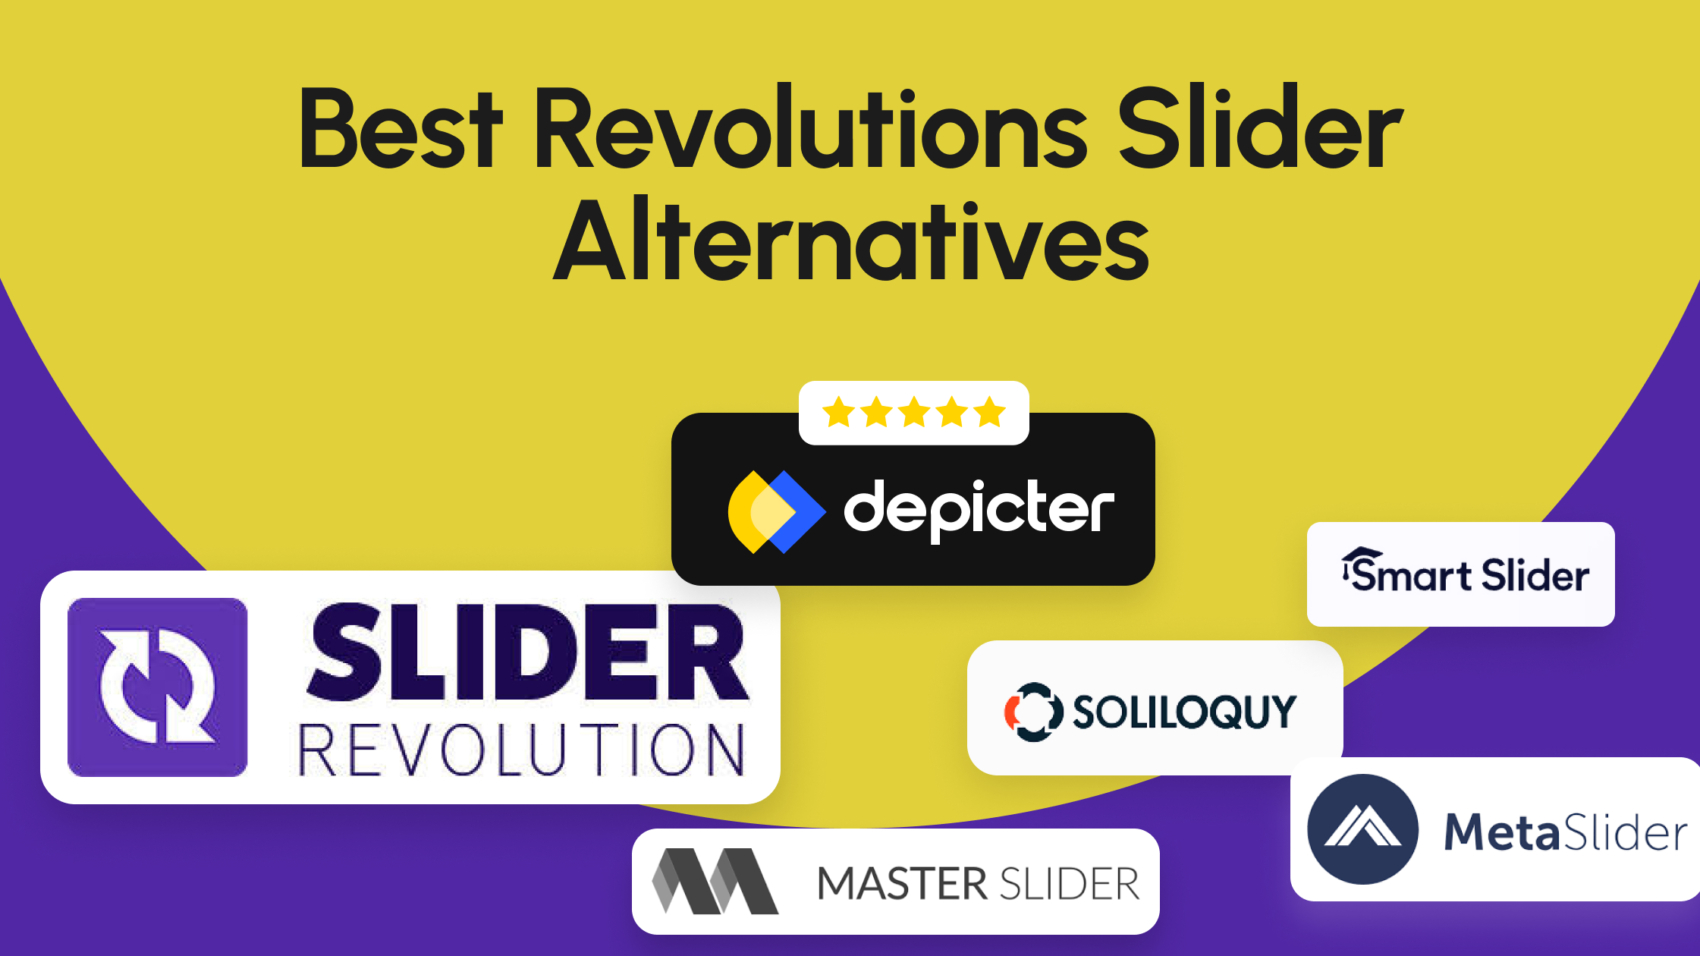
While it could be said that Slider Revolution is the most well-known and widely used WordPress slider plugin due to its long history, the most experienced is not always the best, and depending on your needs and circumstances, more attractive alternative options may be your first choice for creating sliders and you might want to find Slider Revolution alternatives.
In this article, we will examine this topic in detail.
All of the options on our list for replacing Slider Revolution are modern and proven plugins, each with its own relative strengths in different areas. We will try to discuss this topic in a concise yet more detailed way to help you find a suitable option as the top Slider Revolution alternative.
What are the key features of the Slider Revolution?
Drag and drop editor :
The Slider Revolution offers a user-friendly drag-and-drop editor, providing a seamless and intuitive interface for creating visually stunning sliders. Users can easily arrange and customize various content elements within the slider design, such as images, text, videos, and more. The drag-and-drop functionality streamlines the process of building and refining sliders, allowing users to achieve their desired layout and design without the need for extensive technical expertise.
Animation Library:
The Slider Revolution WordPress plugin includes an extensive Animation Library, offering a diverse range of captivating animations to enhance slider presentations. From subtle transitions to dynamic effects, users have access to a wide array of animation options that can be applied to different elements within the sliders.
Deep levels of customization and options:
Users have access to deep levels of customization and a wide range of options to customize their sliders to specific design preferences. From controlling transition effects and timing to adjusting layout and interactivity, the plugin provides comprehensive customization capabilities.
250+ ready-to-use templates:
Slider Revolution comes with a collection of over 250 ready-to-use templates, offering users a diverse selection of pre-designed slider layouts and styles. These templates cater to various industries and design aesthetics, providing a valuable starting point for users looking to quickly implement professional-looking sliders on their websites.
Element library:
With Slider Revolution, you’ve got a royalty-free media library at your fingertips all included in the plugin. Background images, videos, object PNGs, font icons & SVGs, and premade layer groups.
Addons for Special FX:
lider Revolution offers addons for Special FX, providing users with additional tools and effects to elevate the visual impact of their sliders. These add-ons introduce special visual effects and enhancements, such as particle effects, dynamic backgrounds, and advanced transitions.
Alright, let’s dive into the best alternatives for Slider Revolution.
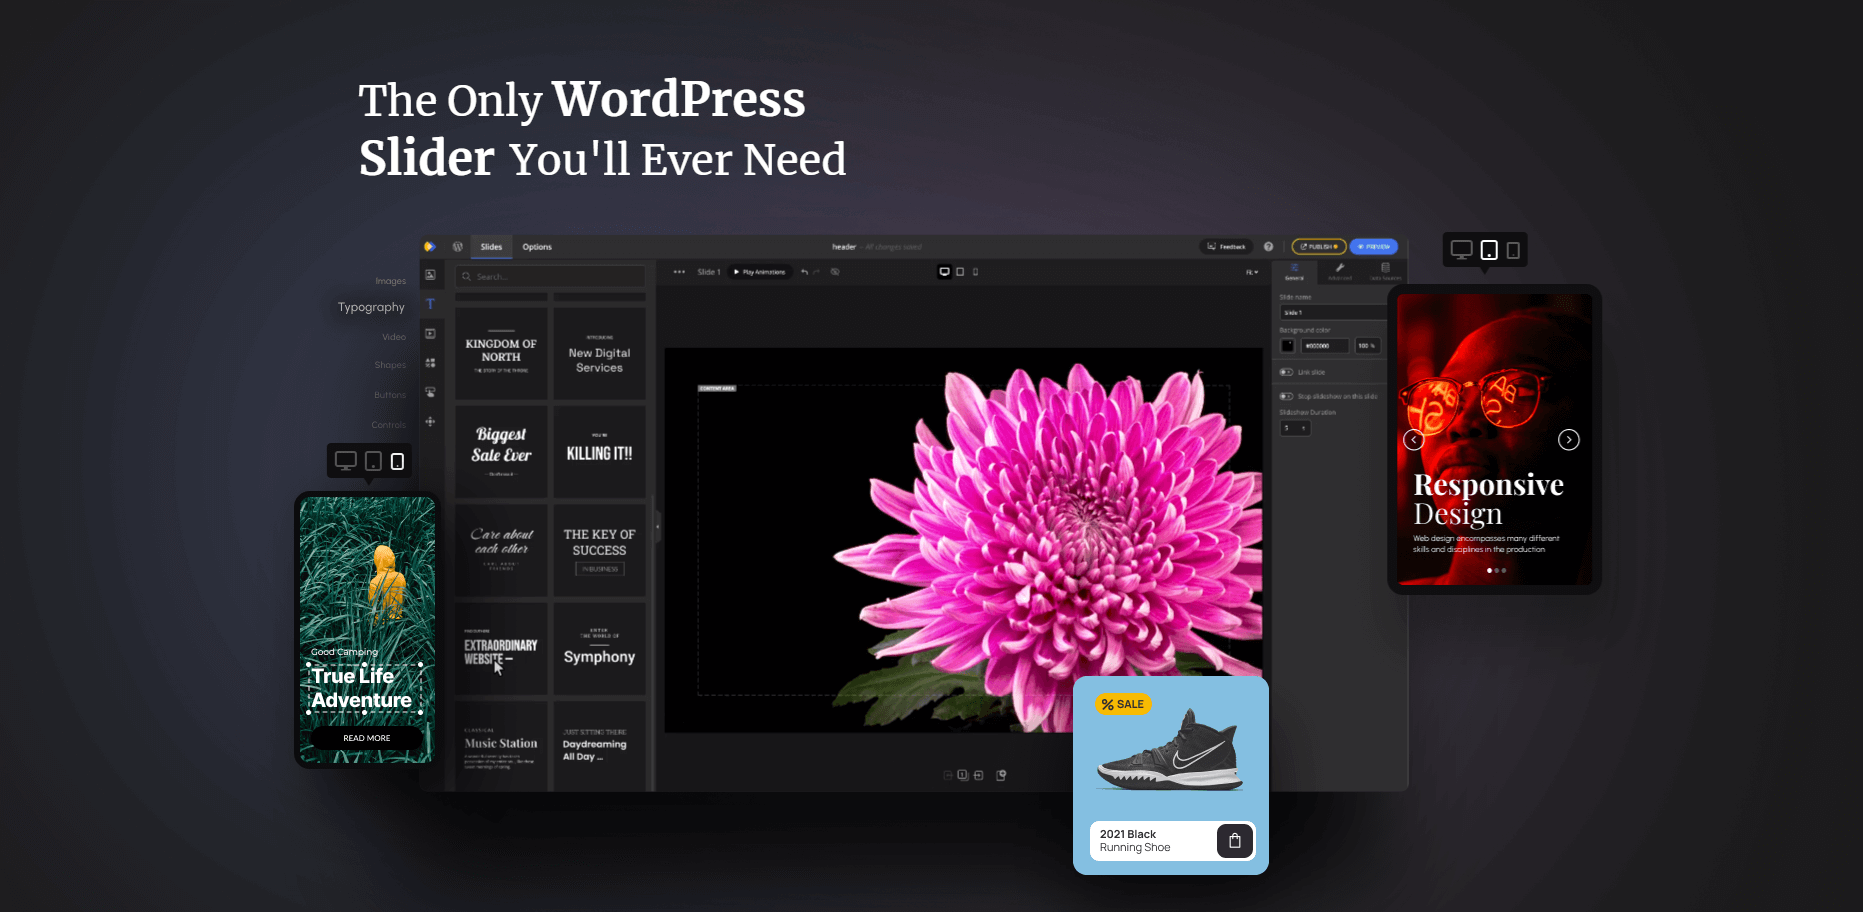
With over 100,000+ active users in a very short time since its release, Depicter has become one of the top choices for WordPress sliders, if not the first one, especially if you are looking for a Slider Revolution free alternative.
The completely modern Canva-like editor is incredibly easy to use and intuitive, while still offering a full range of professional and modern features.
Depicter offers a wide variety of image, text, and video elements, an asset library with millions of royalty-free images and videos, a professional and customizable collection of animations and transitions, support for Ken-burns Effect and Parallax Effect, Post Slider, Shop Slider, ACF Slider, AI Slider, and of course Popup builder, Notification bar builder.
In fact, Depicter’s feature list is so extensive that it will surprise you.
With Depicter, you have access to a collection of over 600+ professional and modern templates, with 30+ new templates added to this collection every 2 weeks.
Master Slider, considered a successor to Depicter, also falls into the category of user-friendly sliders that get you to your goals as quickly as possible. In Master Slider, you also have access to over 90+ ready-made templates and can assign various animations to image, text, and video layers. Master Slider is responsive and offers the best possible support for touch-swipe navigation. Another feature of Master Slider is its pre-designed layouts for your slider selection, meaning you can change the structure of your slider with just a few clicks. Due to its small size, Master Slider is also reliable in terms of performance for your website. Therefore, Master Slider is another attractive option to replace the Slider Revolution.
Meta Slider is a veteran WordPress slider plugin that has evolved alongside the WordPress ecosystem, gradually adding modern features while retaining its simplicity. SEO optimization is a standout feature of this plugin, and like other plugins on this list, it also offers ready-made templates for importing and customizing. If a straightforward slider creation process and a simple UI are more important to you than replacing Slider Revolution, Meta Slider is a great option.
Soliloquy is another powerful option for replacing the Slider Revolution. It offers all the features you’d expect from a premium slider plugin, including a drag-and-drop editor, ready-made templates, responsive support, SEO optimizations, and a variety of slider types. Soliloquy is another great option on our list to replace Slider Revolution.
The Slider Revolution has been around for longer than Depicter, and its editor reflects this. The editor is packed with a wide variety of options and features that give you control over almost every aspect of your slider.
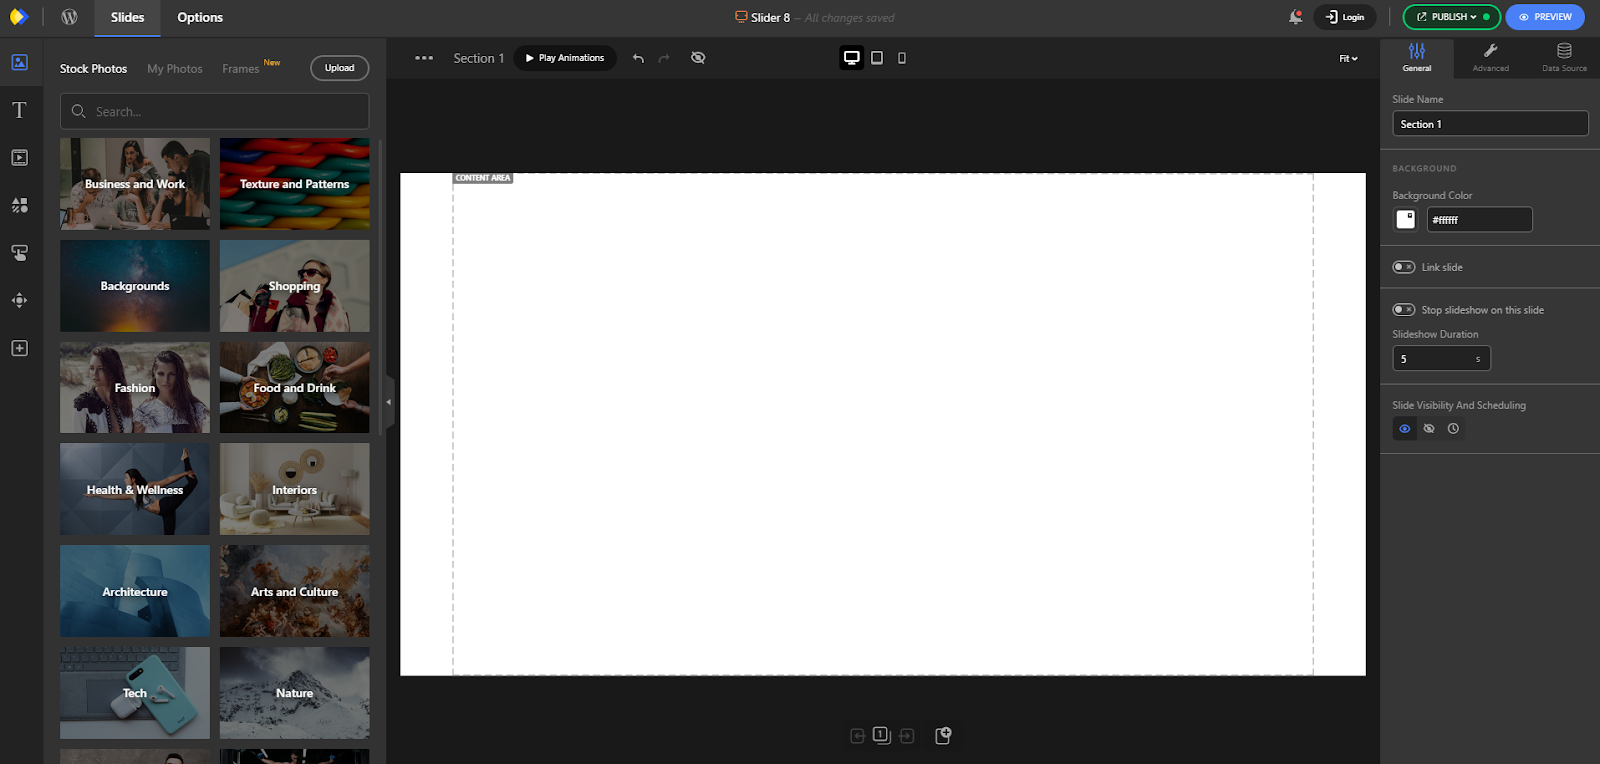
Depicter has a more comfortable editor and Drag & Drop capabilities are done more easily.
Options and Features
Both Depicter and Slider Revolution offer you a lot of features and options, but for the main goal of creating a slider, if you are working with either of these plugins for the first time, Depicter has a shorter learning curve and you will learn how to work with the tools in no time.
Depicter includes a snap feature that can be used to align layers. This feature is especially useful when you are moving layers around. It can help you to quickly and easily align layers next to each other. This can save you time and make it easier to create sliders.
Depicter includes several other features that make it easy to use. For example, you can drag and drop images from the asset panel to replace existing images. This is a quick and easy way to change the images in your slider.
Image and Text Layers
Double-click on an image to enter crop mode. This allows you to crop your images to the desired size and shape.
By clicking on a text layer, you can replace the text. This is a quick and easy way to change the text in your slider.
In contrast, Slider Revolution does not offer these same features. To replace an image in Slider Revolution, you must open the image’s options panel and select a new image. To change the text in Slider Revolution, you must open the text layer’s options panel and edit the text field.
Another important point here is that as you use Depicter, you will realize that the layout of the panels has been done with great care and purpose. The result is highly intuitive panels, which is an advantage over the Slider Revolution.
Ready-to-use templates
Both plugins are powerful when it comes to templates. There are a large number of high-quality and professional templates available for use.
The way you import templates is slightly different because Slider Revolution has separated the different display effects into different addon plugins from the main plugin. Therefore, when importing a template, you may need to install the addon specific to it which can have bad effects on your site performance, while in Depicter everything is done with one click.
Furthermore, the preview template is built-in to Depicter, eliminating the need to visit another website, unlike Slider Revolution.
Also, Depicter wins in terms of the number of templates with 600+ ready-made templates to Slider Revolution’s 290+, another reason to consider it as the top Slider Revolution alternative.
Available Slider Building Options
As our main Slider Revolution alternative, Depicter offers a wider variety of slider types. Depicter includes options for:
Standard Image sliders
Video Slider
Woocommerce Product Slider
Carousel
Post Slider
Custom Post and ACF slider
Social Media Slider
Slider Revolution only includes options for:
Standard Image sliders
Video Slider
Woocommerce Product Slider
Carousel
Post Slider
Social Media Slider
This means that Depicter is a more versatile WordPress slider plugin. You can use it to create a wider variety of sliders for your website. For instance, you can employ Depicter to craft a hero section to introduce your website or a popup to collect email addresses.
Animations and Transitions
Both plugins are powerful when it comes to implementing animations. You can create different animations on different layers with advanced settings. Slider Revolution has a larger collection of animations, and more advanced settings, and uses an animation timeline that allows you to professionally set the order and timing of all animations while achieving almost the same result as the Depicter is a more straightforward path and does not confuse a newbie user.
Performance
Performance is a complex issue, and there are many factors that can affect it. The final result depends on a variety of conditions. For a fair comparison, we created a simple 2-slide slider with one image on both plugins and tested the result.
Depicter:
HTTP requests: 32
Resources loaded by the page: 2.0MB
Total load time: 3.82s
Slider Revolution
HTTP requests: 33
Resources loaded by the page: 3.6MB
Total load time: 4.65s
The results showed that Depicter outperformed Slider Revolution in terms of both loading speed and overall performance. It’s mainly because Depicter is a more recent plugin that has been created with a focus on performance.
Reasons to Choose Depicter as the Slider Revolution Alternative
Easier to Use Editor: Depicter has a more user-friendly drag-and-drop editor with a shorter learning curve, especially for beginners. Features like snap-to-align and easy image/text replacement make building sliders faster.
More Templates: Depicter offers a wider selection of ready-made templates (over 600 vs 290) and requires no additional installation for use, unlike Slider Revolution.
More Slider Types: Depicter allows you to create various sliders like Popups, Notification bars, and Social Media sliders, in addition to the standard options offered by Slider Revolution.
Faster Performance: Tests showed Depicter loaded faster and used fewer resources compared to Slider Revolution.
Depicter provides ease of use, diverse templates, slider types, and faster loading, making it a strong Slider Revolution alternative.
Conclusion
In this article, our goal was to evaluate and suggest the best slider plugins in the WordPress community for replacing Slider Revolution and compare their features.
Finally, we made a thorough comparison between Slider Revolution and Depicter and concluded that Depicter is the best option to replace Slider Revolution.
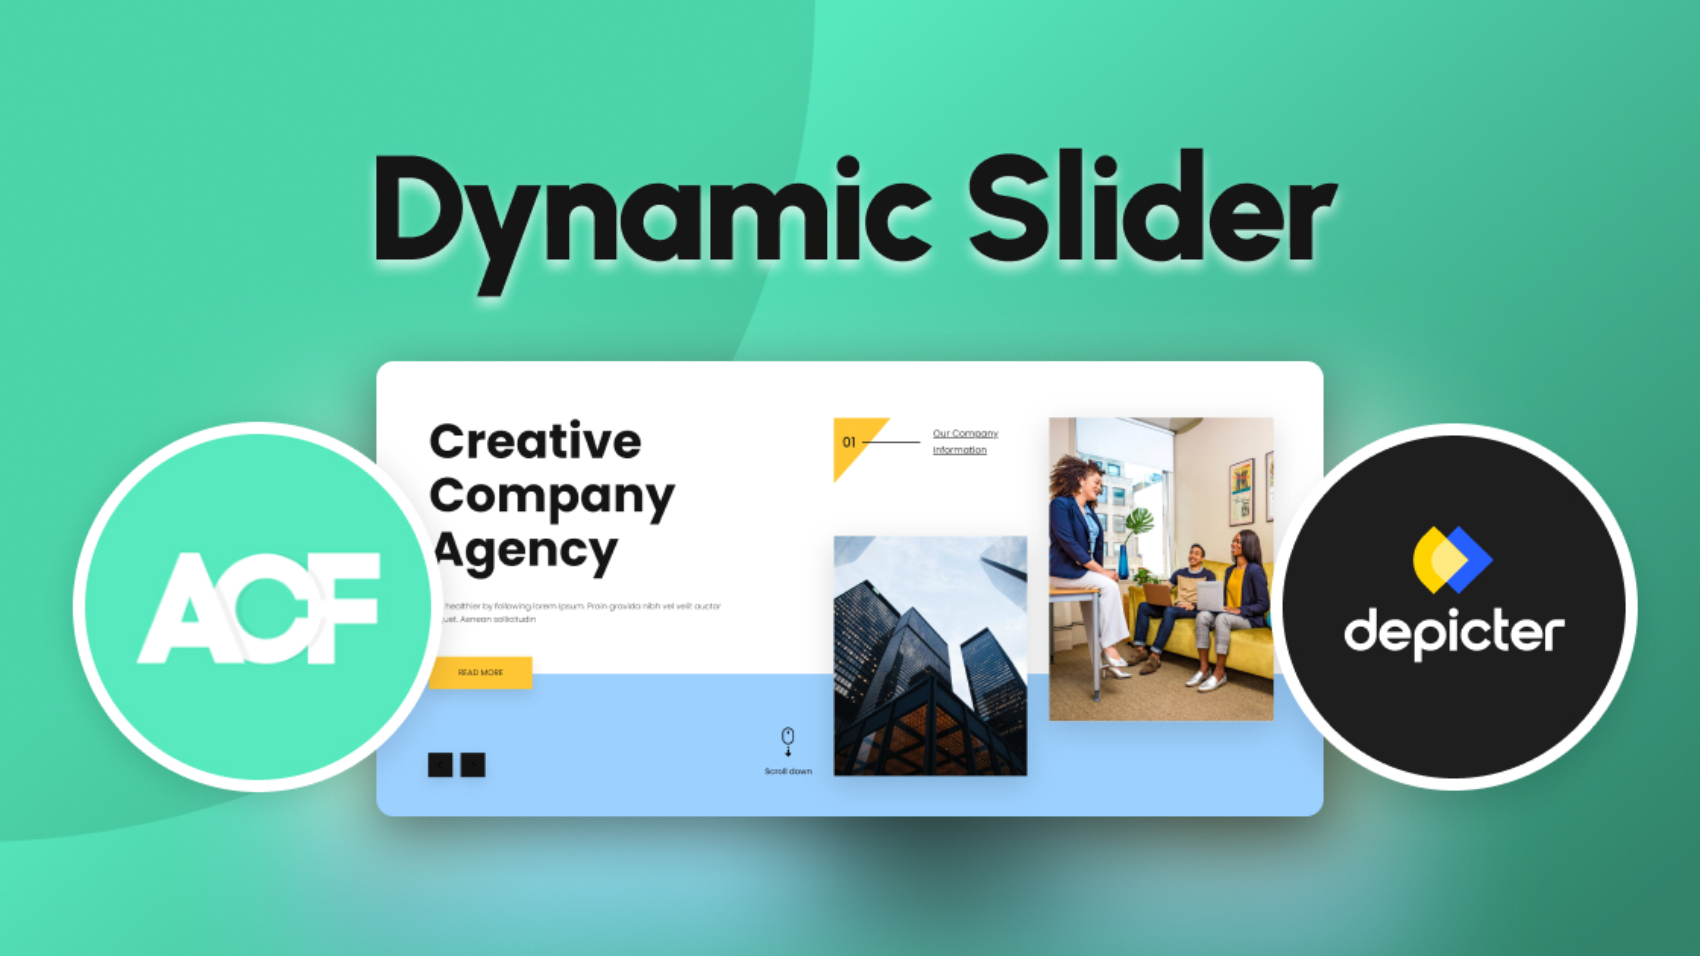
Creating an ACF slider allows you to display dynamic and engaging content that captures the attention of your website visitors. If you’re interested in learning how to create an ACF slider, you have come to the right place.
🎥 Video Tutorial: How to Integrate a Custom Post Type Using ACF
In this video, you’ll learn how to use Advanced Custom Fields (ACF) together with Depicter to integrate custom post types into the Depicter Slider. Perfect if you want more control over your sliders, display dynamic content, or use custom fields per post type.
//
What is a custom post type in WordPress?
On a WordPress website, post types are utilized to differentiate between various content types in WordPress. Although both posts and pages are categorized as post types, they are designed for different purposes.
WordPress includes several default post types:
Post
Page
Attachment
Revision
Nav Menu
Moreover, you have the option to establish custom post types. These are particularly helpful when creating content with a format different from that of a standard post or page.
For example, if you manage a movie review website, you may consider creating a custom post type for movie reviews. Additionally, custom post types can be tailored for portfolios, testimonials, and products.
The most popular custom post type for WordPress, which is added to WordPress by a plugin, is the product post type.
When you install the WooCommerce plugin on your WordPress website, it creates a custom post type called “product” for managing the products in your store.
What is ACF?
By default, there is no way to create custom post types in WordPress without touching the code. If you want to do this manually, you need to add the code for defining the custom post type to the code of your WordPress site.
The code snippet provided below creates a basic custom post type called “Recipe” that will be accessible through your admin menu.
// Our custom post type function named Recipe
function create_posttype() {

    register_post_type( 'recipes',
    // Options
        array(
            'labels' => array(
                'name' => __( ‘Recipes’),
                'singular_name' => __( 'Recipe' )
            ),
            'public' => true,
            'has_archive' => true,
            'rewrite' => array('slug' => 'recipes'),
            'show_in_rest' => true,

        )
    );
}
// Adding our function to theme setup
add_action( 'init', 'create_posttype' );
There are many more details to consider when adding custom post types and their taxonomies.
Combining all of this together and adding the code to your website can be time-consuming and requires a lot of attention to detail. Therefore, using plugins specifically for this task can be a much better option for achieving this goal.
ACF stands for “Advanced Custom Fields” which is a popular WordPress plugin. It allows users to add custom fields to their WordPress content, making it easy to tailor the editing experience to the specific needs of a website. With ACF, users can visually create fields such as text inputs, checkboxes, and more, and then assign these fields to multiple edit screens. This greatly enhances the flexibility and functionality of WordPress.
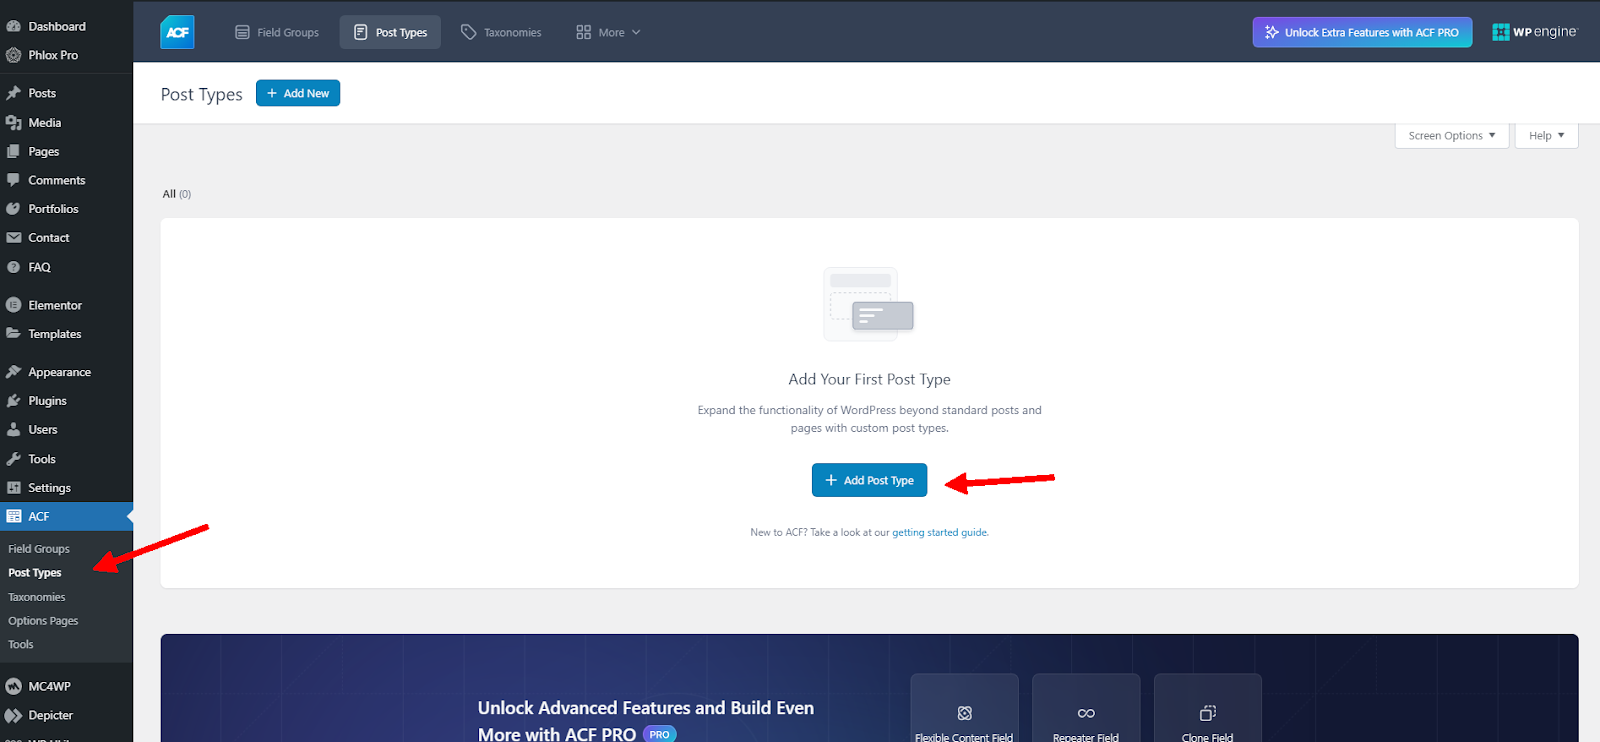
How to create a custom post type with ACF?
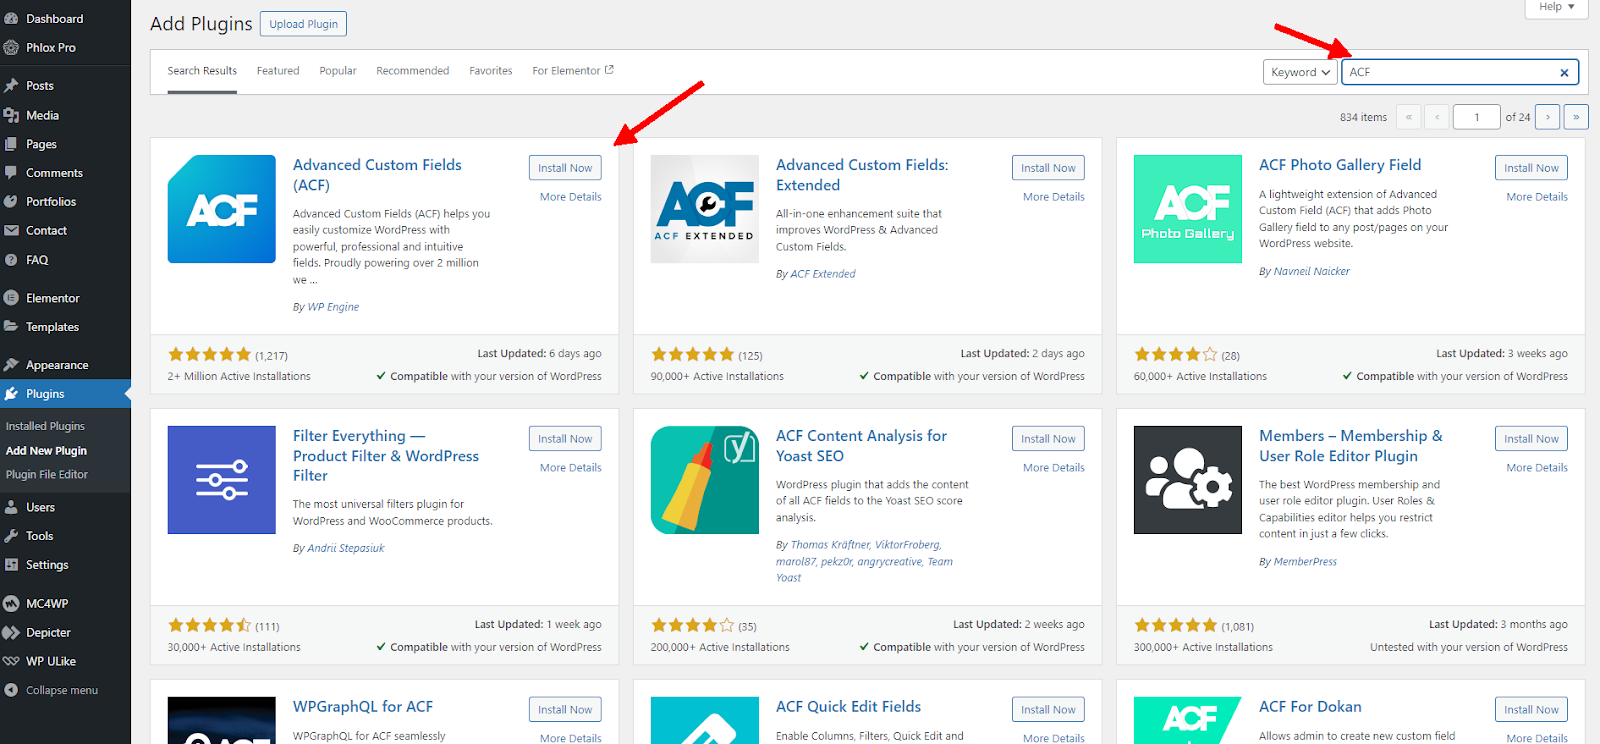
Installing ACF
From the Plugins menu, click on Add New Plugin and then search for “ACF”. In the search results, click the Install and then Activate button for the “Advanced Custom Fields” plugin.
Add a new post type
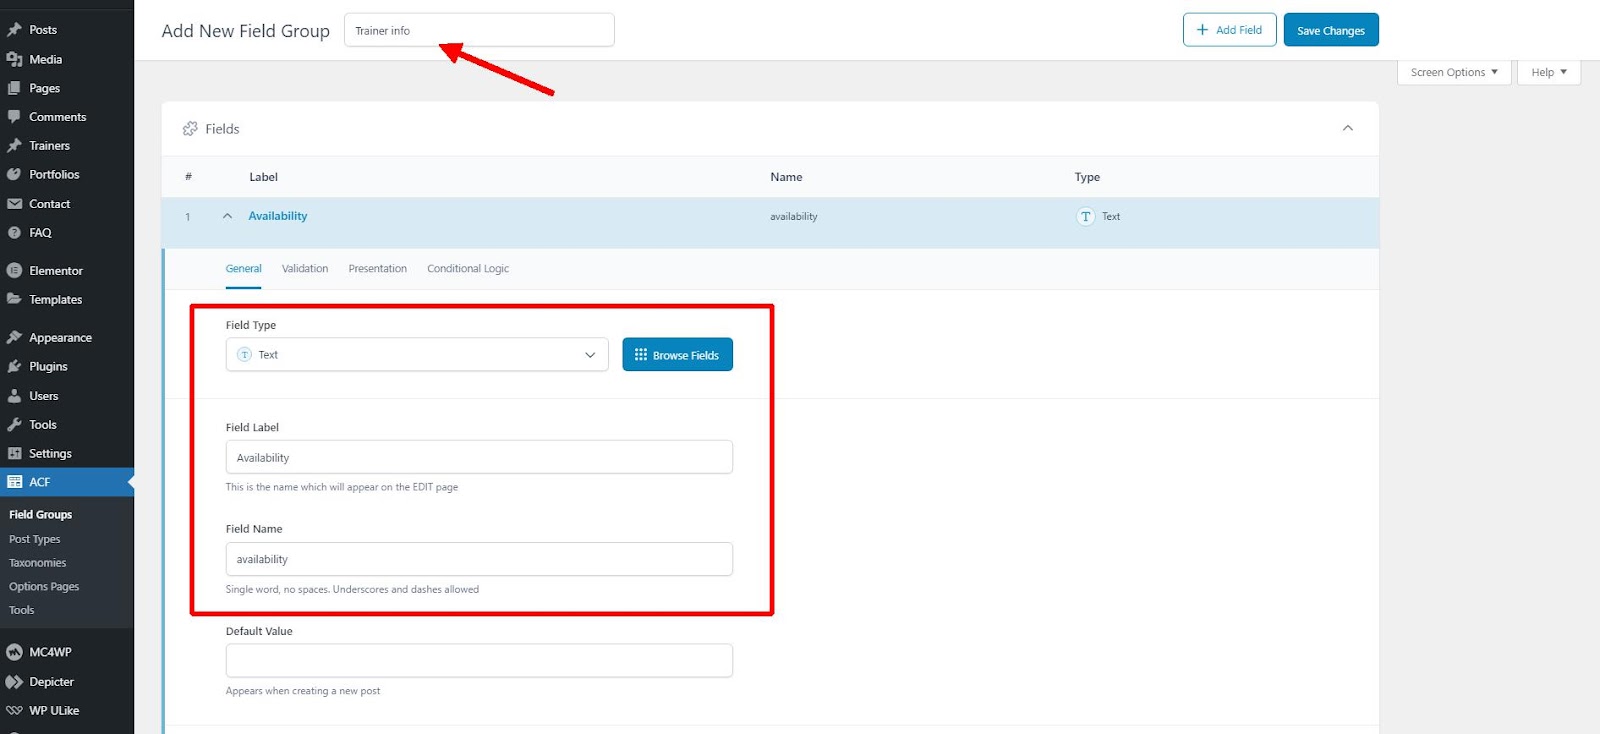
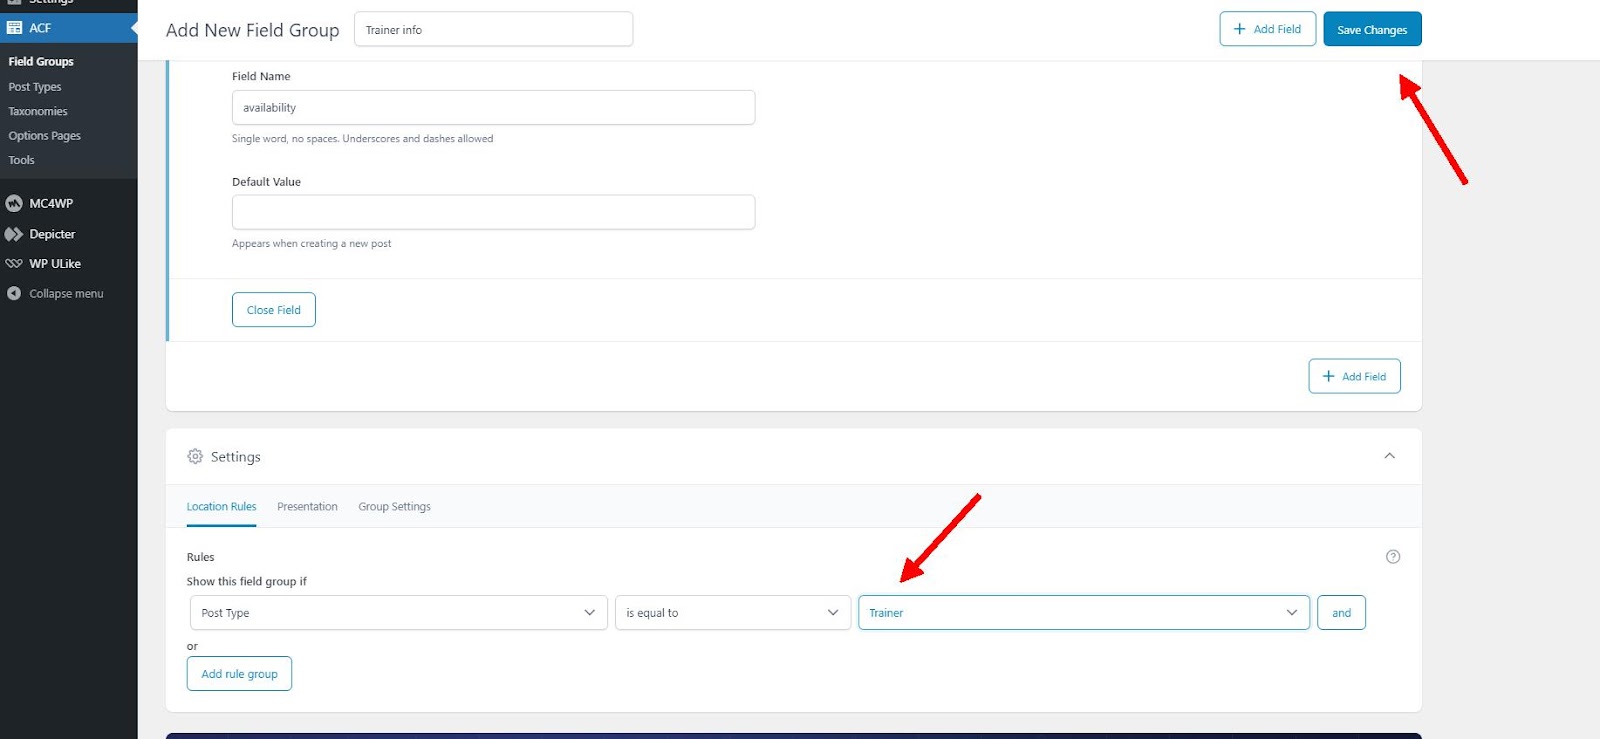
From the Post Type menu, click on the Add Post Type option and enter the information related to the post type. The initial information includes Name, Label, and Key, which are sufficient to create a basic post type.
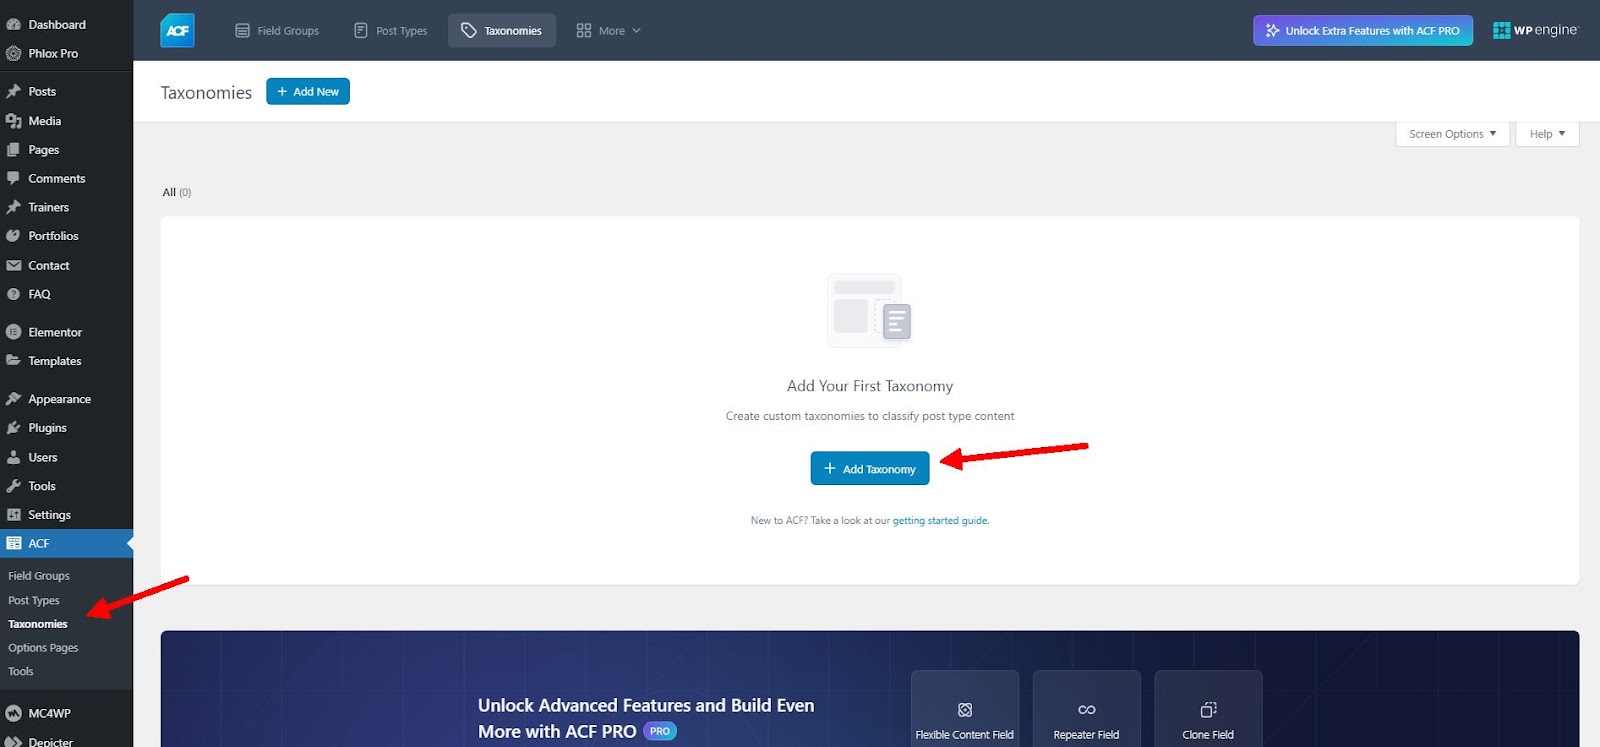
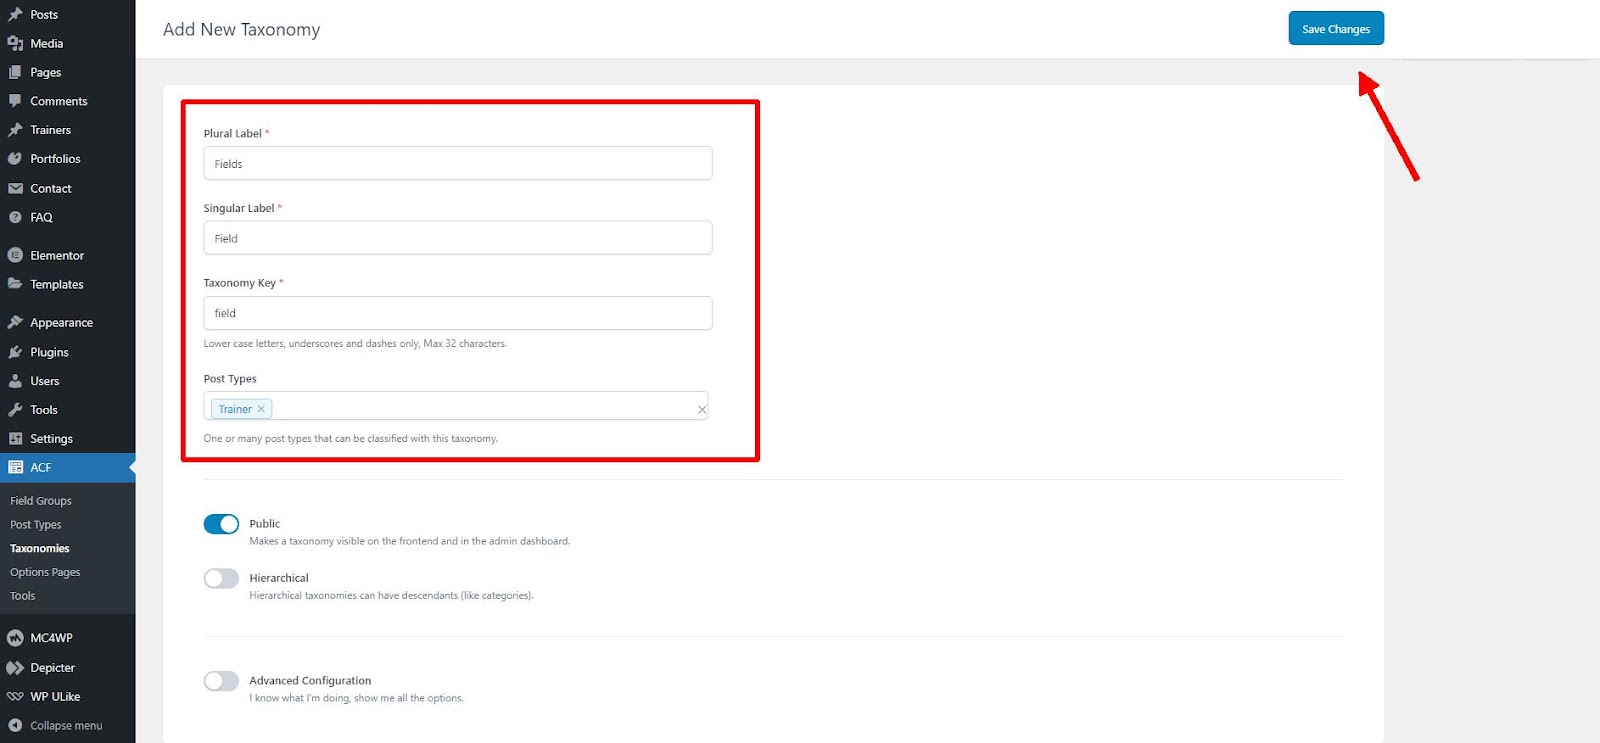
The next step is to create taxonomies. In this example, we will define a taxonomy called Field for our Trainer post type. To create it, simply enter the basic information as in the previous steps.
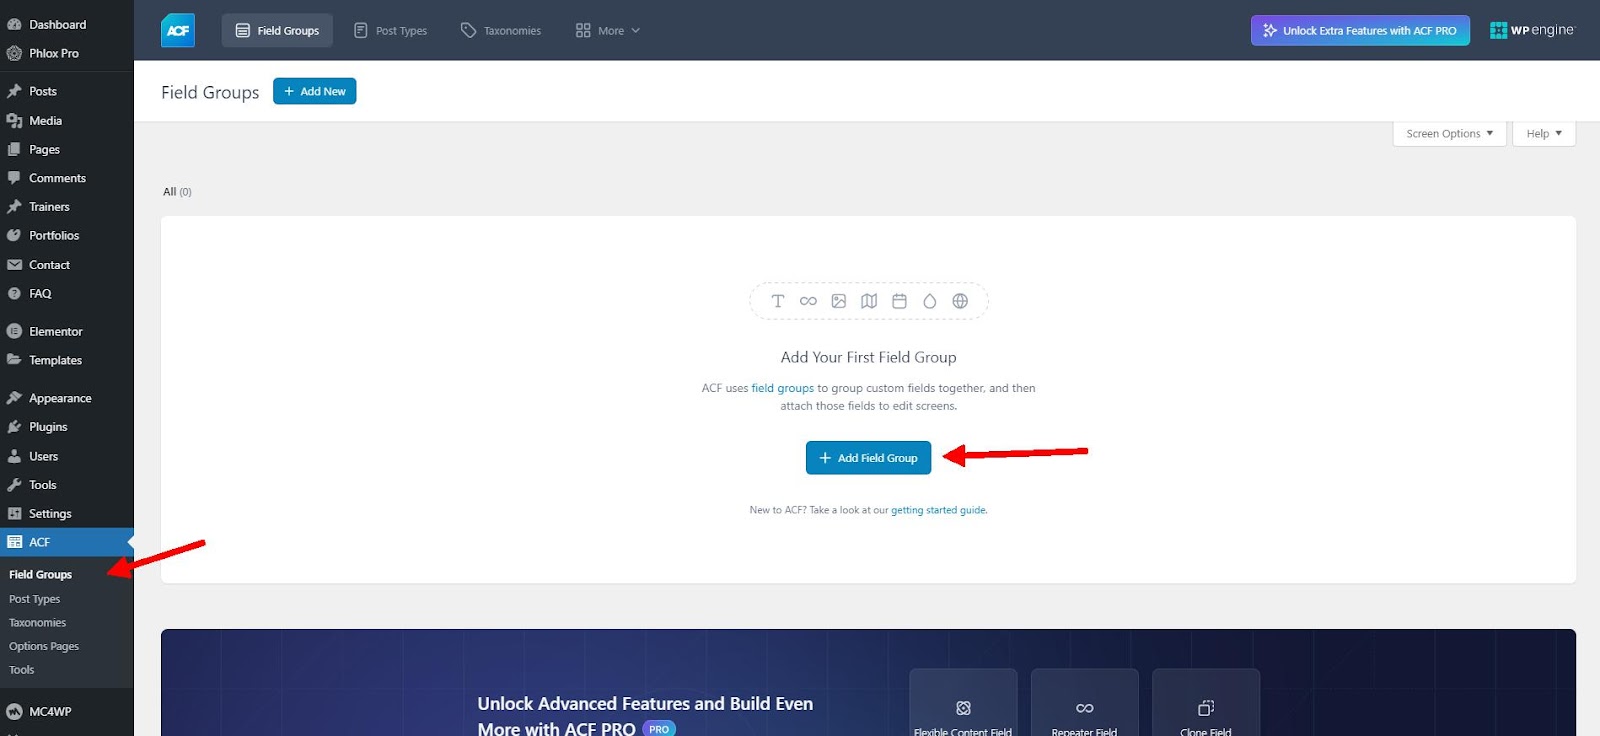
After creating a taxonomy, we proceed to create fields, which are actually metadata for our post type. These are completely optional and you can create as many of them as you want in different types such as text, option box, image, and more, according to your needs and preferences.
After entering the basic information, you must make sure that you link the newly created field to the corresponding post type.
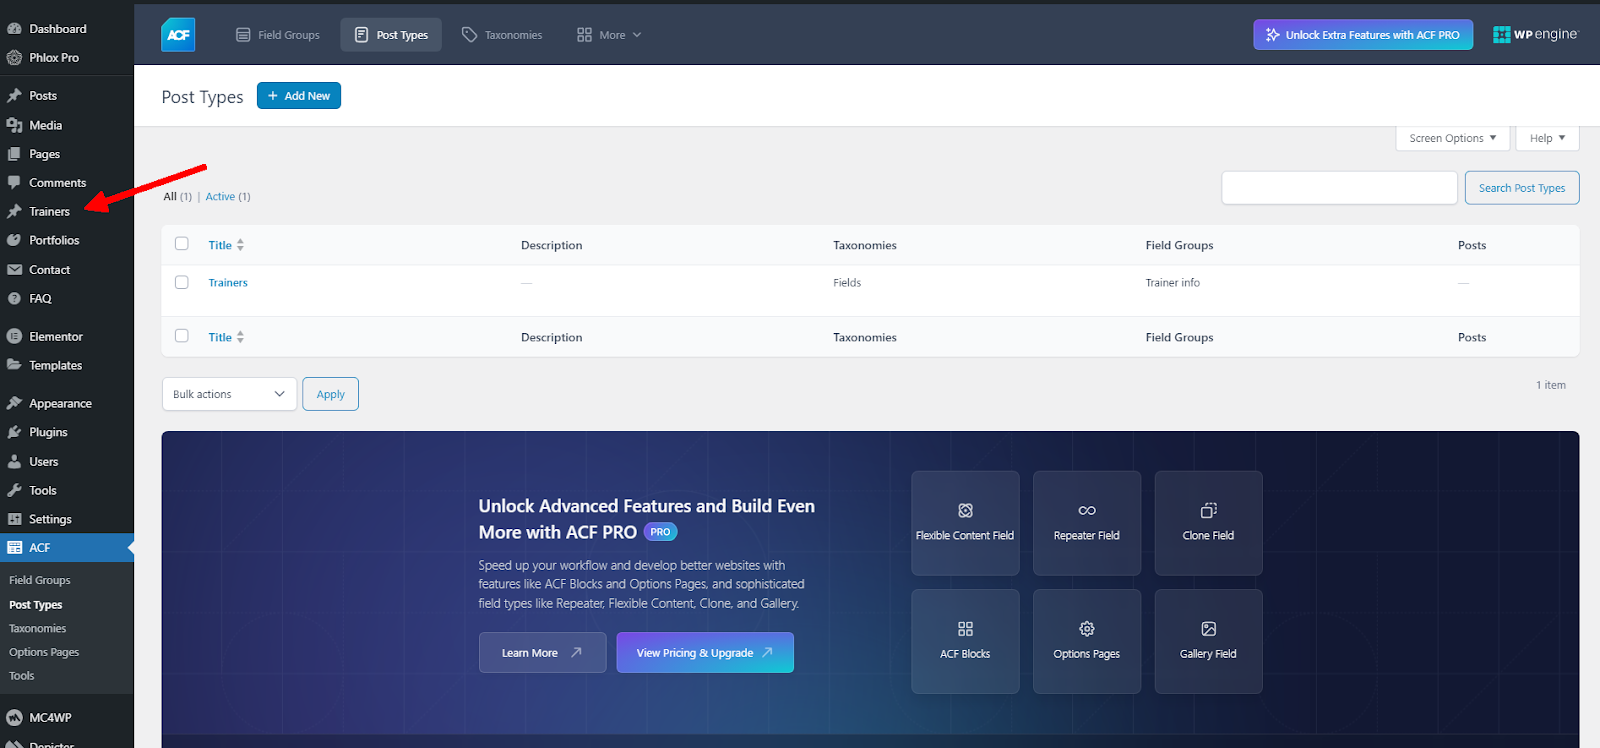
Finally, you will see that a menu with the same name that we assigned to your post type has been added to the WordPress admin menus. We can use this menu to manage your post type.
Adding new posts to our custom post type
We go to the Trainer menu in the admin dashboard to create a new trainer, just like we would write a blog post or page. We then enter the information for the trainer and finally publish it. That’s it.
How to create an ACF Slider with ACF Plugin and Depicter?
If you are wondering what is the best slider for ACF to create dynamic sliders, the answer is Depicter. It fully supports WordPress custom posts types and you can easily create professional sliders in the shortest time. For a complete demonstration, watch the following video tutorial or continue reading for more details.
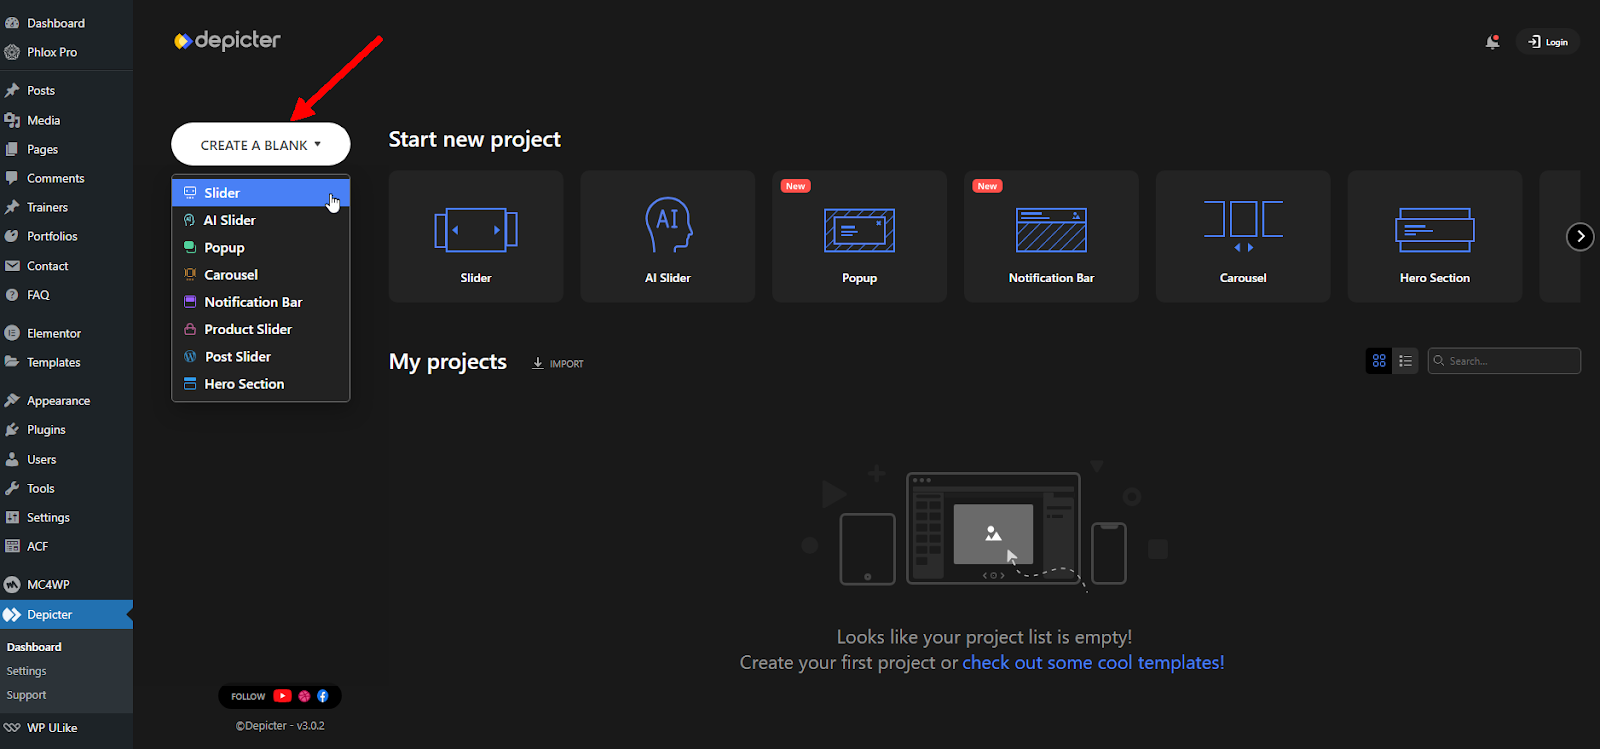
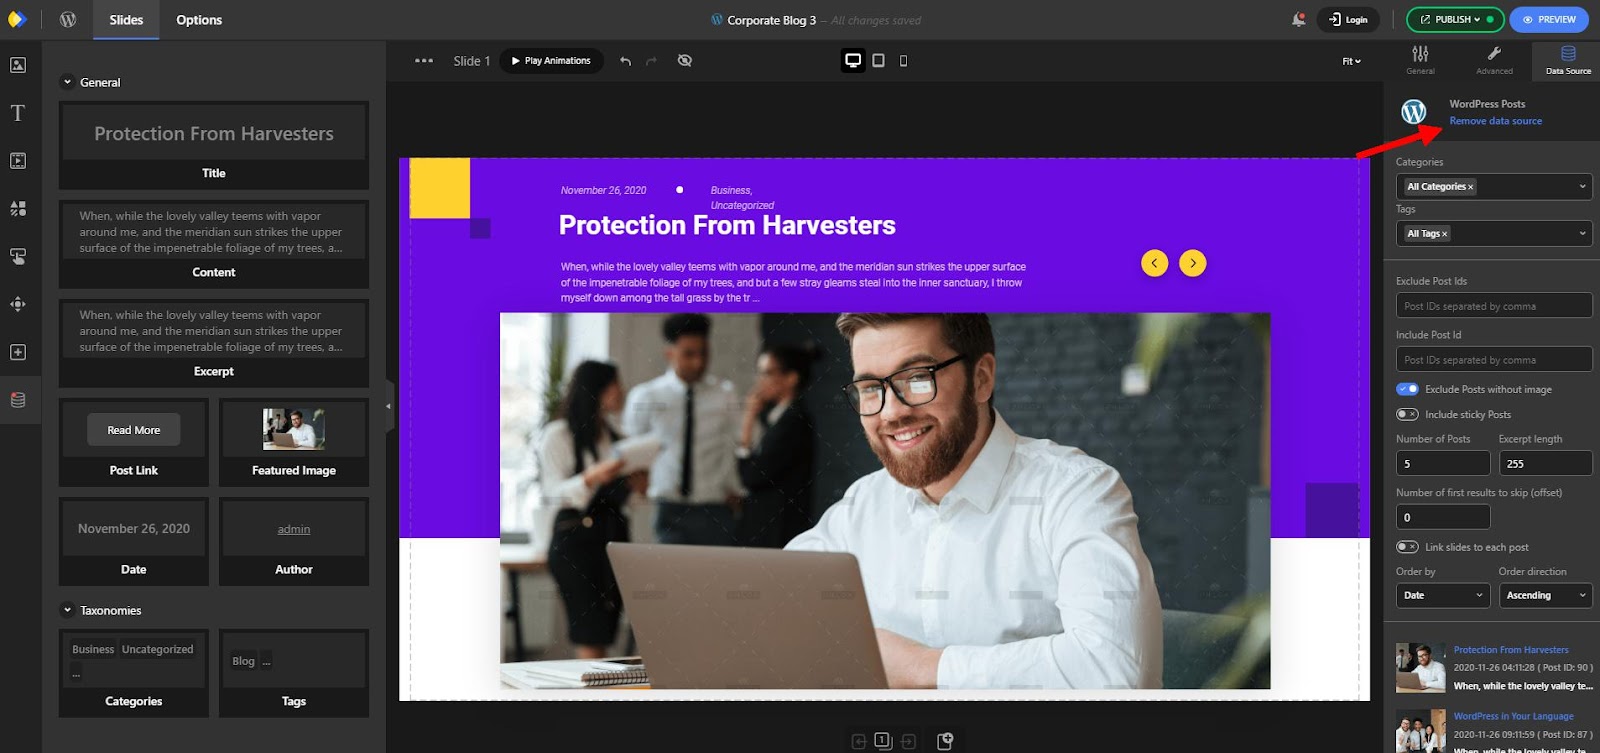
Open the Depicter dashboard and select the “Slider” option from the “Create a Blank” section to create a blank slider.
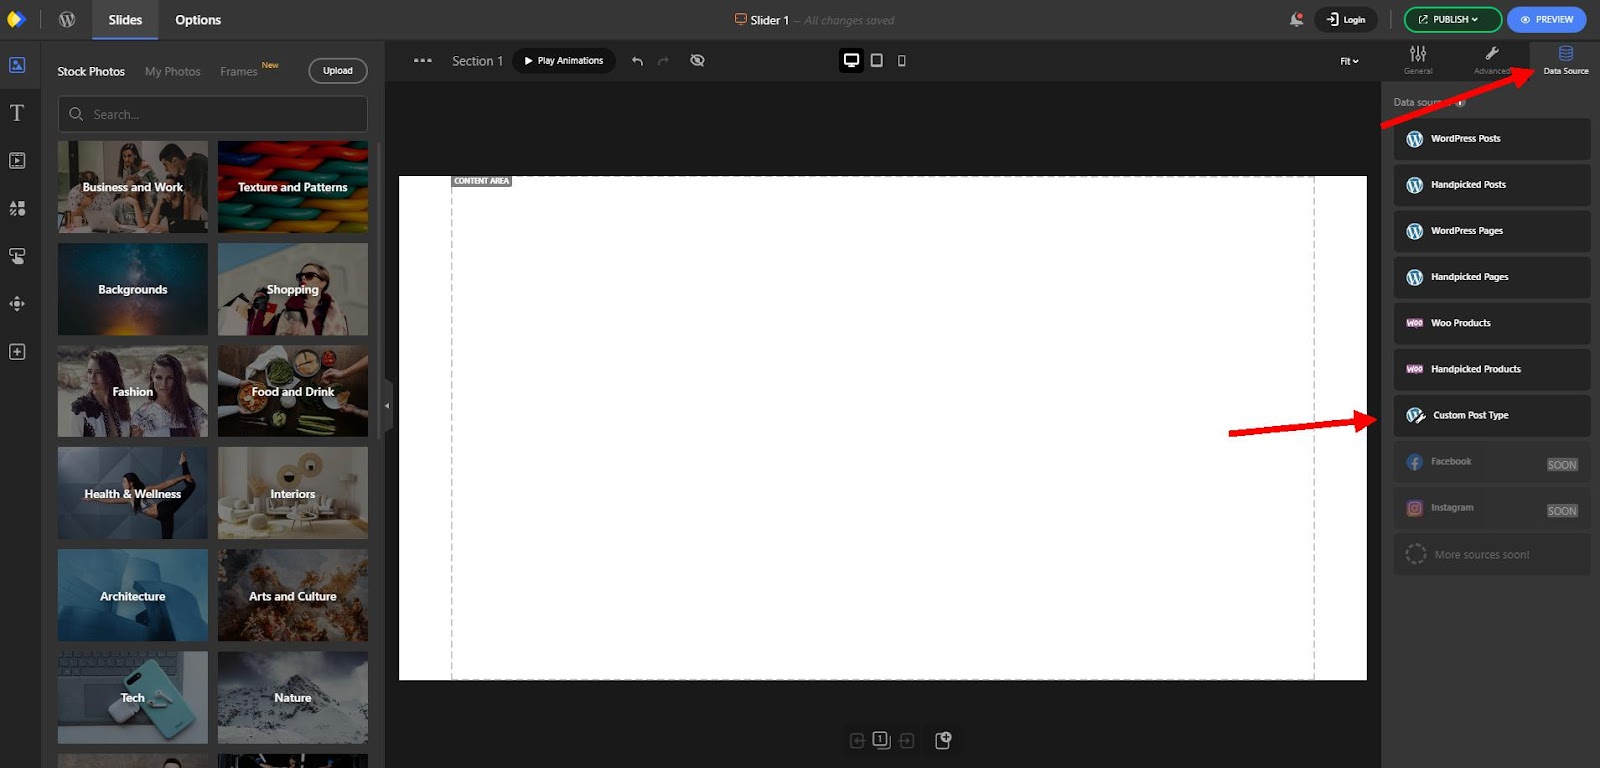
Next, we select the Data Source option from the top right corner and then select Custom Post type. This essentially converts a basic slider into a dynamic slider.
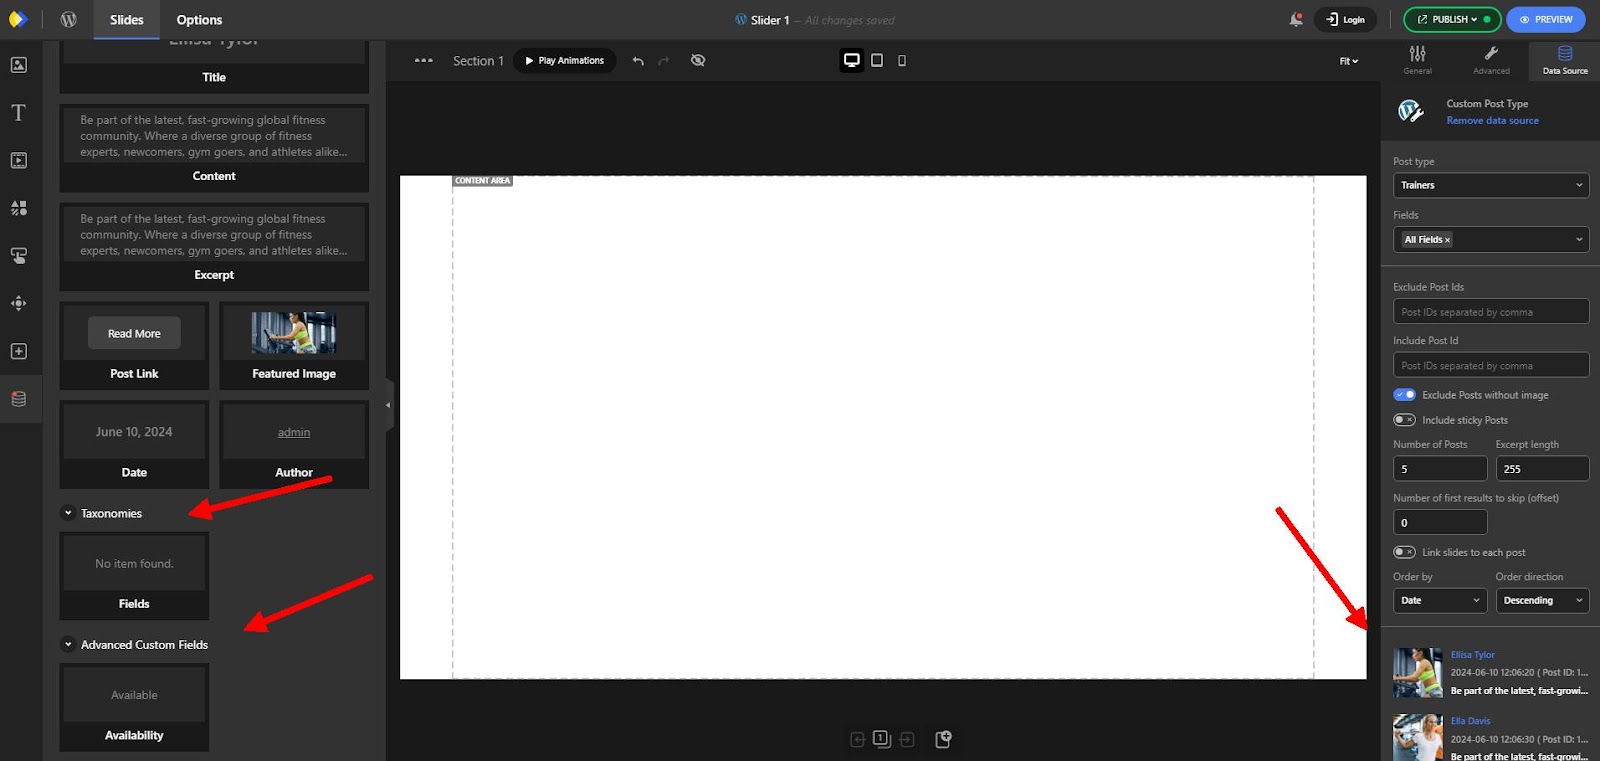
In the next step, we select the type of post type we want to choose for the slider, which in this case is Trainer.
After that, we see a preview of the available fields for Trainer in the bottom right corner, and all the default and ACF-customized data are also available for use in the slider from the left panel.
Using ready-to-use templates for your ACF slider
Utilizing pre-designed templates is an effective way to optimize time and leverage professional designs for creating sliders.
Pre-built templates for both standard and dynamic sliders differ in their functionalities. Fortunately, Depicter offers a vast selection of templates for both types, ready for import.
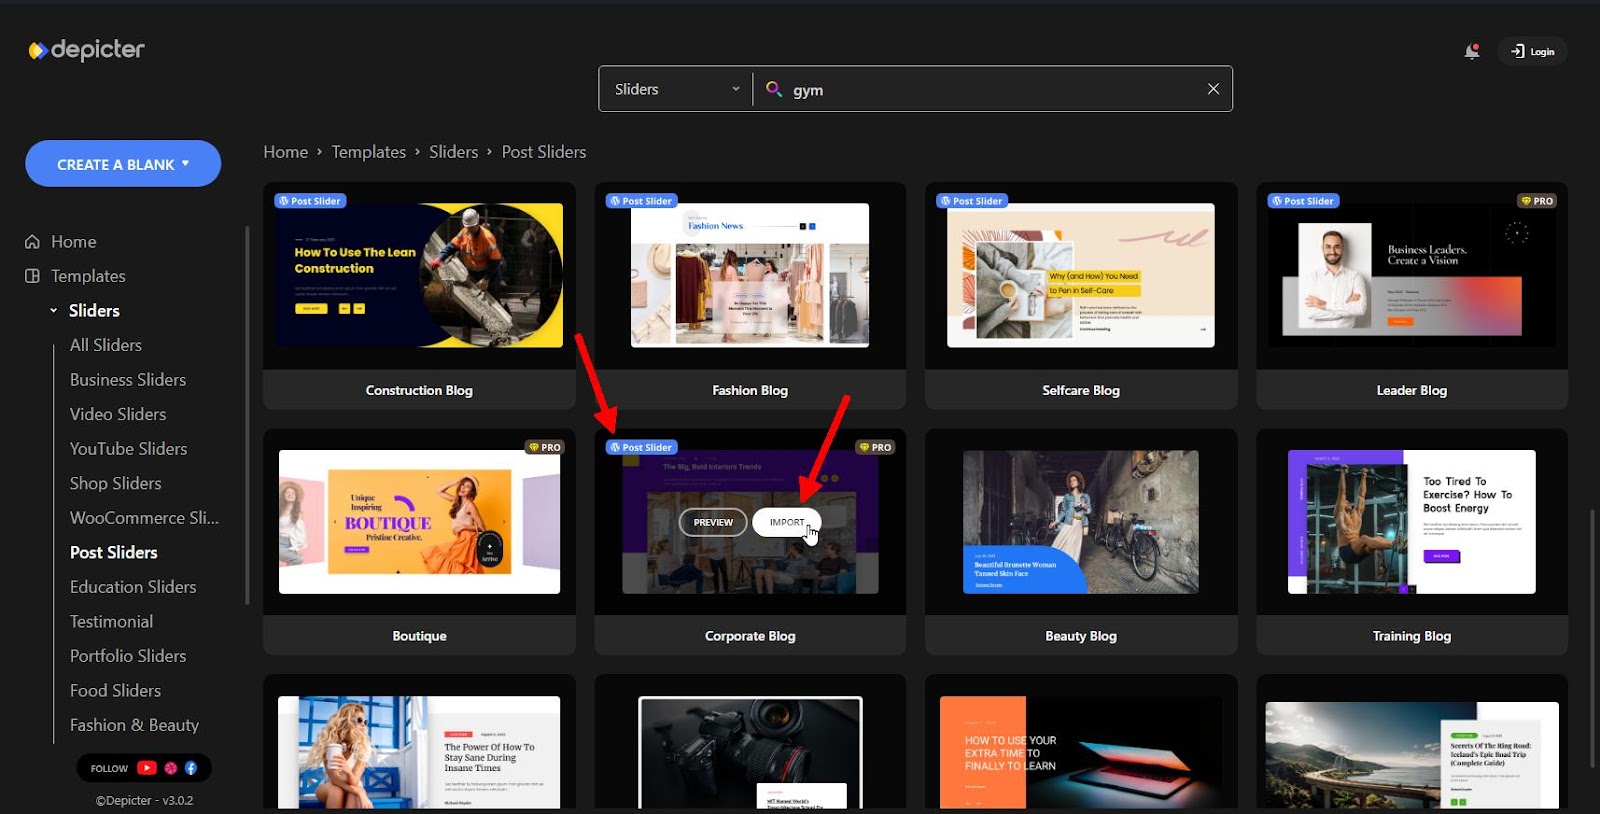
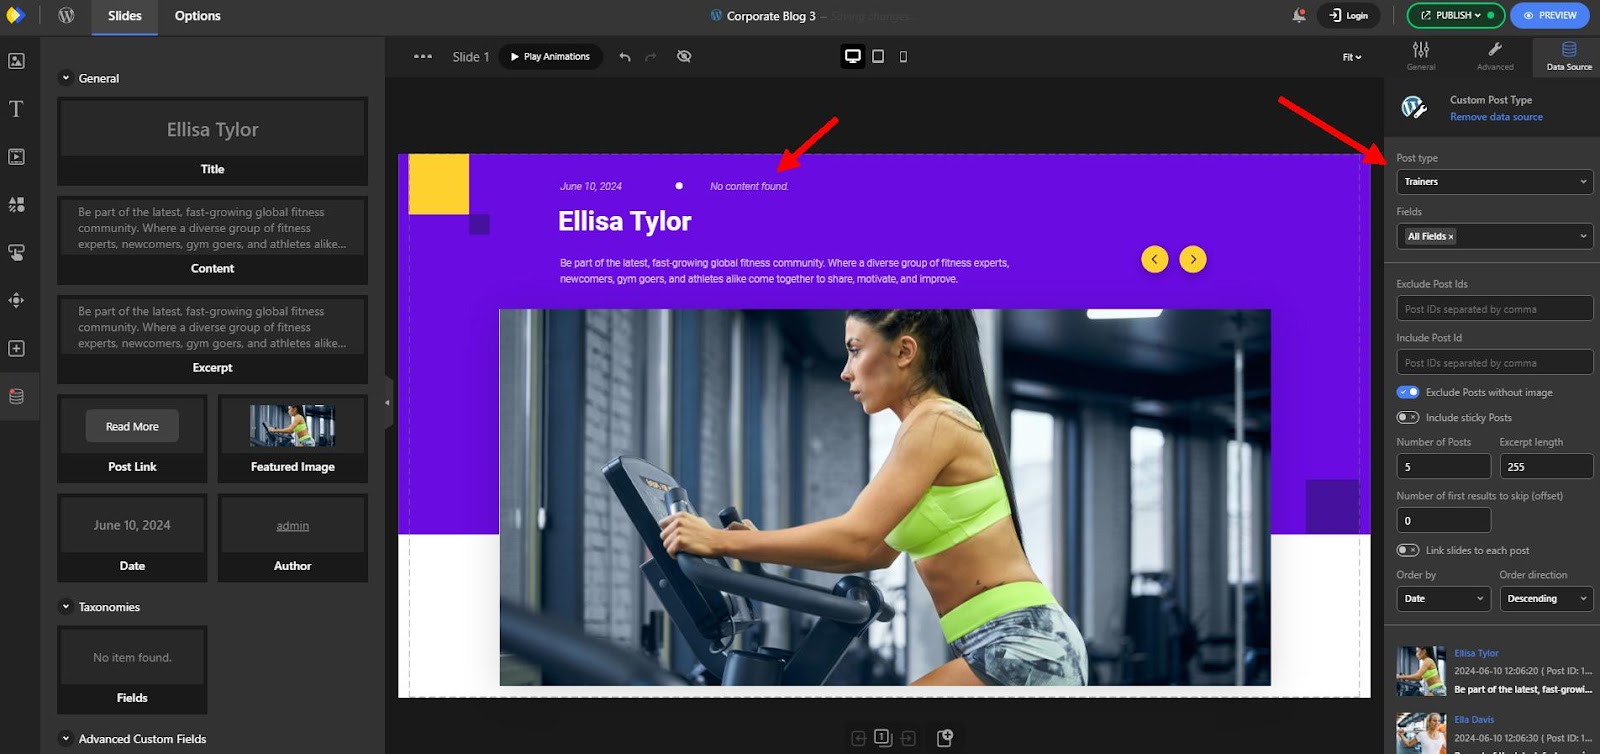
To import a template, navigate to the “Post Slider” section of the Depicter dashboard and select the desired template from the available options.
Since the imported template is designed for blog posts, we need to perform the following steps after importing it:
Navigate to the “Data Source” section.
Click the “Remove Data Source” option.
Select your custom post type, which is “Trainer” in this case.
By following these steps, we have effectively utilized a pre-designed blog post template to create our own dynamic slider with our ACF slider.
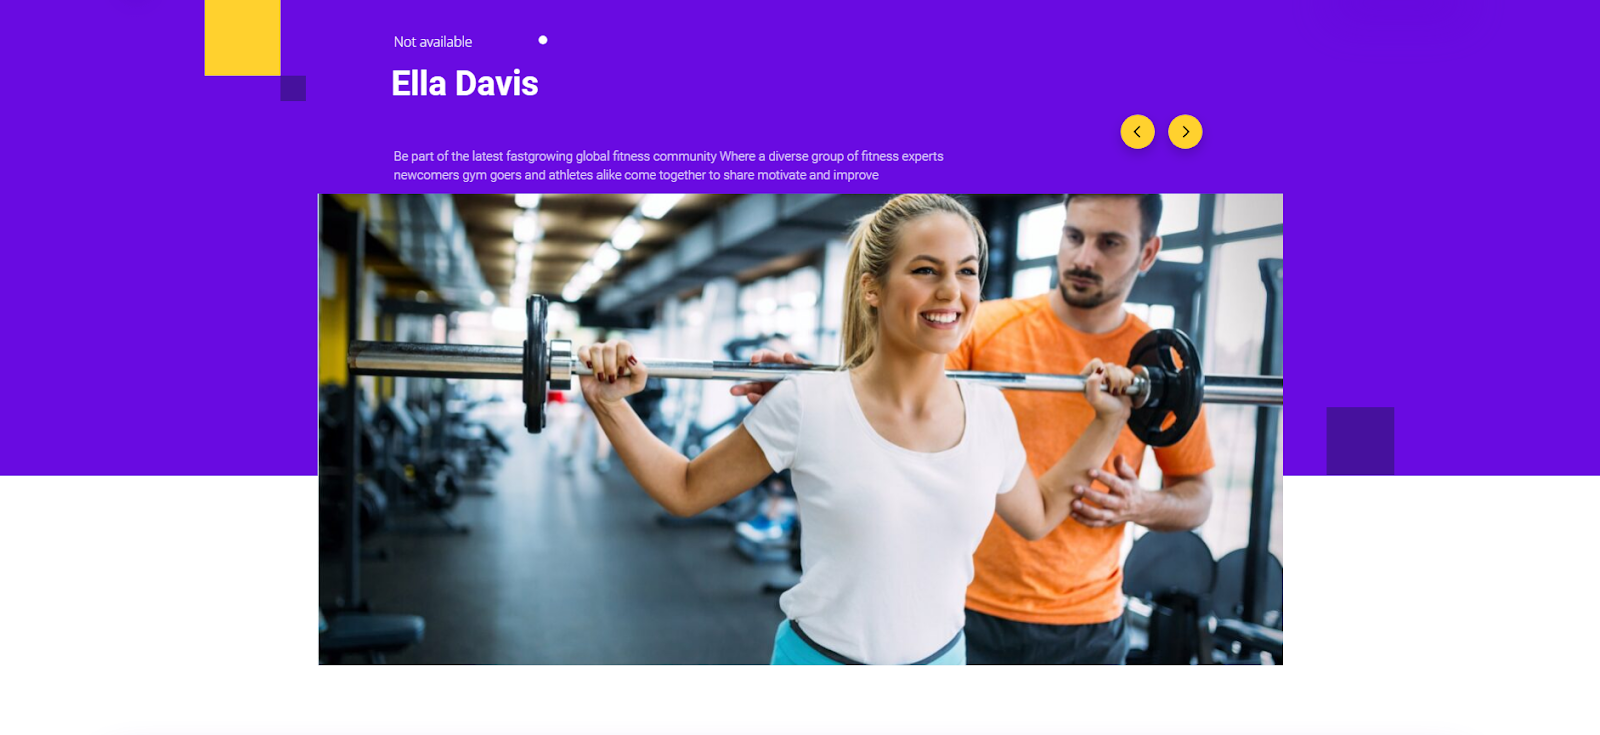
Please note that changing the data source may require modifying or removing certain dynamic elements on the slider. For instance, you might need to remove the “Category” element if it doesn’t apply to “Trainers,” since WordPress typically associates it with blog posts.
Additionally, we can add any custom fields we’ve defined to the slider.
One of the attractive features of WordPress is custom post types, which gives your website unlimited flexibility to create personalized content. One of the best plugins for creating and managing custom post types in WordPress is ACF. In this article, we saw how we can create a post type using ACF and finally create a dynamic slider of our custom post type using the Depictor slider plugin.
FAQs
Can I build an ACF slider without writing any code using Depicter?
Yes, with Depicter, you can create an ACF slider without coding. Just set up your fields in ACF and use Depicter’s dynamic content feature to display them in a slider visually.
Does Depicter only support custom post types created with ACF?
No, Depicter does not exclusively support custom post types created with ACF.
Depicter recognizes and can work with any custom post type defined and registered within WordPress.
Why use a plugin like ACF to create custom post types?
While it’s possible to create custom post types manually by editing code, using a plugin like ACF is a more user-friendly and efficient option. It avoids the need for coding knowledge and streamlines the process.
Can I use ACF to create custom fields for existing post types (like posts or pages)?
Yes, ACF works for both standard post types and custom post types. You can add custom fields to pages, posts, or any other post type on your website and the new fields will be available to use in the Depicter slider as well.
If you’ve been captivated by one of the most compelling visual elements in web design, namely image sliders, and you’re eager to gain comprehensive knowledge about a professional image slider, you’ve come to the right place.
What is an Image Slider?
An image slider is a website section that showcases multiple images in a rotating format. It’s also called a slideshow. Each image, typically accompanied by a brief text snippet, acts as a visual teaser linked to a specific page or post on your website or any other website. These sliders can advance automatically after a set time or manually by user clicks, allowing visitors to explore content that fits their interests. The popularity of image sliders comes from their ability to display captivating visuals, create dynamic effects, and showcase a variety of content in a space-saving format. As a result, most modern website themes utilize one or multiple instances of an image slider in many different formats.
Understanding the Types and Features of Different Image Sliders
Simple image sliders: These display a series of images that rotate or transition automatically or with user interaction. They often include captions and can link to other website sections.
Shop slider (WooCommerce Slider): Specifically designed for WooCommerce websites, this slider displays product images with details like titles and prices. Often used to promote featured products or new arrivals.
Post slider: Showcases a selection of blog posts or articles with featured images and titles. Users can click on the slides to read the full posts.
Custom post type slider (ACF): This slider utilizes the Advanced Custom Fields (ACF) plugin to display content from custom post types you’ve created (e.g., events, portfolio items, testimonials). Provides flexibility to showcase diverse content beyond standard posts.
Samples for Each Type of Image Slider
Whether you’re running an online store, a blog, or a portfolio website, there’s a slider type that can perfectly complement your content strategy.
Let’s explore some popular types of sliders:
Image Slider:
Cycling: A beautiful yet simple image slider with full-screen compatibility, autoplay navigation, and a stunning Ken Burn effect.
Shop Slider:
Summer shop: A WooCommerce shop slider that loads selected products and presents them to visitors for maximum attention and boost in sales.
Post Slider:
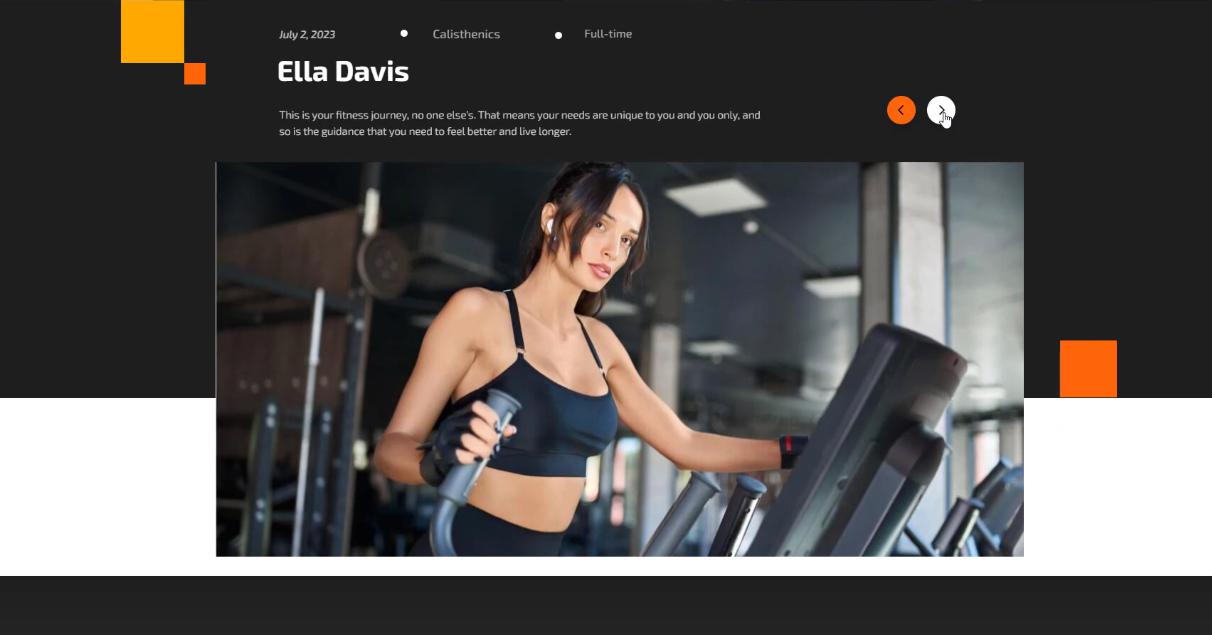
Games News: Turns the normal blog posts into an amazing visual element on a blog, magazine, or news website.
ACF Slider:
Trainers: takes a custom-created post type (Trainers) and creates a professional slider, best for any WordPress website with customized content.
Advantages and Disadvantages of Image Sliders
Advantages
Making the Most of Limited Space
If you want to present a large amount of information to your website visitors within a confined space, a slider or carousel is the ideal solution. It’s safe to assume that no one enjoys scrolling through a lengthy page of information. On the other hand, an image slider offers a pleasant user experience due to its compact and optimized nature.
When information is presented to users in small sections that occupy relatively little space, it is easier to digest and provides a higher-quality user experience. This demonstrates that careful consideration has been given to the presentation of content to the user.
Visual Appeal
In today’s digital landscape, users tend to favor visual elements over lengthy blocks of text. This psychological reality makes image sliders a valuable asset for your website. For instance, if you want to convey the story of a startup to your audience in the shortest possible time, utilizing a slider, supplemented by concise text elements, would likely be the most effective and engaging approach.
Capturing User Attention
A slideshow prominently featured on the first section of your homepage can effectively grab your user’s attention from the start, making them curious to explore the subsequent slides or utilize the call-to-action elements embedded within the slider.
Therefore, if you have a service or product to offer, employing one or more captivating images is a sound recommendation. Combining these visuals with compelling call-to-action elements empowers your audience to dig deeper into the core message without wasting time.
Disadvantages
The Impact of Sliders on Page Load Time
Every slider requires loading its own set of scripts to function, which directly impacts page loading speed. When you factor in animated effects and potentially slow internet connections, this can overall negatively impact the user experience.
However, utilizing professional plugins with built-in optimization features and choosing pre-optimized images can mitigate this issue to some extent. The impact is likely most pronounced for mobile users.
Lack of Responsive Optimization
It’s true that there are numerous options for adding a slider to your website. If you quickly search for “how to make a slideshow” you will find a large number of plugins available for this purpose, but only a selected few are genuinely responsive. Sliders that fail to account for responsiveness simply shrink your entire slide to a smaller scale on mobile devices. In contrast, professional options provide you with the ability to define specific layouts and behaviors for your slider based on specific screen sizes.
Neglecting Content Consumption Patterns
In many scenarios, there’s a high likelihood that users won’t spend a significant amount of time on your website. While designing your slider, you might assume that visitors will exactly read and absorb every word of your content. However, the reality is that the average user will only view one or two slides before moving on from that section or even the entire website.
Therefore, prioritizing a minimalist design and avoiding content overload is crucial for an effective slider design.
Creating Effective Image Sliders: Design and Implementation Best Practices
Image sliders are a website’s dominant visual element, but their effectiveness depends on thoughtful design and implementation. Here are some image slider best practices and key strategies to ensure your slideshow engages and converts visitors:
Intuitive Navigation:
Make it easy for users to explore your slider. Offer clear arrows for desktop users and a smooth swipe functionality for mobile visitors. Remember, an interactive slider helps engagement far better than a passive slideshow.
Visual Storytelling:
Combine stunning visuals with captivating text. Choose high-quality images that resonate with your message. Craft clear, concise, and persuasive text that compels visitors to Explore further.
Clean and Responsive Design:
Prioritize simplicity and responsiveness. Maintain a clean, uncluttered aesthetic that avoids overwhelming viewers. Consider things like font size, weight, and background color for optimal readability across devices.
Compelling CTAs:
Every slide should grab attention with a captivating headline followed by a clear call to action (CTA). CTAs should be straightforward and actionable, guiding visitors toward the desired outcome. Use action-oriented language in your CTAs, such as “Explore Our Collection Now” or “Download Your Free Guide.”
Optimal Slide Speed:
Slower is often better. Avoid frustration by presenting slides at a slow and steady pace. A good starting point is 3 seconds per slide, allowing viewers to take their time to absorb your message without feeling rushed.
Subtle Transitions:
Transitions should enhance the experience, not distract from it. Sometimes, a straightforward fade effect is more effective than an elaborate animation. Choose transitions that complement your overall design and avoid overwhelming viewers.
Focus on Clarity:
Limit your slider to a maximum of 5 slides. Remember, the fewer images you display, the more likely visitors are to recall them. Avoid information overload that leaves viewers confused and disengaged. Focus on sparking curiosity and encouraging future exploration.
Autoplay for Engagement:
Don’t leave navigation entirely to chance. Implement autoplay to ensure viewers see your content even if they don’t manually navigate. However, always provide clear controls alongside autoplay, giving users the freedom to explore at their own pace.
By following these best practices, you can create image sliders that not only showcase your content but also transform your website into an engaging and dynamic platform for attracting and converting visitors.
How to Create an Image Slider With the Depicter Plugin for Your WordPress Website
Installing the Depicter Plugin
Go to the Plugins menu.
Click Add New Plugin.
Search for Depicter.
Click Install and then Activate.
Importing an Image Slider Template
Go to Templates > Sliders
There are many image slider templates to choose from. Select one and click the import button
Your image slider will be imported and ready for customization.
Customizing the Slider
Typically, after importing a template, you may need to make some small adjustments to get the final slider exactly as you want it.
Click Publish.
Your slider is now ready to be added to your website.
Step 4: Add the Image Slider to Your Website
Edit the page where you want to add the image slider.
Select the location where you want to add the image slider.
From the list of widgets, select the Depicter widget and drag it into the section.
From the list of sliders, select your slider. Your slider will be displayed.
Update the changes and you’re done.
Conclusion
Image sliders are a powerful tool to enhance your website’s visual appeal, promote key content, and ultimately engage visitors. By understanding the different slider types, design best practices, and leveraging a user-friendly plugin like Depicter, you can create an impactful slideshow that elevates your website’s user experience and drives conversions. Remember, keep it simple, prioritize clarity, and focus on showcasing your best content to leave a lasting impression on your audience.
FAQs
What are the benefits of using a slider plugin like Depicter?
Depicter offers a user-friendly interface to create and manage sliders without needing coding knowledge. It provides a variety of slider types like image sliders, video sliders, and shop sliders to suit your specific needs.
How do I choose the right slider type for my website?
Image sliders are great for showcasing high-quality visuals and storytelling. Shop sliders (WooCommerce Sliders) are perfect for promoting featured products or new arrivals on your online store. Post sliders are a great way to display a selection of blog posts with featured images and titles. Custom post-type sliders (ACF) offer flexibility to showcase content beyond standard posts, like events, portfolio items, or testimonials.
How many slides should I include in my slider?
It’s best to limit your slider to a maximum of 5 slides.
With fewer slides, viewers are more likely to remember them and avoid information overload. Focus on sparking curiosity and encouraging further exploration on your website.
What are some tips for creating effective slider content?
Use high-quality images that are visually appealing and relevant to your message. Keep your text clear, concise, and persuasive, compelling visitors to take action. Prioritize a clean and responsive design that is easy to read on all devices. Include clear calls to action (CTAs) on each slide, guiding users toward a desired outcome.
Does Depicter offer free and paid plans?
Depicter offers both free and paid plans with varying features.
Create a Slider with AI is an exciting new approach that is revolutionizing the way sliders are designed and implemented. This innovative technique harnesses the power of artificial intelligence to generate sliders that are not only visually stunning but also highly functional. By combining the flexibility of sliders with the capabilities of AI, designers, and developers can now create dynamic and interactive sliders that adapt to user preferences and behavior. This cutting-edge technology opens up a world of possibilities for creating engaging and personalized user experiences.
How to Create Slider with AI Video Tutorial
How to Create AI Slider Under One Minute
What is AI and how can it affect your workflow?
Emerging from the field of machine learning, Artificial Intelligence (AI) has achieved a significant breakthrough. It can now not only learn and adapt but also generate entirely new creative formats, from captivating visuals to sophisticated written text. This represents a major paradigm shift within the creative industry, redefining the boundaries between computational power and human artistic expression.
AI workflows harness the power of artificial intelligence to streamline and enhance business processes that are often manual and repetitive. By automating these tasks, organizations can significantly improve overall productivity and efficiency. This shift frees up valuable employee time, allowing them to focus on more strategic and complex work.
The expansion of the web is no exception to this trend, and all those working in this field can somehow utilize AI to enhance and optimize their daily mechanisms and routines. AI WordPress plugins further empower users by offering advanced features, such as content generation, personalization, and analytics, seamlessly integrated into their websites. In this article, we will talk about the pros of using AI in slider world.
Benefits of using AI for making website sliders
Streamlined Design
With just a few clicks, AI tools can streamline the complex process of designing layouts and matching to design standards. This allows you to achieve the best possible outcome or the closest possible approximation for your slider, aligned with your website’s visual framework, in the shortest possible time. This eliminates the need for manual iteration and guesswork
Effortless Content Curation
Spend less time searching for visuals. AI can suggest royalty-free images and videos based on your chosen theme or keywords. This ensures your sliders are visually compelling and relevant to your audience.
A/B Testing Made Easy
AI streamlines A/B testing by automatically generating variations of your slider with different elements. Quickly identify the most effective design for your target audience.
Creating AI Slider with Depicter
The following video tutorial provides a comprehensive walkthrough of using AI in WordPress with the Depicter plugin. However, if you prefer more detailed text instructions for how to create a slider with AI, please refer to the steps outlined below:
To create and add a slider to your website using AI in WordPress, we will use the Depicter plugin.
Install the Depicter plugin:
Go to the Plugins menu.
Click Add New Plugin.
Search for Depicter.
Click Install and then Activate.
After entering the dashboard, navigate to the “AI Slider” section to initiate the process of creating an AI-powered slider.
Category Selection: Begin by selecting the appropriate category for your slider’s topic.
Keyword Input and Slide Count: Next, specify the slide topic using keywords and indicate the desired number of slides.
Topic Selection: Choose relevant topics for each slide from the list suggested based on the category selected in the previous step.
Content and Image Suggestions: For each slide select the most relevant image from the list generated using the information provided in the earlier steps.
Color Scheme and Layout Selection: In the final step, choose your preferred color scheme and overall layout for the slider from the available options.
Once completed, your slider is ready for use.
And here it is, the whole process of creating a slider using AI in WordPress for your website via the Depicter plugin.
Conclusion
The world of web design is rapidly evolving with the integration of AI. AI-powered tools like Depicter empower users for using AI in WordPress to create professional-looking website sliders with minimal effort. These tools not only streamline the design process by suggesting layouts and content but also save valuable time by automating tedious tasks. If you’re looking to enhance your web presence and stay ahead of the curve, consider embracing the power of AI in web design.
FAQs
Do I need any design experience to use AI sliders?
No prior design experience is necessary! AI tools like Depicter offer user-friendly interfaces that guide you through the process. With simple keyword selection and image choices, you can create professional-looking sliders even if you’re a beginner.
Are AI-generated images original and copyright-free?
The article mentions Depicter suggests “royalty-free images” based on your chosen theme. This means you can use these images legally without copyright restrictions for your website.
Can I customize the AI-generated slider further?
Absolutely! While AI provides a strong foundation, you still have creative control. You can adjust the suggested layouts, color schemes, and text content to perfectly match your website’s unique style and brand.