In fast-paced industries like news, sports, finance, or even e-commerce, timing is everything. When something important happens, your audience expects to see it right away, not buried somewhere in a blog post or a social media feed they might miss.
Highlighting breaking news in your website header ensures your message gets seen first. It’s a simple move that can improve user experience, increase engagement, and help build trust with your visitors. Whether it’s a major announcement, a live event, or an urgent update, putting it at the top of your site shows your visitors that you’re up-to-date — and that you care about keeping them informed.
Benefits of Showing Breaking News in the Header
Displaying breaking news or the so-called news ticker in the header offers several key advantages. First, it instantly captures visitors’ attention by placing urgent updates at the very top of the page, where they’re hard to miss.
This not only helps users stay informed but also improves their overall experience. It shows that your site is active and reliable, which builds trust, especially important for news platforms, public services, or any business with time-sensitive content.
A header announcement can also guide users toward specific pages, such as detailed articles or product updates, increasing traffic to those areas.
Plus, in urgent situations like service disruptions or major announcements, it’s a fast and effective way to get critical information in front of your audience without delay.
How to Add Breaking News to Your Header Using Depicter
Depicter is a free notification bar builder for WordPress that lets you easily display announcements, updates, and messages on your website — all without needing to code. But it’s not just limited to notification bars. Depicter also works as a powerful Popup Builder and slider creator, giving you a flexible set of tools to grab attention, promote offers, or guide visitors through your content. It has features like dynamic content, responsive design, animation effects, and a rich template library. It’s perfect for anyone who wants to create engaging visuals and boost user interaction without relying on multiple plugins.
Before you begin, ensure that the Depicter plugin is installed on your site.
To install it, just head to the Plugins section in your WordPress dashboard and search for “Depicter” — it’s quick and easy to add.
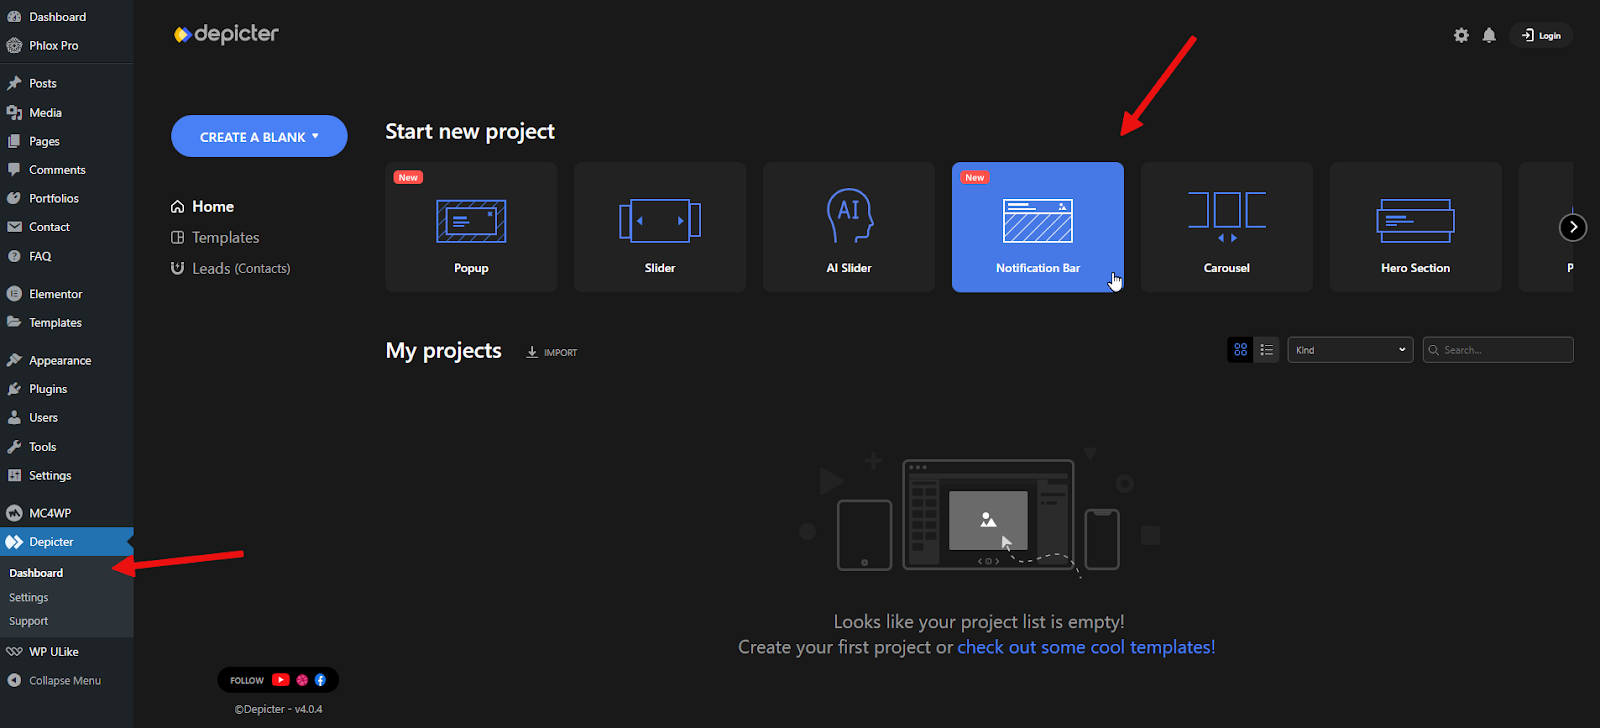
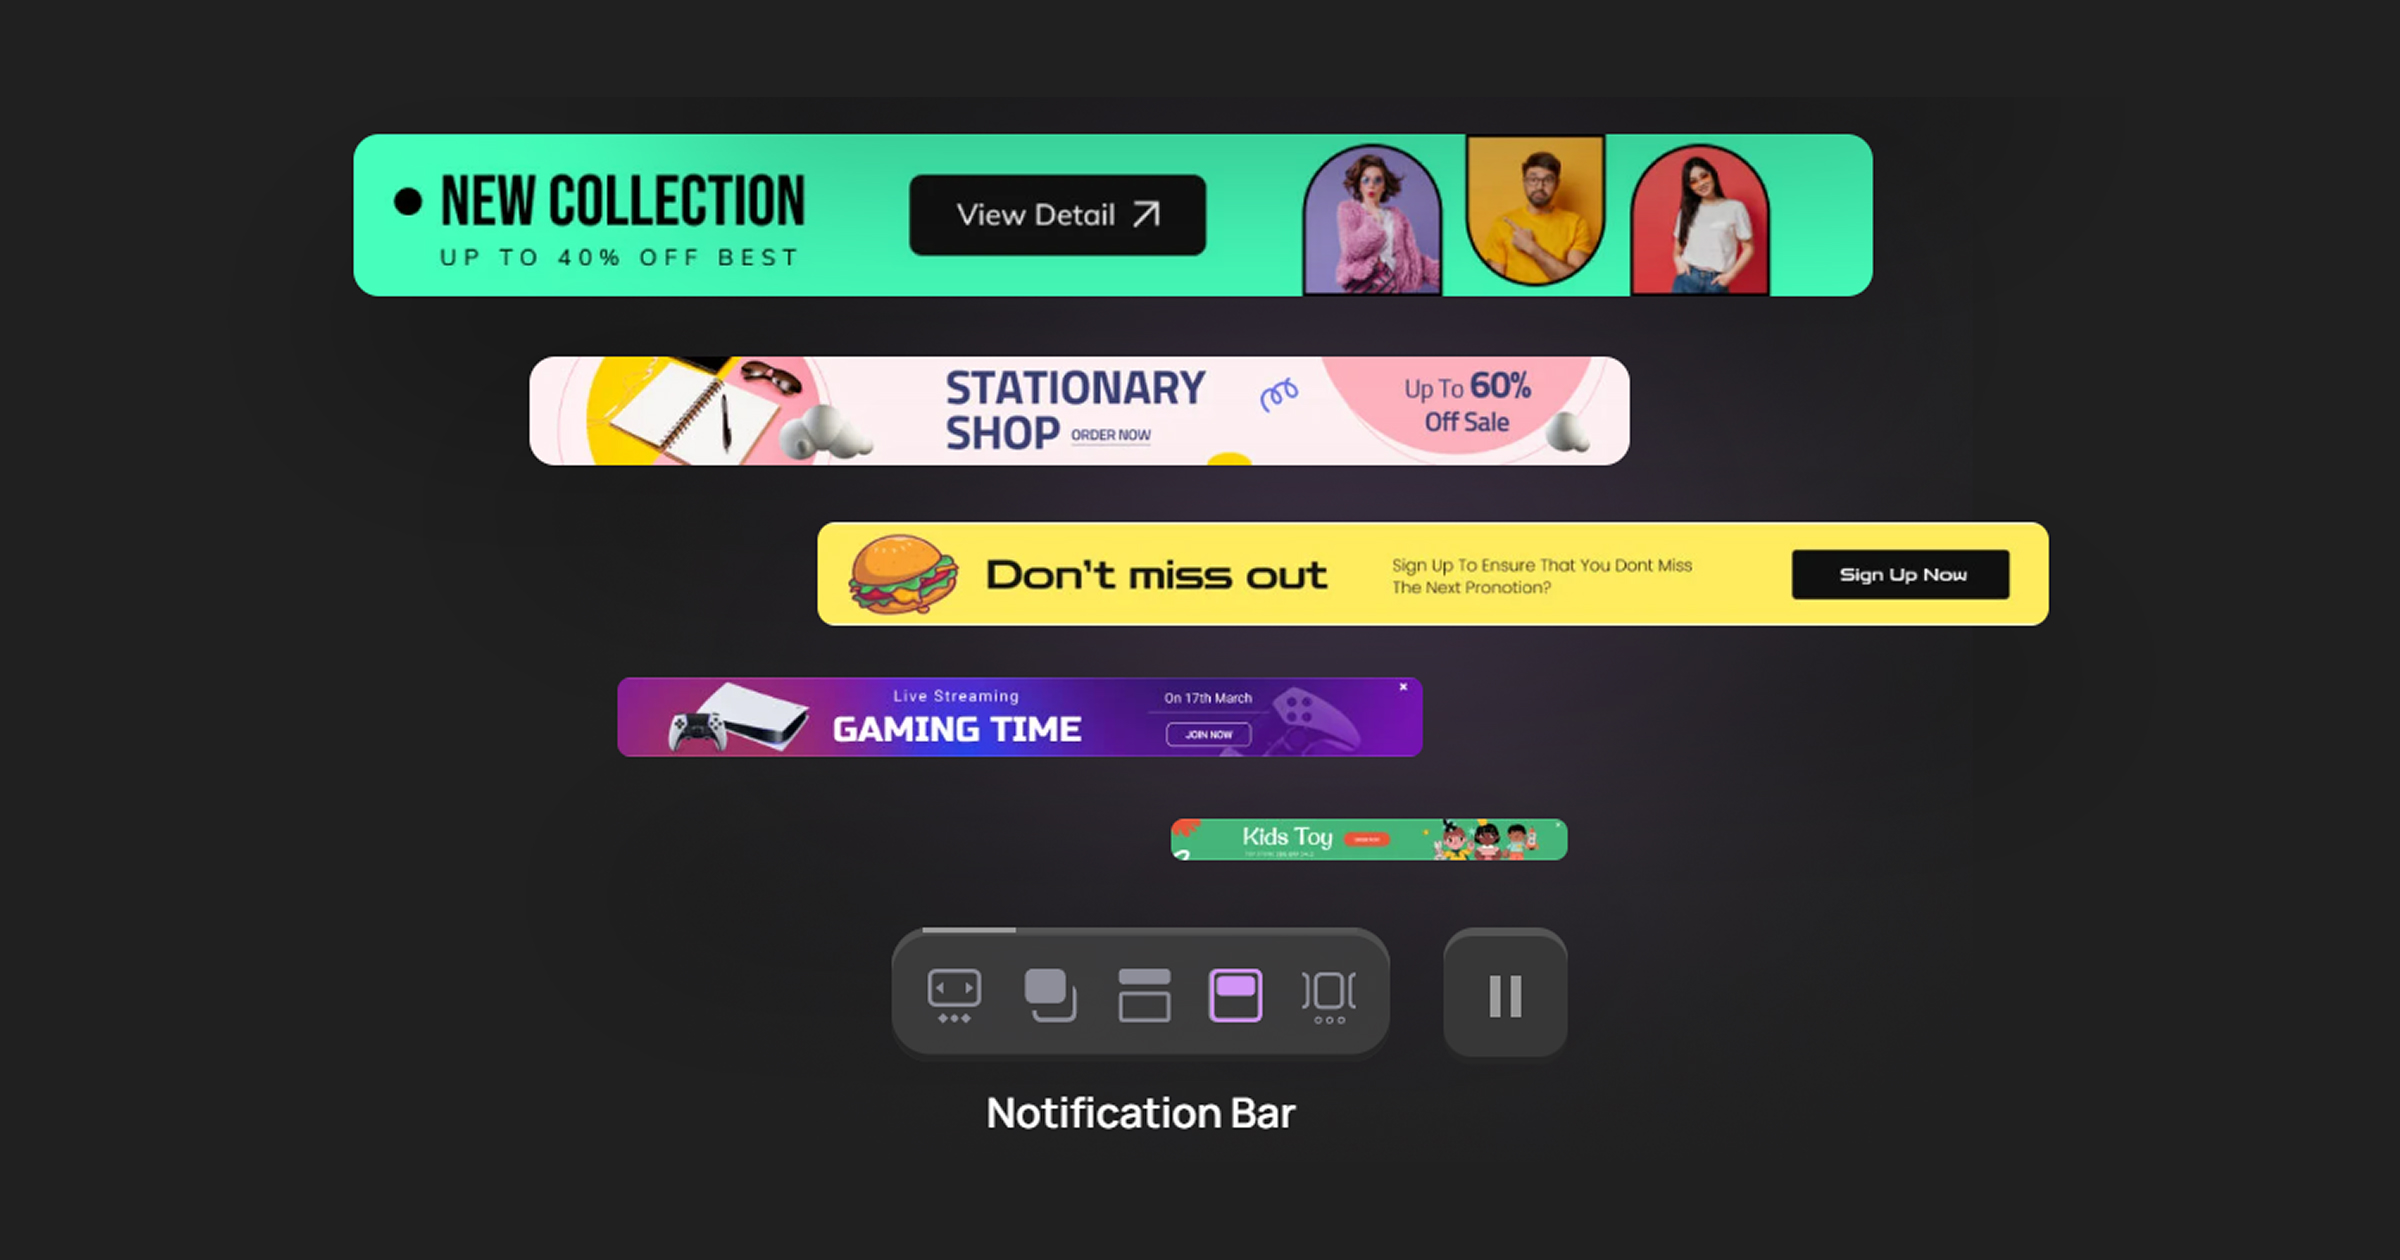
After opening the Depicter dashboard, go to the Notification Bar section to get started.
To speed things up, we’ll use a ready-made template — it’s a quick way to get everything set up without starting from scratch.
Depicter’s extensive template library makes it easy to create a professional-looking Notification Bar with minimal effort.
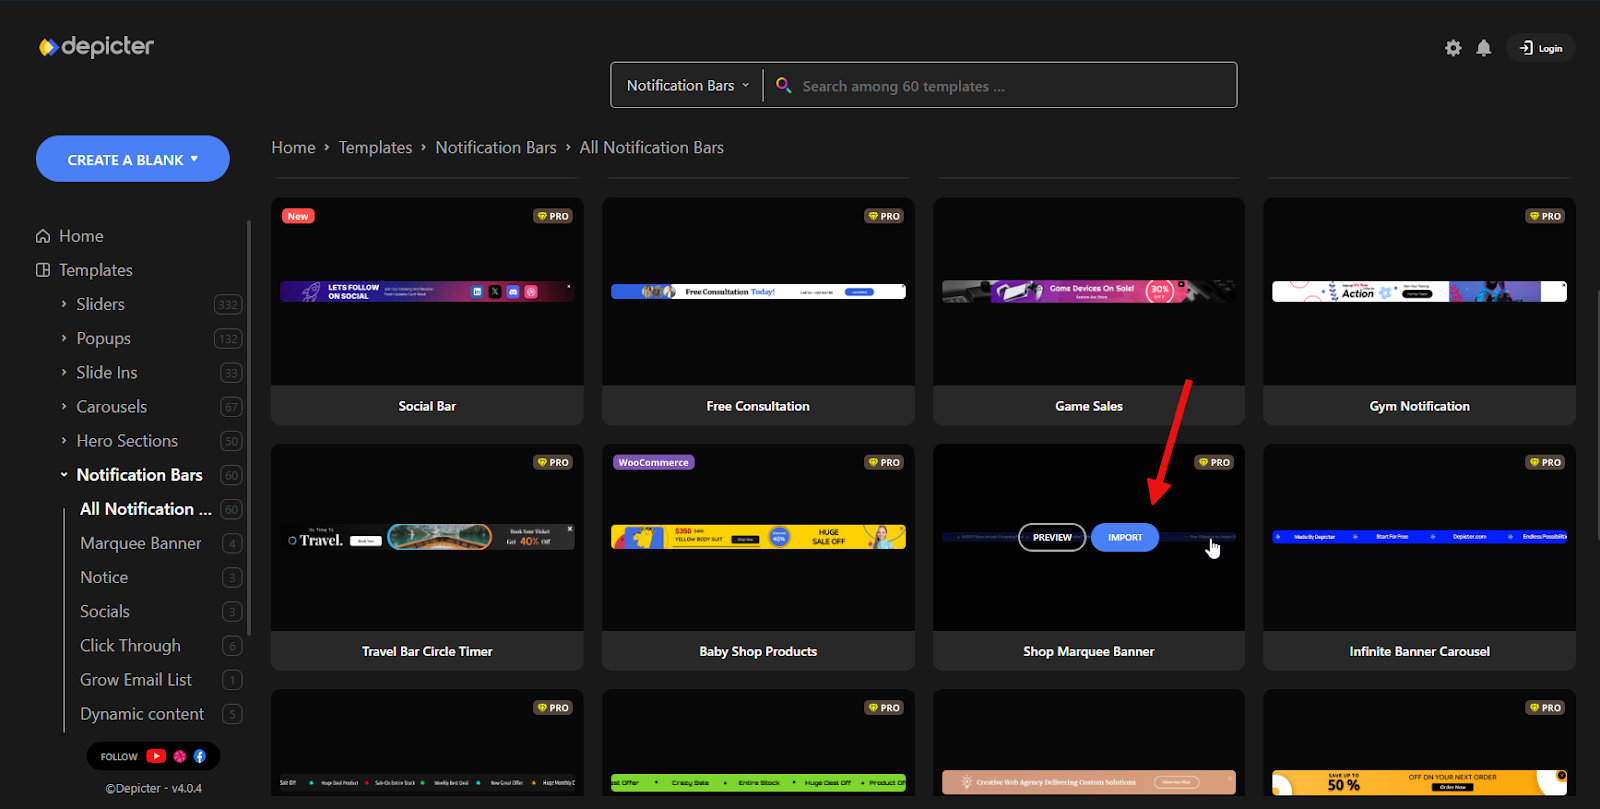
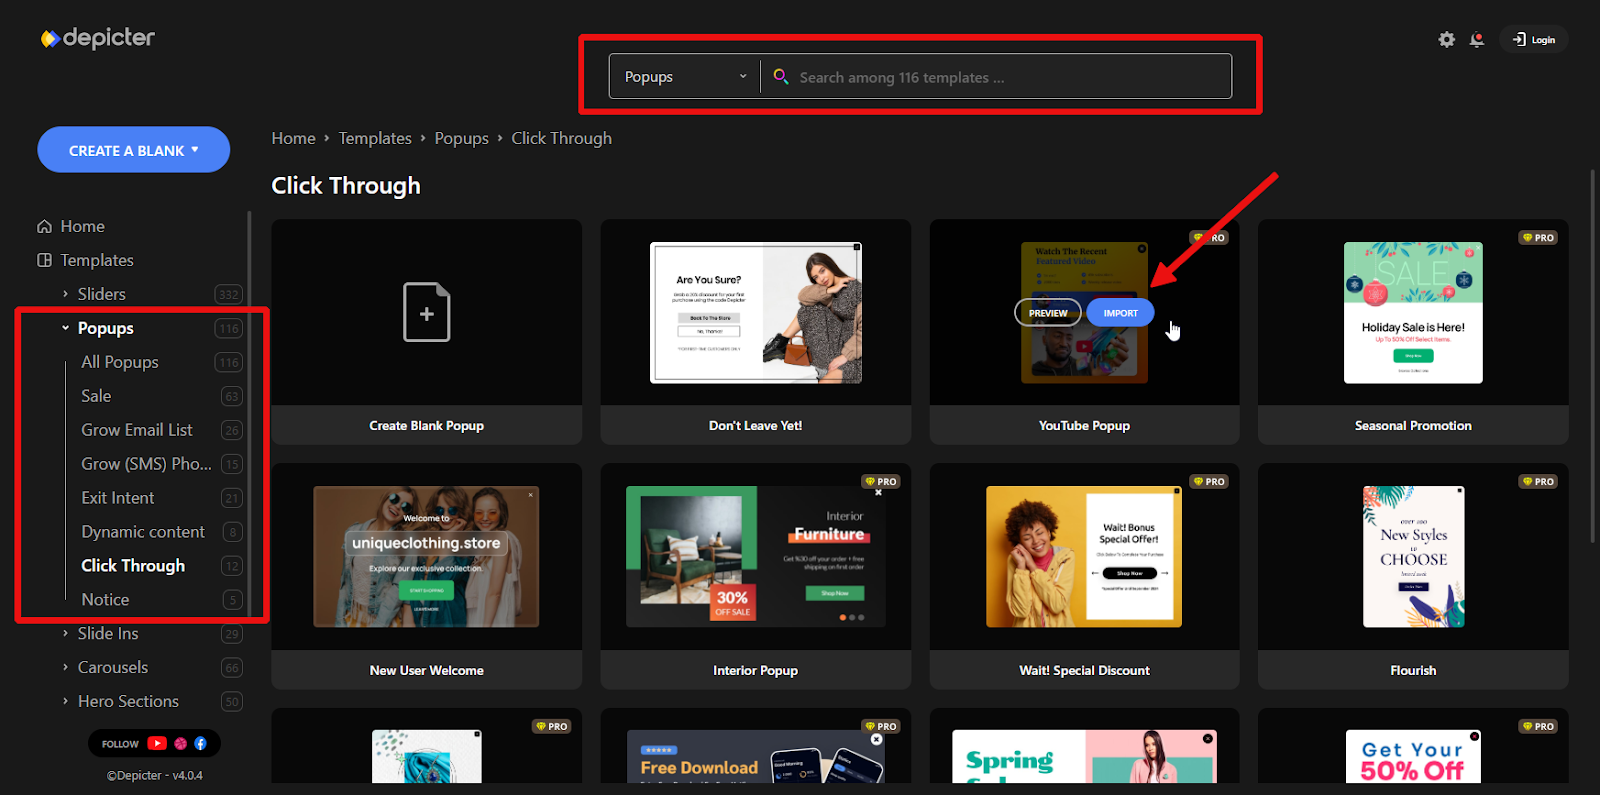
Depicter offers a wide range of clean, modern, and professionally designed templates, including free Notification Bar templates you can use at no cost. You can browse through different categories using the menu on the left or quickly find what you’re looking for with the search bar.
No need to start from zero — just pick a template you like and hit Import to begin.
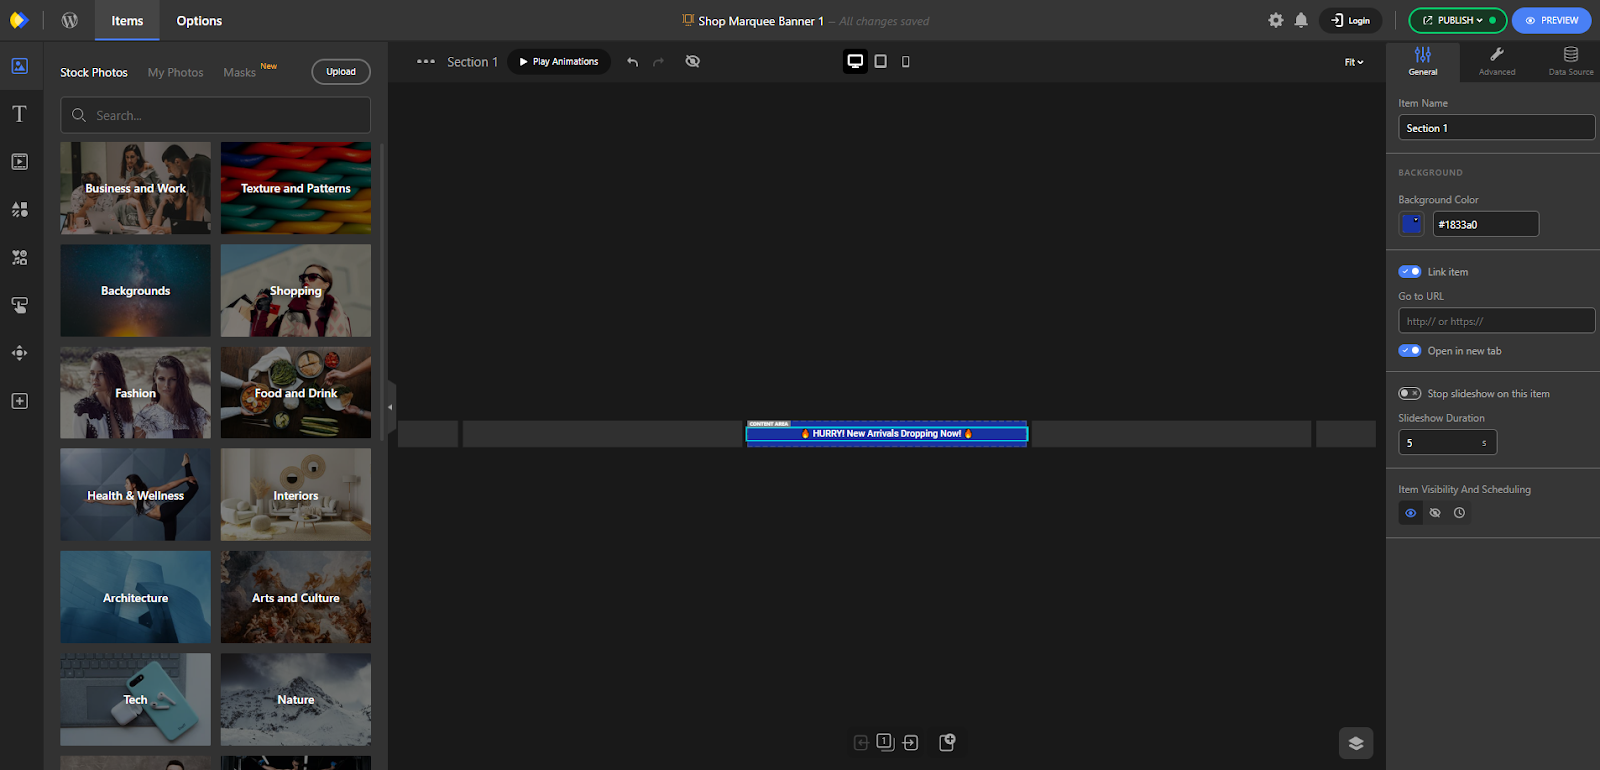
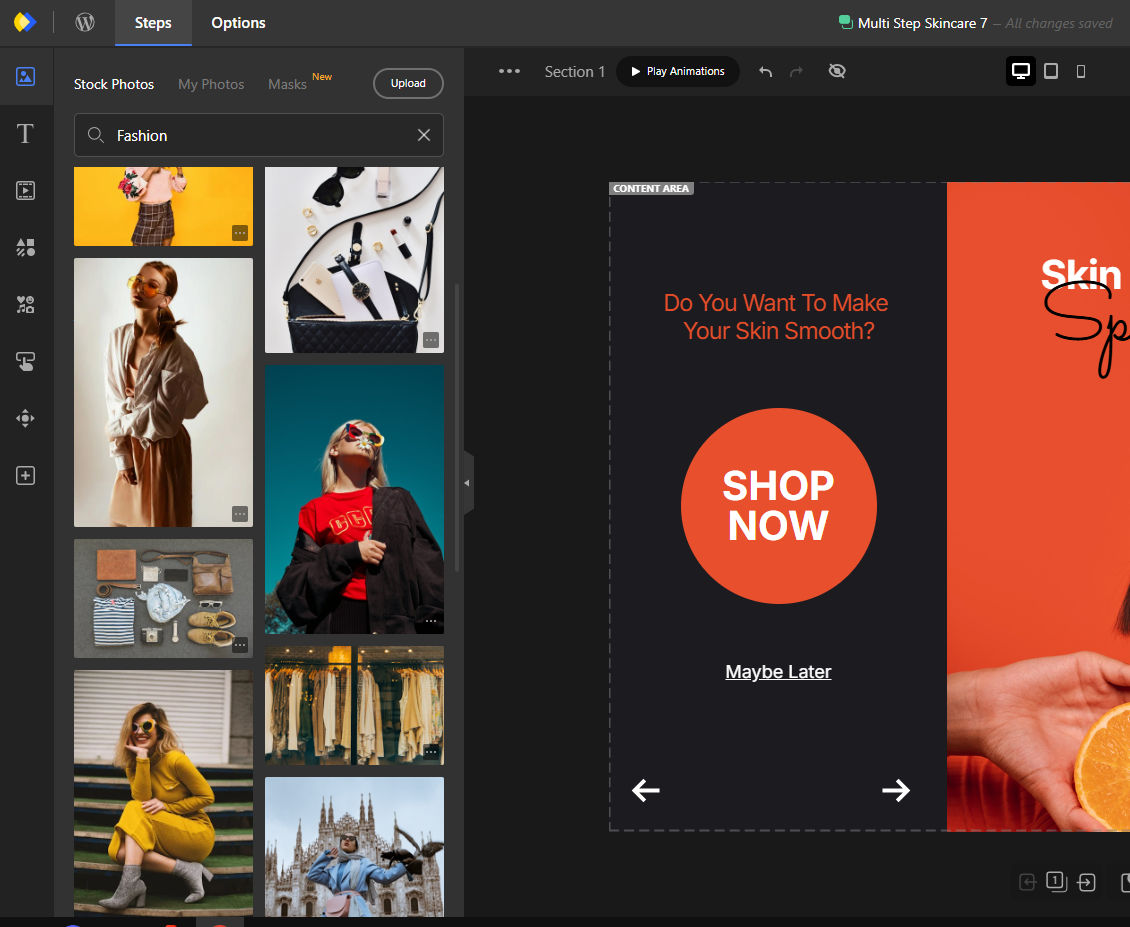
In just a few seconds, the template will load, and you’ll be taken straight to the Depicter Notification Bar Builder.
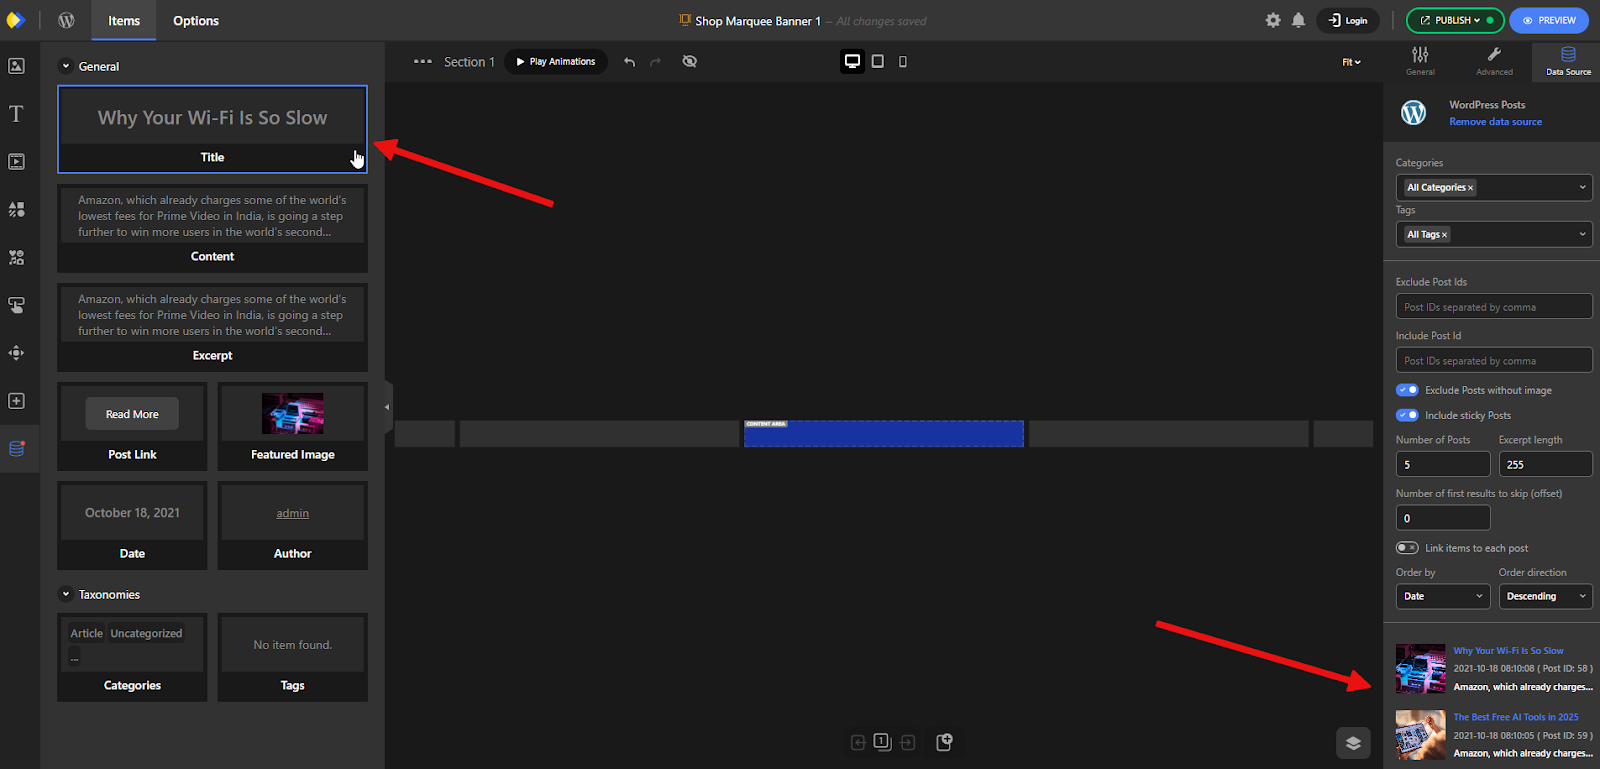
This is where you can make it your own. Click on any of the Notification Bar elements, and its settings will appear in the panel on the right, ready for you to adjust.
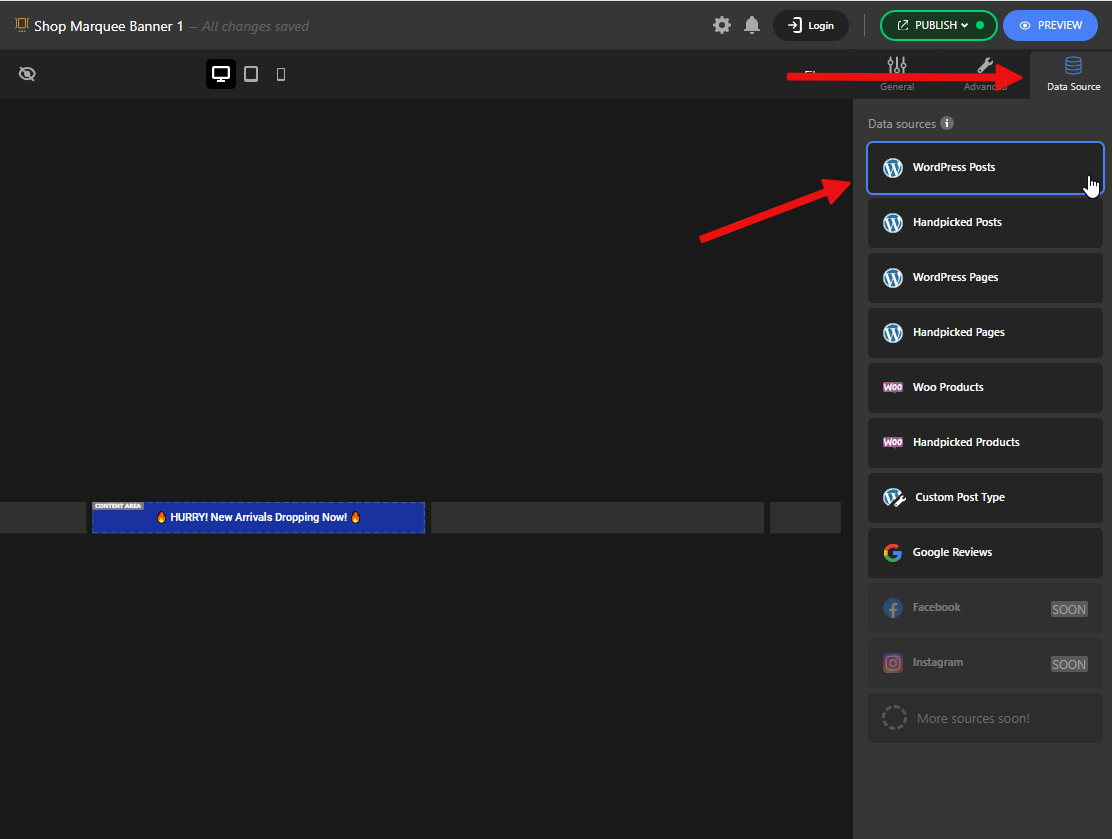
We want to display the latest posts from our website automatically, so we’ll use the Dynamic Content feature. To do this, open the Data Source menu on the right and select WordPress Posts.
Once that’s done, all the dynamic elements related to posts will appear in the menu on the left. You can use these in your Notification Bar.
For this example, we’ll only use the Title.
After customizing the appearance — including color, size, layout, and more — we’re ready to go. Just click Publish to apply the changes.
Add the News Ticker on your Website Header
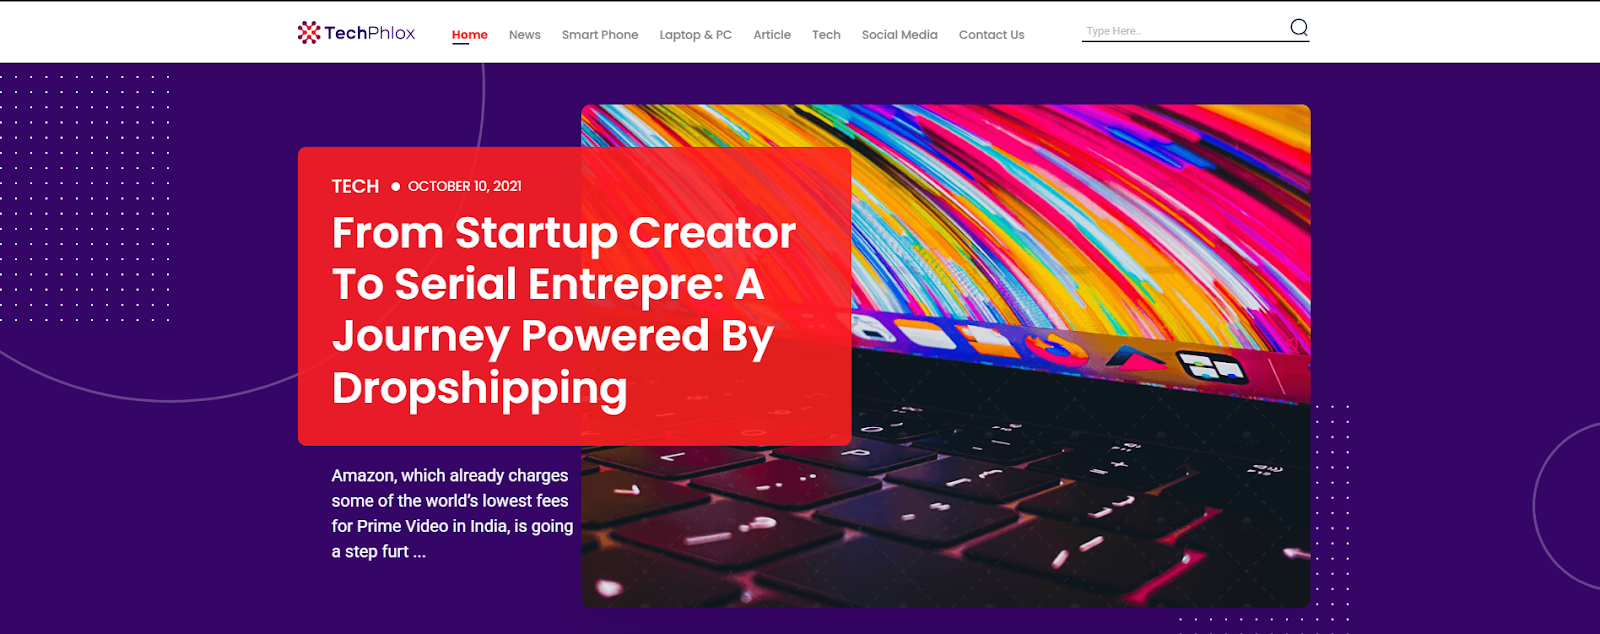
This is our website, and we want to place the Notification Bar at the top of the header.
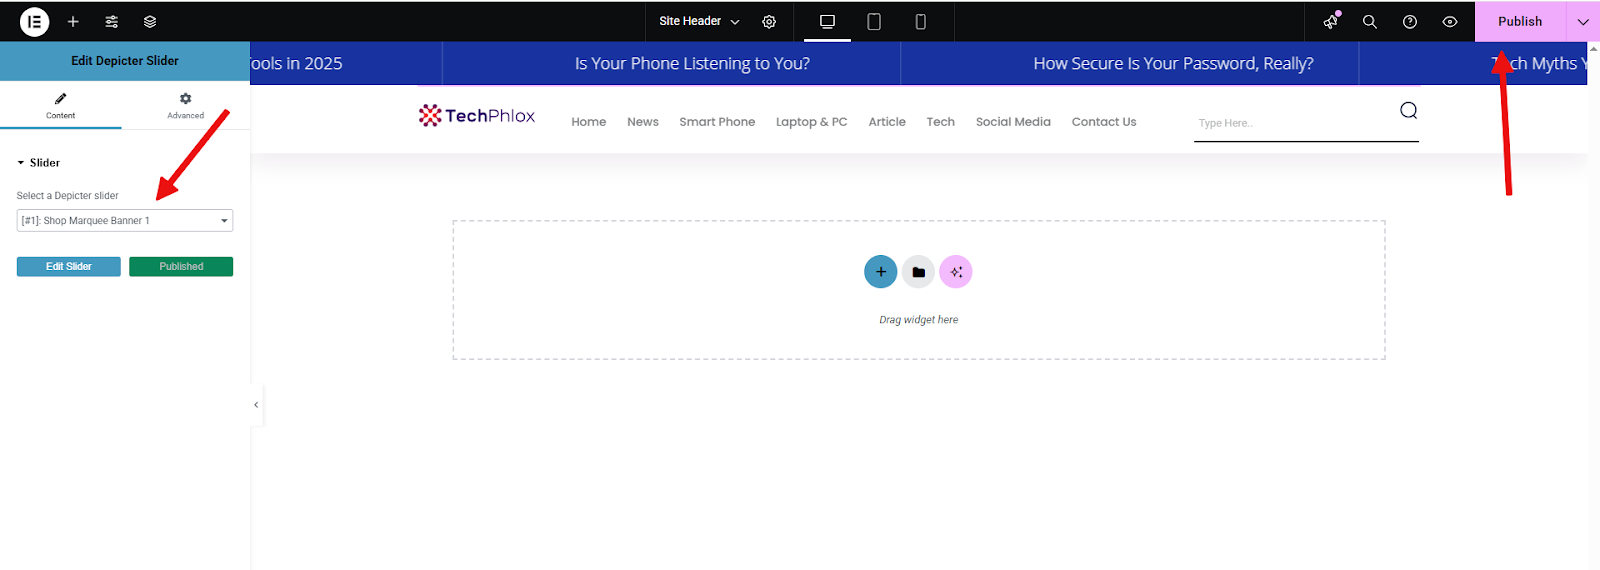
To do that, we’ll edit the header built with Elementor, drag the Depicter widget into the top section, and save the changes.
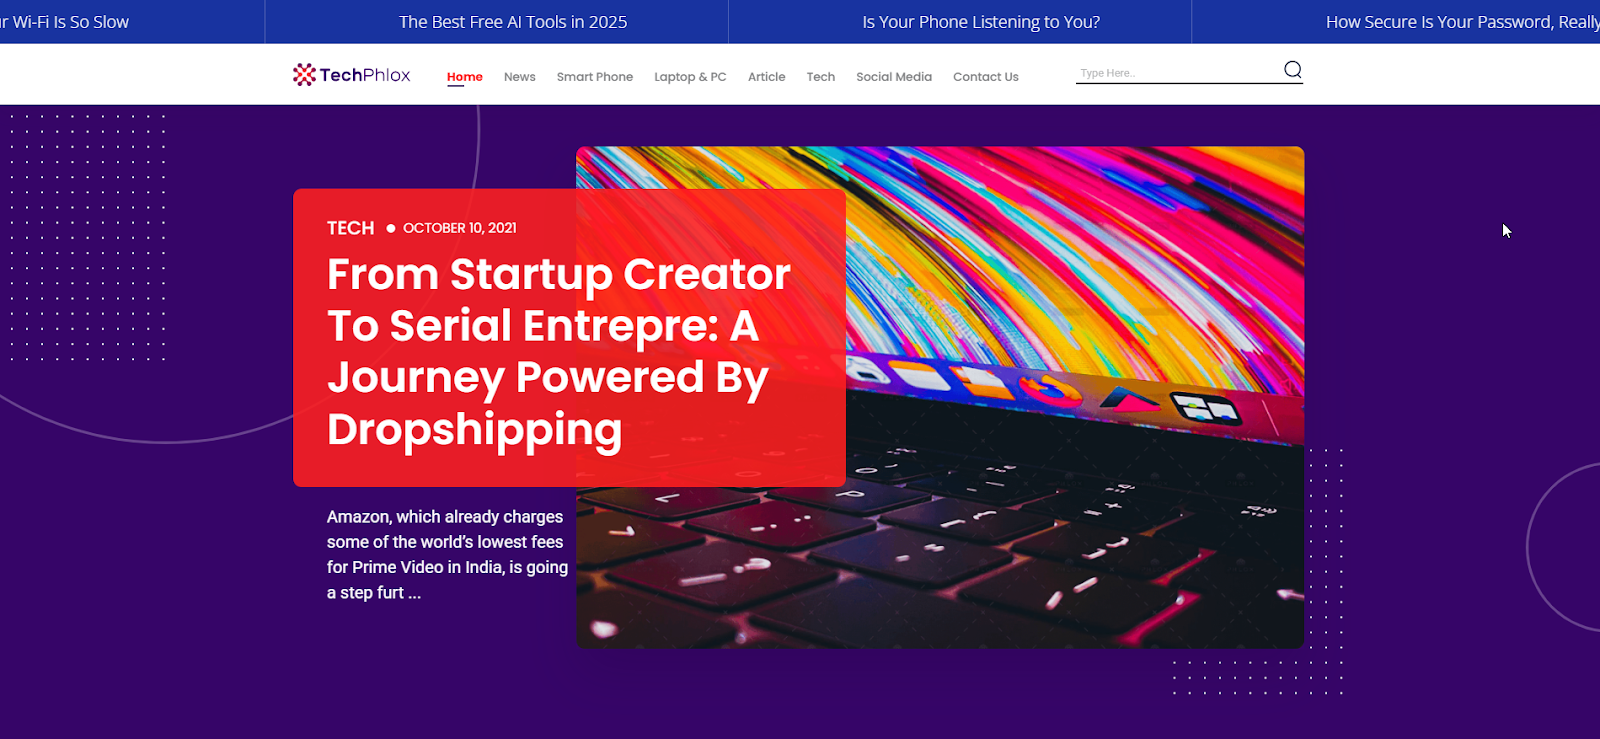
That’s it! As you can see, the Notification Bar is now live, animated, and automatically showing the latest posts from our site.
Adding a breaking news bar to your website header is a small change that can make a big difference. It helps visitors stay informed, builds trust, and improves overall engagement, especially when every second counts. With Depicter, you can set it up in minutes using ready-made templates, dynamic content, and an intuitive drag-and-drop interface. Whether you’re running a news site, an online store, or a business that values real-time updates, a notification bar at the top of your site is one of the easiest ways to keep your audience in the loop.
FAQs
Do I need to know coding to add a notification bar with Depicter?
No coding is required. Depicter is a visual builder with drag-and-drop functionality, perfect for beginners and professionals alike.
Can I use dynamic content like the latest blog posts in the notification bar?
Yes! Depicter supports dynamic content from WordPress. You can display post titles, links, and more — all updated automatically.
What if I want to show more than just breaking news?
No problem. You can use the notification bar to show promotions, event reminders, announcements, or any other custom message.
Want more people to buy from your store, without changing your whole website? Simple, limited-time offers shown in a popup can do the trick. It gives visitors a reason to act now, whether that means completing a purchase, trying your product for the first time, or coming back for more, just because it’s a “limited time only” offer. It creates a sense of urgency and scarcity.
In this article, you’ll see how to quickly and easily set up a Limited-Time Offer that can boost your sales, reduce cart abandonment, and build stronger customer relationships — all with the Depicter Free Popup Builder.
Why Limited-Time Offers Get Results
A potential customer might start with something like What are the best limited-time offers online?
Limited time offers are deals that only last for a short while—maybe a few hours, a few days, or up to a week.
They can include things like a small discount, free shipping, a gift with your order, or even a buy-one-get-one offer.
These kinds of deals work well because they make people feel like they need to act now. When shoppers know a deal is ending soon—or that only a few items are left—they’re more likely to decide quickly instead of putting it off. This sense of time pressure turns a casual visitor into someone who takes action.
It also helps when someone’s unsure about buying from a store for the first time. A short-term offer gives them a reason to try, since they feel like they’re getting something extra. And for returning customers, a special deal sent through email or shown in a popup makes them feel appreciated and keeps them coming back.
Even people who leave items in their cart might return if they see a reminder that the offer is about to end. That small push can make a big difference in getting them to complete their order.
Limited-time offers are simple, but they work. They help people make decisions, try new things, and come back again—all of which lead to more sales. You might be asking yourself right now what does it sound like to motivate a customer for a limited-time promotion? Don’t worry, we’ve got you covered.
Create a Limited-Time Offer Popup With a Countdown Timer
Before getting started, make sure the Depicter plugin is installed on your site.
You can find and add it easily by searching for “Depicter” in the Plugins section of your WordPress dashboard.
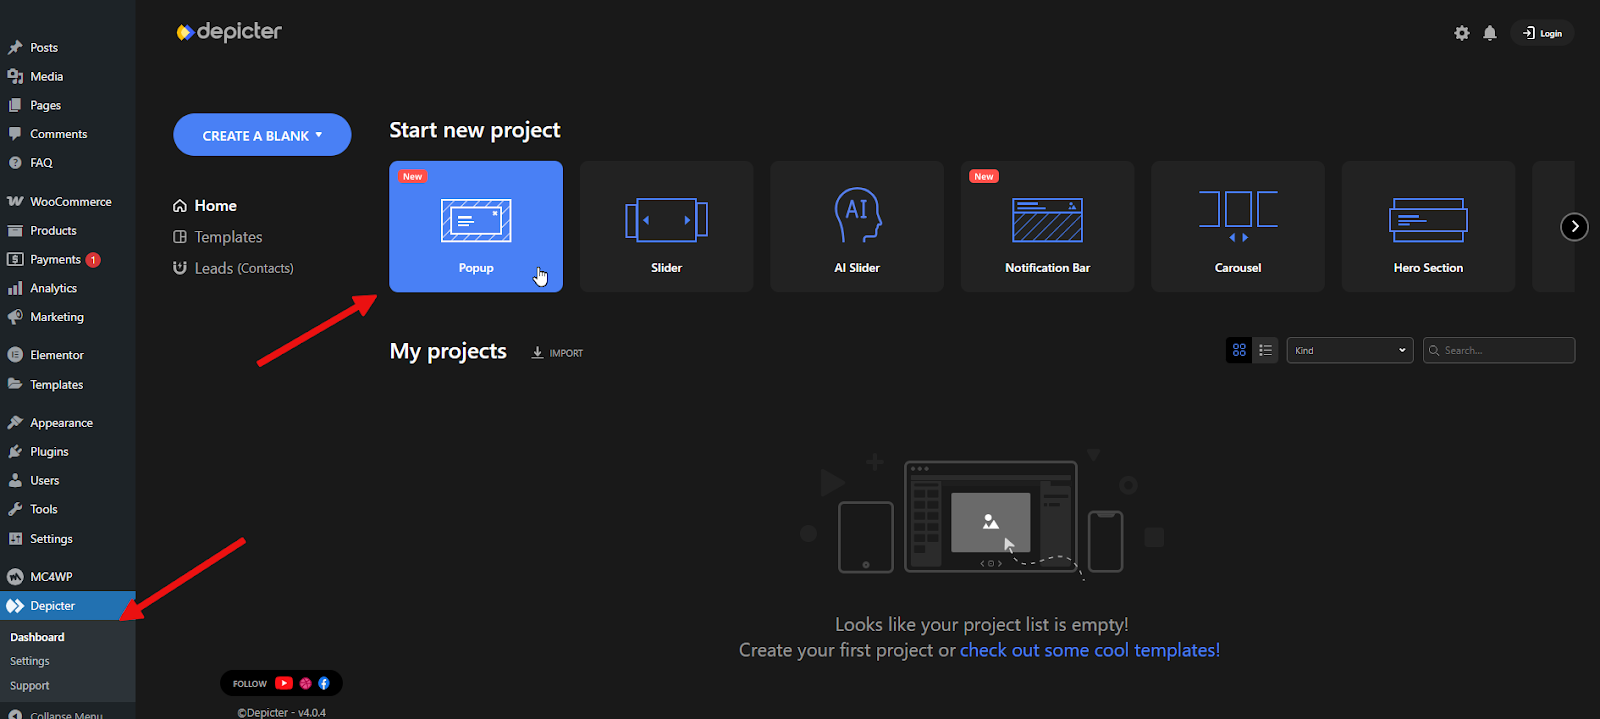
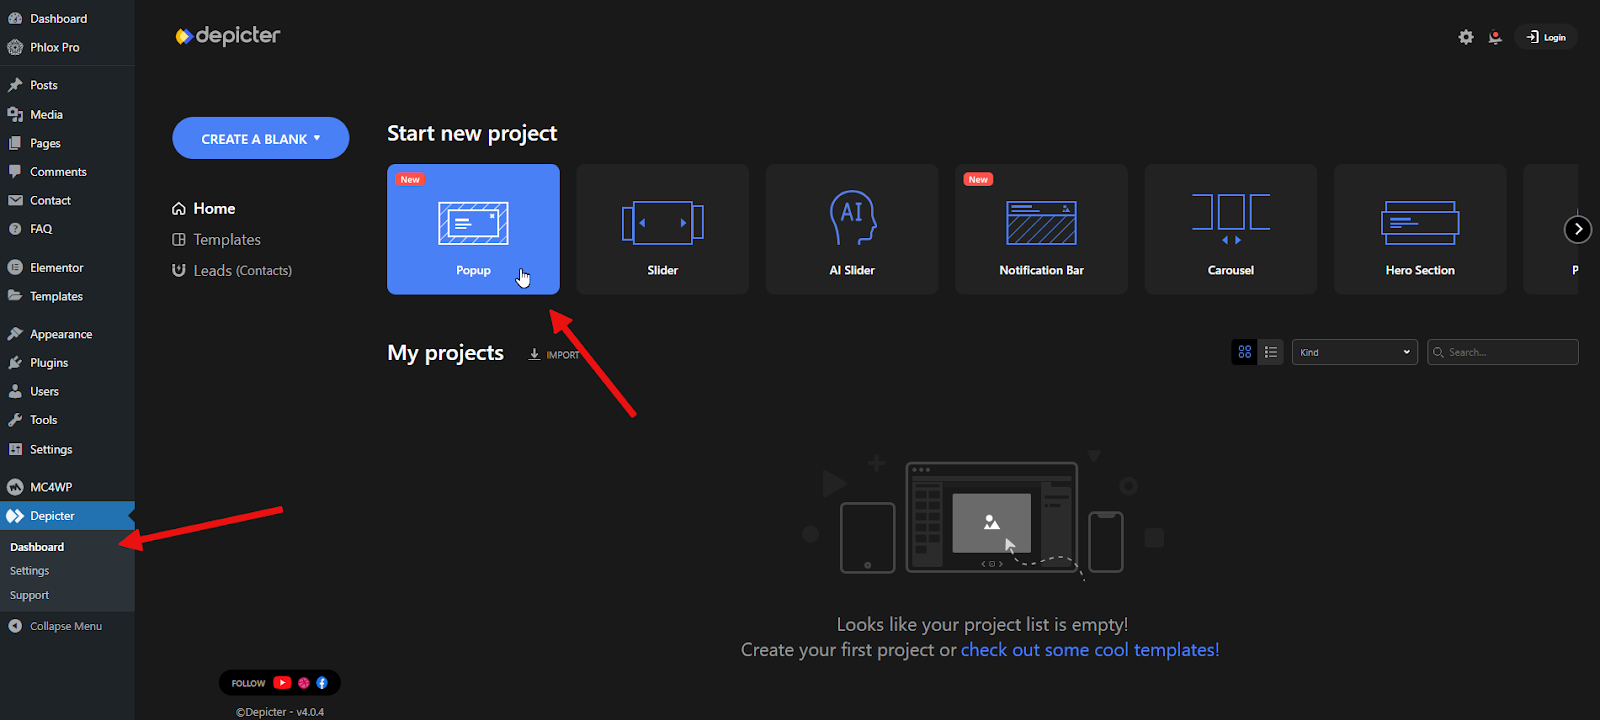
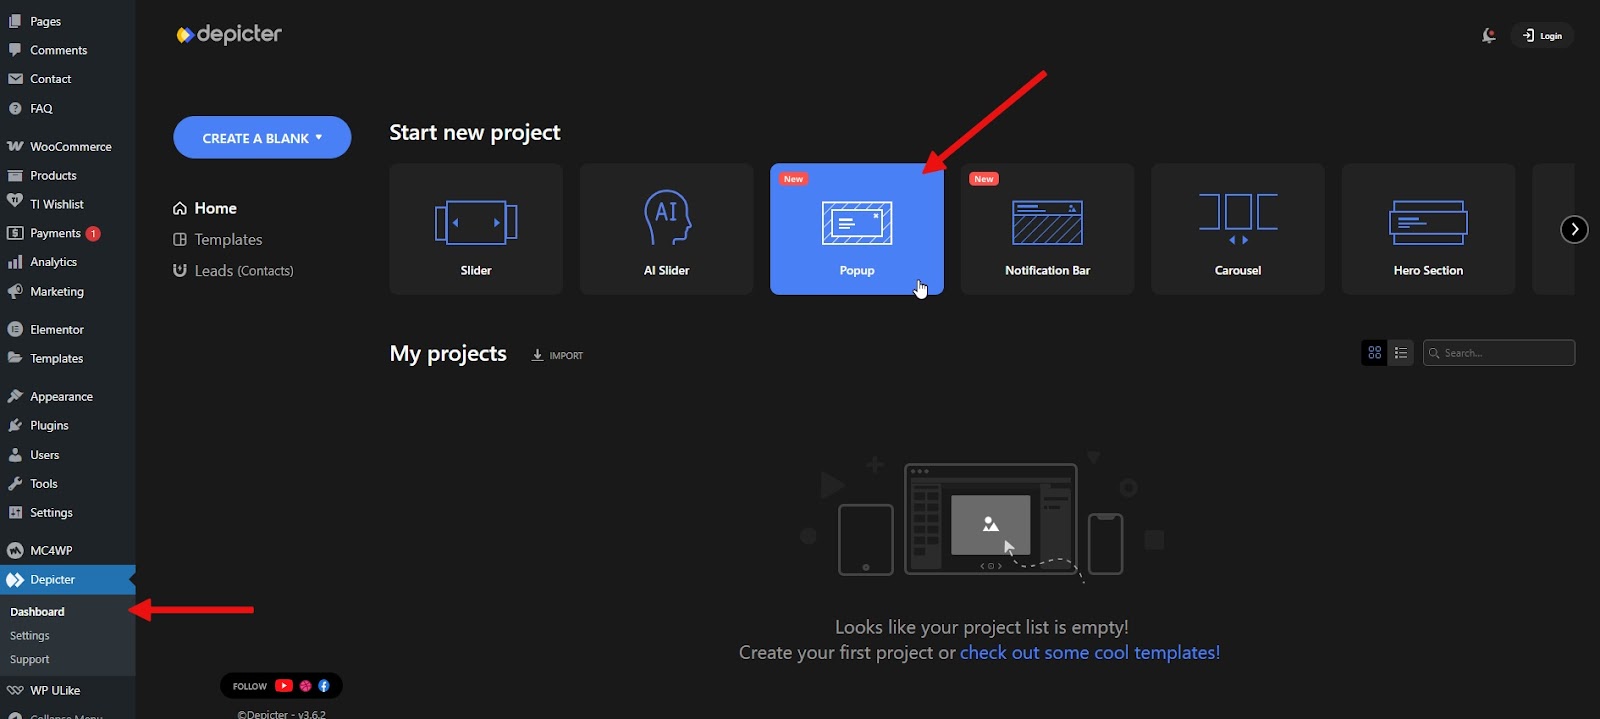
Once you’ve opened the Depicter dashboard, head over to the Popup section to begin.
To save time, we’ll use a pre-designed template. It makes the setup much faster and gets you to the final result sooner.
One of the great things about Depicter is its large template library, which makes creating your popup simple and hassle-free.
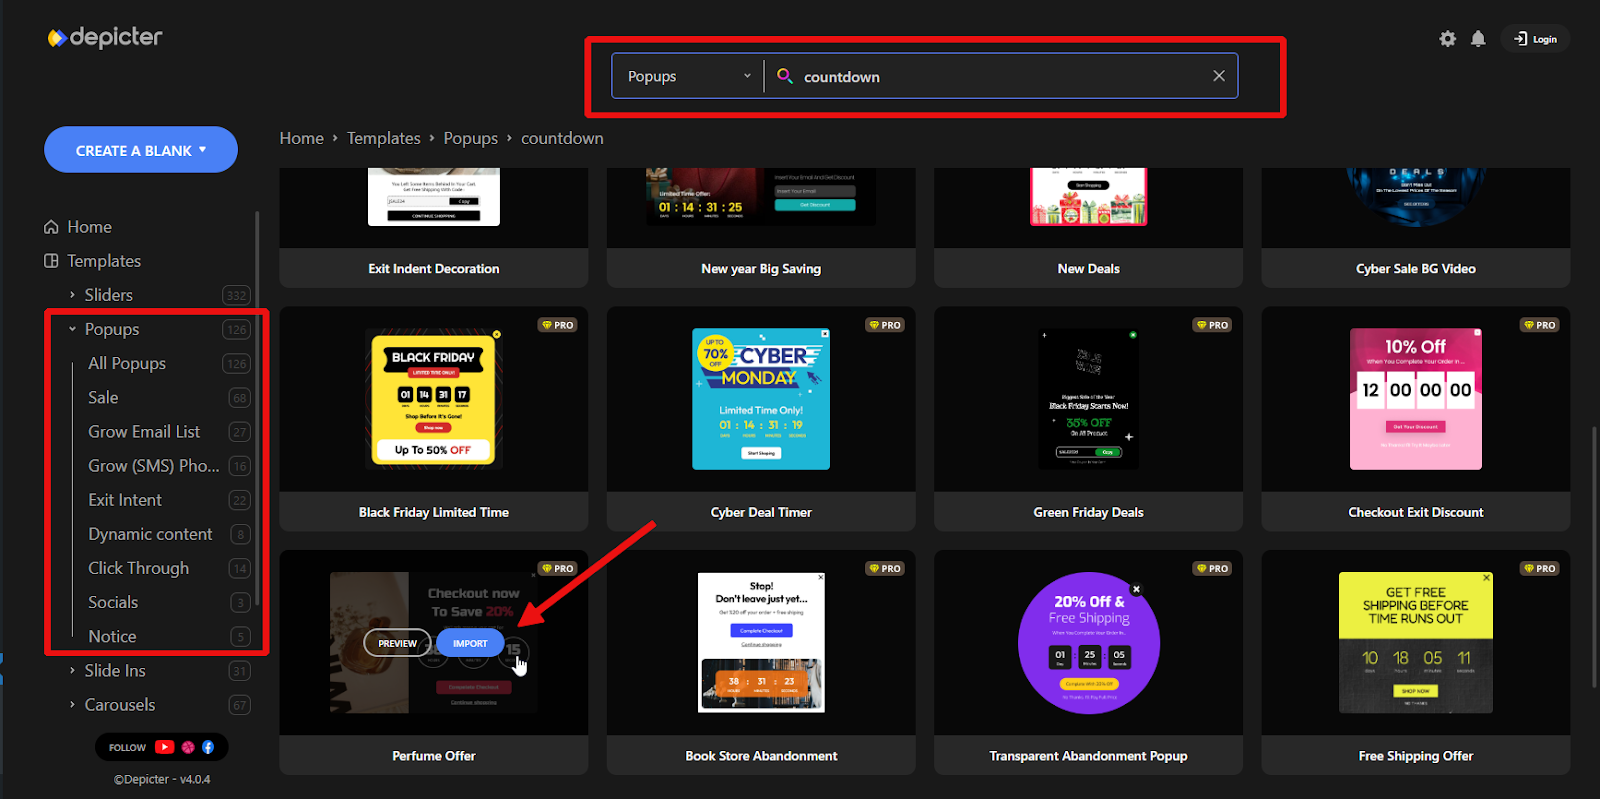
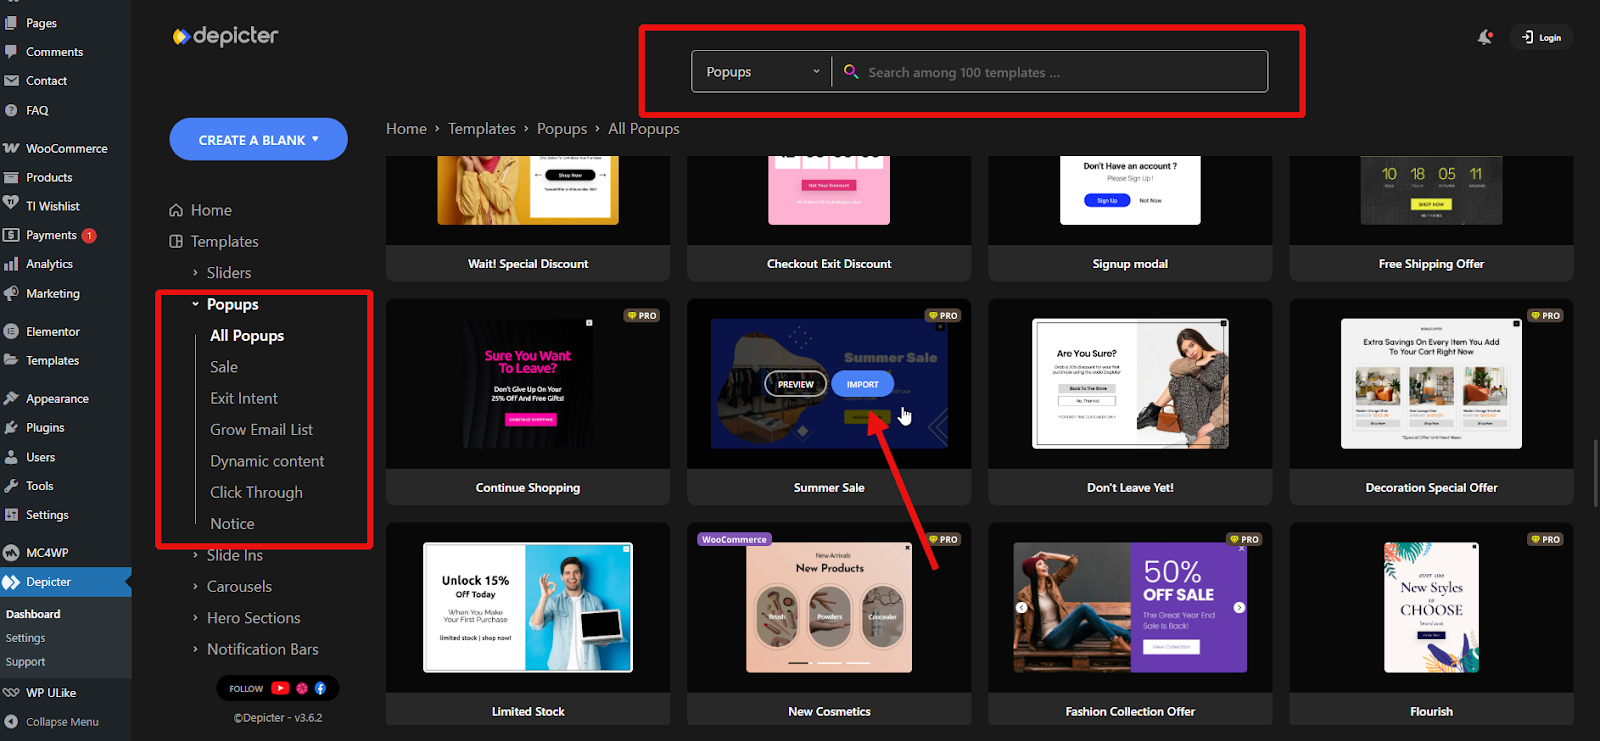
Depicter’s templates are clean, modern, and professionally made. There are also Free Popup Templates that you can start with no cost. You can explore different categories using the menu on the left, or use the search bar to quickly find a design that matches your needs or style.
There’s no need to build from scratch—just choose a template you like and click Import.
In just a few seconds, the template will load, and you’ll be taken straight to the Depicter Popup Builder.
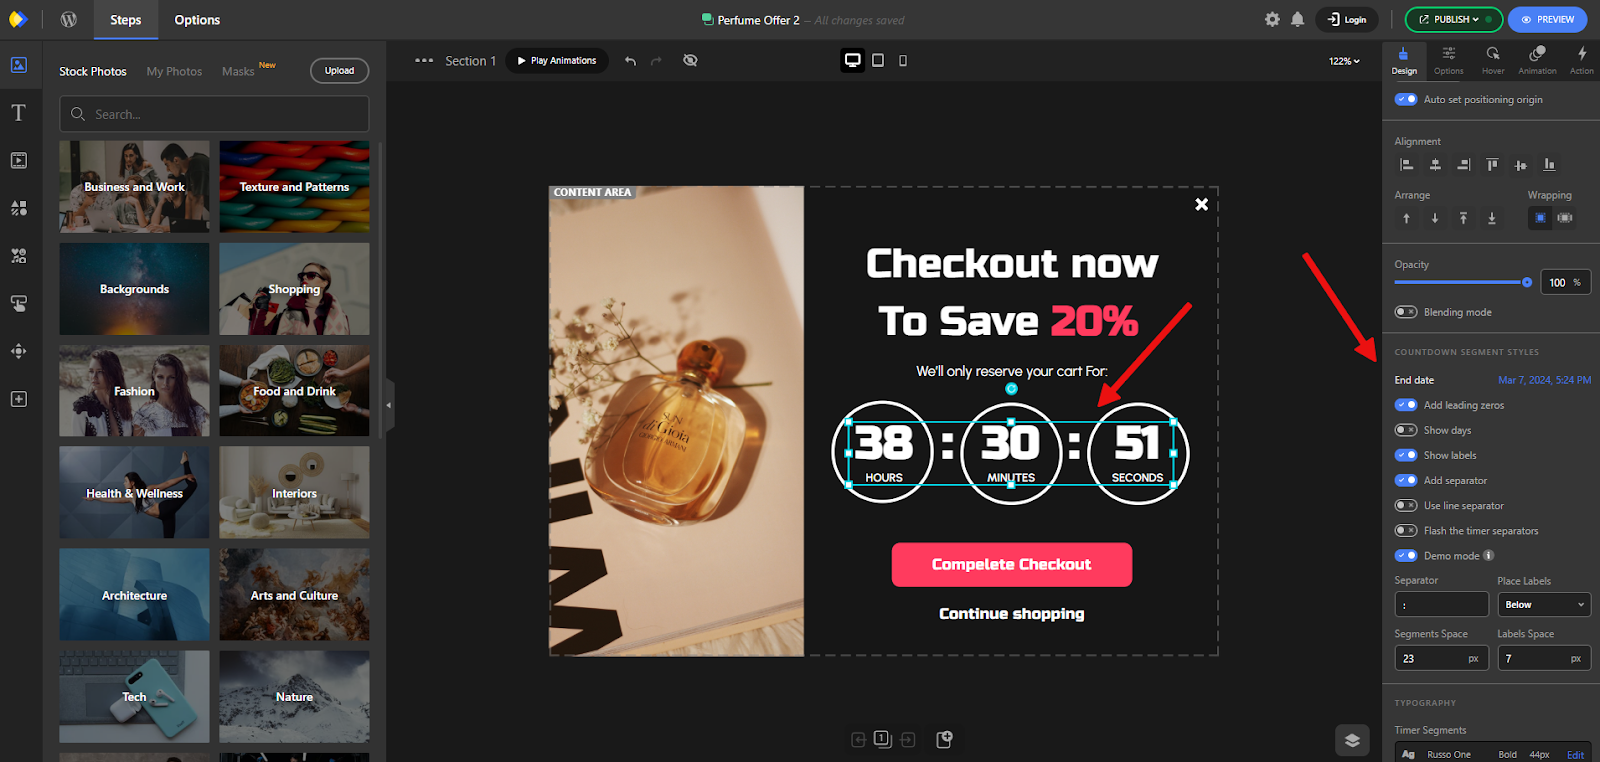
This is where you can make it your own. Click on any part of the popup, and its settings will appear in the panel on the right, ready for you to adjust.
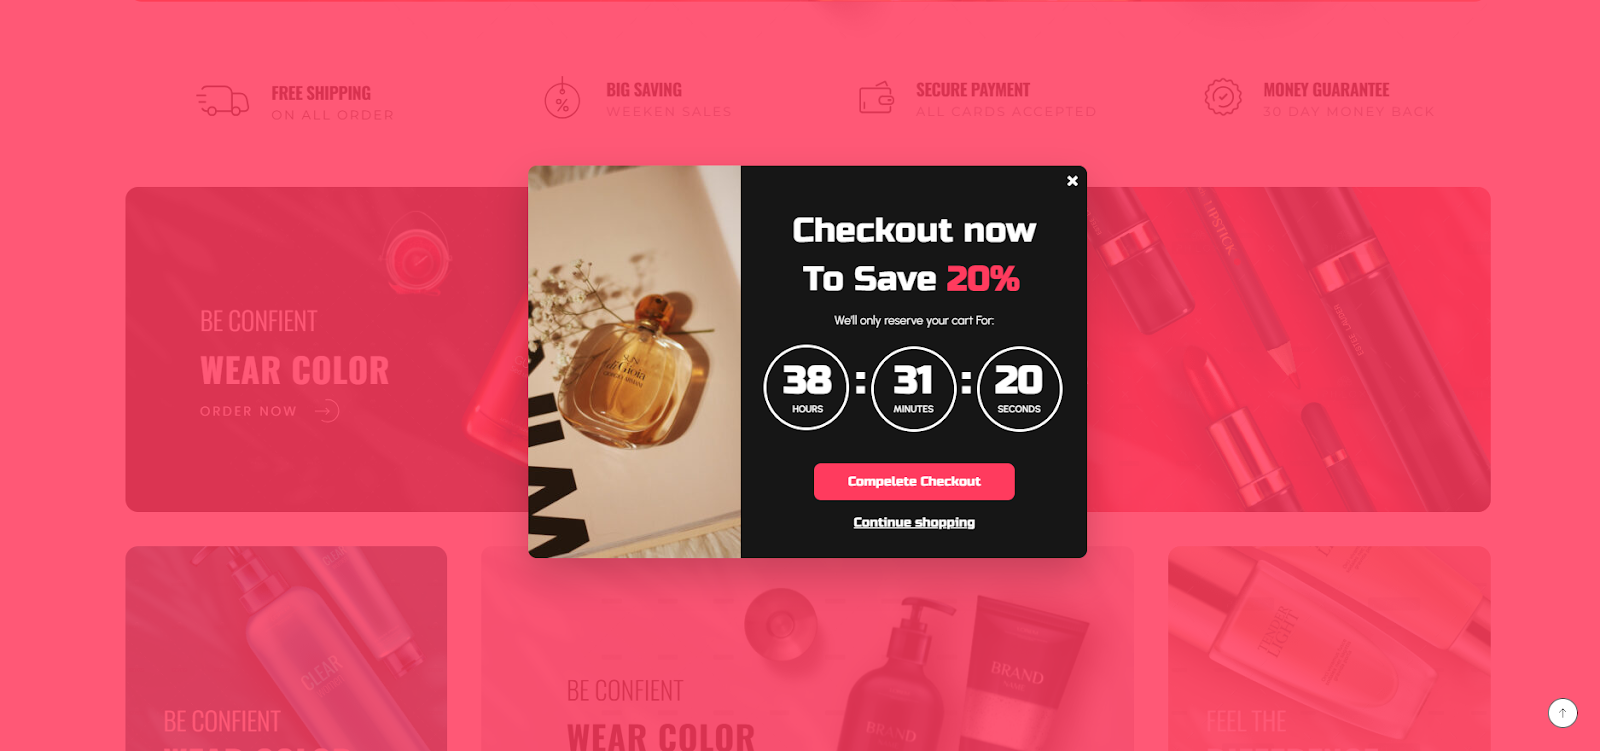
For example, select the countdown element and set the exact date and time using the options in the right-hand panel.
Next, you’ll want to decide when and where your countdown popup should show up, since timing and placement can make a big difference.
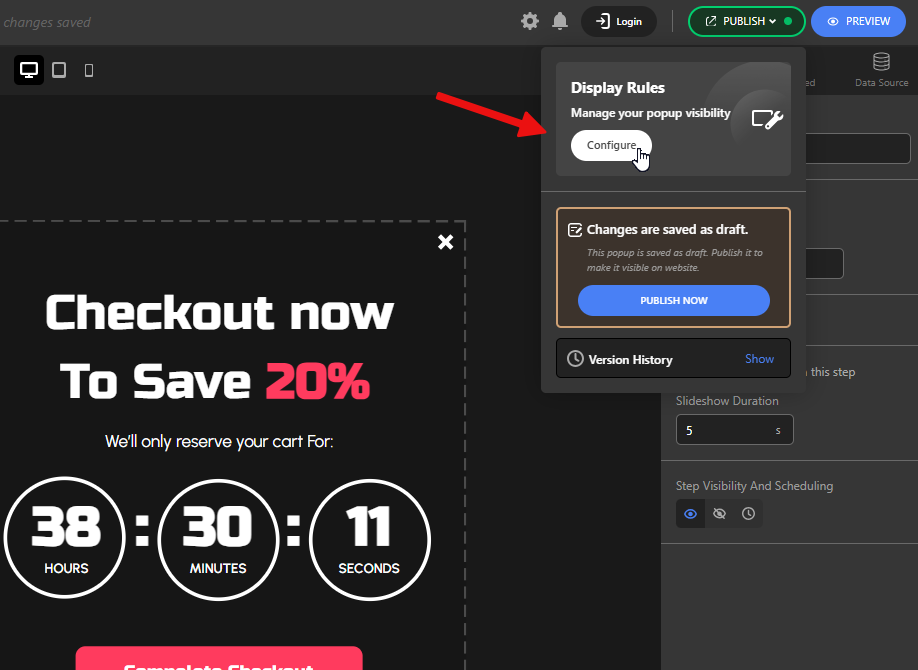
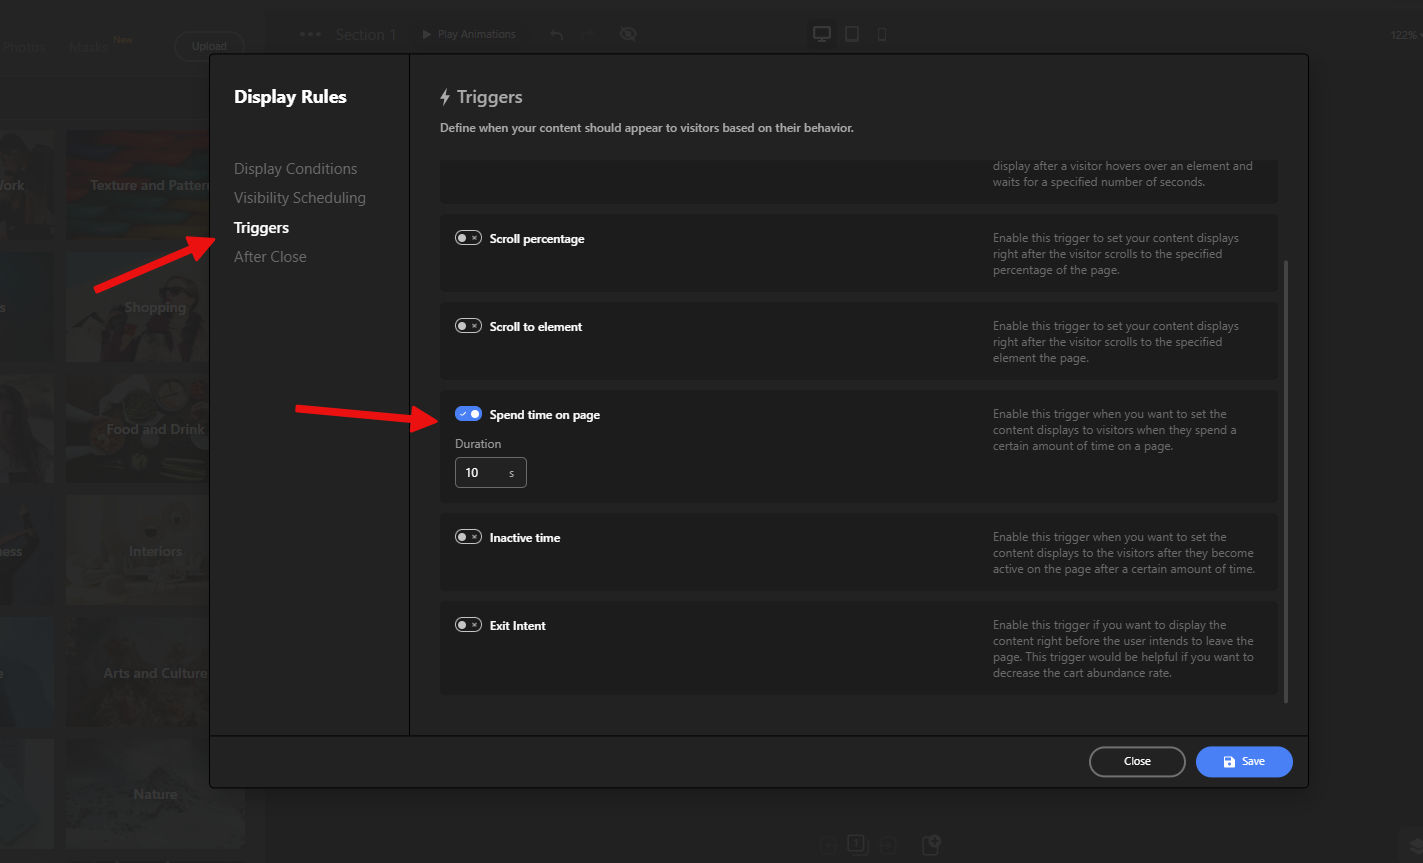
Configuring the Display Rules for the Popup
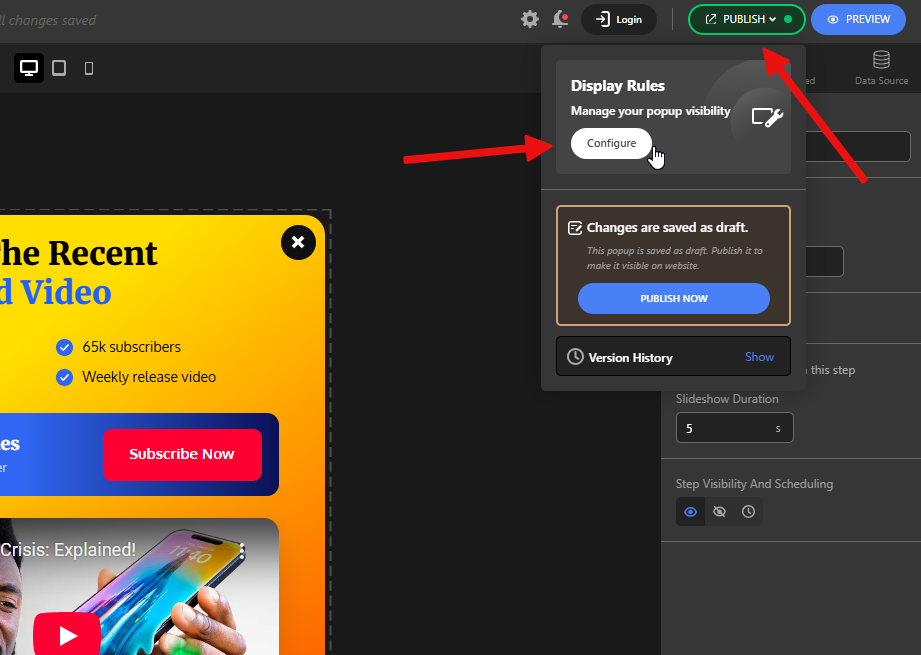
To set that up, click the Publish button, then head to the Display Rules section and select Configure. This will open the settings for controlling how your popup appears.
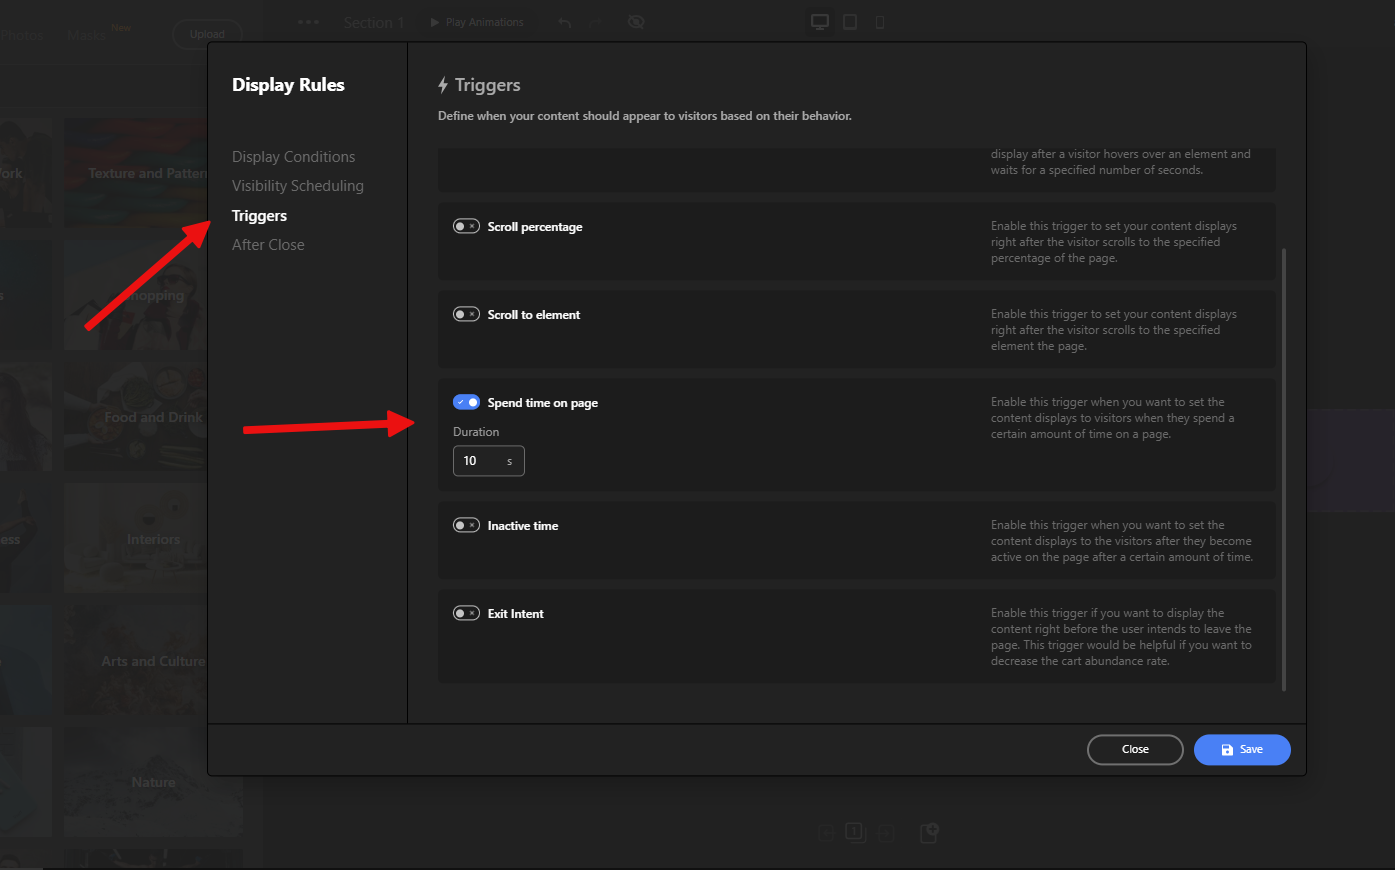
Now, let’s set it up so the popup appears on all pages, but only when a user has spent 10 seconds on the page. This kind of popup is often called a time-triggered or just timed popup.
Just go to the Triggers section, enable Spend time on page, and enter the number 10.
That’s it! Now, just save your changes and click on the Publish button.
As a result, your popup will appear exactly when the user has spent 10 seconds on the page, at a perfect moment when they’re already engaged with your content.
Conclusion
If you’re looking to increase engagement, drive more conversions, or simply capture more leads on your WordPress site, using a Free WordPress Popup Builder is one of the most effective and affordable ways to do it. Whether you’re just getting started or looking to improve your current setup, the right popup tool can help you create attention-grabbing popups without needing to write a single line of code.
FAQs
What is a WordPress popup builder?
A WordPress popup builder is a plugin or tool that lets you create and manage popups on your WordPress website. You can use it to collect emails, promote offers, reduce cart abandonment, and more — all without touching code.
Can I use a popup builder for free?
Yes! Depicter is Free WordPress Popup Plugin that offers plenty of powerful features without requiring a paid plan.
How many popups should I use on my site?
Less is more. It’s better to have a few well-timed, relevant popups than many that might overwhelm visitors. Focus on offering value and keeping the user experience smooth.
These days, launching a YouTube channel is more than just a pastime. It’s a fantastic way to expand your brand, establish trust, and connect with a worldwide audience.
Whether you’re running a business, creating content, or simply have a story to share, YouTube holds incredible potential. Reaching your initial milestones, particularly the 1,000-subscriber threshold, is not just thrilling. It opens up genuine earning possibilities. Many creators often wonder, How much money do you make on YouTube with 1,000 subscribers? While it might be tempting to purchase subscribers to get a leg up, there’s no need to take that shortcut.
If you are asking yourself how to get subscribers on YouTube, there are effective strategies for that. And absolutely, you can acquire free subscribers and even grow consistently by using smart tools and organic techniques.
This article will guide you on how to get free YouTube subscribers with Depicter, a Free Popup Builder, enabling you to cultivate a genuine audience and confidently expand your channel.
How to Get More Subscribers on YouTube with Depicter
One of the simplest and most impactful methods to expand your YouTube channel is by incorporating a video popup on your website’s homepage.
It quickly captures the attention of visitors and motivates them to watch and subscribe. Using Depicter, you can effortlessly design beautiful video popups without needing any coding skills. This is a clever approach to enhance visibility and get you closer to that target of gaining 1000 free YouTube subscribers instantly, all while ensuring your website remains neat and professional.
Before you dive in, double-check that you’ve got the Depicter plugin installed.
You can quickly locate and install it by typing “Depicter” in the Plugins section of your WordPress dashboard.
For a complete guide along with a video tutorial, take a look at our guidelines on how to install Depicter.
Creating Your Video Popup with Depicter
Once you’re in the Depicter dashboard, click on the Popup section to get started.
To move faster, we’ll use a ready-made template. This really speeds up the process and helps you get results quicker. One of the best things about Depicter is its huge collection of templates, which makes designing way easier.
All the templates are super clean, modern, and professionally designed. You can browse through the categories on the left side, or just use the search bar to quickly find something that fits your style or goal.
No need to start from scratch. Just pick a design you like and click on the Import button.
After a few seconds, your chosen template will be imported, and you’ll be taken straight into the Depicter editor.
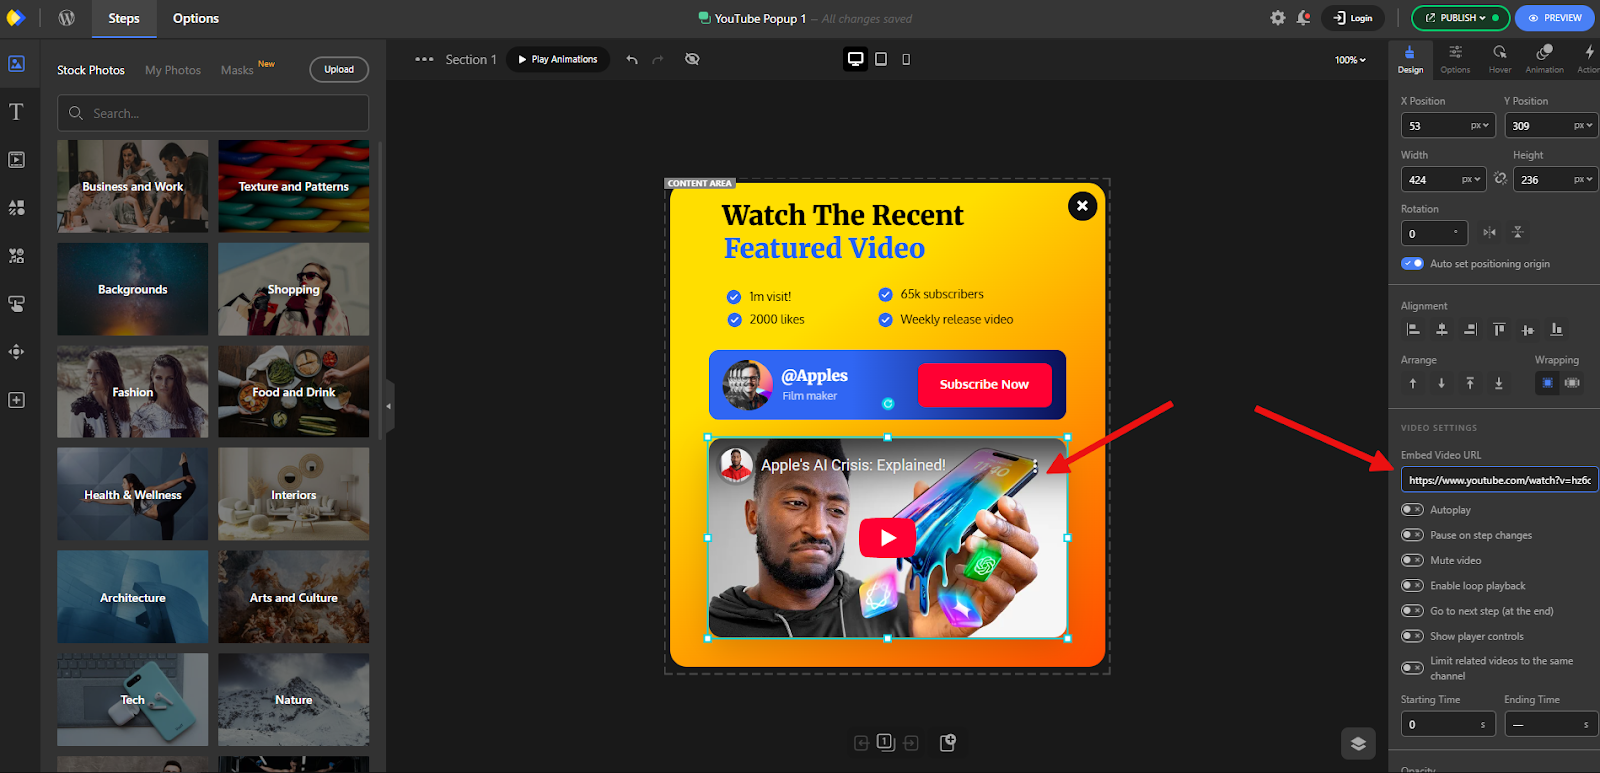
Here’s where the fun begins. You can customize and tweak the popup however you like. Just click on any element, and the related settings will appear in the right-hand panel.
For example, you’ll probably want to replace the default video with one from your own YouTube channel. To do that, simply click on the YouTube Video element, then paste your video link into the appropriate field on the right.
The next step is to control when and where your video popup appears, because timing and placement matter a lot.
To do that, after clicking the Publish button, go to the Display Rules section and click on Configure. This will open up the popup display settings.
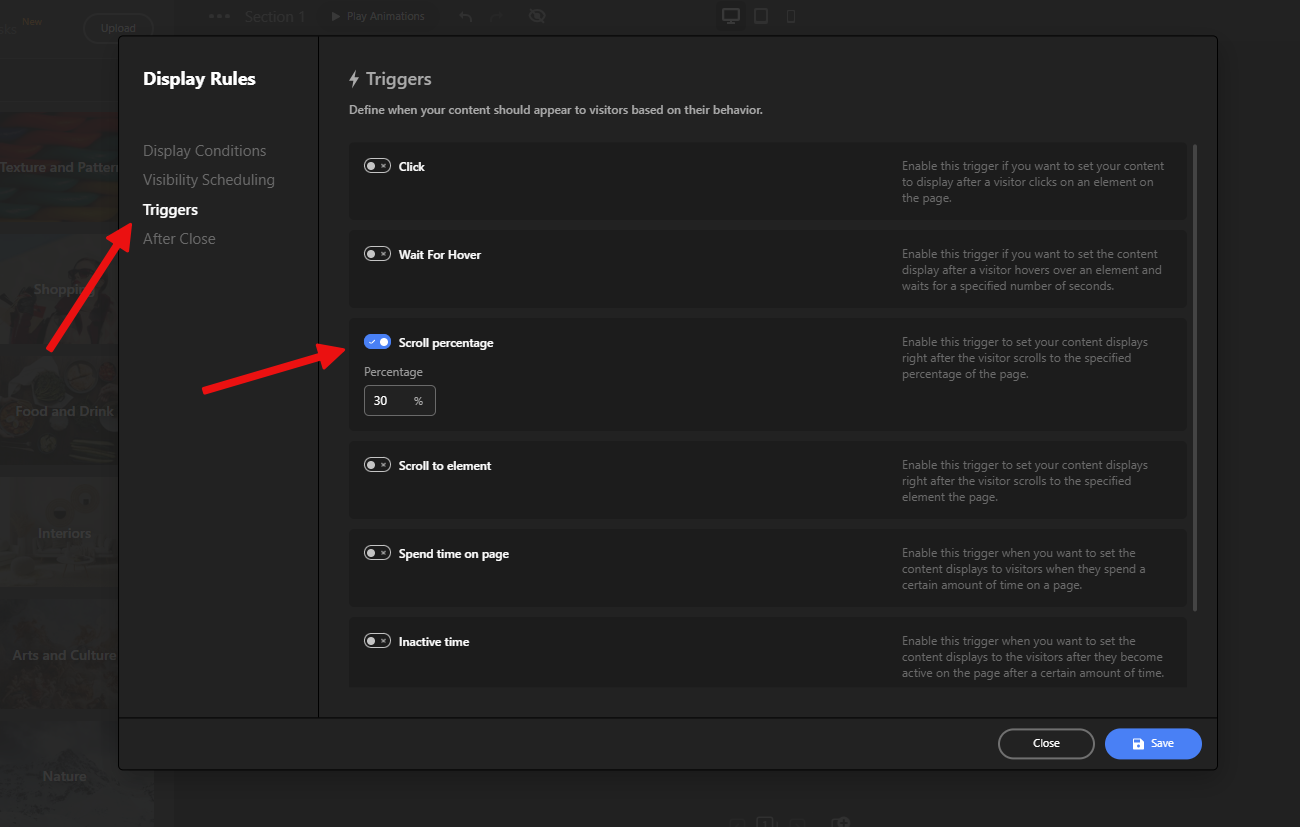
Now, let’s set it up so the popup appears on all pages, but only when a user has scrolled 30% down the page. This kind of popup is often called a scroll-triggered or just scroll popup.
Just go to the Triggers section, enable Scroll Percentage, and enter the number 30.
That’s it! Now just save your changes and hit Publish.
The result? Your popup will appear right when the user has scrolled 30% down the page, at a perfect moment when they’re already engaged with your content.
Conclusion
If you’re serious about building your channel, getting 1000 free YouTube subscribers instantly isn’t just a dream; it’s a realistic milestone. You don’t have to buy subscribers. Instead, focus on creating great content, understanding your audience, and using the Depicter Free Video Popup feature to turn website visitors into loyal fans.
Remember, YouTube success doesn’t come overnight, but with consistency, creativity, and a little strategy, your subscriber count will grow faster than you think.
FAQs:
What is the quickest method to increase subscribers on YouTube?
The quickest method involves merging valuable content with compelling calls-to-action. Additionally, utilizing tools such as Depicter popups can effectively invite visitors from your website to subscribe.
Can popups genuinely assist in expanding my YouTube subscribers?
Strategically placing popups on your blog or website actively draws visitors to your YouTube channel and encourages them to subscribe, especially when you time them well or show them on exit intent.
In what ways can Depicter facilitate YouTube growth?
Depicter enables you to design highly customizable video popups and calls-to-action that can direct users to your YouTube channel and promote subscriptions through captivating visuals.
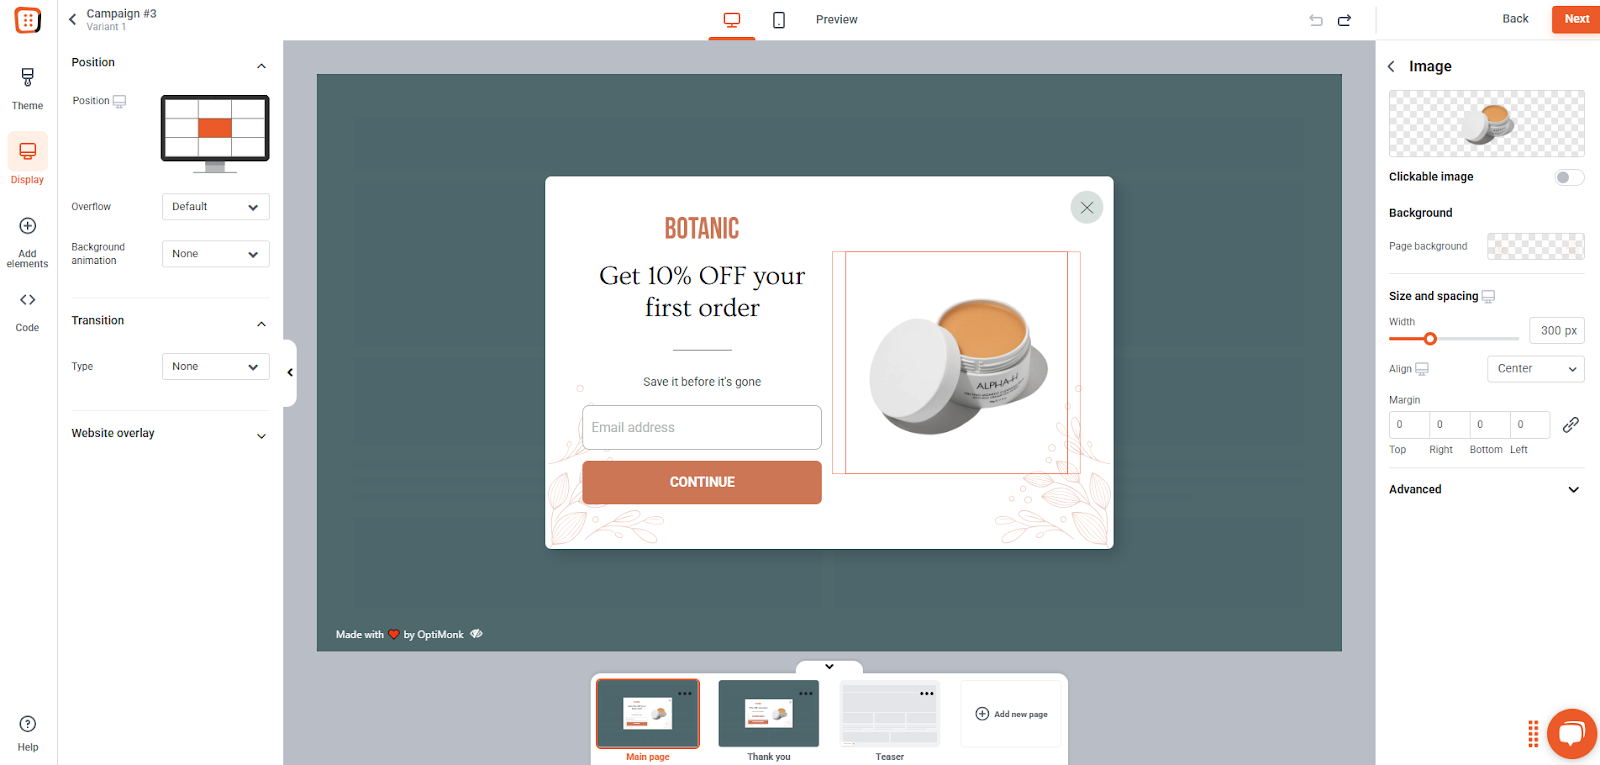
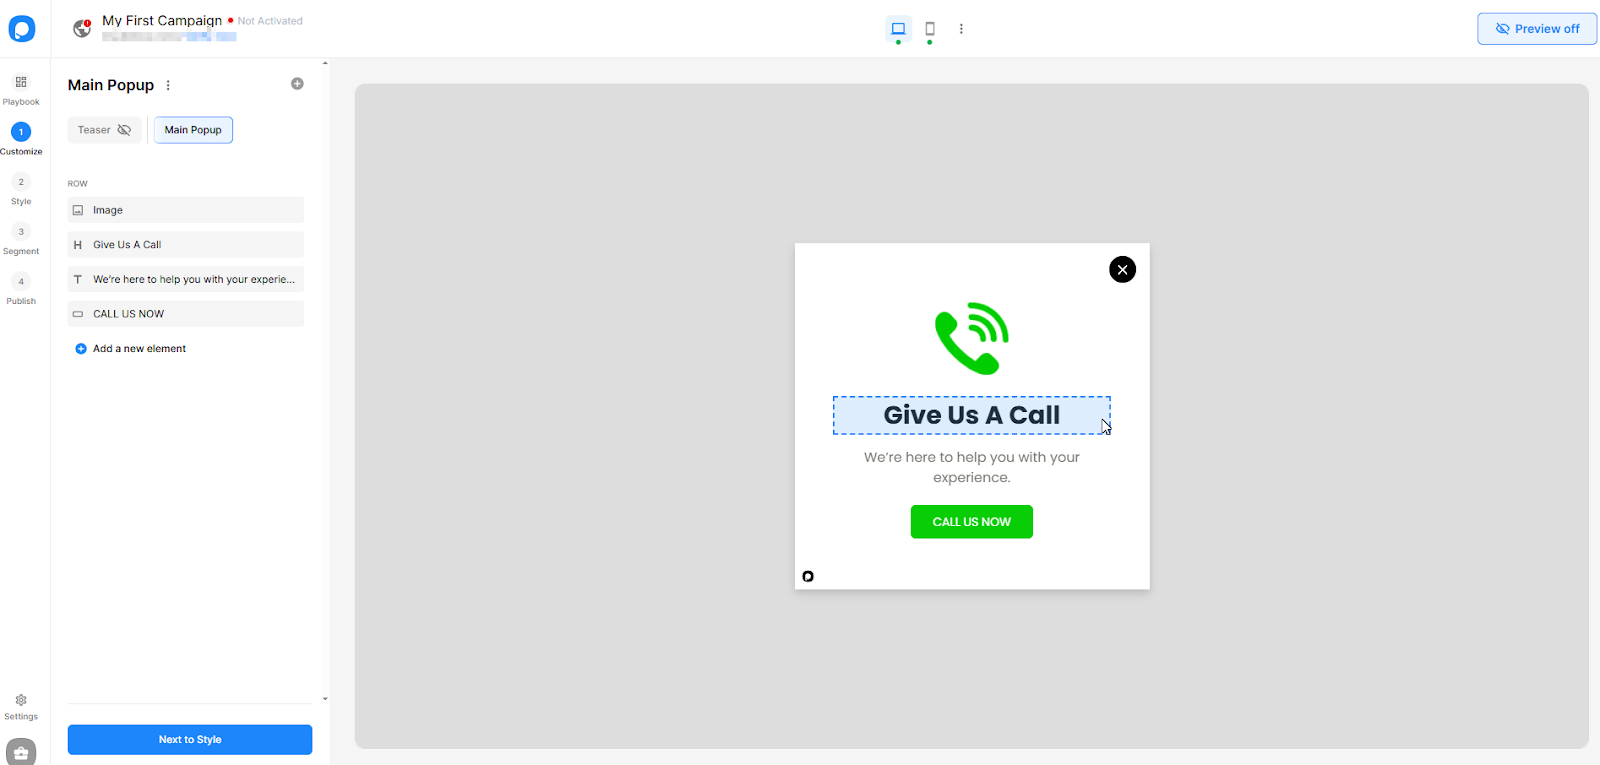
If you’ve ever felt overwhelmed while trying to set up a simple popup in OptiMonk, you’re not alone. With its complicated interface, rigid layout system, and limited styling tools, even basic customizations can turn into frustrating design tasks. While OptiMonk does offer a range of features, the experience often feels more complicated than it should be, especially for users who want creative freedom and flexibility. That’s why many marketers and designers are now exploring OptiMonk alternatives that are more intuitive, powerful, and affordable. And that’s exactly where Depicter comes in as a modern and powerful Popup Builder.
User Interface and Experience
OptiMonk has many features, but that’s a double-edged sword. Sometimes it feels like wandering through a maze. There are tons of config options, submenus, and nested settings that can overwhelm even experienced users. For instance, one can get lost in the menus and submenus, especially when setting up targeting rules display conditions.
Imagine you’re updating your exit‑intent popup and suddenly find yourself six levels deep in settings, without even knowing how you got there or how to get back.
Editor Limits
OptiMonk’s editor relies heavily on a row-and-column grid system, where every element must be placed in a predefined place. While this structure works well for building campaigns from scratch, it can quickly limit flexibility. If you import a template and want to rearrange or resize elements, such as moving text blocks or images to a new position, you often find yourself battling with the grid layout.
The editor doesn’t support freeform placement; you can only drag elements into available columns or rows. This makes even simple layout adjustments feel hard to do, as you’re limited to the existing grid structure and can’t freely shift elements outside their assigned cells
Small customizations shouldn’t feel like a hard design task, but with OptiMonk’s UI, sometimes they do.
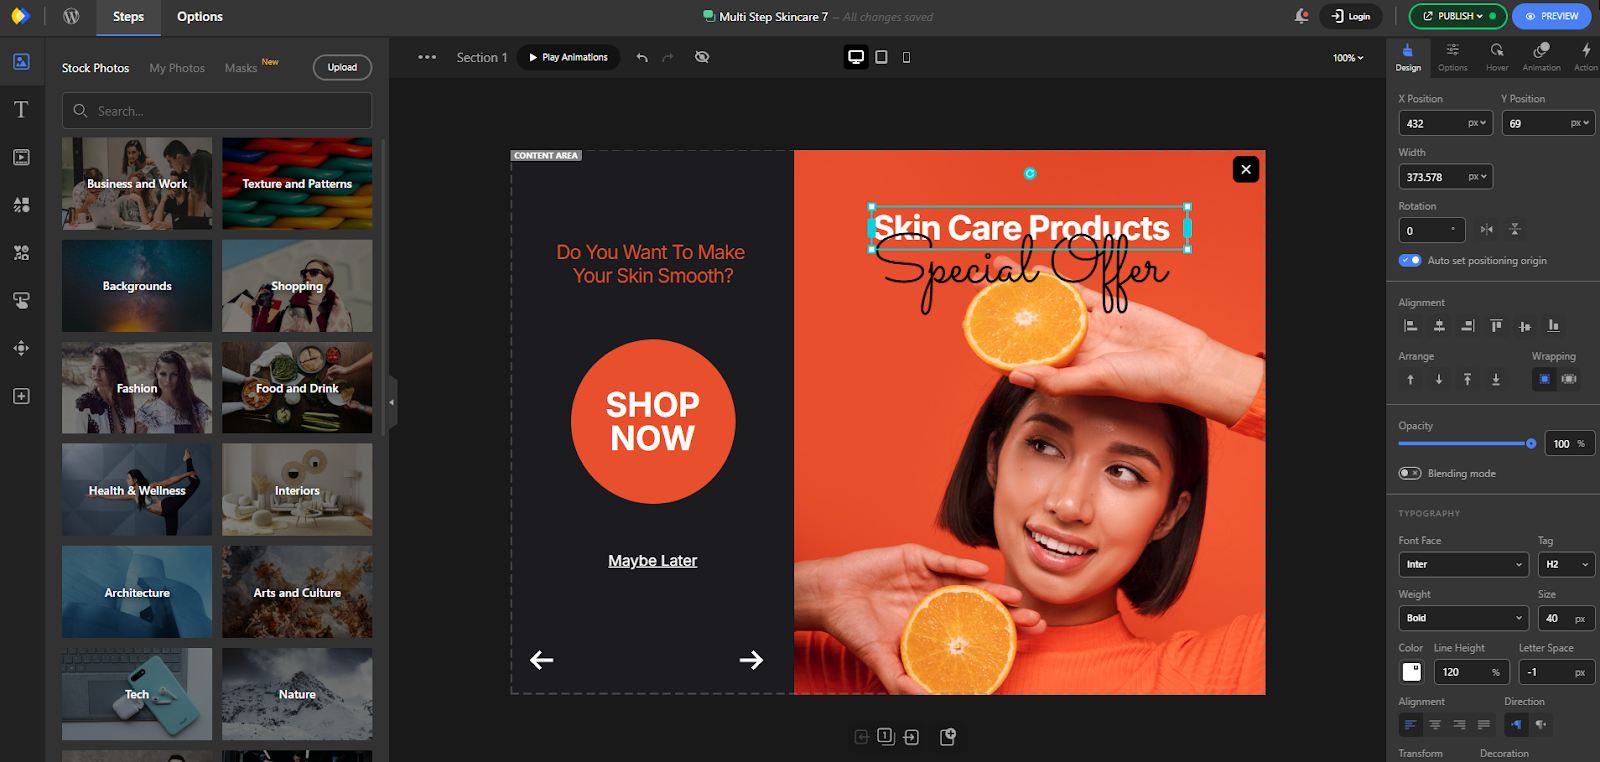
Depicter sets itself apart with a truly modern, visual editing experience that feels both intuitive and highly professional. Unlike many tools that rely on rigid layout structures, Depicter Free Popup Builder gives you complete creative freedom.
You can drag and drop elements anywhere on the canvas, resize and rotate them, align items precisely with smart snapping guides, or move and group multiple components at once all without restriction.
The editor’s flexibility is impressive, especially when compared to traditional popup builders, which often feel limited by grids or predefined columns.
Every detail, from the dashboard to the user interface, has been designed to support a seamless, end-to-end experience for building popups or sliders. Whether you’re working with layouts like Grid or Flex, or designing from a blank canvas, the platform offers advanced tools that let your creativity take the lead.
The level of control it gives over visual customization, layout behavior, and design flexibility is rare, even among the most popular popup builder platforms.
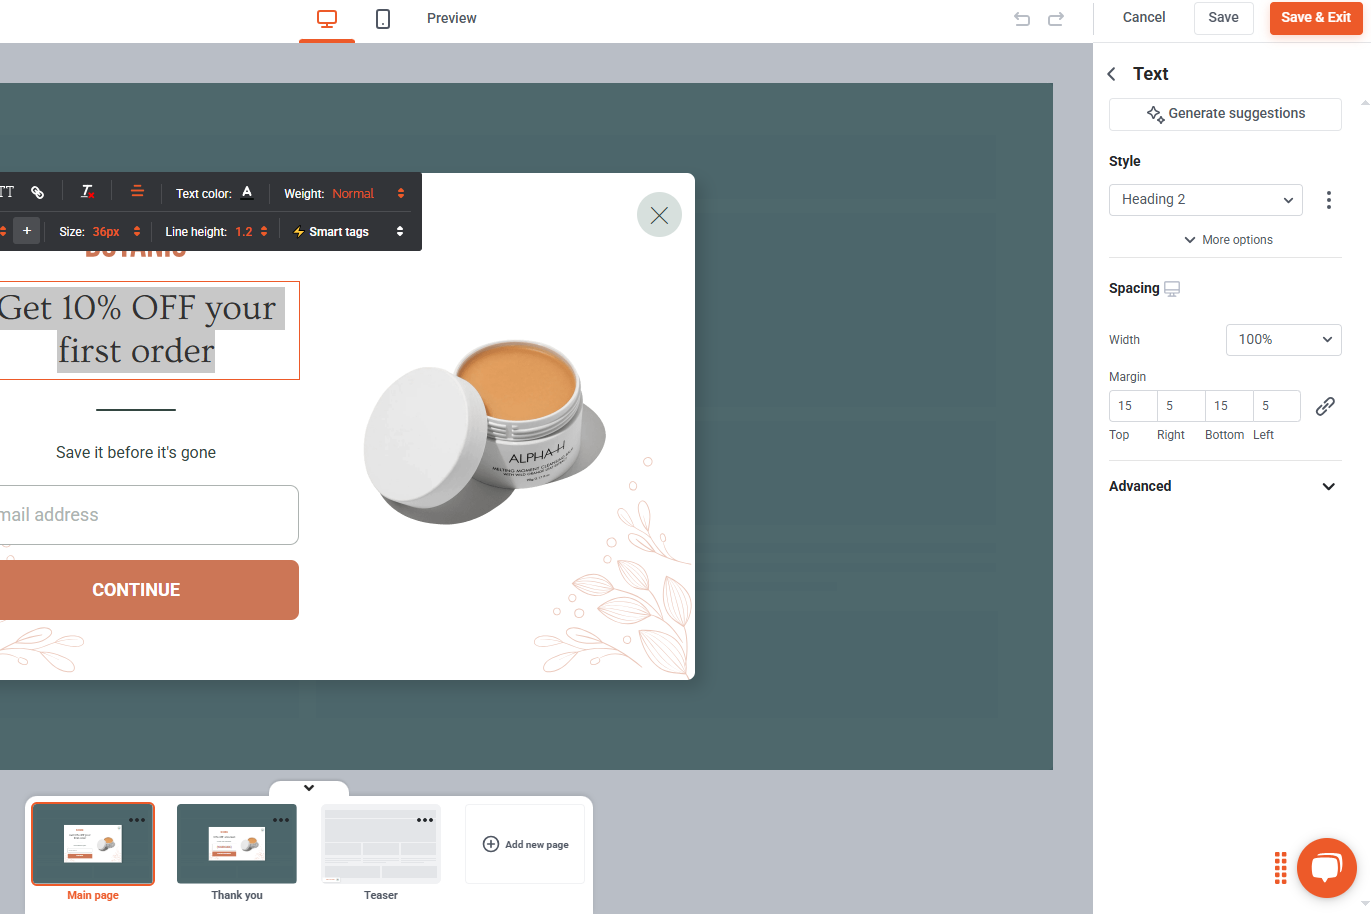
Styling Tools
One of the drawbacks of OptiMonk is its limited design and styling capabilities. The style menus are quite basic, offering only simple options for adjusting colors, fonts, and spacing.
For example, there’s no way to assign hover effects to text elements, something that’s considered standard in most modern editors.
Additionally, elements are locked into a strict grid layout, meaning you can’t freely move them around or overlap elements to achieve layered, modern designs. This restricts your ability to create visually dynamic layouts where, for instance, text or images partially overlay one another.
Additionally, OptiMonk lacks animation features altogether. You can’t apply entrance animations to individual elements, and it doesn’t support any advanced effects like parallax scrolling or Ken Burns-style zooms. Even basic transition animations between different states or steps of a popup are limited to only Fade and Zoom options.
These limitations make it difficult to design popups that feel interactive, animated, or truly polished by today’s design standards.
Depicter gives you design tools that feel like something from professional design software. For every element, you can control all the details, from basic things like color, shape, and size to more advanced options like animations, visual effects, responsive settings, and other helpful features.
You can also add entrance and transition animations to the popup itself, change its size, decide how it shows up on the screen, and use professional effects to make it more engaging.
When you click on any element, a style menu opens with all the options you need, neatly organized in tabs, some general, and some special just for that type of element.
You can even copy and paste styles between elements, which saves a lot of time. Thanks to these tools, designing with Depicter feels smooth, fast, and actually fun.
Popup Elements
When designers have access to a broader selection of elements, like icons, buttons, animations, custom typography, and vibrant color options, they’re better equipped to create visually compelling and effective user experiences.
A limited toolkit, on the other hand, often leads to repetitive layouts and less impactful messaging, especially in popups where grabbing attention quickly is the key.
In the case of OptiMonk, the element library is fairly minimal. It includes only the basics: text blocks, images, forms, and a few product-related components.
While the interface itself is clean and user-friendly, we found during our review that the restricted range of design elements may limit users who want more freedom in customization.
Compared to more feature-rich platforms, OptiMonk falls short in offering the flexibility needed to build highly tailored and engaging popup experiences.
Depicter goes well beyond the basics, offering far more than just standard elements like text, images, videos, and lead capture forms.
It includes a range of unique components that open up creative possibilities you won’t typically find in similar tools.
Some of these advanced elements include masks, progress bars for stories, play/pause controls for slideshows, scroll-down indicators, Lottie animations, shortcodes, coupon boxes, number-based timers, and even before/after comparison modules.
These aren’t just fancy names; they enable you to build more engaging, interactive designs. For instance, the shortcode element allows you to integrate content from other plugins directly into your design, unlocking an impressive level of flexibility that can elevate your popups far beyond the ordinary.
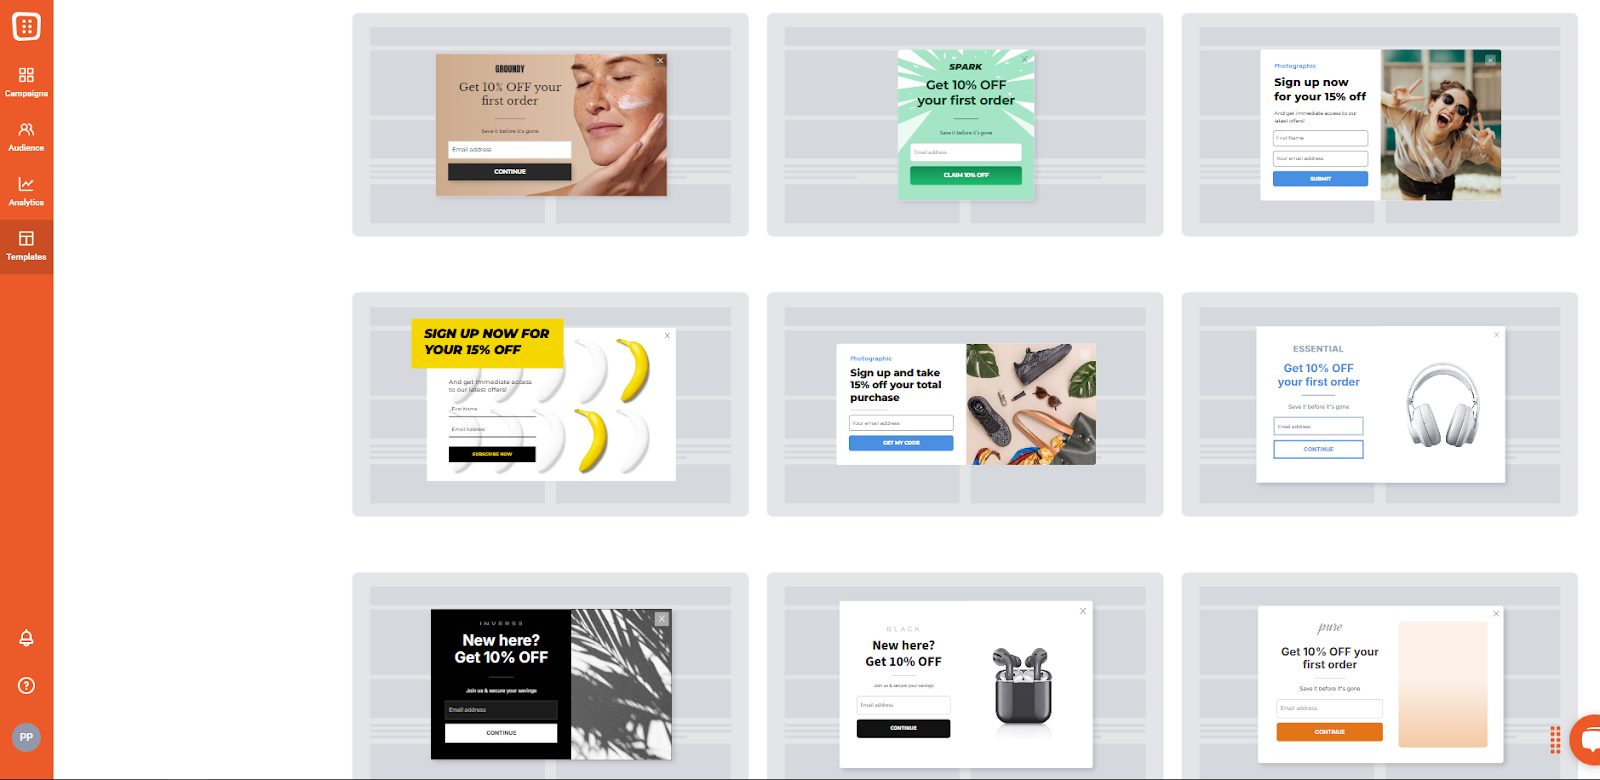
Templates
OptiMonk offers over 300 templates for users to choose from, which may seem like a decent starting point. However, if popups play an important role in your marketing strategy, this library will likely fall short in meeting the full range of your website’s needs, especially when it comes to variety and coverage for different events, campaigns, and targeting strategies.
Moreover, the designs themselves are quite basic and conventional. While they’re good enough to cover essential use cases, like displaying simple announcements or collecting emails, they lack the visual uniqueness needed to truly stand out.
If you’re aiming for more creative or eye-catching popup designs that make a strong impression, you won’t find much inspiration among OptiMonk’s current template collection.
What sets Depicter apart is its ever-expanding collection of over 600 professionally designed templates, covering a wide variety of styles, industries, and use cases, including a generous selection of Free Popup Templates.
And the library doesn’t stay static. Depicter adds more than 10 new templates each week, so users always have access to fresh, modern designs. This steady growth, paired with the high visual quality and versatility of its templates, positions Depicter as a scalable, forward-thinking tool for anyone looking to build creative, impactful campaigns.
Pricing
For individuals, startups, or small teams working with low budgets, pricing plays an important role when choosing a Popup Builder. Depicter stands out in this area by offering a much more budget-friendly option; its premium plan starts at just $39.
In contrast, Optimonk pricing can be a problem for many, with its most basic paid plan beginning at $228, creating a considerable price difference right from the start. This gap can be a deciding factor for users looking for professional-level features without a high initial investment.
What’s more impressive is that Depicter manages to deliver powerful functionality despite the lower price. Users still get access to advanced visual editing tools, support for dynamic content, responsive layouts, and a growing collection of ready-to-use templates and design assets, making it a strong value across the board.
Conclusion
OptiMonk might have been a go-to solution for a while, but it’s clear that design limitations, a complex interface, and a high price tag can hold users back.
If you’re searching for a better OptiMonk alternative, Depicter offers a refreshing change, with a smooth, flexible editing experience, rich design options, and budget-friendly plans. Whether you’re creating your first popup or refining a complex campaign, Depicter gives you the tools and freedom to design without limits. If you’re ready to build stunning popups that actually reflect your vision, it’s time to make the switch.
Looking for more ways to connect with your audience?
In addition to email, collecting phone numbers opens the door to SMS marketing, a highly effective channel known for its 98% open rates and real-time visibility. It’s a great option for time-sensitive messages, flash sales, or quick updates that need to be seen instantly.
But like any communication method, SMS should be used wisely, with your audience’s trust and privacy in mind.
Let’s explore how to do it the smart and responsible way.
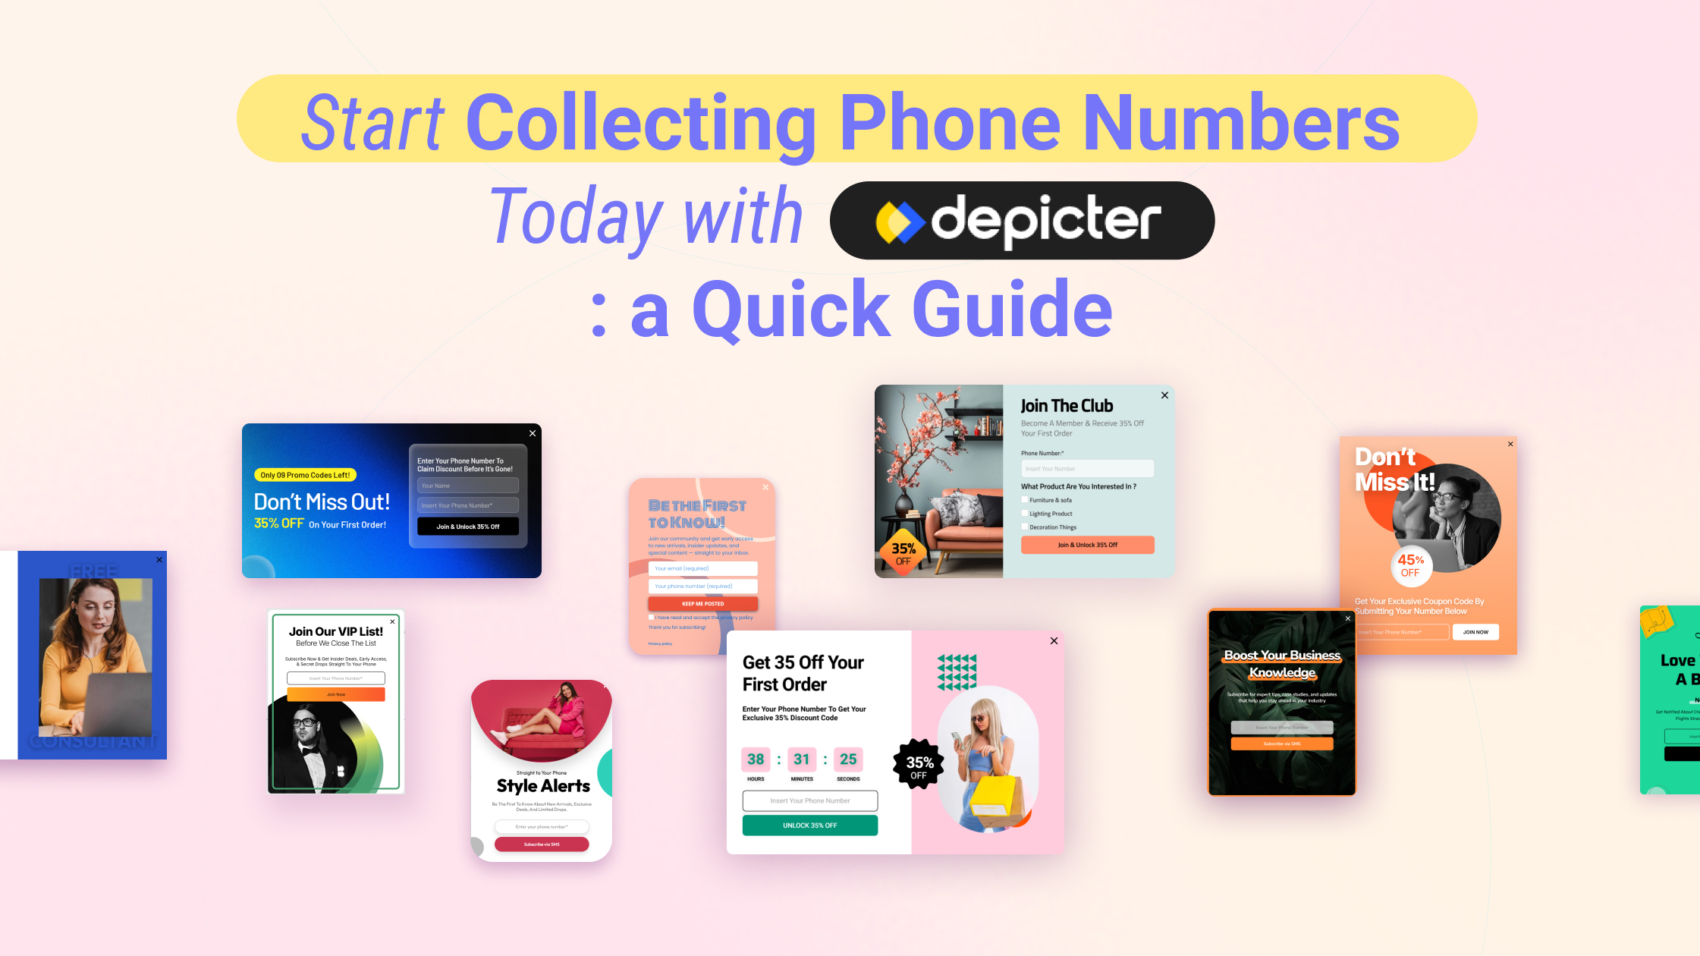
🎥 Video Tutorial: How to Collect Phone Numbers with Depicter
Watch this quick guide to see how Depicter helps you easily collect phone numbers on your site. From creating a popup to setting triggers and exporting leads — it’s all explained step-by-step so you can start growing your SMS list today.
//
Why Should You Collect Phone Numbers?
Phone numbers are a powerful addition to your contact list. Text messages are often read within minutes, making them especially useful for urgent promotions or important alerts.
For example, if you’re running a 24-hour flash sale, an SMS can help drive instant traffic and action.
While email remains a reliable and essential tool for building long-term relationships, SMS can complement it by adding speed and immediacy to your messaging strategy. Used together, they create a well-rounded communication plan with higher engagement and better results.
Important Points to Consider When Collecting Phone Numbers
Collecting phone numbers through popups isn’t just about throwing a form on your website. It requires careful planning to ensure users feel safe and motivated to share their details. Here are some important points:
Value Proposition: Clearly explain what the user gets in return. For example, “Get 10% off your next order – just enter your phone number!”
Trust and Privacy: Add a short note like “We’ll never spam you or share your number” to reduce hesitation.
Compliance: Make sure your form complies with regulations like GDPR or TCPA by adding a consent checkbox.
Also, using multi-step popups (first asking for an email, then the phone number) has been shown to increase conversion rates by making the process feel easier. Which will be coverd in details on how to collect email and
Let’s show you exactly how to start collecting phone numbers using Depicter.
Before getting started, make sure you have the Depicter plugin installed.
You can easily find and install it by searching “Depicter” in the Plugins section of your WordPress dashboard.
For a step-by-step guide with a video tutorial, check our guidelines here.
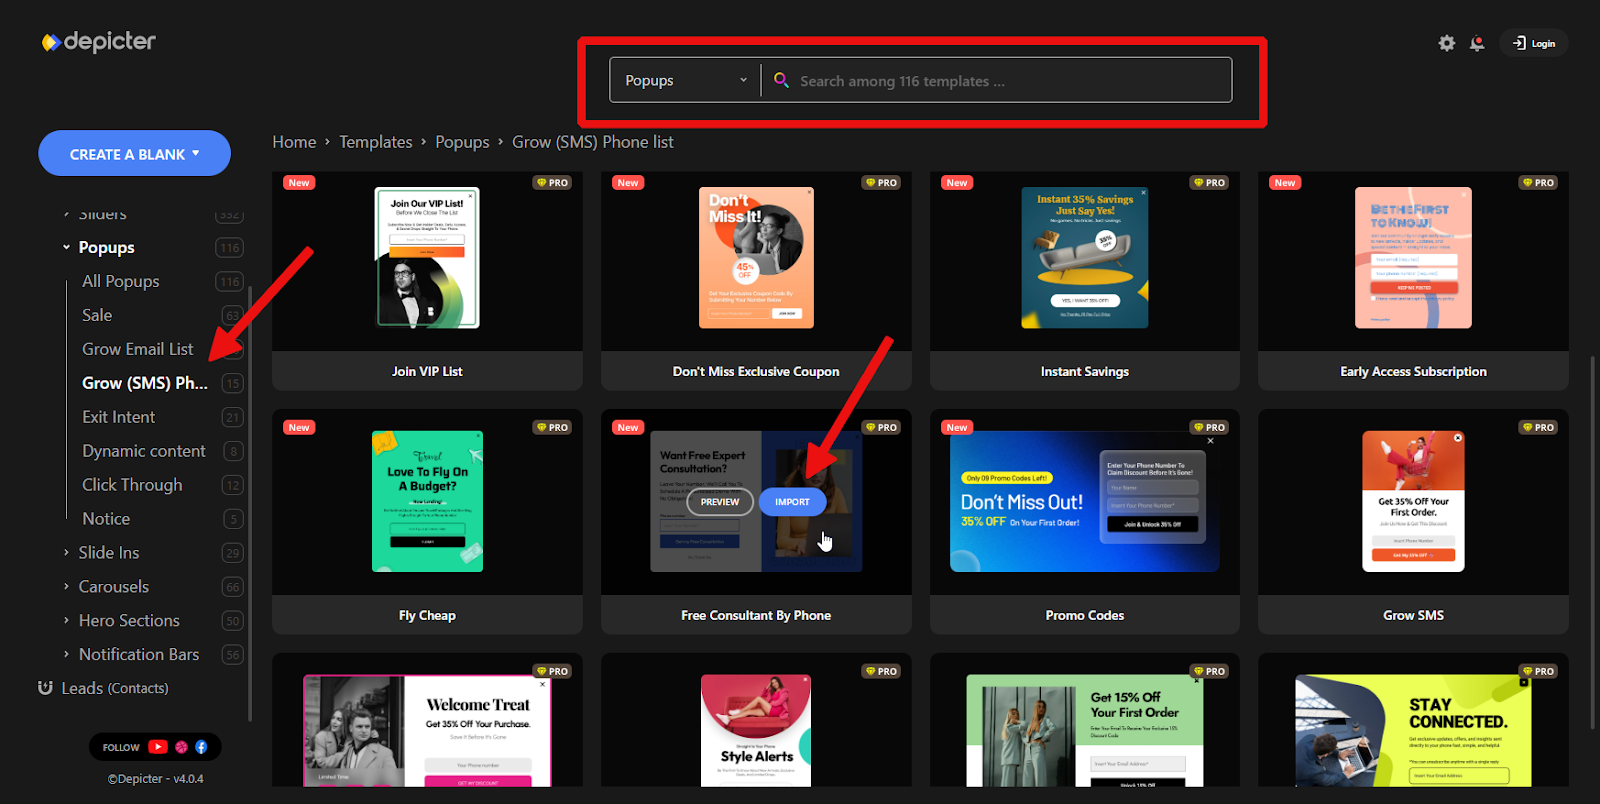
Step 1: Import a Template
We do have the option to create a popup from scratch, but one of Depicter’s biggest advantages is its large collection of ready-made Popup templates. These templates are all designed by top designers and built for real-world scenarios.
So, I recommend we start from there and move forward together using one of these templates.
After entering the Popups section, you can use the search bar at the top or the categories on the left to find the template you’re looking for.
All templates are designed with modern trends in mind and built for real website needs, making it super easy for you to choose and get started.
Once you’ve picked your desired template, just click Import. Within a few seconds, it will be loaded and you’ll be taken to the Depicter editor.
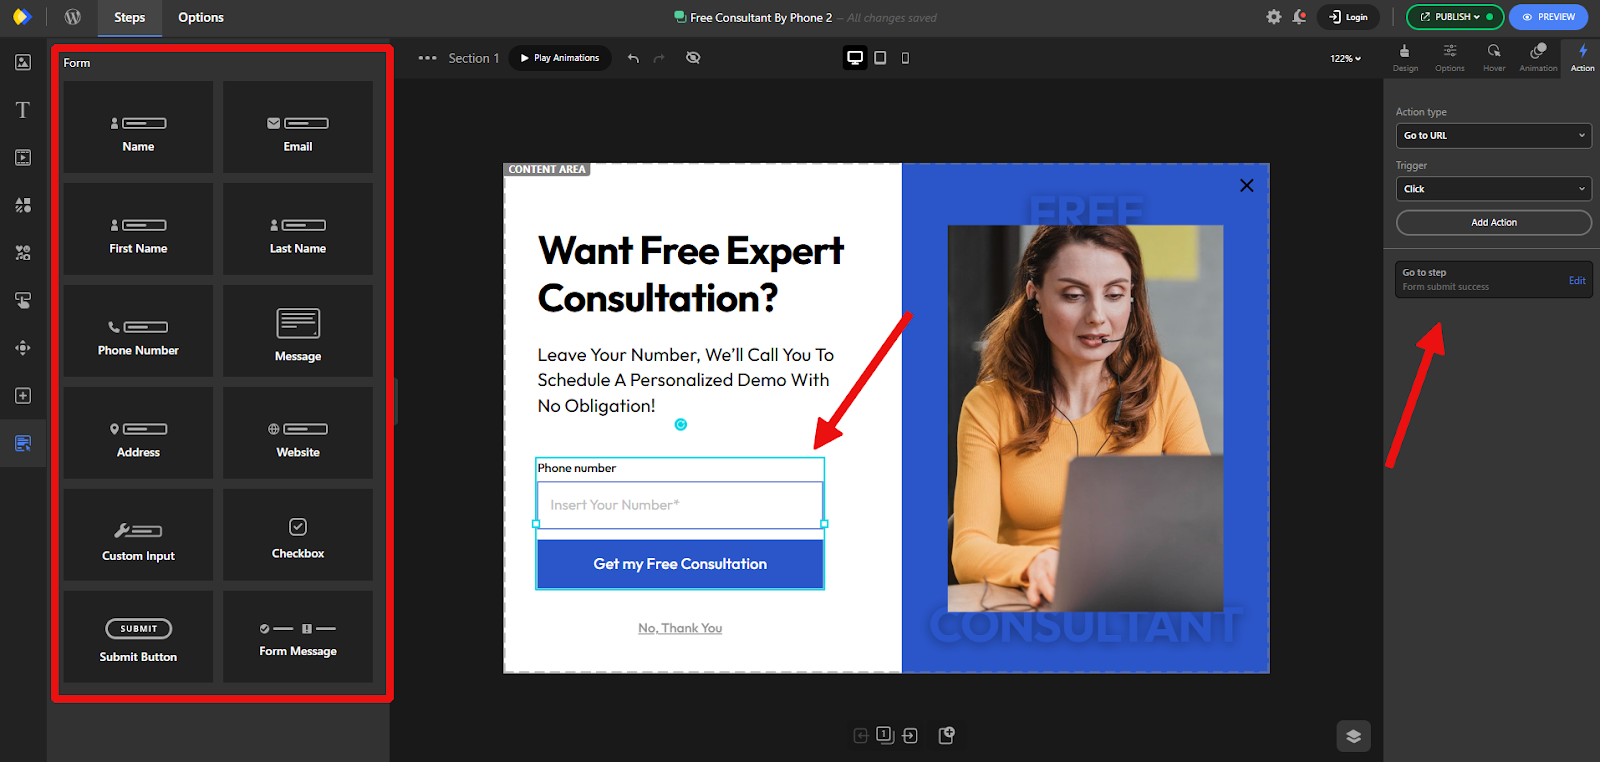
One important thing to note about this type of Depicter popup is that it includes a Form element.
When you select it, you’ll see additional form fields available to add on the left panel, and options to control what happens after submission in the right panel.
Everything from the design and appearance to behavior and functionality is fully customizable, giving you complete control to tailor the popup to your needs.
[Video Tutorial Coming Soon!]
Step 2: Configure Triggers That Work Best for Phone Number Collection
Different types of popups serve different goals. Here are a few examples that work particularly well for collecting phone numbers:
Exit-Intent Popups: Triggered when a user is about to leave the site, offering a last-minute incentive.
Timed Popups: Appear after a user has spent a certain amount of time on a page.
Slide-ins: Subtle and non-intrusive, these are great for ongoing campaigns like SMS club sign-ups.
A clothing store, for instance, might use an exit-intent popup saying: “Wait! Want 15% off via SMS? Drop your number below!”
For this example, we’ll choose a Timed Popup trigger — meaning the popup will appear 10 seconds after the visitor lands on the page.
The idea behind this timing is that a visitor who has stayed on the site for at least 10 seconds is likely more engaged with the content and therefore more likely to respond positively to the offer shown in the popup.
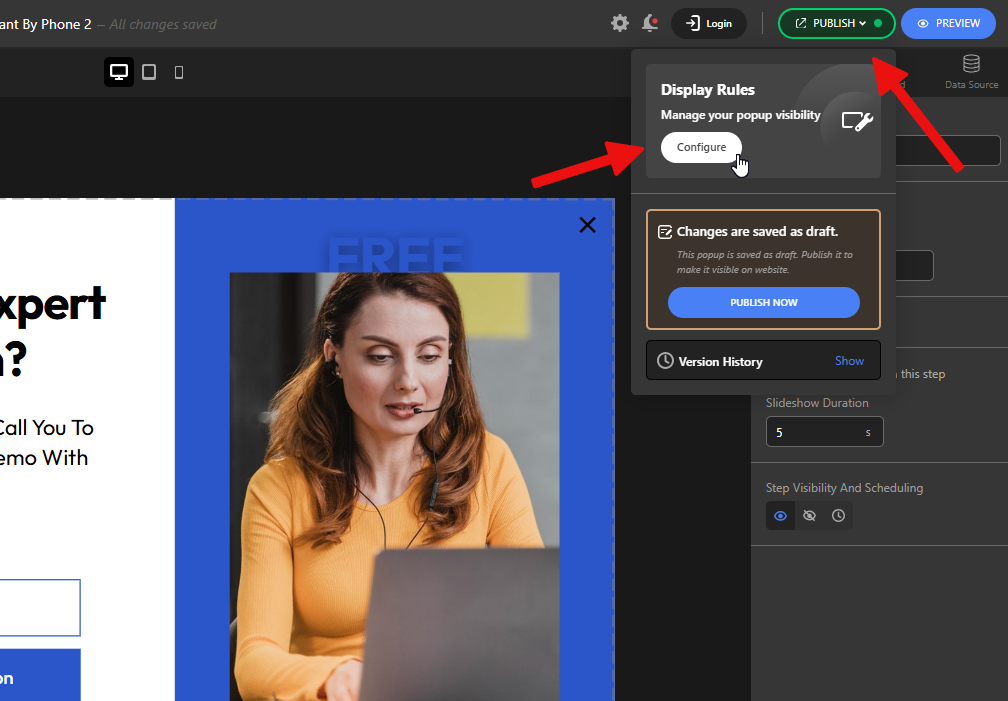
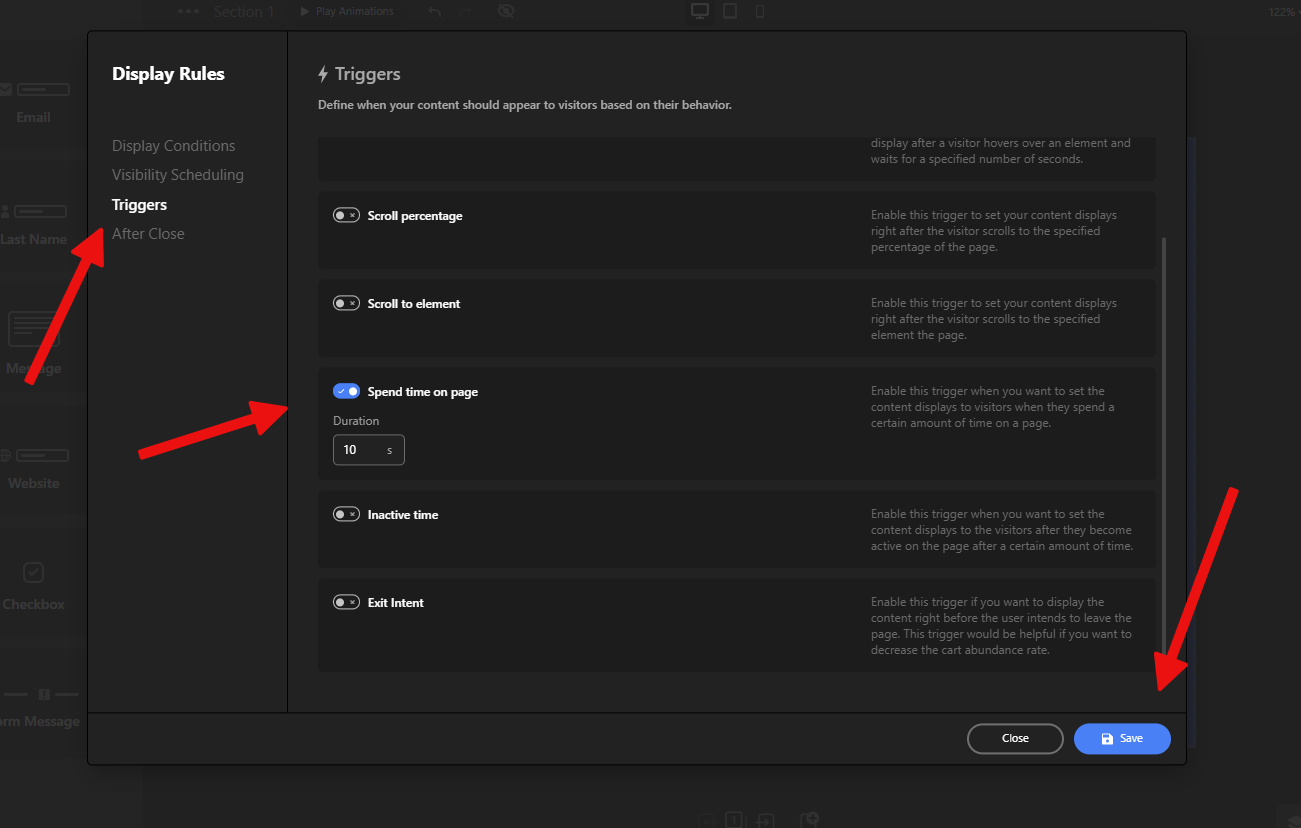
To do this, after clicking the Publish button, go to the Display Rules section and click on Configure.
Next, under the Triggers section, enable the Spend time on page option and set the value to 10 seconds.
Save your changes, and you’re all set!
Now, on your website, the popup will appear to visitors 10 seconds after they land on the page.
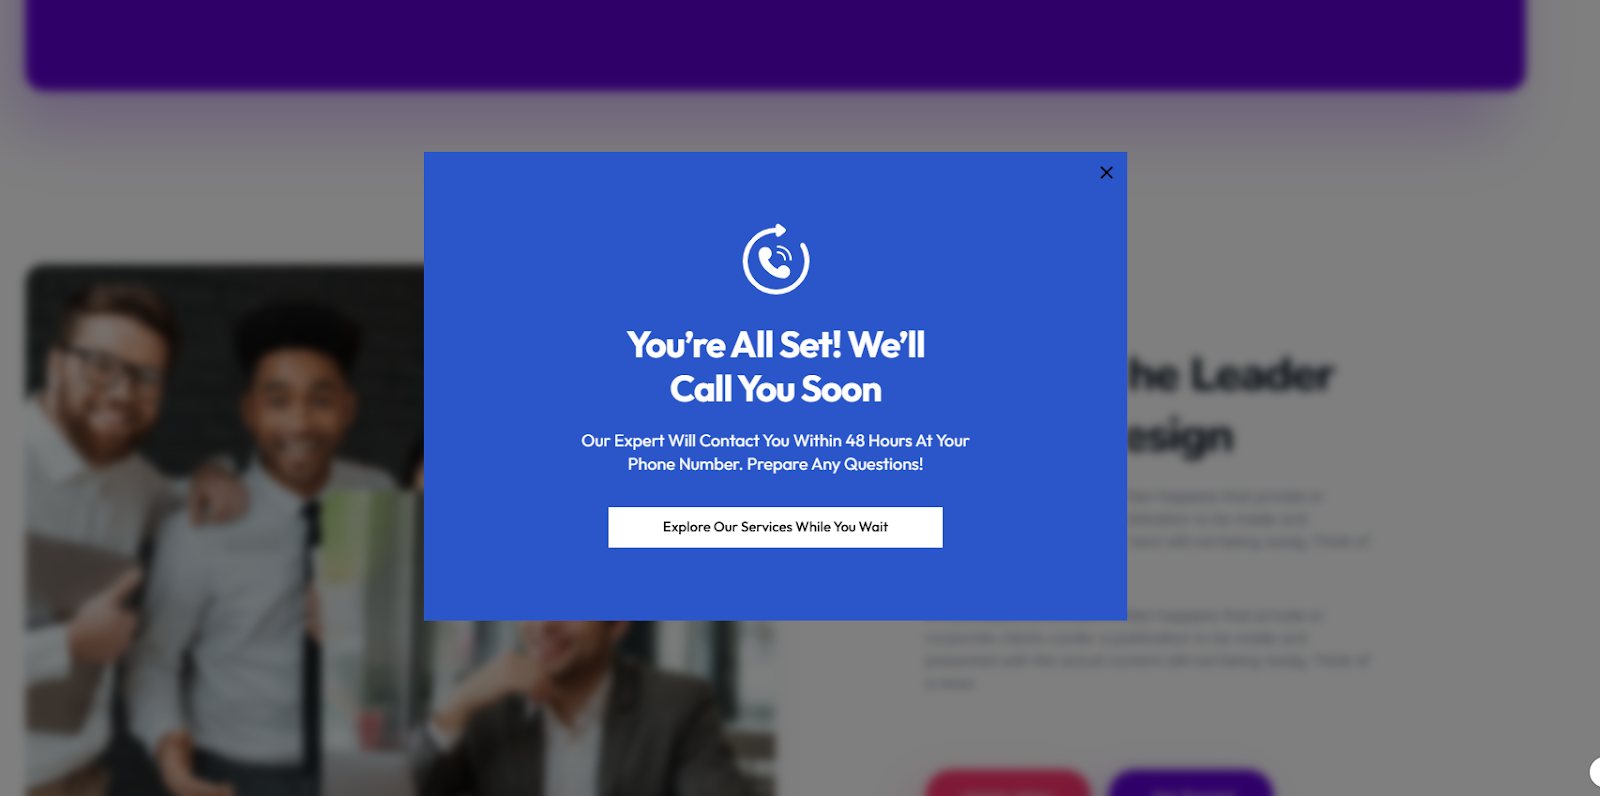
After the user enters their phone number and clicks the Submit button, the second step of the popup will display a success message.
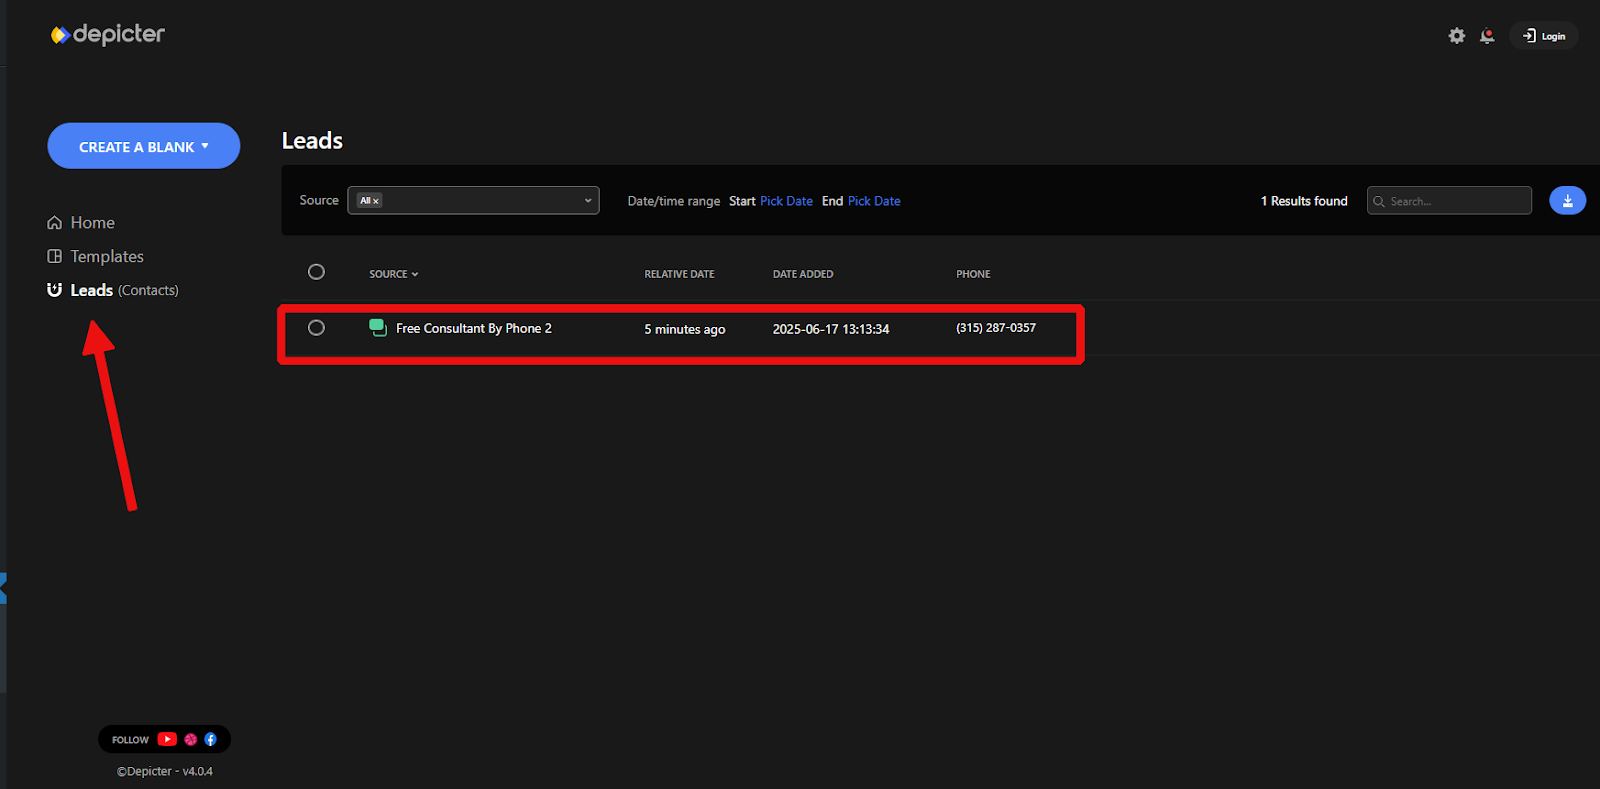
Once that’s done, you can go to the Leads menu in the Depicter dashboard to view the records of successful submissions.
What Can You Do With Collected Phone Numbers?
Once you’ve collected phone numbers, the real value begins. You can use them for:
SMS Marketing: Send promotions, restock alerts, cart reminders, or exclusive deals directly to users’ phones.
Customer Service: Offer fast responses or order updates via text, building trust and loyalty.
Segmentation: Combine phone numbers with other data like purchase history or location to send more personalized messages.
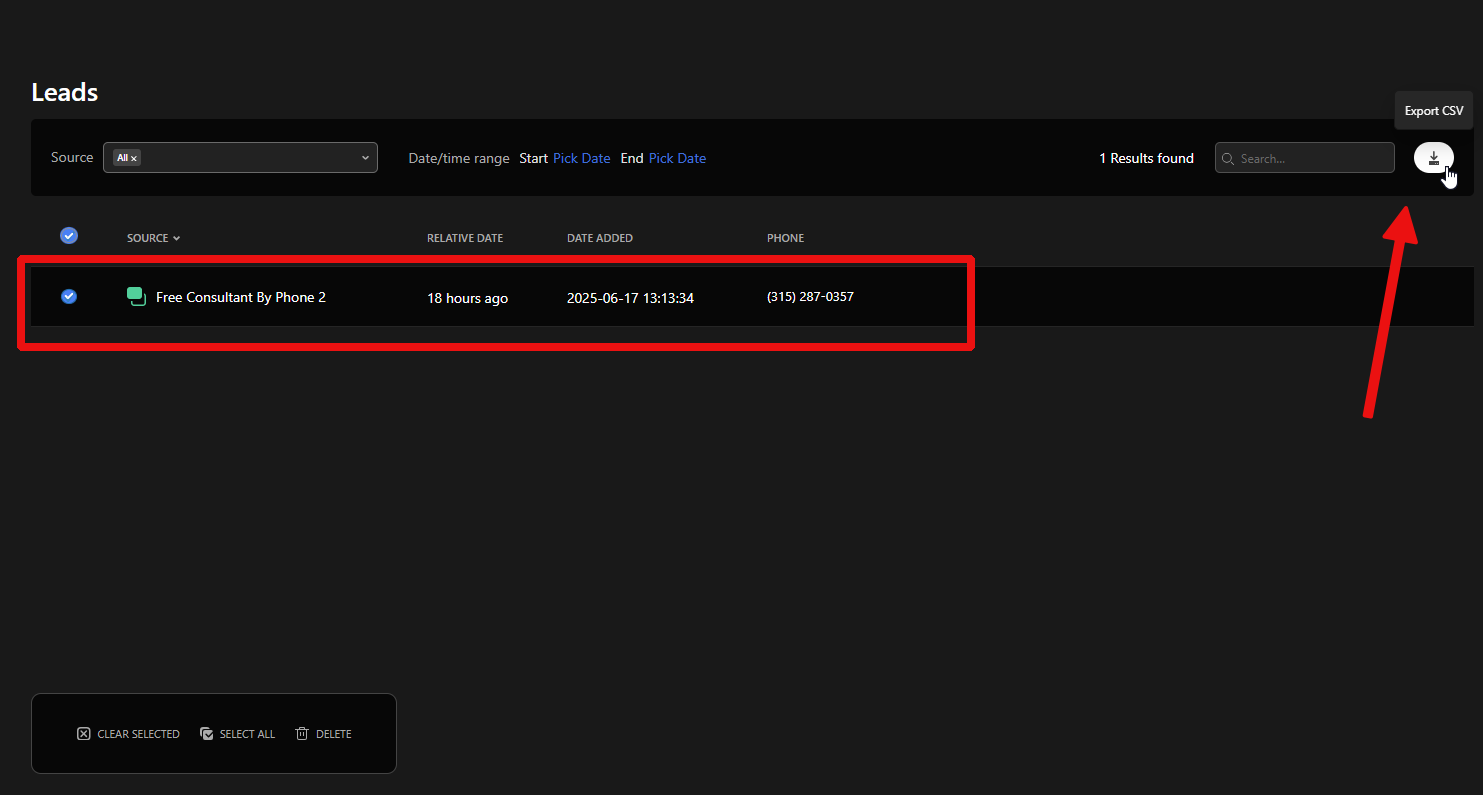
Fortunately for Depicter users, you can easily export the list of collected phone numbers as a CSV file.
After you’ve selected the desired records using options like search, choosing the source, setting the time range, and filtering by various tags, you can download the CSV file by clicking the Download button.
From there, you can import the list into your SMS marketing platform (like Twilio, Klaviyo, or Mailchimp’s SMS feature) and launch targeted campaigns in minutes. It’s a seamless way to go from data collection to action.
Congratulations on choosing the best Popup Builder and Slider plugin! You’re now part of a growing community of over 100,000 happy and satisfied users.
Depicter is built by Averta. We’ve been part of the WordPress community for more than a decade.
Our team is also behind Phlox (50K+ customers on ThemeForest) and Master Slider (30K+ on CodeCanyon, 80K+ active installs on WordPress.org). That same expertise powers Depicter, and we continue our mission to elevate WordPress experiences.
We’re about to begin an exciting journey together starting tomorrow! But before we dive in, I’ve listed a few helpful places below that you’ll want to get familiar with. Throughout this journey, you’ll learn how to create eye-catching content for your website and pick up valuable marketing tips to help grow your business.
Don’t worry, everything will be simple and easy to follow, and we’ll be with you every step of the way. You’re never alone in this.
If you ever have questions or need support, just reach out using the links below.
Depicter Members Area
This is our recommended first stop. It’s a free support portal inside your account where you can manage your subscriptions and get quick help.
We’re available around 14 hours a day to chat with you live. Just head over to depicter.com and look for the chat button in the bottom right corner.
Whether you need quick guidance, have a technical question, or just want to share feedback, we’re here and happy to help. Don’t hesitate to reach out anytime during your journey.
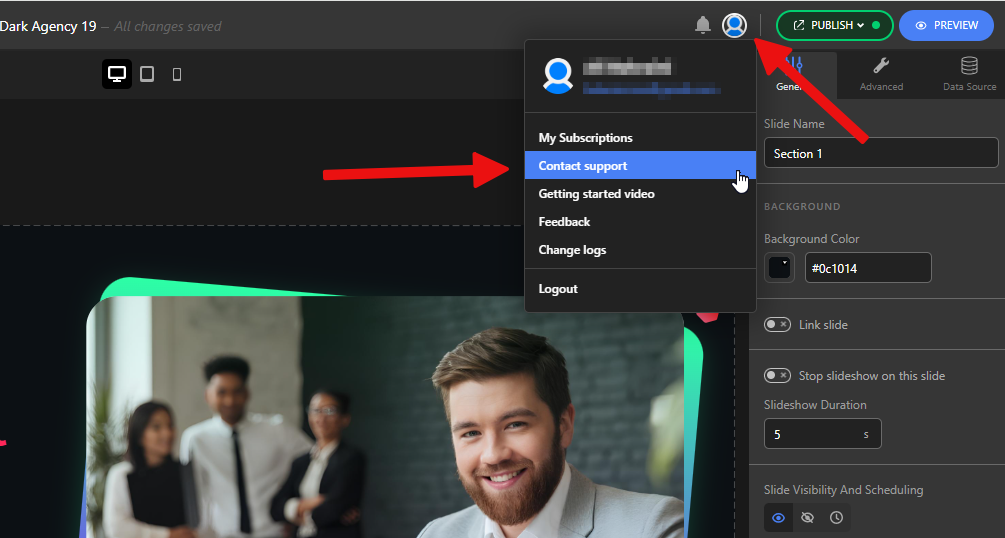
Help Inside the Product
Need help while working inside Depicter? Just click on the highlighted areas to contact our support team directly.
We’ve built support right into your workflow to make sure you never lose momentum.
WordPress.org Support Forum
You can also post your questions on our community forum here:
Our team regularly checks the forum, and you’ll also find answers from other experienced Depicter users. It’s a great place to ask questions, share ideas, or browse existing topics for quick solutions.
Subscribe to Our YouTube Channel
Don’t forget to subscribe to our YouTube channel. We release 1–2 new tutorials every week to help you get the most out of Depicter.
Video popups are a powerful way to grab attention, increase engagement, and drive action, right when it matters most. As studies show, people now spend nearly half their online time watching videos, and the majority prefer learning about products through short, engaging clips.
If you want your visitors to actually watch your videos and take action, putting them in a popup video is one of the smartest moves you can make—it keeps their focus, eliminates distractions, and delivers your message exactly when they’re most likely to engage.
This not only makes the experience smoother but also boosts time on site, click-through rates, and conversions. Simply put, if you want your message to be seen and remembered, a well-timed video popup is one of the most effective tools you can use.
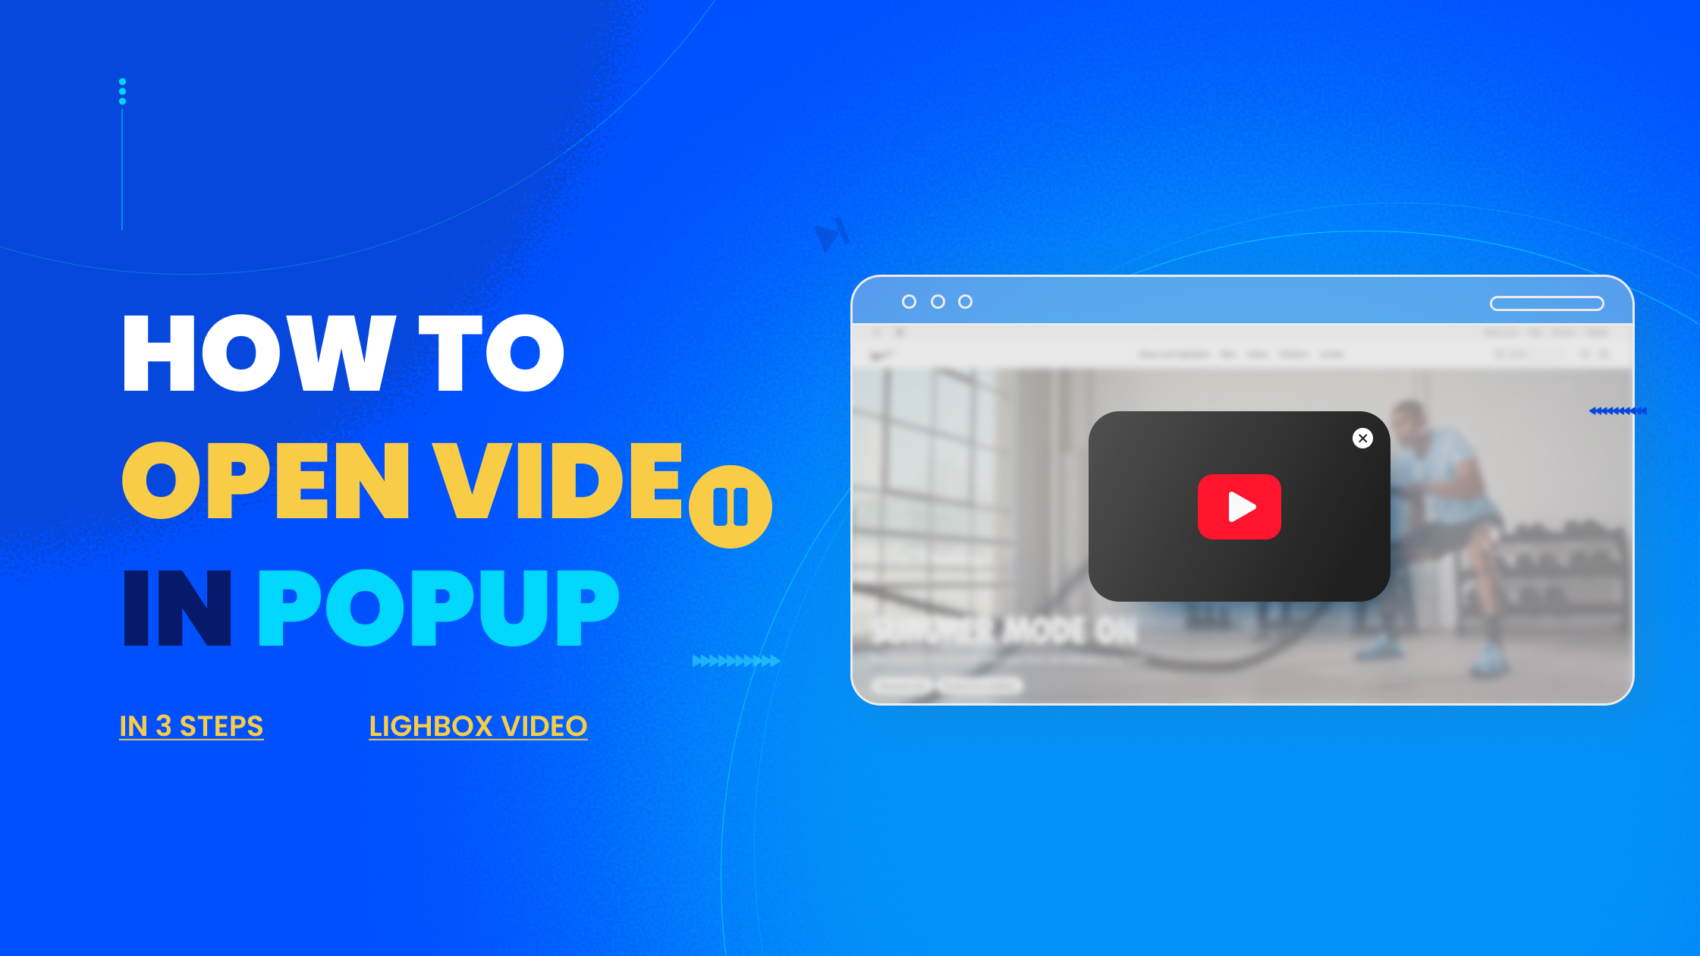
Let’s learn how to create a video popup with everyone’s favorite Free Popup Builder, the Depicter.
This video walks you through the entire process of creating a video popup with Depicter, but if you prefer step-by-step written instructions, just keep reading.
Step 1: Install Depicter Free
Before getting started, make sure you have the Depicter plugin installed. You can easily find and install it by searching “Depicter” in the Plugins section of your WordPress dashboard. For a step-by-step guide with a video tutorial, check our guidelines here.
Step 2: Prepare Your Call to Action Element
Our setup is simple. On the homepage of our website, we place a button. When users click this button, our video popup should open.
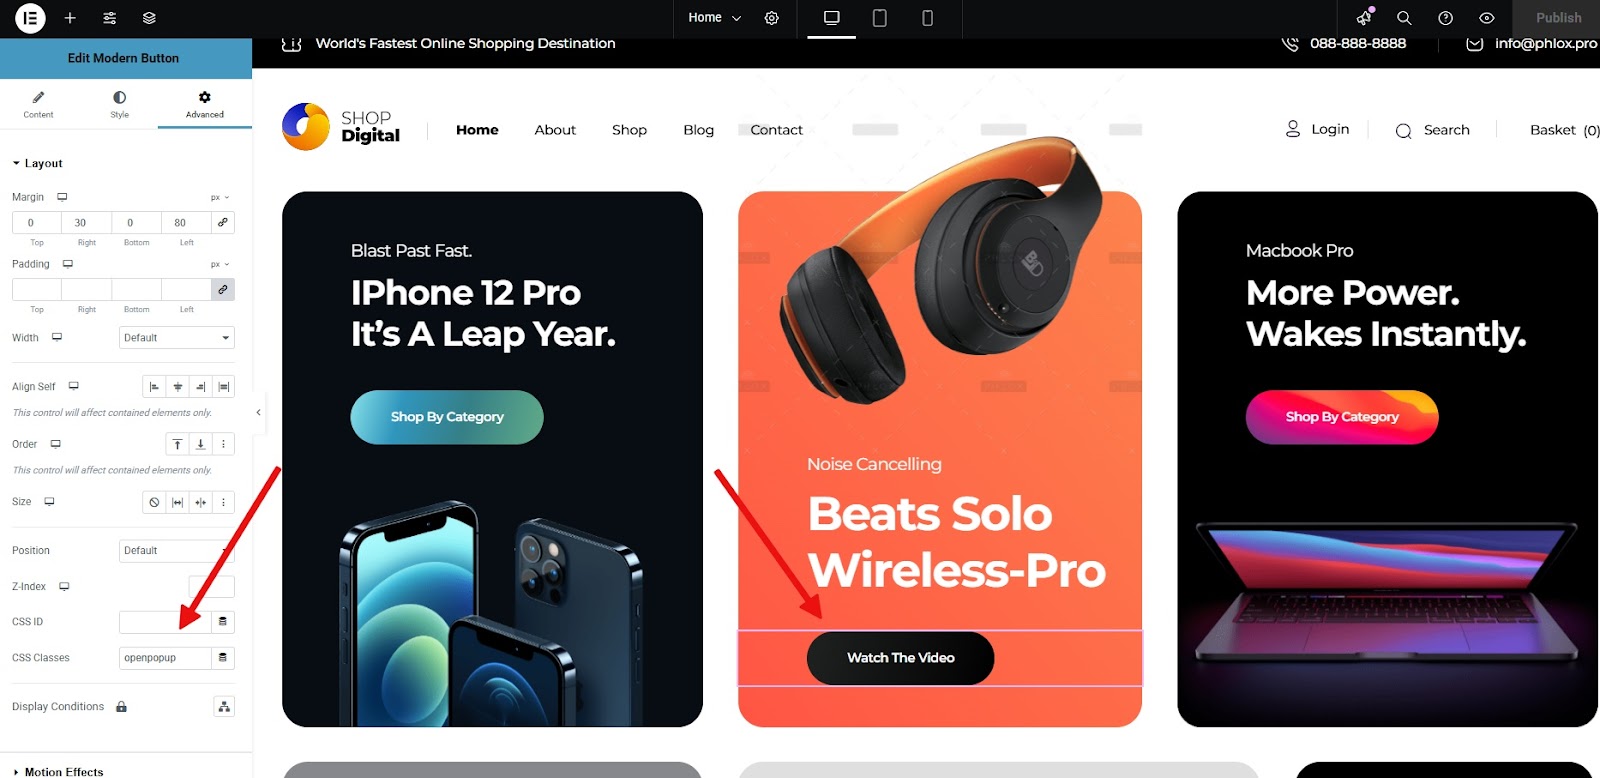
To make this happen, we simply assign a CSS selector—either an ID or a class—to the button.
Since the page was built using Elementor, we are creating an Elementor video popup (though the process is the same with any Page Builder). After opening the Elementor editor, open the Advanced tab, and enter a custom class name, let’s say “openpopup” in the CSS Classes field.
That’s all there is to it! We save the changes, and the button is now ready to trigger the popup.
Step 3: Create Your Video Popup with Depicter
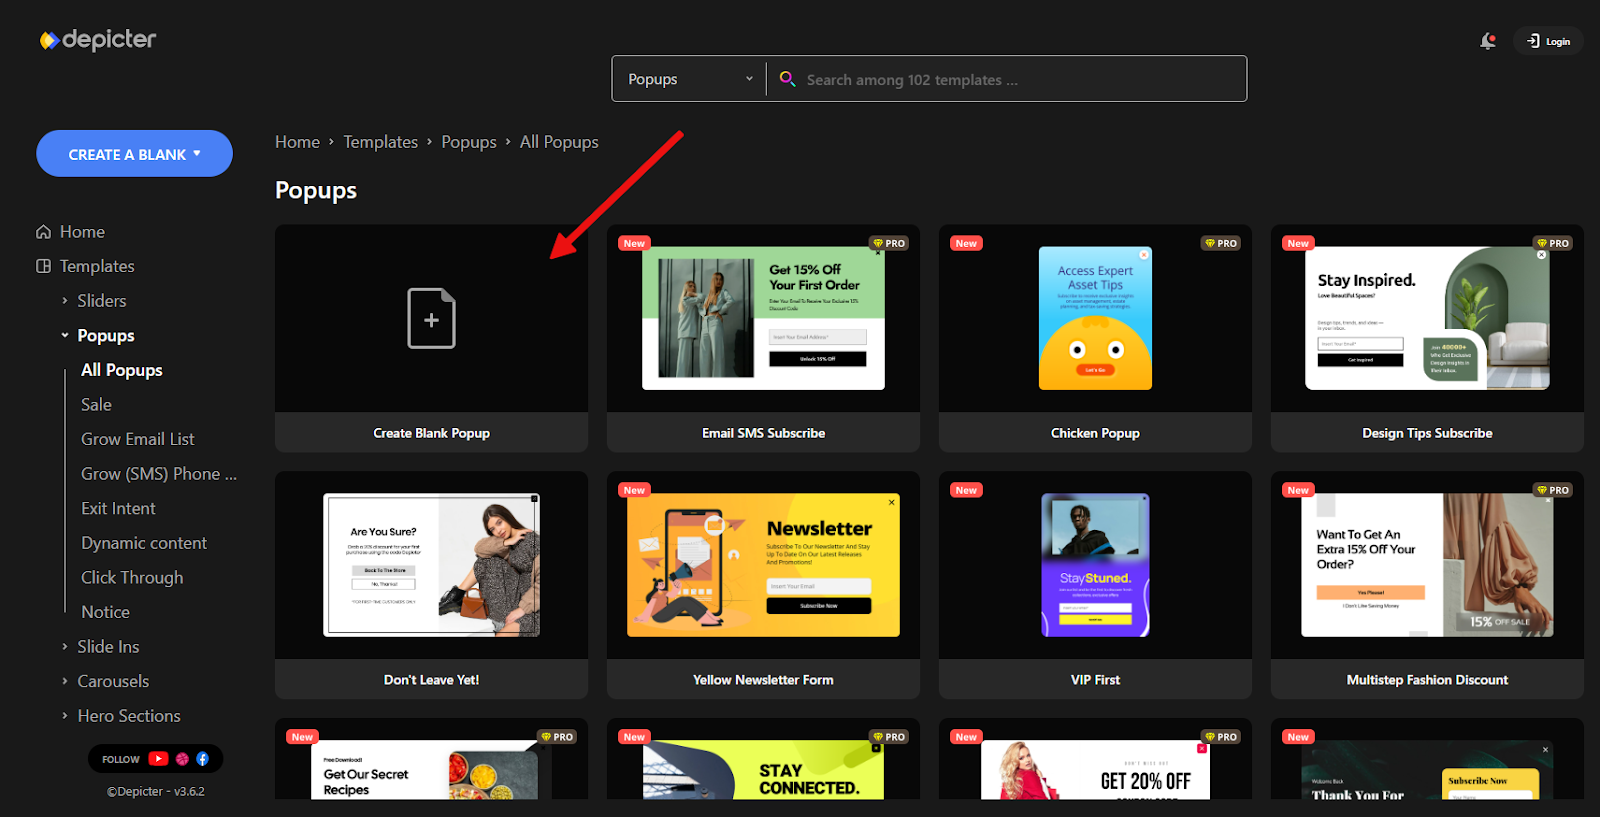
After opening the Depicter dashboard, go to the Popup section.
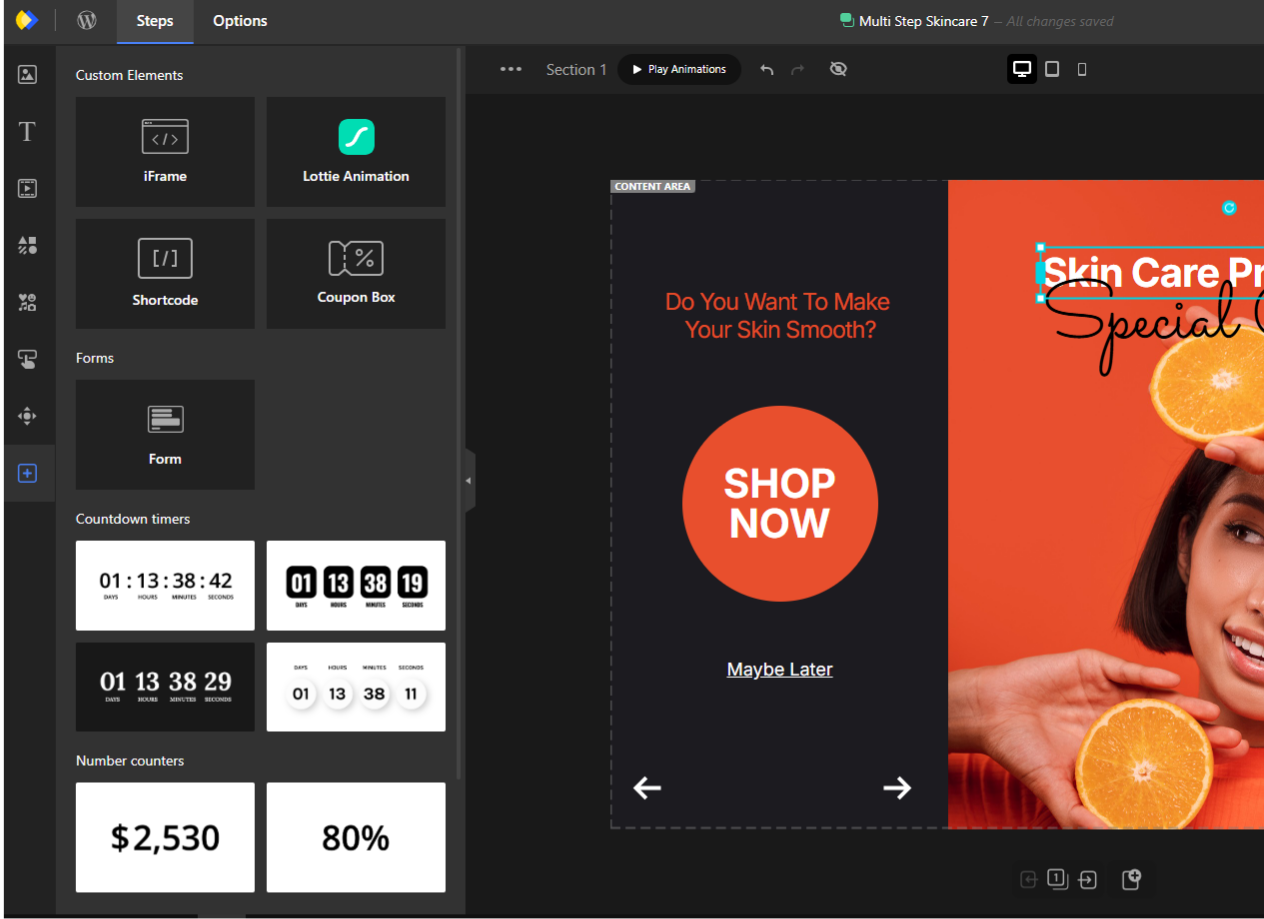
Although Depicter offers over 600 ready-to-use templates that make the process quick and easy, in this case, we want to build a simple popup from scratch. So, click on Create Blank Popup.
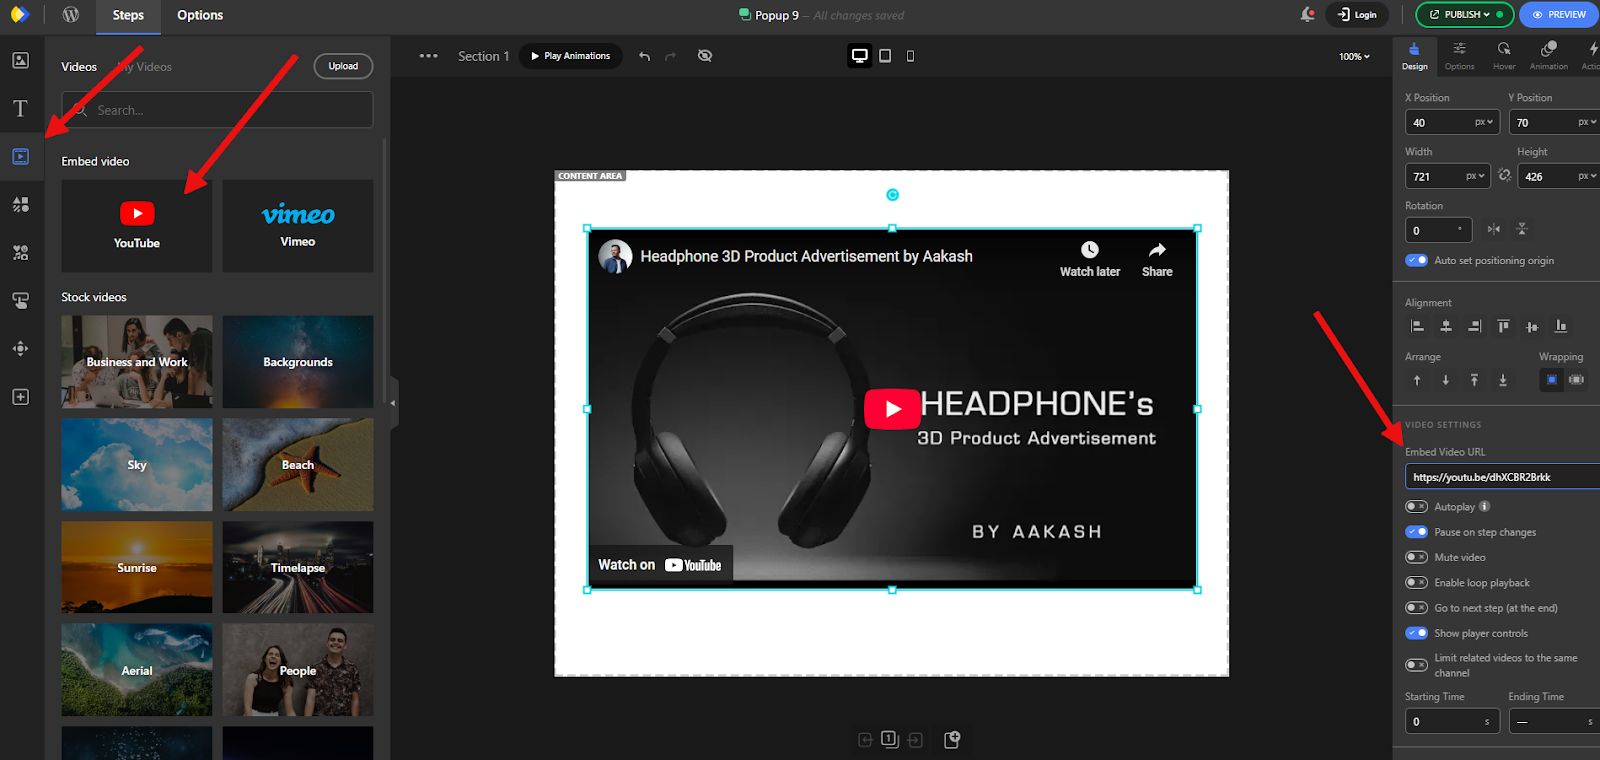
Once inside the Depicter editor, click on the Videos tab in the left panel and add the YouTube element.
Note that for embedded videos, we can also use Vimeo, or even upload our own video directly to the website. For this tutorial, we’re using a YouTube video.
After adding the video element, paste the video URL into the Embed Video URL field in the right-hand panel.
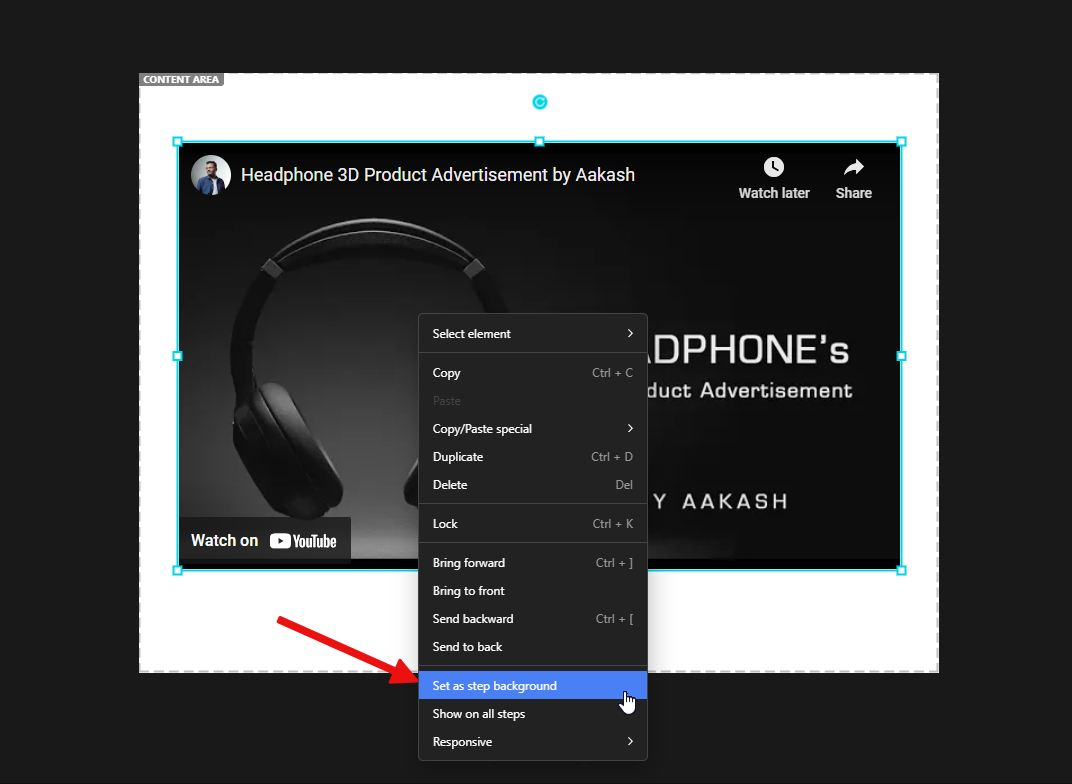
Next, to make a full-screen popup video player, we right-click on the video and select Set as step background.
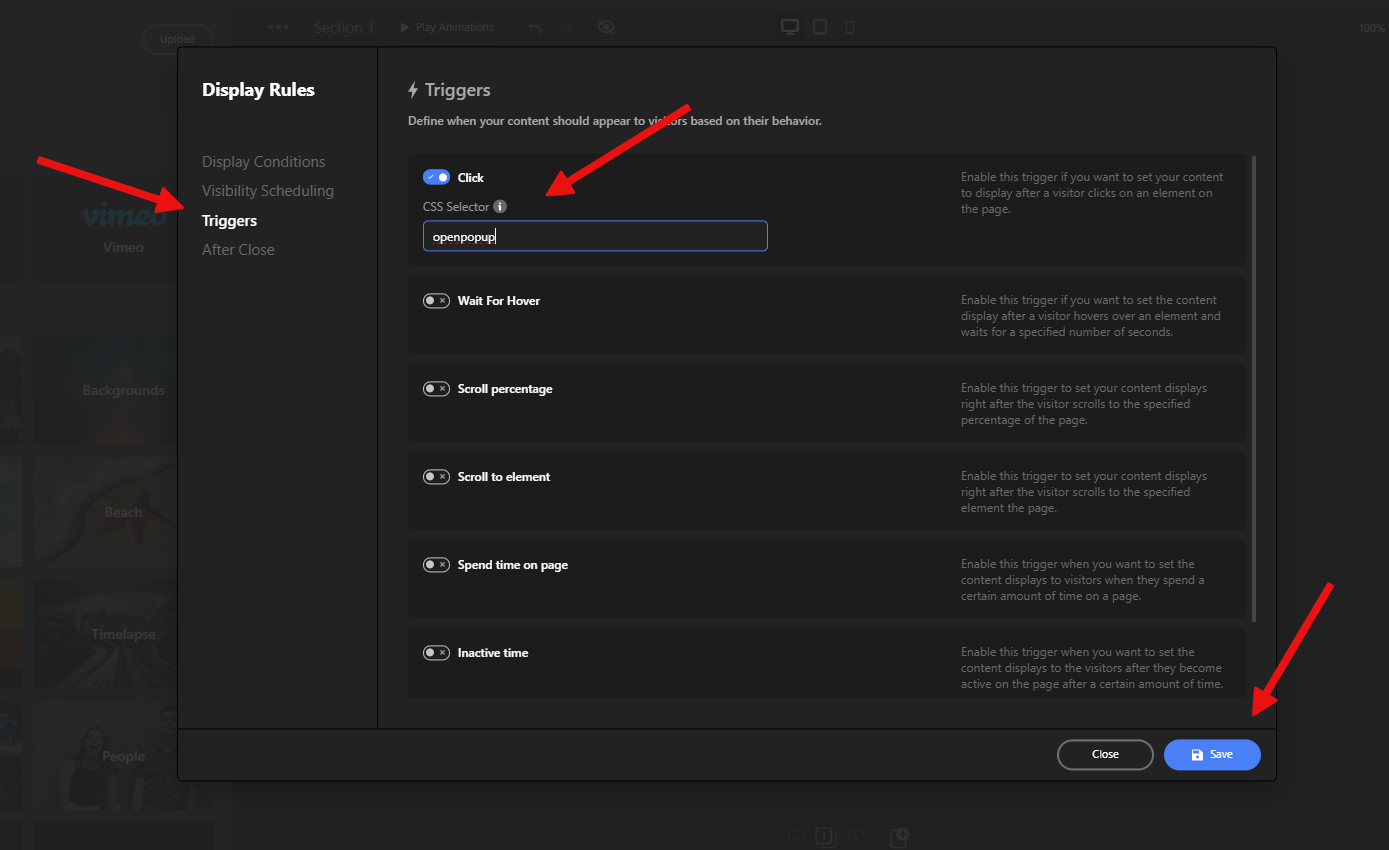
Now, let’s set up the Display Rules so that the popup opens when the user clicks a button with the CSS class we defined earlier.
To do this, we click on Publish, then select Configure under the Display Rules section.
In the Triggers tab, activate the Click option and enter the same CSS class we used earlier, starting with a dot (.) to indicate it’s a class selector.
In the CSS, a class selector is a name preceded by a full stop (“.”) and an ID selector is a name preceded by a hash character (“#”)
Finally, save the changes, and we’re done!
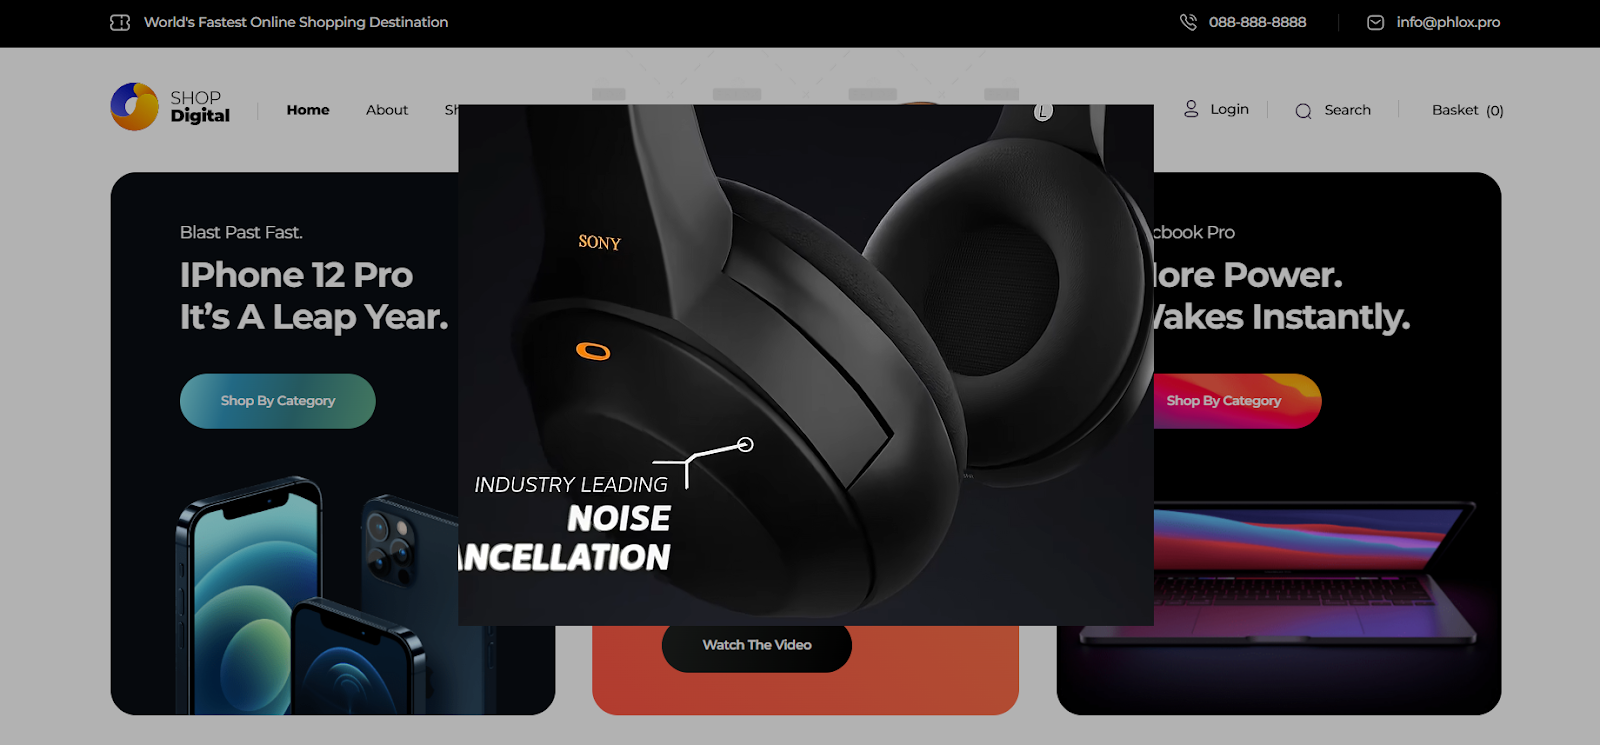
Now, when a user clicks the button on our page, the video popup opens and the video starts playing.
That’s it! This quick tutorial showed you how to create a video popup in just a few easy steps.
If you’d like to get even more out of the Depicter WordPress Popup Builder, make sure to check out the posts below for more simple, powerful tutorials like this one.
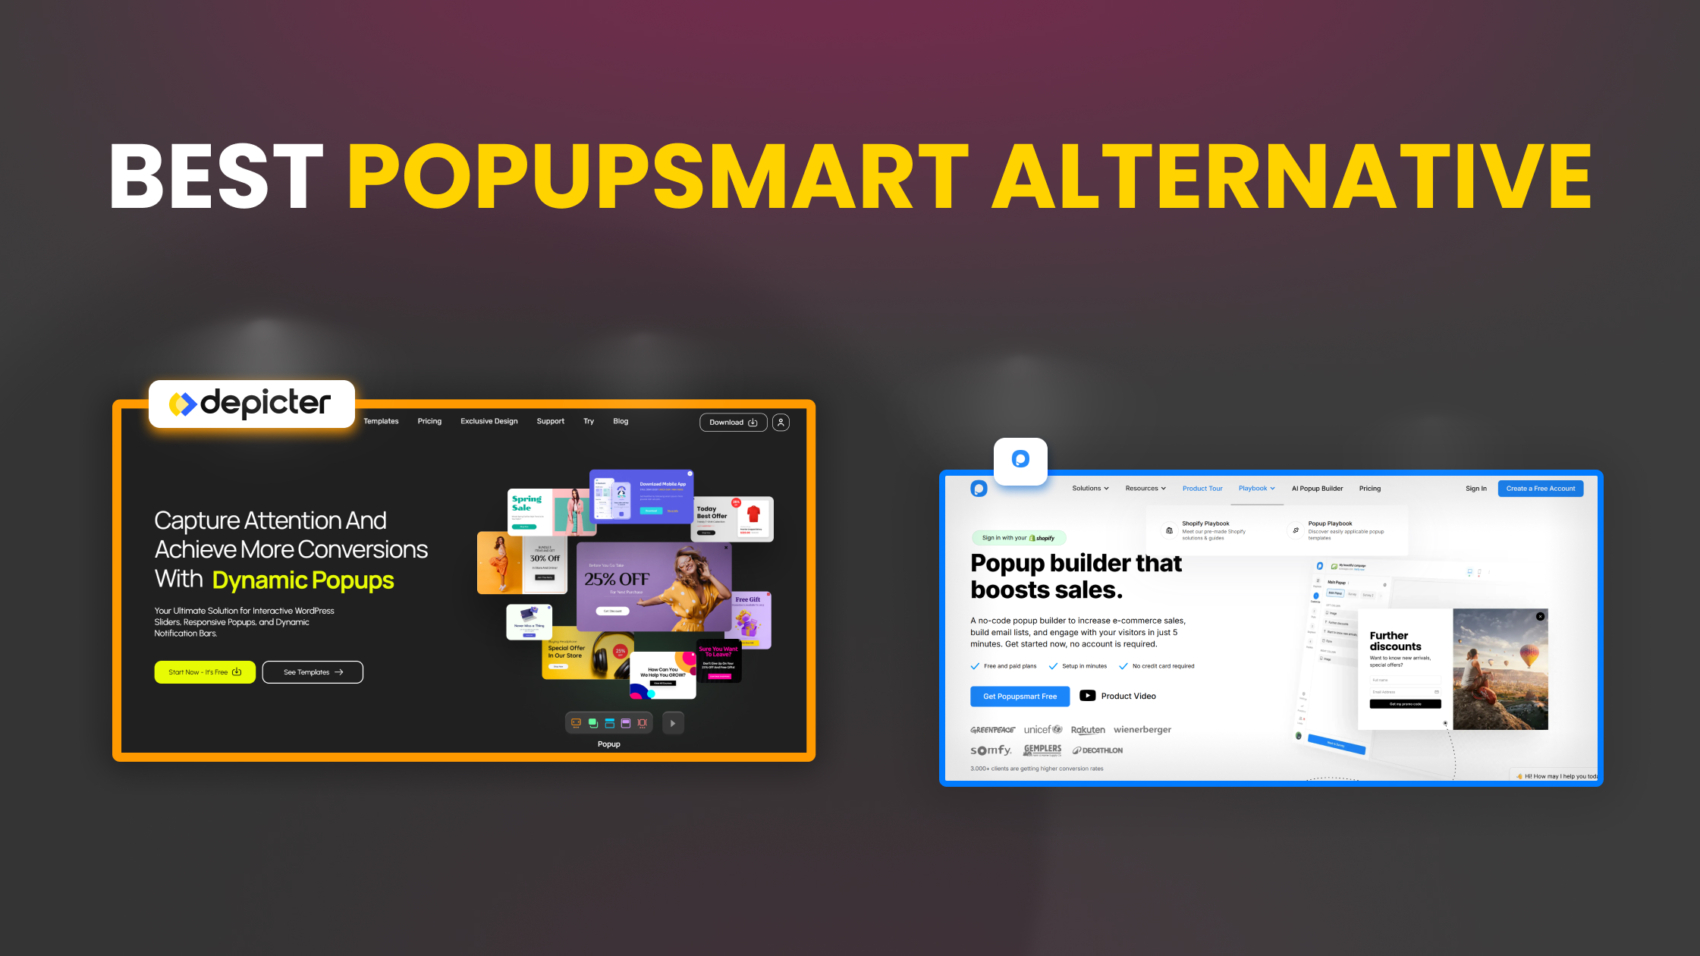
When it comes to creating high-converting, visually appealing popups, the tool you choose plays a critical role in both your workflow and your results. While Popupsmart has established itself as a user-friendly popup builder, it’s not without limitations, particularly when it comes to flexibility, customization, and cost. That’s why many users find themselves exploring Popupsmart alternatives that offer more advanced capabilities and better overall value.
For users seeking more creative control, a richer feature set, and better value, Depicter Popup Builder emerges as a compelling alternative. In this article, we’ll take a closer look at the key differences between the two, comparing them across various areas, and examining why Depicter leads the pack among Popupsmart popup builder alternatives.
The Editor
In the Editor section, we compare two user-friendly editors — one offering greater flexibility and advanced features, and the other focusing on simplicity.
Popupsmart uses a basic editor based on a row-and-column structure. You can rearrange elements through a drag-and-drop system to some extent. Standard options for editing content and styling are available when you select each element, providing a simple and straightforward workflow overall.
However, if you try to make a specific change to a template, like adding a new element to a particular spot in the popup, the rigid layout structure can quickly become frustrating. You’ll often find yourself stuck in a loop of excessive, ineffective clicks just to move an element where you want it.
In contrast, Depicter offers a fully visual drag-and-drop editor. With its modern and advanced features, it delivers an experience that is both intuitive and professional when editing visual elements.
You can freely move elements anywhere on the canvas, resize them, align them with each other or the content area — all while snapping guides assist you automatically. You can move multiple elements together, group them, rotate them, and much more. In fact, the capabilities of the Depicter editor are so extensive that they deserve a dedicated article of their own.
Variety of Elements
As the variety of available elements increases, designers gain more creative freedom to craft purposeful and engaging user experiences. These elements can include icons, buttons, animations, diverse typography, and a wide range of color schemes. When options are limited, designs often become repetitive, reducing the overall effectiveness of the messages displayed in the popup.
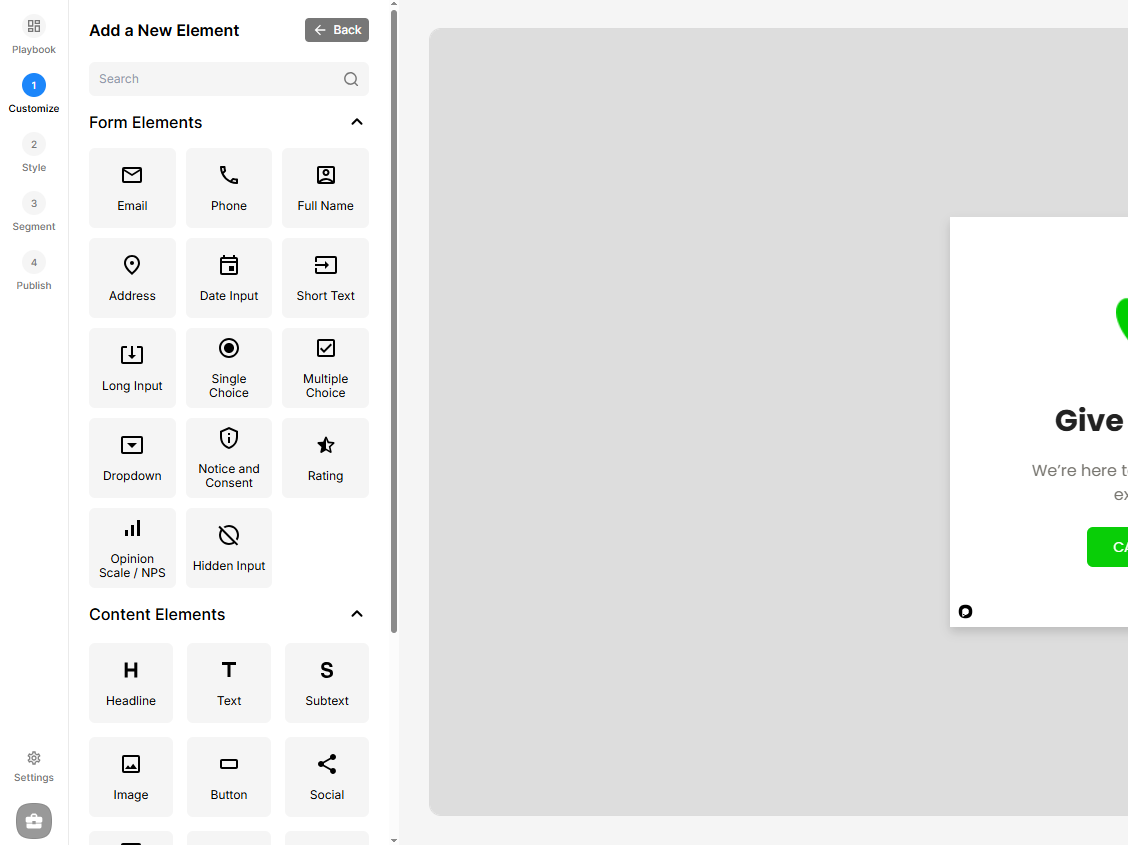
Looking at Popupsmart, elements are divided into two main categories: Form Elements and Content Elements. These mostly consist of input fields for forms, as well as basic components like text, image, and video, along with a few additional elements. In our Popupsmart review, we found that while the platform offers a clean and intuitive interface, the variety of available design elements is somewhat limited compared to more advanced tools, potentially restricting highly customized experiences for users seeking more flexibility.
On the other hand, Depicter takes it a step further. In addition to offering standard elements like text, image, and video, as well as a full set of form fields specifically designed for lead capture, it also provides a collection of specialized elements, including:
Masks
Stories Progress Bars
Slideshow Play/Pause Controls
Scroll Down Indicators
Lottie Animations
Shortcodes
Coupon Boxes
Number Timers
Before/After Comparison Modules
Each of these elements opens up new creative possibilities for the final output in Depicter. Just imagine, for example, the potential of using the Shortcode element to embed and display content from other plugins directly within your Depicter design — the flexibility this unlocks is remarkable.
Templates
In terms of template offerings, Depicter holds a clear advantage over Popupsmart, both in quantity and design versatility. Popupsmart provides around 500 templates, covering common use cases with a straightforward approach. Depicter, on the other hand, offers a growing library of over 600 templates, including free popup templates, designed with greater visual polish and a broader range of styles and industries in mind.
Notably, Depicter expands its library with 10+ new templates every week, ensuring that users have continuous access to fresh and up-to-date design options. This consistent growth, combined with the professional quality and diversity of its templates, makes Depicter a more scalable and future-ready solution for users seeking both creative flexibility and visual impact.
Visual Effects
When it comes to making a strong visual impact, animations and effects play a crucial role in capturing user attention. These visual enhancements — whether applied to individual elements, popup transitions, or interactive sections — significantly influence how engaging the final experience is. In this area, Popupsmart offers only a basic “Opening Effect” option, with no further support for advanced visual dynamics.
Depicter, in contrast, provides one of the most comprehensive collections of animations available. Users can apply detailed animation settings to each element individually, and take advantage of popular effects like Parallax, Ken Burns, Marquee, and a wide range of transitions and navigation effects for different parts of the popup.
This level of visual control allows for highly dynamic, eye-catching popups that not only stand out but also encourage user interaction.
Such visual richness not only elevates the aesthetic appeal of the popup, but also helps guide user attention toward key messages and call-to-action areas. In fast-scrolling environments where attention spans are short, this can make a measurable difference in performance.
Responsiveness
Responsive design is no longer optional — it’s essential. With users accessing content from a wide range of devices, from desktops to tablets and smartphones, ensuring a seamless and optimized experience across all screen sizes is critical to maintaining engagement and usability. A well-executed responsive layout not only improves user satisfaction but also directly impacts conversion rates and overall performance.
In this area, Popupsmart offers only limited functionality. It supports just two responsive modes — desktop and mobile — and simply auto-resizes the content to fit smaller screens, with no real control over layout or design customization per device.
Depicter, however, takes responsive design to the next level with a set of dedicated features that provide exceptional flexibility. You can create fully customized layouts for three distinct modes: Desktop, Tablet, and Mobile. For each screen size, you can adjust typography, swap images, change backgrounds, show or hide specific elements, and even rearrange their order to best suit the viewing context.
This allows you to deliver truly tailored and optimized designs for every device your audience may be using — a level of control that ensures both visual consistency and user experience remain top-notch across the board.
Dynamic Content
One of Depicter’s standout capabilities is its support for dynamic popups, allowing content to be pulled directly from your website in real time. For example, you can automatically display your best-selling products or items from a specific category inside a popup, without needing to update the design manually each time. This is especially powerful for e-commerce sites, where showcasing live product data such as prices, stock levels, or new arrivals can significantly boost engagement and conversions.
And it’s not limited to products — Depicter supports any post type defined on your site, from regular blog posts to custom post types built with tools like ACF (Advanced Custom Fields). Whether you want to highlight a new blog article, feature testimonials, or display dynamic event listings, Depicter gives you full control to create personalized, data-driven popups.
In contrast, Popupsmart WordPress lacks this level of dynamic content integration, offering only static elements with no native support for real-time data. This makes Depicter a far more flexible and scalable solution for websites that need to stay fresh, relevant, and personalized.
The Assets panel
Another valuable feature that sets Depicter apart is its built-in Asset Panel, which provides users with direct access to a vast library of stock images and videos — all ready to use within their popups. This integrated resource eliminates the need to search for visual assets on external websites or worry about licensing and file compatibility. Having high-quality media at your fingertips streamlines the design process and allows users to focus on creativity rather than logistics.
Whether you’re building a product showcase, an announcement banner, or a lead capture popup, the ability to instantly browse and insert relevant visuals saves time and enhances the overall quality of your designs. It also ensures visual consistency, since everything is accessible from within the same platform.
Popupsmart, by contrast, does not offer a built-in media library, which means users must manually upload all images and videos — a process that can slow down production and limit creative flexibility. For anyone looking to produce professional-looking, media-rich popups quickly and efficiently, Depicter’s Asset Panel is a game-changing advantage.
Price
When evaluating popup builders, pricing is often a key factor, especially for small businesses, startups, or individual creators working within a limited budget. In this regard, Depicter offers a far more accessible solution, with its premium plan starting at just $39, compared to Popupsmart’s entry-level plan priced at $390. This significant price gap — a key point in Popupsmart pricing — makes Depicter an appealing option for users who want professional-grade features without committing to a high upfront cost.
Despite its affordability, Depicter doesn’t compromise on capabilities, offering advanced design tools, dynamic content support, responsive editing, and a growing library of templates and assets.
Conclusion
While Popupsmart may be a solid choice for simple use cases, it quickly shows its limitations for users who need more creative freedom, design flexibility, and advanced functionality. Depicter Popup Builder clearly stands out as a more modern and powerful popup builder, offering a professional-grade editor, dynamic content integration, visually stunning effects, a richer template library, and a responsive design system that adapts to every screen.
Add to that its built-in stock asset panel and an unbeatable price point — starting at just $39 compared to Popupsmart’s $390 — and it becomes clear why Depicter is the best among today’s Popupsmart alternatives. Whether you’re a designer, marketer, or business owner, Depicter empowers you to build popups that not only look great but also perform.
Understand what sales campaigns are and how they help achieve specific business goals.
Learn how to set measurable objectives and align your strategy with your audience’s needs.
Follow a structured approach to launching campaigns with compelling content and timing.
Discover proven promotional tactics like flash sales, referrals, and loyalty programs.
Get practical guidance on using Depicter to build effective popups and notification bars.
Capturing your audience’s attention and converting interest into action is more important than ever. That’s where sales campaigns come in. Whether you’re launching a new product, clearing out seasonal stock, or simply trying to drive more traffic to your website, a well-planned campaign can make all the difference.
But creating a campaign is just the beginning. The real challenge lies in promotion. How do you promote sales in a way that actually drives results? That’s where strategy comes in, and tools like popups and notification bars can be powerful ways to boost visibility and conversions.
In this guide, you’ll learn what makes a successful sales campaign, how to plan one strategically, and how to amplify your results using Depicter.
1. What Is a Sales Campaign?
A sales campaign or sales promotion is a short-term, focused effort that businesses use to boost interest in their products or services and drive more sales within a specific period. It’s a step-by-step plan that helps reach the right people, often through methods like emails, calls, ads, or social media, and encourages them to take action.
Whether the goal is to launch a new product, clear out extra inventory, or hit sales targets before a deadline, these campaigns are designed to make an impact quickly.
A good sales campaign not only brings in new customers but also keeps existing ones engaged.
It’s more than just pushing a product—it’s about offering something that feels timely, useful, and even exciting for buyers, while giving the sales team clear goals and tools to succeed.
For example, an online clothing store might run a “Summer Flash Sale” where everything is 30% off for 48 hours to clear out seasonal stock. They promote it through email and social media, driving urgency with a countdown timer.
Another case could be a tech store launching a “Back to School” campaign, offering student discounts on laptops and free shipping for a limited time. These kinds of campaigns use specific timing, clear offers, and targeted communication to increase engagement and sales quickly.
2. Planning for a Successful Campaign
Launching a sales or promotional campaign that truly delivers results takes more than just a good idea — it requires thoughtful planning, a clear direction, and a deep understanding of your audience. Below is a step-by-step guide to help you organize a campaign that not only catches attention but also drives meaningful results.
Set Specific and Measurable Goals
Start by defining what you want to achieve. Are you looking to clear out seasonal inventory, increase revenue during a slow period, bring in new customers, or simply get your brand more exposure? Avoid broad goals like “increase sales.” Instead, choose measurable targets such as “increase website purchases by 20% over the next three weeks.” These clear benchmarks help you and your team stay focused and assess how well the campaign is working.
Know Your Audience Inside Out
Understanding who you’re targeting is just as important as what you’re offering. Start by creating detailed customer profiles based on real data, such as age, interests, buying habits, and location. Segmenting your audience allows you to customize your offers. For example, young parents might respond well to baby product bundles, while frequent online shoppers might be more interested in free shipping. Use tools like surveys, purchase history, and social media analytics to gather insights that shape your approach.
Choose the Right Promotional Strategy
The method you choose to deliver your offer can greatly affect your campaign’s impact. There are three common strategies:
Push Strategy: Offer incentives to retailers or distributors to stock your product — ideal for B2B and retail-focused campaigns.
Pull Strategy: Focus on end customers by creating demand directly through promotions like flash sales or giveaways.
Hybrid Strategy: Combine both push and pull methods — for instance, give your distributors a bonus while also offering a buy-one-get-one deal to consumers.
Match your strategy to your product’s lifecycle. New products often benefit from pull tactics like samples or influencer promotion, while well-established ones may perform better with a push approach.
Develop a Detailed Campaign Plan
A structured plan ensures smooth execution. Lay out your campaign elements in advance, including:
Timeline: Set start and end dates to build urgency. Short durations (like 48-72 hours) can motivate quicker responses.
Budget: Decide how much to invest in areas such as ads, discounts, influencer fees, or giveaways.
Channels: Choose where to promote — email, social media, website banners, or even physical displays — based on where your audience is most active.
A well-timed offer aligned with holidays or shopping seasons can also increase relevance and boost performance.
Craft a Compelling Launch
How you present your offer can make or break the campaign. Pay attention to:
Messaging: Use clear, catchy headlines and action-driven phrases like “Ends Soon” or “Grab Yours Now.”
Visuals: Eye-catching graphics and clean design help your message stand out on crowded platforms.
Multi-Channel Distribution: Don’t rely on just one outlet. Combine social media posts, email blasts, website banners, SMS alerts, and influencer collaborations to maximize visibility.
It’s also smart to test variations of your content, such as different images or headlines, to see what performs best before scaling it across all platforms.
A successful campaign doesn’t happen by chance. It’s the result of clear goals, audience awareness, a solid strategy, and strong execution.
When all these pieces work together, you’re more likely to see results that matter — whether it’s more sales, new customers, or stronger brand presence.
3. Proven Campaign Promotion Strategies
Running effective promotions helps online stores attract new customers, increase sales, and build brand loyalty. While there are many ways to do this, here are five of the most popular strategies:
1. Buy One, Get One Free (BOGO)
Why it works: Shoppers love getting something for free—it feels like a reward. BOGO promotions also help move excess stock quickly.
Example:
Kraft Heinz used BOGO offers to increase sales of slower-moving products. This helped clear out their inventory while giving customers extra value for their money.
2. Flash Sales
Why it works: These limited-time offers create urgency. People don’t want to miss out, so they’re more likely to buy right away.
Example:
Amazon Prime Day is a huge flash sale event. For a limited time, customers get deep discounts on popular products, resulting in a massive spike in purchases and engagement.
3. Email Marketing
Why it works: Email lets you talk directly to your customers. You can send targeted messages, offer discounts, and follow up on abandoned carts.
Example:
Grammarly’s Black Friday campaign offered a “55% Off” deal exclusively through email. The urgency and savings pushed many free users to upgrade to paid plans.
4. Referral Programs
Why it works: People trust recommendations from friends. Offering a reward for sharing your brand encourages loyal customers to spread the word.
Example:
Many brands use the classic “Give $5, Get $5” offer. It motivates customers to invite others while earning a bonus themselves, growing the customer base through word of mouth.
5. Loyalty Programs
Why it works: Customers who get rewarded are more likely to come back. Points, discounts, and special perks help build long-term relationships.
Example:
LEGO’s Insiders program gives points for every purchase. Customers can use points for rewards, access members-only content, and feel like part of a special club.
While these five strategies are widely used and highly effective, there are many others worth exploring, like giveaways, cashback deals, product bundles, free trials, and even charitable donations linked to purchases.
4. Use Popups and Notification Bars to Maximize Reach
Popups: Timed and Targeted Engagement
Popups are effective for delivering timely messages, such as special offers or email sign-up prompts. To ensure they enhance rather than hinder user experience, consider the following best practices:
Timing Is Crucial: Deploy popups based on user behavior. For instance, use exit-intent popups to retain visitors about to leave, or display them after a certain time on the page to engage interested users.
Clear and Concise Messaging: Keep the content straightforward, highlighting the value proposition and including a compelling call-to-action (CTA).
Design for Clarity: Ensure the popup is visually appealing but not overwhelming. Use contrasting colors for visibility and make it easy to close to respect user autonomy.
Notification Bars: Subtle Yet Effective
Notification bars, also known as sticky bars or announcement bars, sit at the top or bottom of a webpage and provide persistent, unobtrusive messaging. They are ideal for:
User Experience Stack Exchange
Announcing Promotions: Highlight ongoing sales, discounts, or special offers. For example, a bar stating Offering free shipping on orders over $50 can encourage customers to spend more to qualify for the deal.
Sharing Important Updates: Inform visitors about new product launches, upcoming events, or changes in service.
Encouraging Sign-Ups: Prompt users to subscribe to newsletters or join loyalty programs with concise messages and clear CTAs.
Design Tips:
Keep It Simple: Use brief, impactful text to convey your message without clutter.
Use Contrasting Colors: Ensure the bar stands out against your site’s background to grab attention.
Strategic Placement: Place the bar in a spot that’s easy to see, usually at the top of the page, without covering up any important content.
5. How to Create Campaign Popups with Depicter
Depicter is a visual Popup builder and Notification Bar builder for WordPress that provides many features as part of marketing or promotional campaigns. It offers a user-friendly interface with a range of pre-designed templates, allowing users to quickly implement customized messages without writing code. Depicter’s tools include flexible display rules, responsive design options, and behavior-based triggers, making it suitable for creating targeted interactions such as limited-time offers, email capture forms, and general site announcements.
We will be creating a simple popup-based sales campaign designed to quickly boost sales through a pull strategy and a flash sale. The goal is to create urgency and excitement by offering a limited-time discount to all website visitors. The popup will appear based on user behavior to avoid interrupting the browsing experience and will include a countdown to drive fast action.
[The website full image]
Campaign Details
Campaign Goal: Increase purchases by 25% within 48 hours by promoting summer clothing through a time-sensitive offer.
Strategy:
Pull Strategy: Reaching out directly to customers visiting your website
Flash Sale: Creating urgency with a two-day discount event
Target Audience: All visitors to the website, with no special segmentation for this general campaign
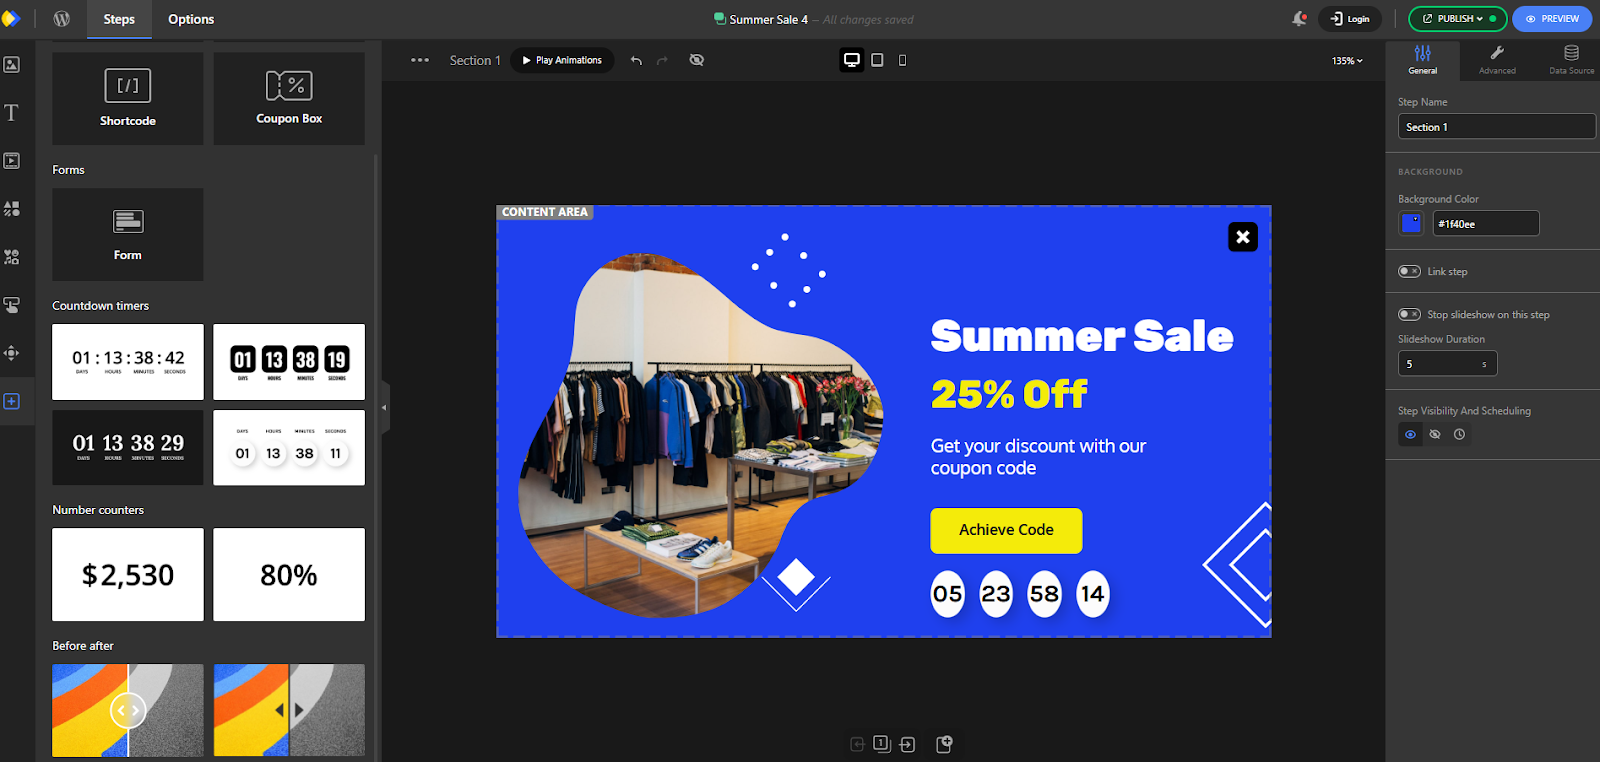
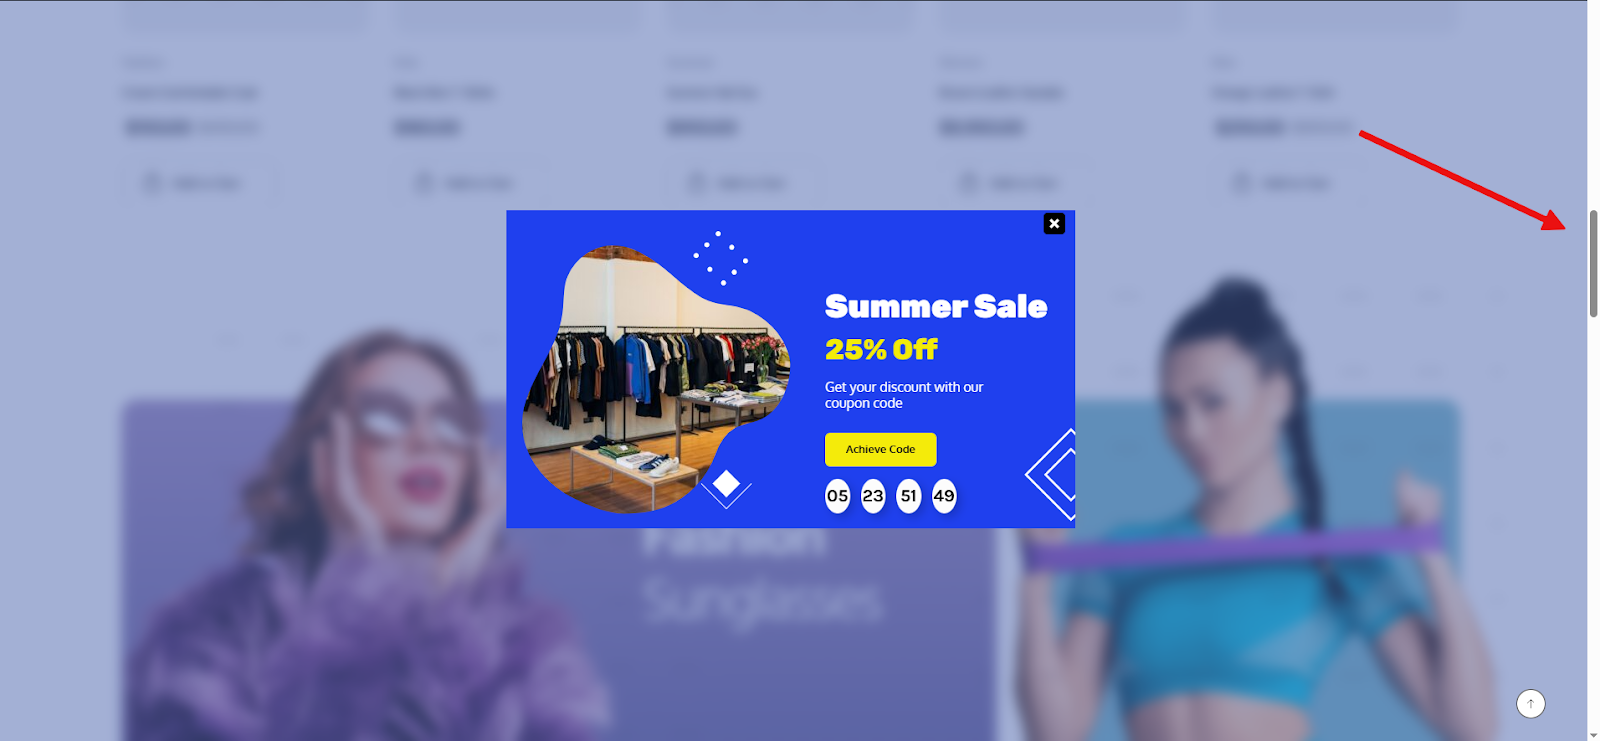
Depicter Popup Content
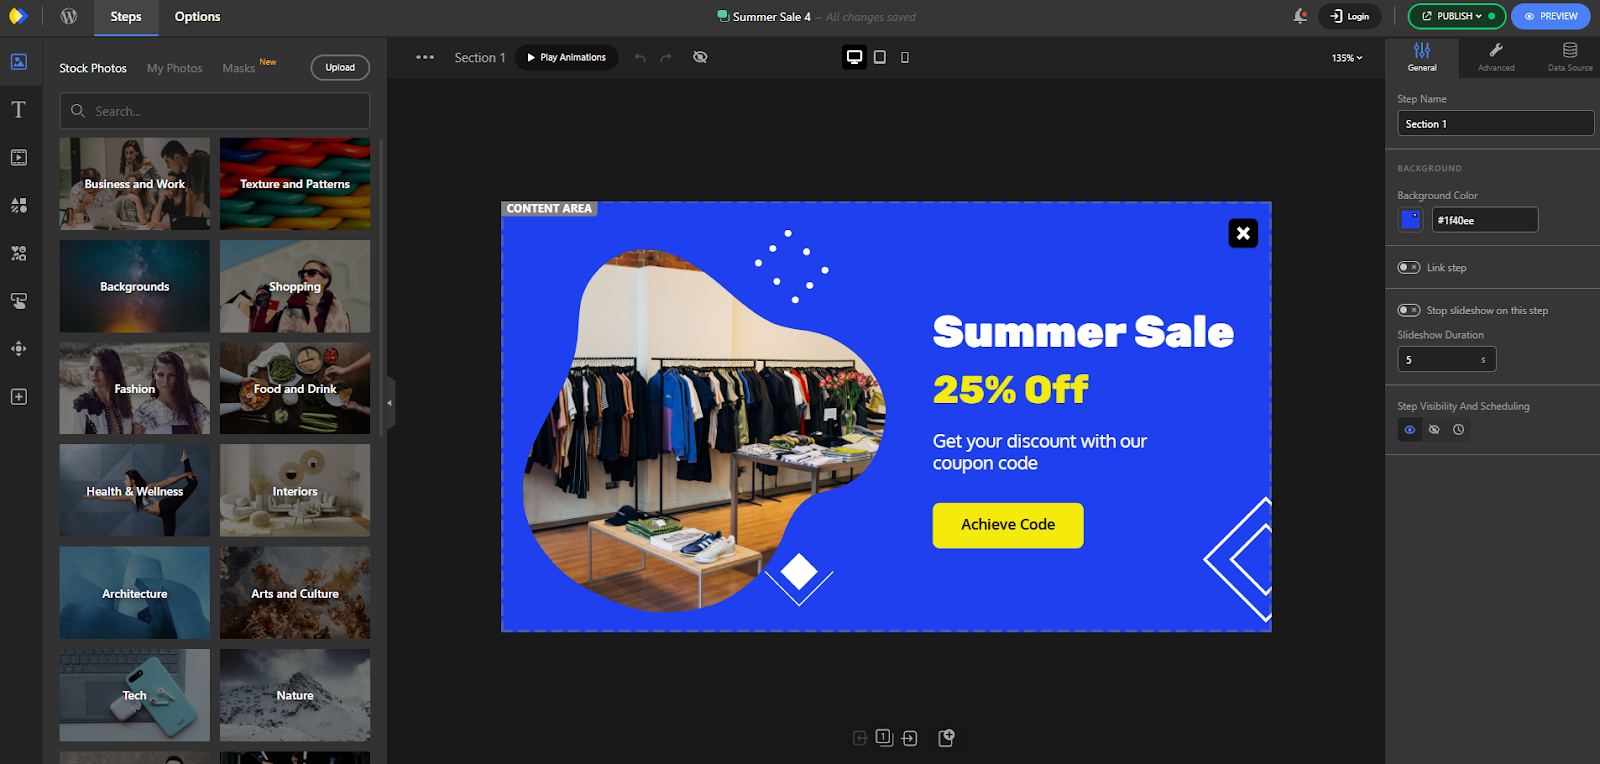
Headline: Summer Sale
Body Text: 25% Off
Get your Discount with our coupon code
Countdown Timer
Call to Action Button: Achieve code
Popup Settings:
Trigger Timing:
Show popup after 10 seconds on the homepage
Or on scroll (30% down the page)
Frequency Control:
Show once per session to avoid annoying users
Design Notes:
Colors: Use brand-aligned and eye-catching colors that draw attention without overwhelming the user.
Appropriate Images: Include visuals that reflect the user’s interests to increase relevance and engagement.
Responsive Design: Ensure the popup adjusts smoothly across all devices and screen sizes.
Close Button: Always provide a clear and accessible close button so users can easily dismiss the popup.
Install Depicter
Before getting started, make sure the Depicter plugin is installed on your site. You can quickly find it by searching for “Depicter” in the Plugins section of your WordPress dashboard. Need help? Check out our step-by-step guide with a video tutorial here.
Importing a Template
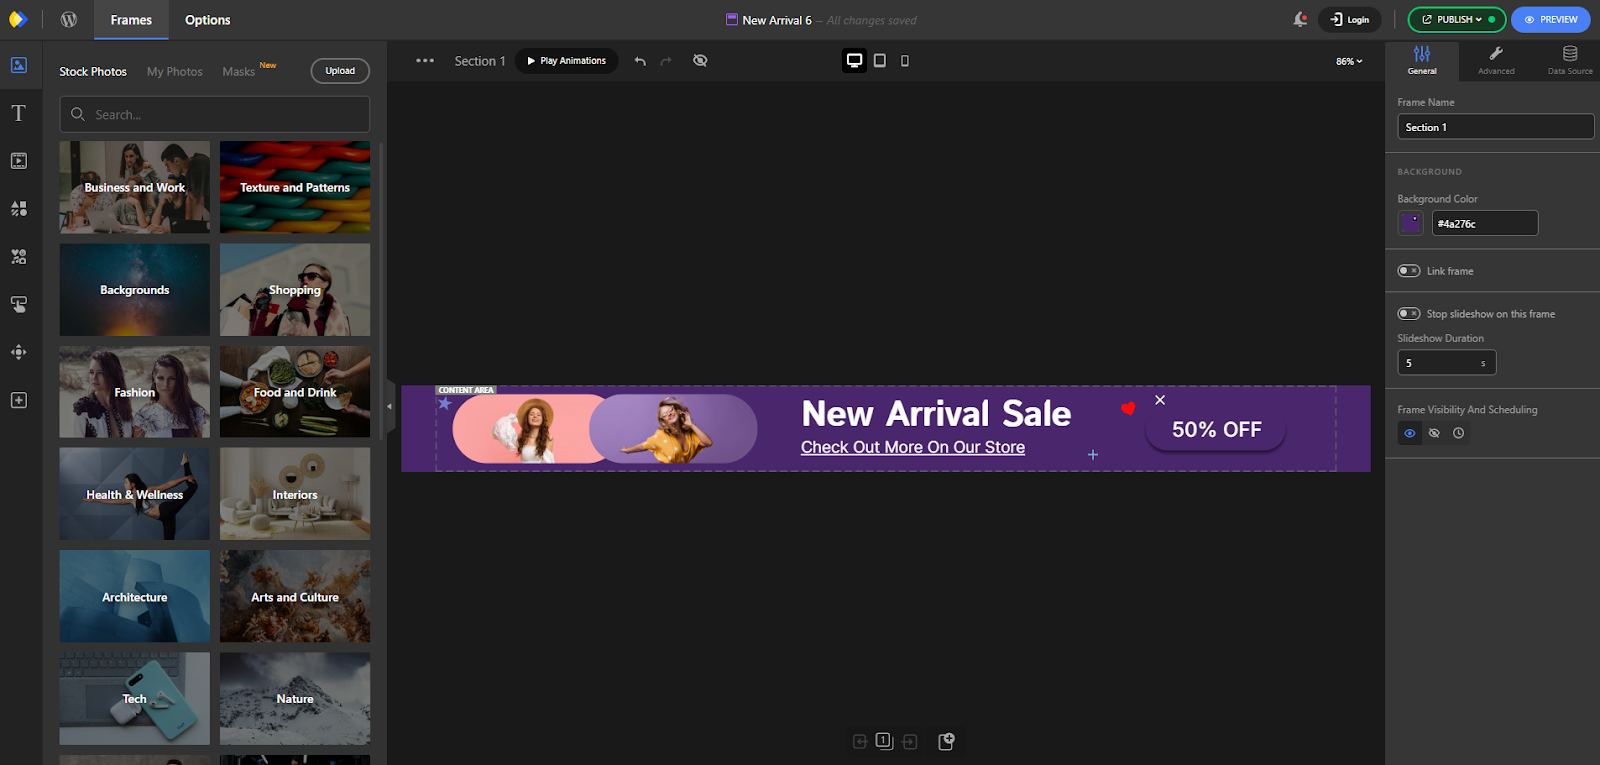
After going to the Depicter dashboard, click on the Popup section.
There are two ways to create our desired popup:
One is to start from scratch with a blank popup and build everything manually, or we can use one of the ready-made templates provided by Depicter.
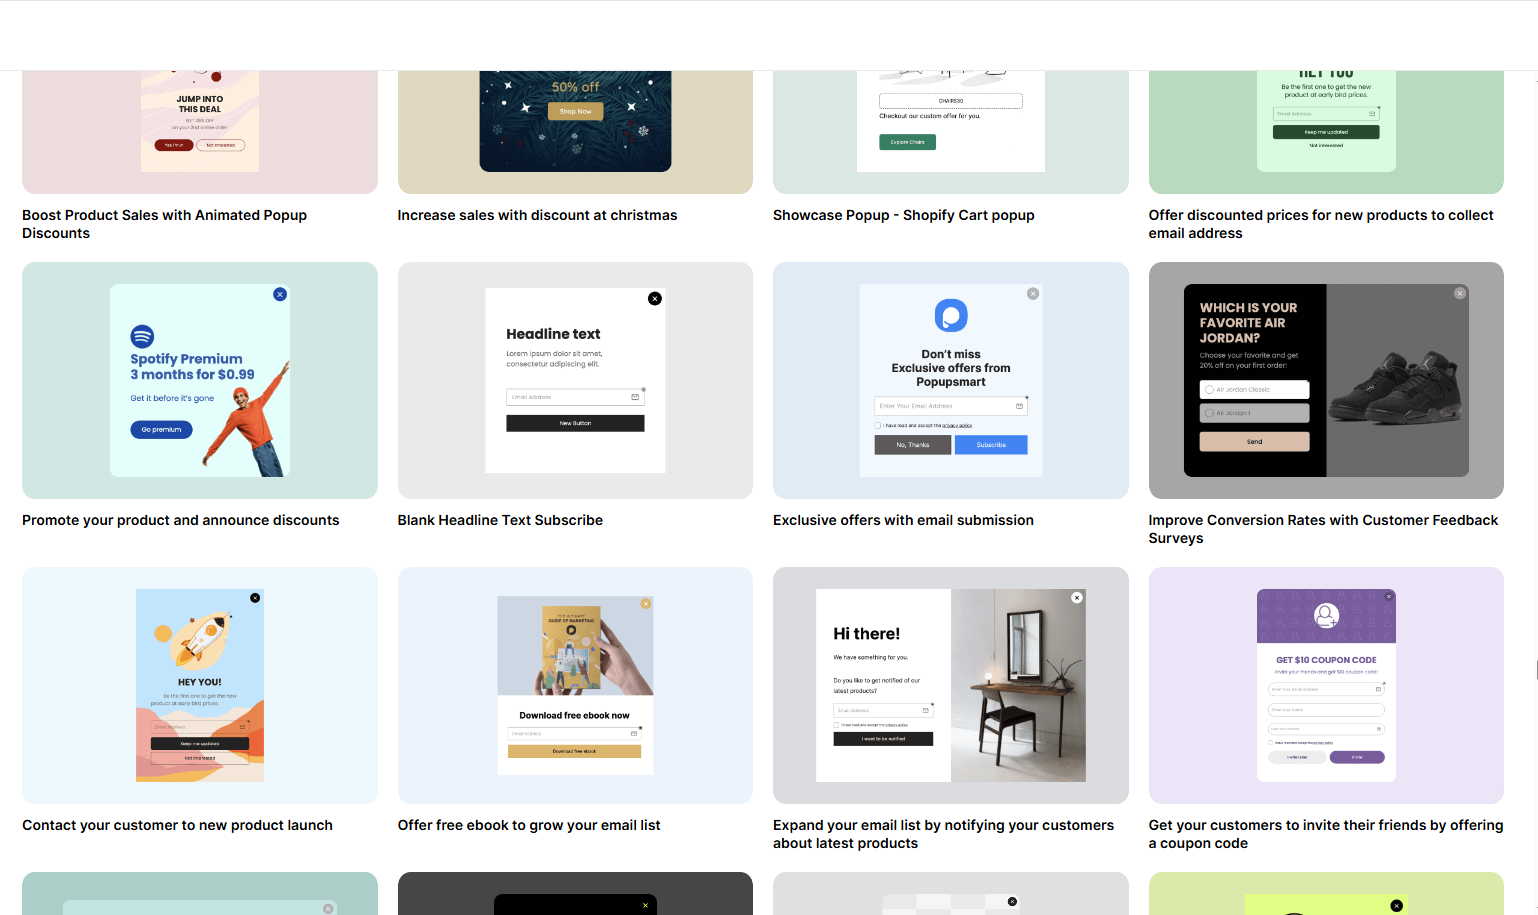
Depicter offers a large and diverse collection of popup templates, covering everything from newsletter signups and promotions to exit-intent messages and seasonal offers.
Having access to such a wide variety is a huge advantage for any popup builder — it saves you a significant amount of time, ensures professional design quality, and helps you get started quickly without the need to build layouts from scratch.
Even better, every template is fully customizable, so you can easily apply your own design, branding, and content to make it truly your own.
You can browse these templates, use the targeted categories on the left side, or filter the popup list using the search bar at the top with relevant keywords.
After selecting the desired popup, simply click the Import button. Within a few seconds, the template will be imported and you’ll be taken to the Depicter editor.
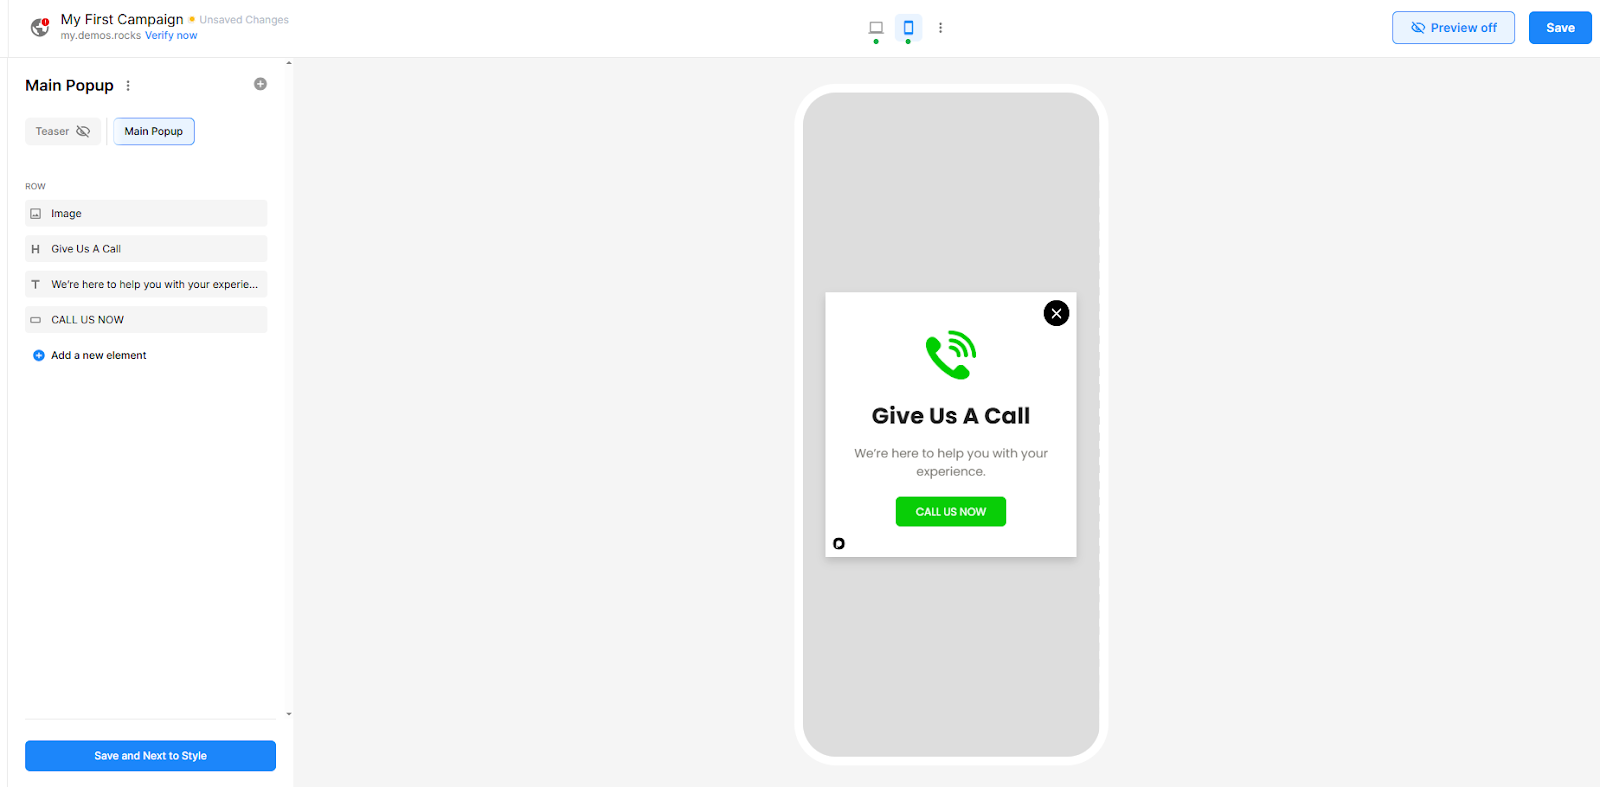
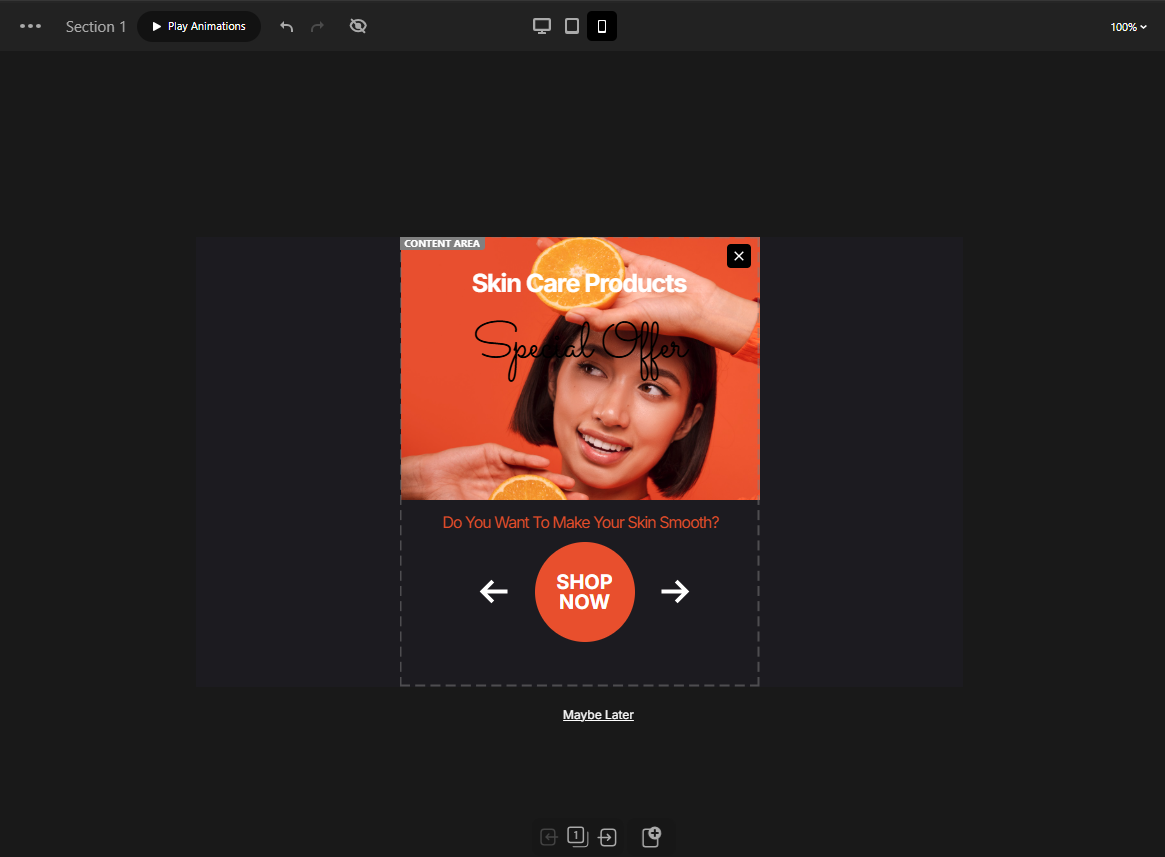
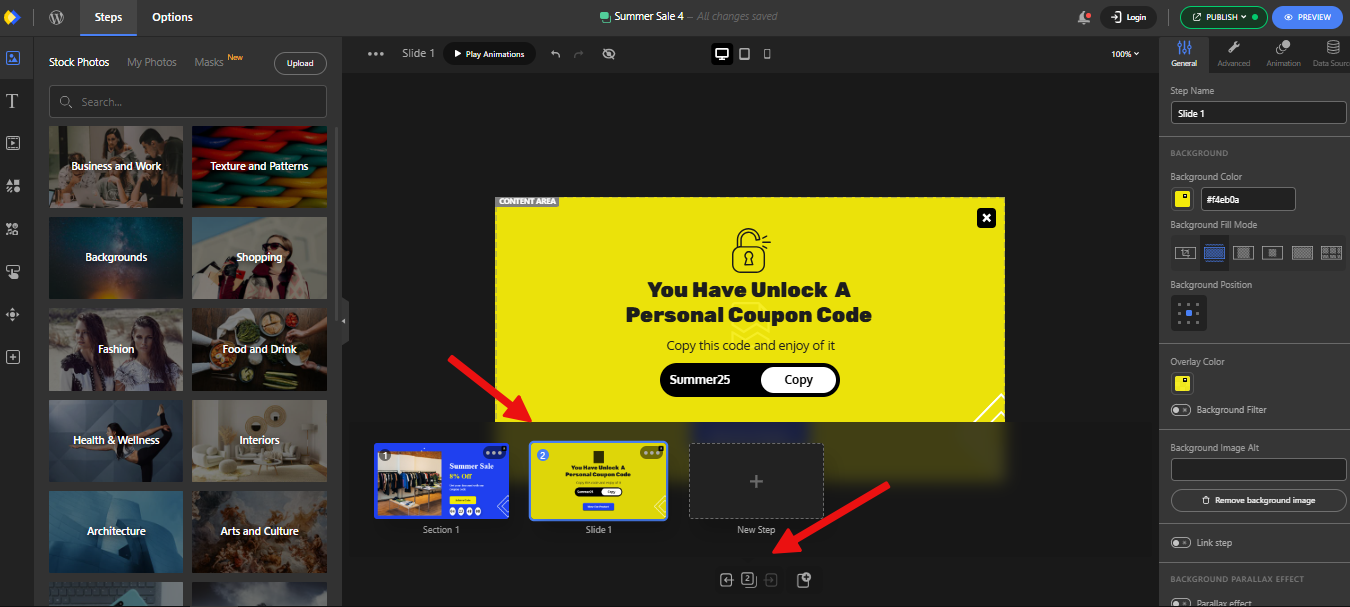
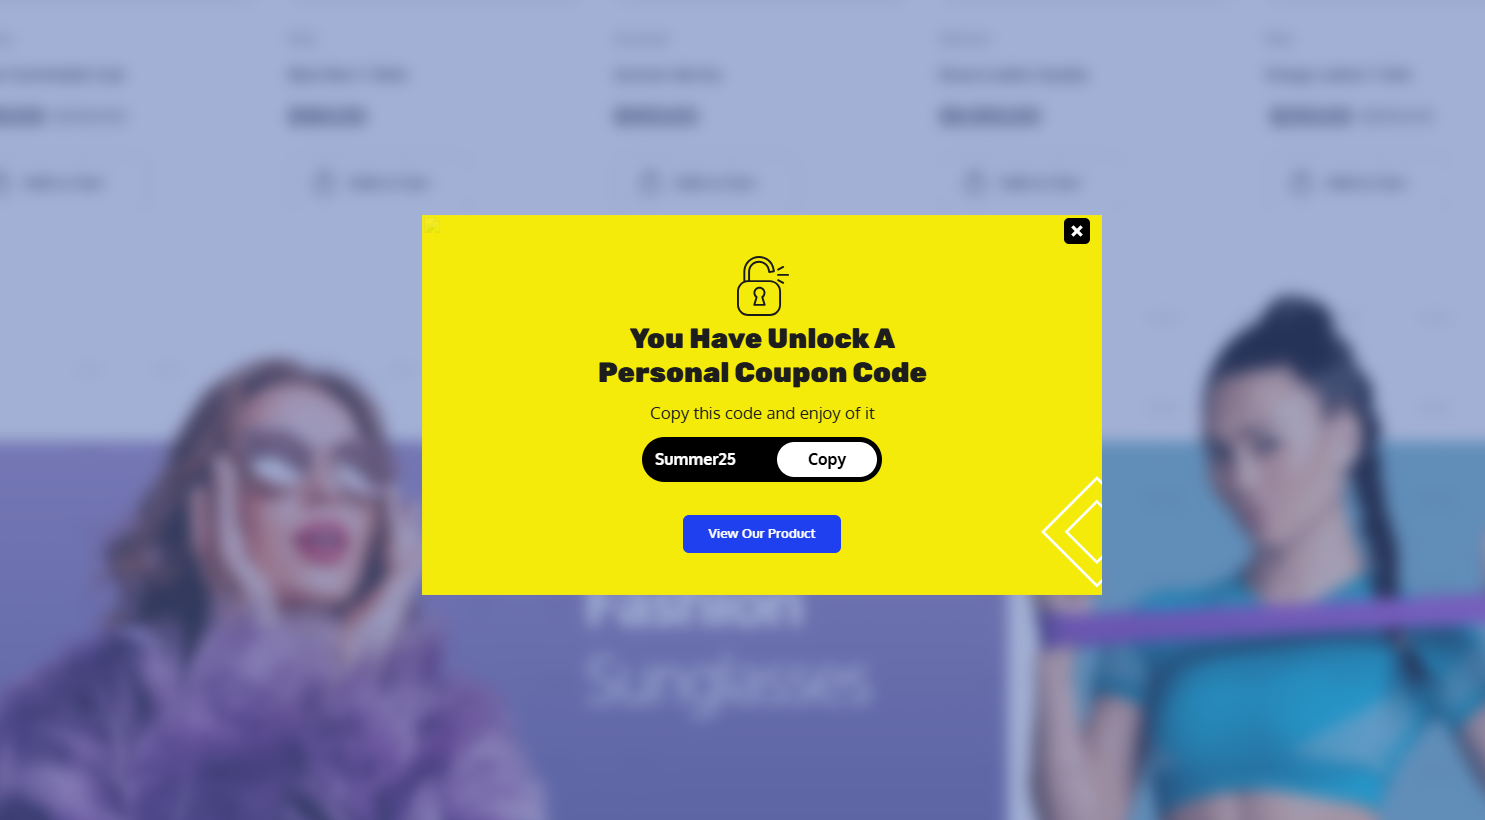
It’s worth noting that our popup has two steps. You can switch between them by clicking on the Steps Panel.
Visitors can click the CTA button on the first step to be directed to the second step, where the campaign’s discount code is displayed.
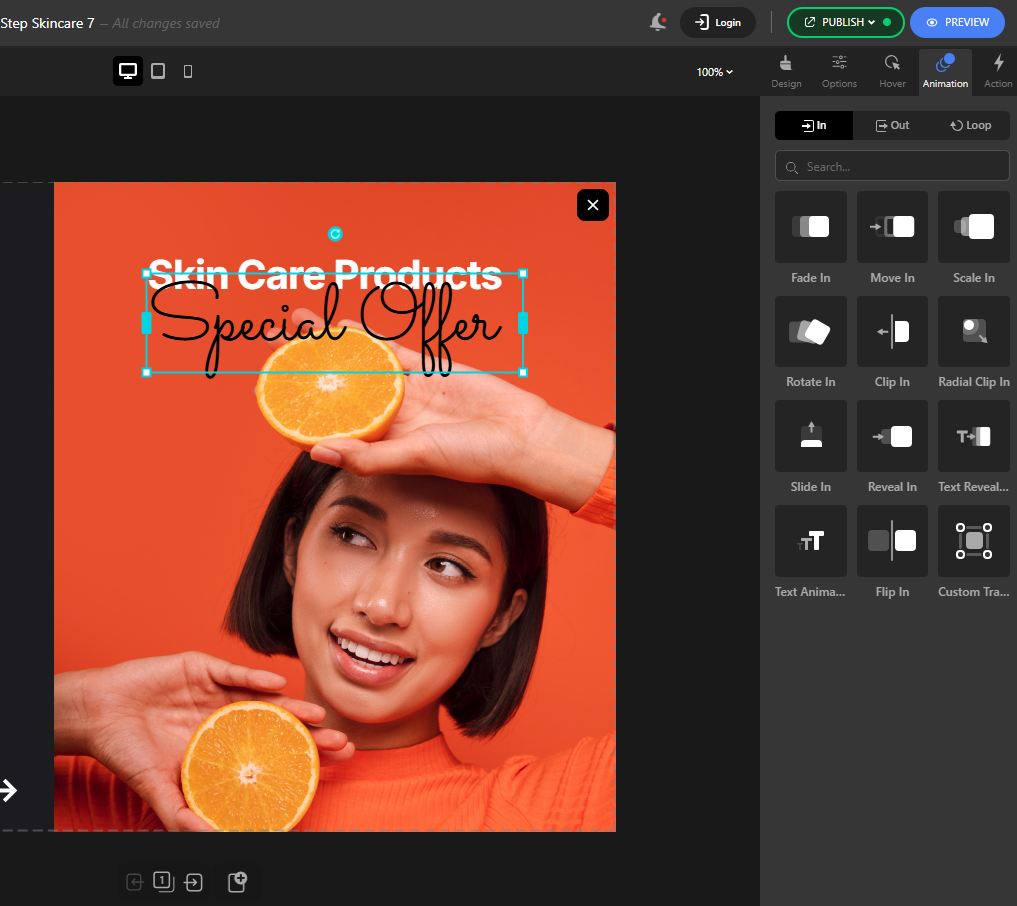
Customizing the Popup
Here, using the tools and features provided by Depicter, you can customize every aspect of the popup — from how it looks to how it functions.
For example, we’ve added a Countdown Timer element to the popup here.
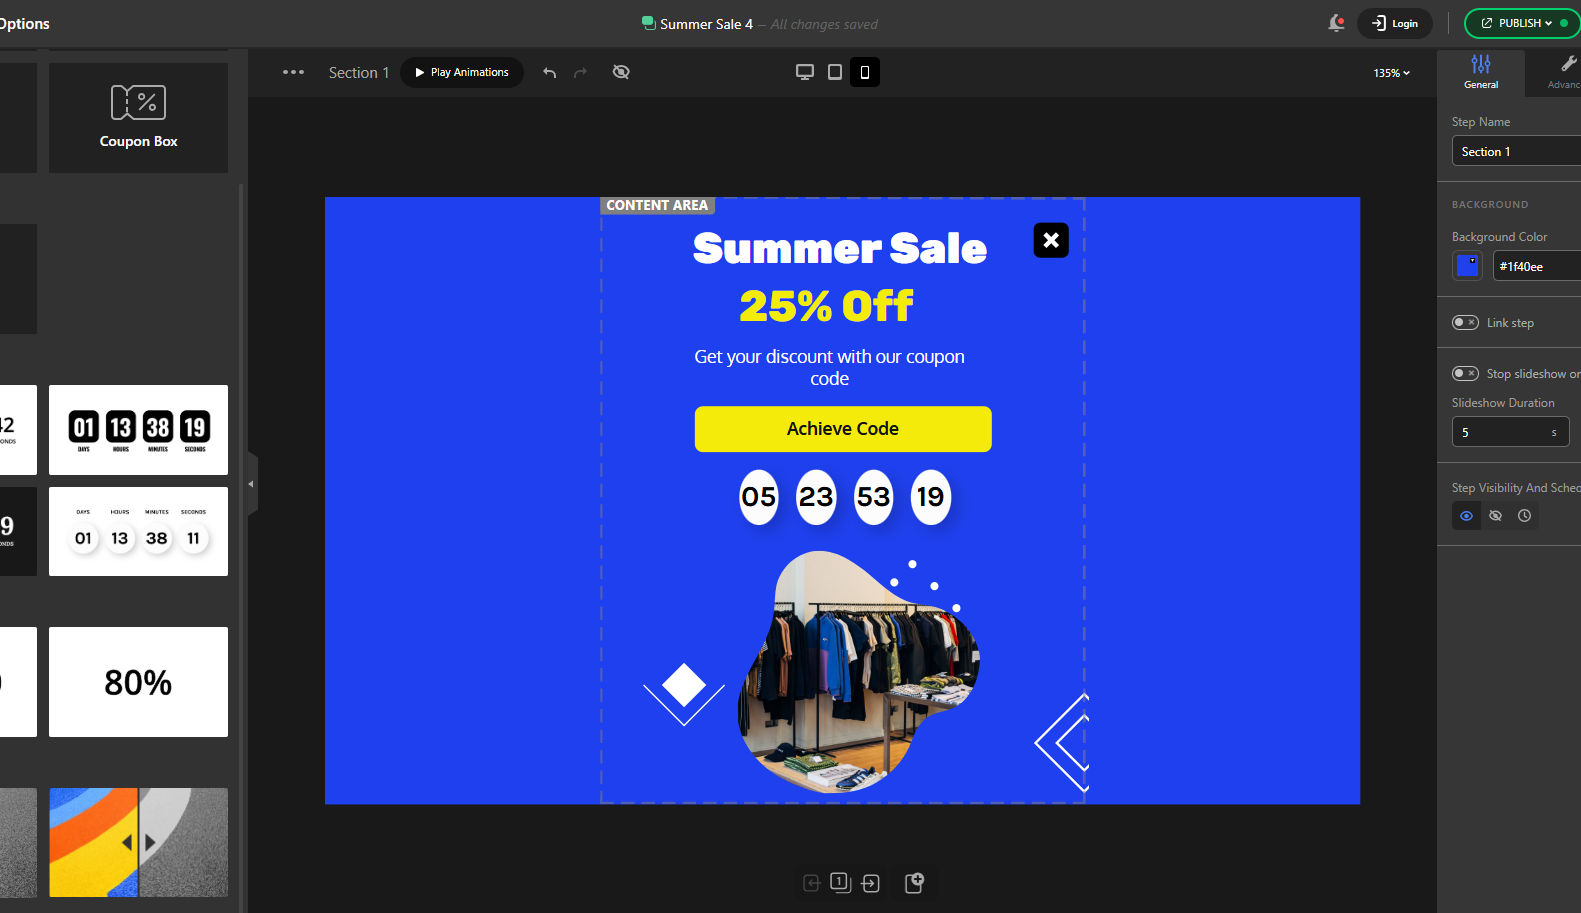
When it comes to responsive design, although all of Depicter’s ready-made templates are fully responsive by default, you still have access to all the tools and options needed to fine-tune the popup’s appearance for standard responsive sizes.
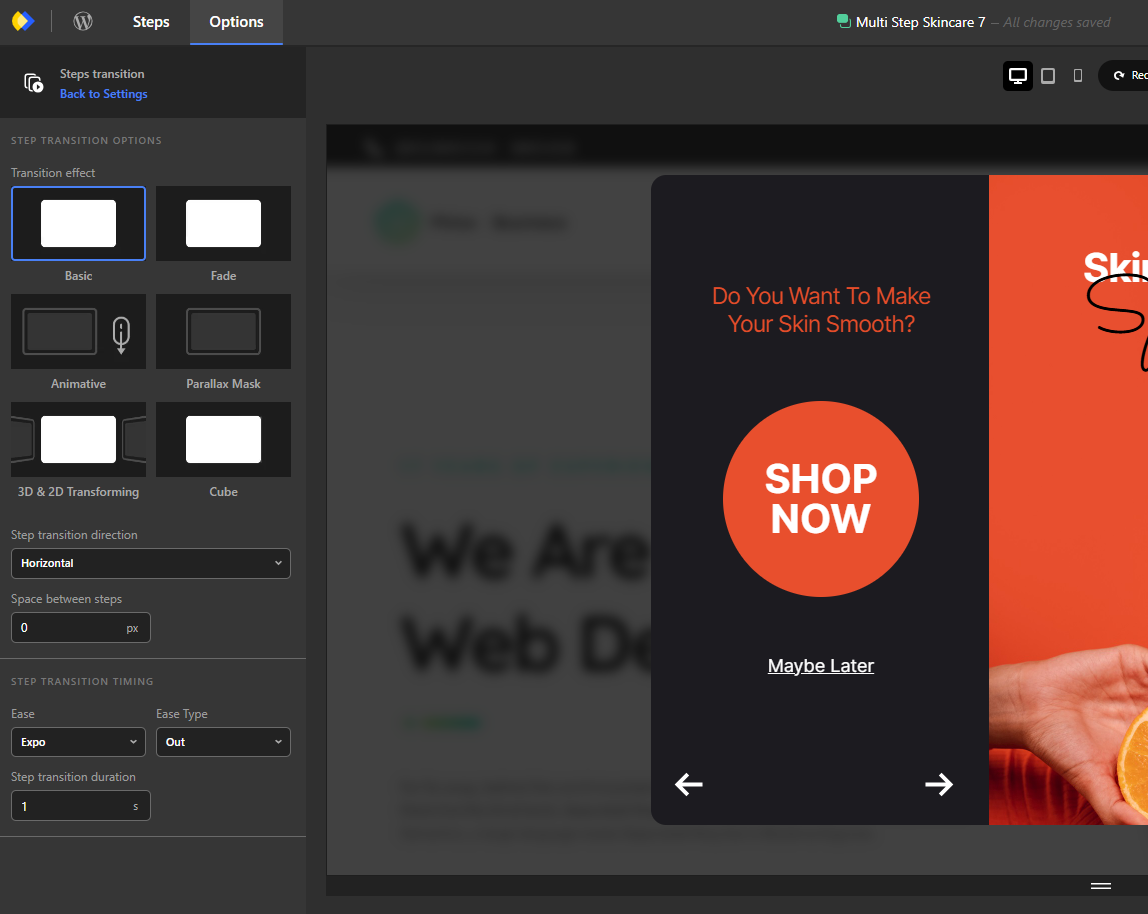
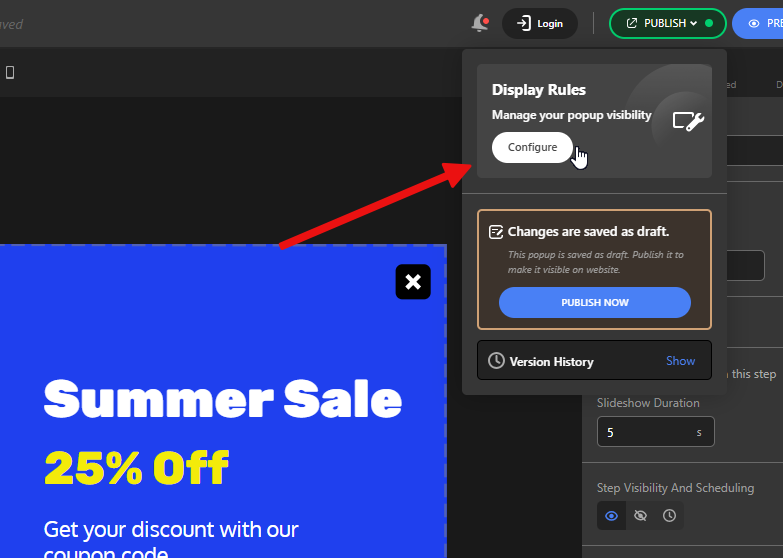
The next step is configuring how the popup is displayed. This section includes all the settings that determine
under what conditions the popup will appear to make sure that it displays at the right time and in the right place. After clicking the Publish button, go to the Display Rules section and click on Configure.
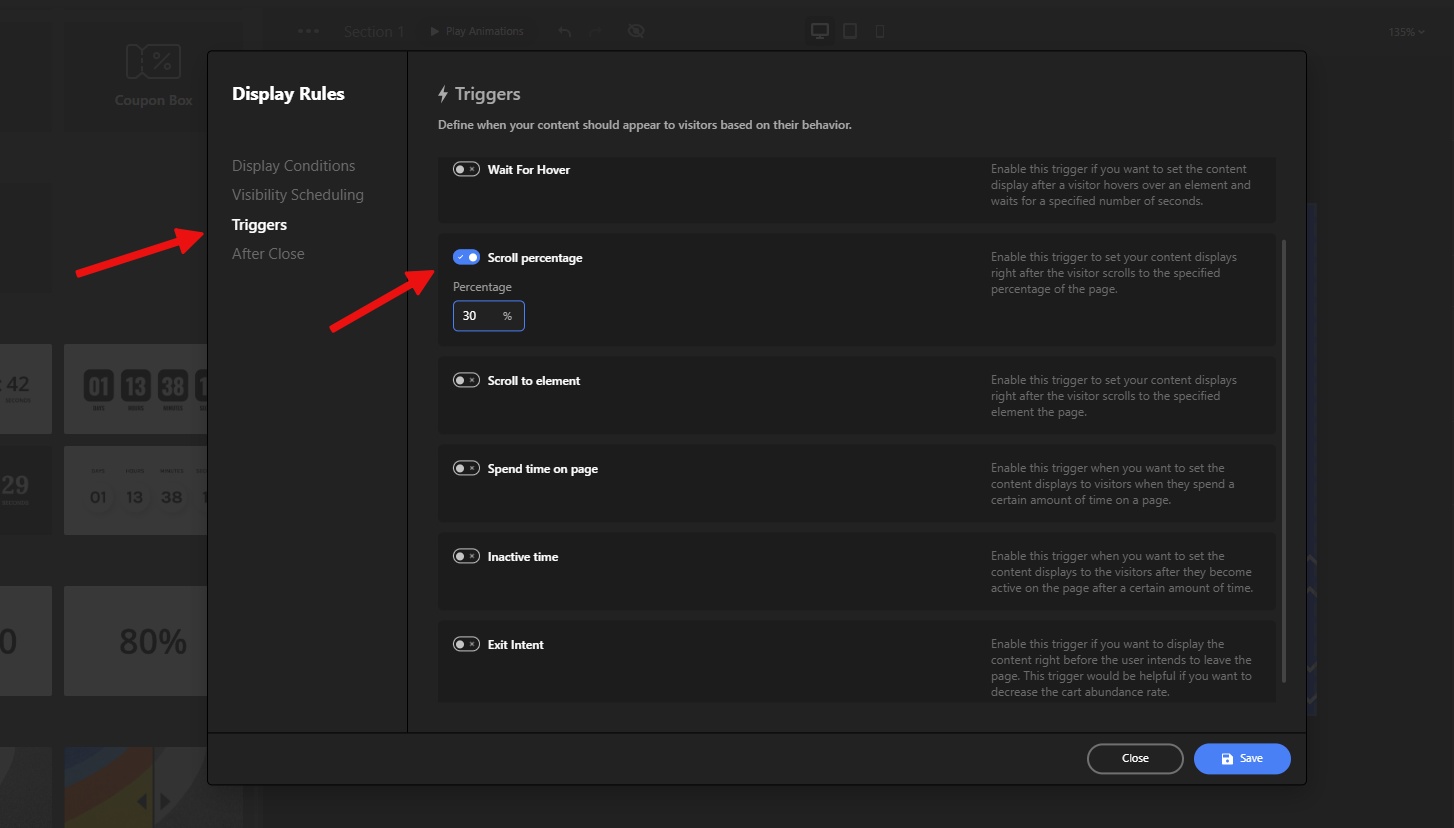
Configuring the Display Rules
Based on what we decided in the details of our campaign, the popup should appear after the user has scrolled down 30% of the page. To do this, go to the Triggers section, activate the “Scroll percentage” option, and set the value to 30 seconds.
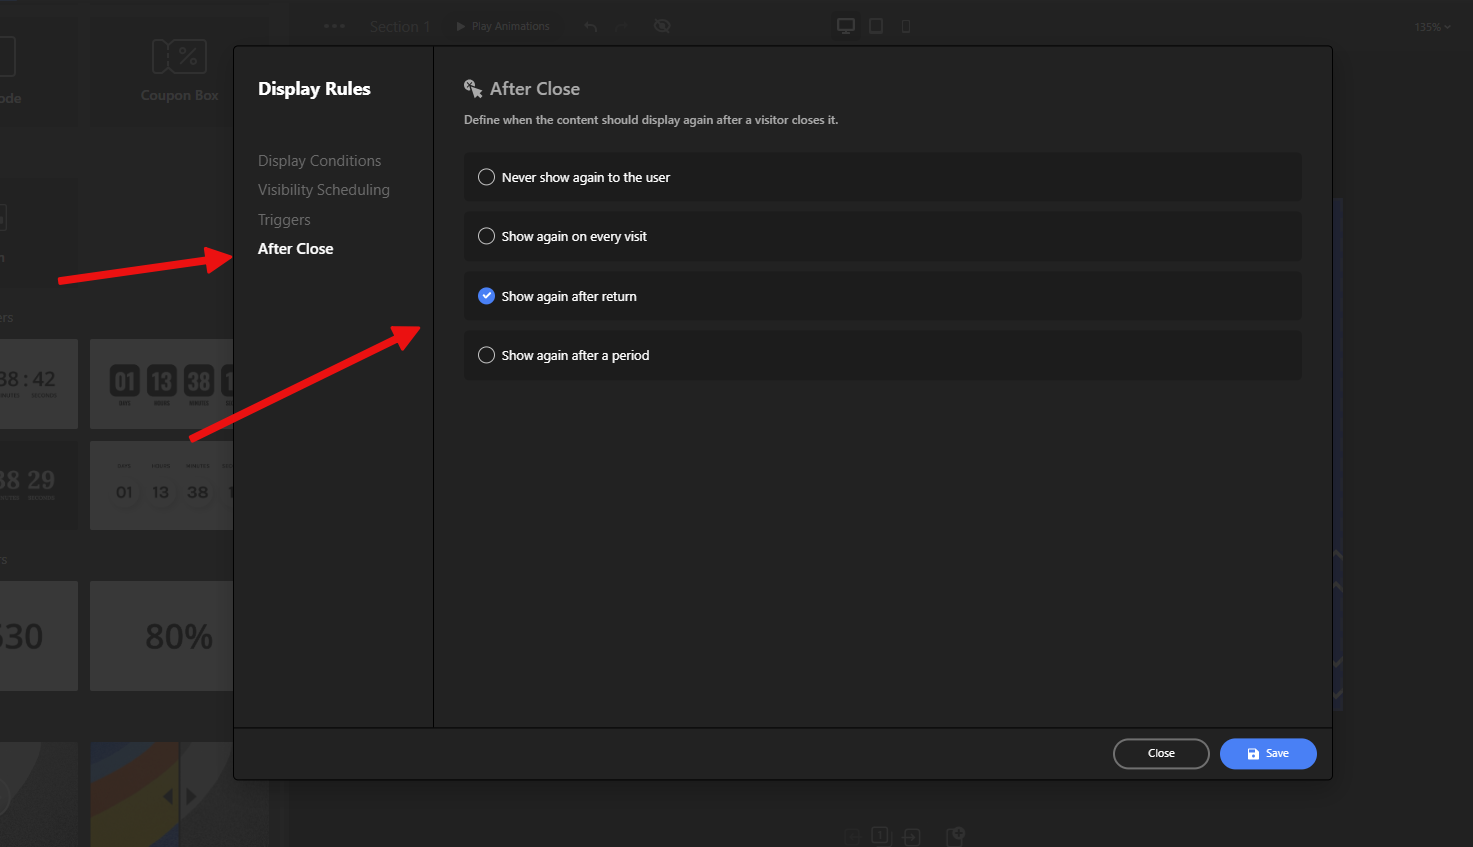
Also, for the popup to reappear, it should only show up again if the visitor returns to the site, and not more than once during the same session. To set this up, go to the After Close section and select the “Show again after return” option.
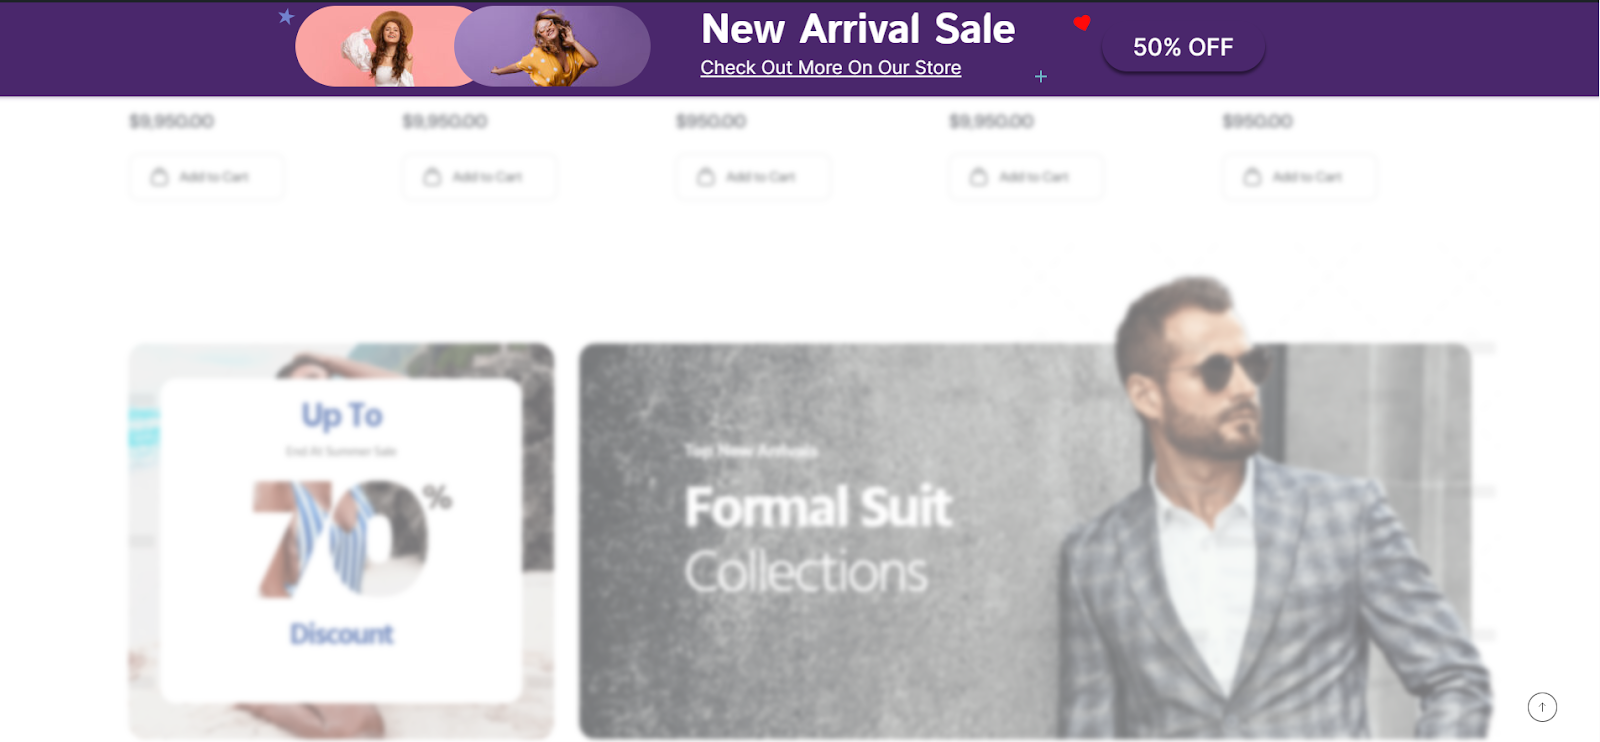
Everything is done, and the result will be that when a user scrolls through 30% of the webpage, our popup will appear.
According to our design, when the user clicks the specified CTA button, the discount code will be
6. Adding Notification Bars with Depicter
When deciding between popups and notification bars, it’s important to consider the nature of your message and how intrusive it should be.
Notification bars are ideal for subtle, ongoing promotions or general announcements, like highlighting free shipping thresholds, new product launches, or seasonal hours.
They sit quietly at the top or bottom of your page, making them perfect for keeping users informed without disrupting their experience.
On the other hand, popups are more attention-grabbing and should be used when you need to drive action, like collecting emails, promoting a limited-time offer, or re-engaging users about to leave the site.
In short, use notification bars when you want to inform, and popups when you want to convert.
We’re not going to go over all the campaign scenario details here—instead, we’ll just walk through how to create a notification bar.
Here is a video that shows the whole process of creating a Notification Bar with Depicter:
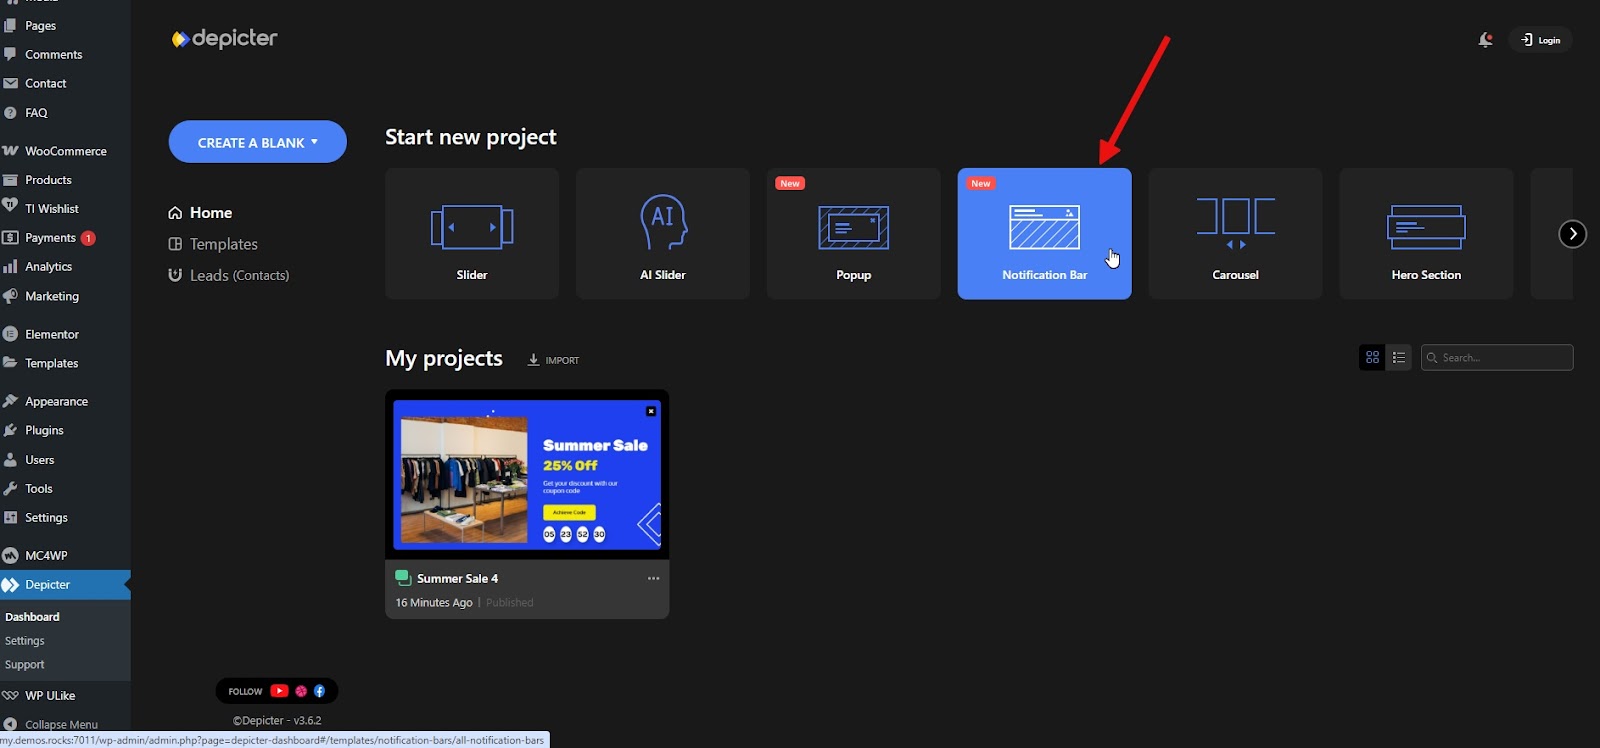
In the Depicter dashboard, click on the Notification Bar option.
From the available templates, choose one and click Import to start the import process.
After a few seconds, it’s done and you’ll be taken into the Depicter dashboard, where you can make any changes you want before finalizing your notification bar.
To configure how it’s displayed—similar to what we did for the popup—go to the Display Rules section.
This time, for the notification bar, we’ll set it to appear a few seconds after the visitor lands on the page by enabling the Spend time on page option and setting it to 10 seconds.
Finally, once a visitor has spent 10 seconds on our site, the notification bar will appear like this.
Conclusion
A sales promotion is an essential tool for any business looking to drive results in a competitive market. But without the right promotional tactics, even the best campaign ideas can go unnoticed. By combining smart planning with high-converting tools like popups and notification bars, you can maximize reach, create urgency, and guide visitors toward taking action.
Depicter makes it easy to launch visually appealing, behavior-based popups and subtle yet effective notification bars—no coding required. Whether you’re running a flash sale, collecting emails, or announcing new products, using these tools strategically can dramatically increase your chances of campaign success.
Remember: Good timing, targeted messaging, and clear design are the keys to getting the results you want.
Let me know in the comments if this article helped you start a campaign.
FAQs
1. What’s the difference between a sales campaign and a regular promotion?
A sales campaign is typically a more structured and time-bound initiative with a clear goal, such as increasing revenue or clearing out inventory. A promotion is one part of a campaign—like offering a discount, running a giveaway, or launching a flash sale.
2. When should I use a popup instead of a notification bar?
Use popups when you want to grab immediate attention or drive a specific action, like collecting email sign-ups or promoting limited-time deals. Notification bars are best for subtle messaging that doesn’t interrupt the user experience, like announcing free shipping or a product launch.
3. How often should I show a popup to users?
To avoid annoying users, limit the frequency. Best practice is to show a popup once per session or only when specific behavior triggers it (e.g., after scrolling or before exit). Depicter allows you to control this easily with built-in display rules.
4. Can I customize popup templates in Depicter?
Yes! All templates in Depicter are fully customizable. You can change the colors, text, layout, and even add features like countdown timers or multi-step flows to match your brand and campaign goals.
5. Do popups and notification bars work on mobile devices?
Absolutely. Depicter templates are responsive by default, and you can fine-tune their appearance on different screen sizes to ensure a seamless mobile experience.
6. What makes a popup effective?
An effective popup is:
Timed well (not shown too early)
Visually appealing
Clear in its message
Action-oriented (strong CTA)
Easy to dismiss
When done right, it adds value without disrupting the user’s journey.