WordPress Staging provides a safe environment to experiment with changes and updates for a live site without distorting the user’s experience.
You will be able to make changes without pressure as you will be doing it within a private space, and no one will see them except those who may be working on the changes with you.
So, we thought, why not tell you how to experiment with various sliders and help improve your design workflow?
Dive into the world of sliders and learn how to experiment with them effectively in your staging environment. Let’s explore together and unlock new possibilities for your website design!
What is Staging?
WordPress Staging is a feature that allows you to create a duplicate version of your website where you can test changes, updates, and new features before making them live on your actual site.
In web development, especially for live sites, using this crucial safety measure will save you tons of headaches.
You can make mistakes, break things, or even delete it and start over. No matter what happens, your live site will remain completely unaffected.
WordPress Staging also allows you to test new plugins and themes without adding the load to your existing database size. This load may remain and bloat your database size even after you decide not to use the tested product again.
Why test slider functionality on a staging site?
Staging sites offer a secure space to test changes and updates intended for a live site without affecting user experience. You can view these changes from the perspective of users who regularly visit the live site.
WordPress websites commonly use design elements known as WordPress sliders or slideshows. These elements are intended to showcase multiple images, videos, or text snippets in a rotating format.
When well-crafted, even a free WordPress slider can be a powerful tool for capturing visitors’ attention and keeping them engaged, highlighting important information, and encouraging visitors to explore various sections of your website.
However, creating sliders on pages is a clear change that can’t be missed. So, it’s best to test your pages with sliders underground by doing it in a staging environment.
Doing this keeps your activities low and allows you to see how the sliders will look and function on your website without affecting the live site.
Using WordPress Staging, you can experiment with different slider designs, settings, and placements to ensure they enhance your website’s aesthetics and user experience.
How to Experiment with Sliders Using InstaWP?
It takes a bit of experimenting and time to master the art of slider creation, and this is necessary because the effectiveness of WordPress sliders depends on how they are designed and utilized. That’s why you need to experiment on a staging environment like InstaWP.
Your slider must showcase a range of content, such as product photos, special promotions, or even videos, directly on your page while highlighting important information and encouraging visitors to explore various sections of your website.
To experiment with sliders, you can easily create a staging site with InstaWP and install Depicter, a powerful WordPress slider tool available in InstaWP’s utility category when setting up a site from scratch.
Depicter is a free WordPress slider plugin that offers a user-friendly interface and a wide range of customization options to create stunning sliders for your website. All the excellent slider features packed into this free plugin will amaze you.
With the InstaWP staging environment and Depicter, you can experiment with as many sliders as you can for as long as you want. When you’ve got the perfect sliders, you can then implement them on your live site.
Best Practices for Including Sliders on Your Site
When incorporating sliders on your website, here are some best practices to consider:
Limit the Number of Slides:
Keep the number of slides to a minimum to avoid overwhelming visitors. Your website visitors may tire of scrolling through sliders, ignoring them, or leaving your site. Make use of 3-5 slides and nothing more.
Use High-Quality Images:
Ensure that the images used in the sliders are high-resolution and visually appealing. Sliders are meant to occupy the entire screen or at least a significant portion. Therefore, use pictures that won’t be distorted on smaller or larger screen sizes.
Optimize for Performance:
Optimize the slider for speed and performance to prevent slow loading times. Using fewer slides, taking out some transitions, and using lossless compressed images are good practices to increase performance.
Include Clear Call-to-Actions:
Each slide should have a clear call-to-action to guide visitors on what to do next. Use a vibrant background for your CTA buttons to stand out from the overlay images or video.
Mobile Responsiveness:
Ensure the slider is responsive and displays well on various devices, including mobile phones and tablets.
Test Different Designs:
Experiment with slider designs to see what works best for your website and audience. If the content breaks out of the screen or is hidden on mobile devices, you lose out on effectively grabbing your website visitor’s attention and irritating them.
Monitor Performance:
Track the slider’s performance using analytics to see how effectively it engages visitors.
Regularly Update Content:
Keep the slider content fresh and relevant to maintain visitor interest. If you track the performance of your slides and CTAs using tools like Google Analytics, you can modify or update the slides for better performance.
Accessibility:
Ensure the slider is accessible to all users, including those with disabilities. Add intuitive and straightforward navigation arrows and buttons to assist visitors in better interacting with the slider.
These best practices will guide you in creating effective sliders on your site that will continue to attract and engage your website visitors.
Using Depicter for Creating Stunning Sliders
Depicter is a versatile and powerful WordPress slider plugin that allows you to easily create as many eye-catching sliders as you desire in WordPress.
With features like drag-and-drop functionality, customizable animations, and transition effects, Depicter empowers you to design sliders that grab users’ attention and enhance your website’s overall look.
Depicter can elevate your website’s visual appeal and engage your audience with captivating slider content.
Let’s see how you can create a staging site with InstaWP and use the staging site and Depicter to create stunning sliders.
How do you install Depicter on your staging site?
The following video provides a step-by-step guide on how to set up a staging Depicter website using InstaWP for free. After watching this video, you should be able to easily perform the setup. However, if you prefer more detailed text instructions, please continue reading this article.
Step 1: Log into InstaWP
You need to create an account on InstaWP to create a free staging site to experiment with and test your sliders with the Depicter Slider plugin.
After creating your account, you can log in to your dashboard.
Step 2: Create Staging Site
Click Create Staging from your dashboard to start the staging site creation process. From the popup, select the From Scratch tab. Then, navigate to the Utility category when setting up your site and select the Depicter Slider plugin.
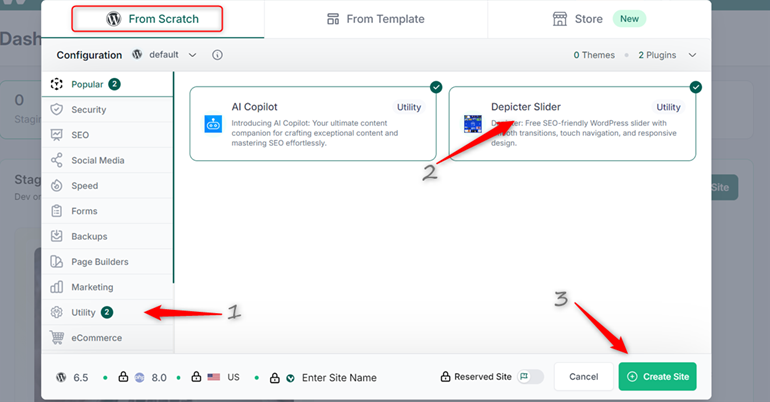
Then click the Create Site button, and your free staging site will be created within seconds.
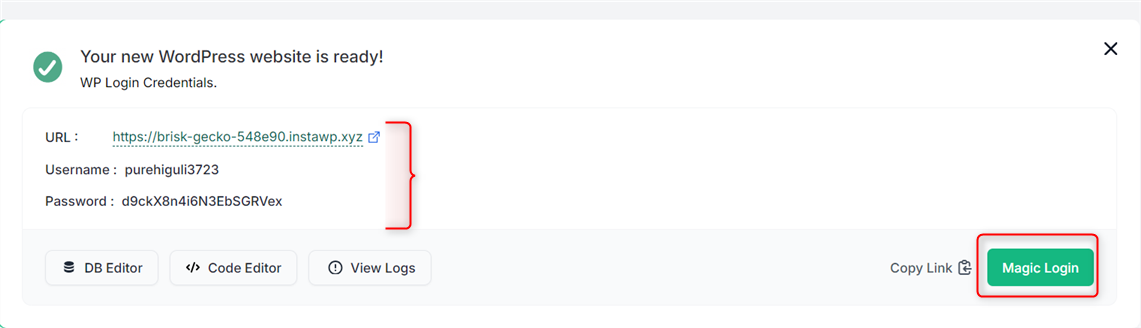
Step 3: Login to Your Staging Site
Simply click the Magic Login button to proceed to the WordPress Admin panel of your newly created staging site.
You will notice that the Depicter plugin has already been activated on your staging site.
Step 4: Create your Slider with Depicter
Select Depicter from the left sidebar navigation, and you will be taken to the Depicter dashboard.
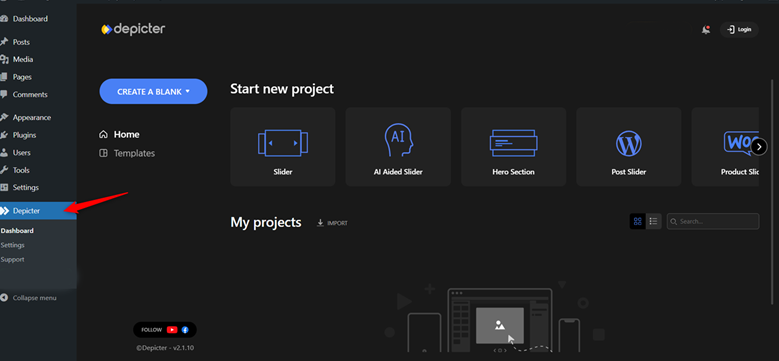
One fantastic feature of Depicter is its templates for those who don’t want to start building from scratch. There are tons of unique free templates that you can select from and integrate seamlessly into your website design.
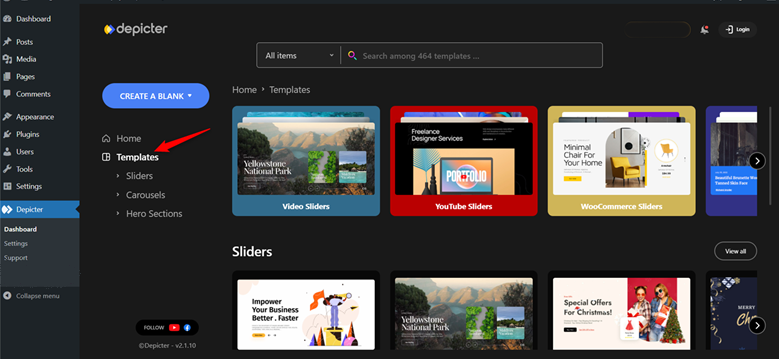
To build a slider from the available templates, simply hover over a template that is more suitable to your appeal and click the Import button to import the template to your Depicter canvas.

After importing the template, you can modify it to your taste. You can edit the existing text and captions, replace the images and videos with yours, and customize the slider’s settings, such as the animation, palette, CTAs, type of navigation controls, etc.
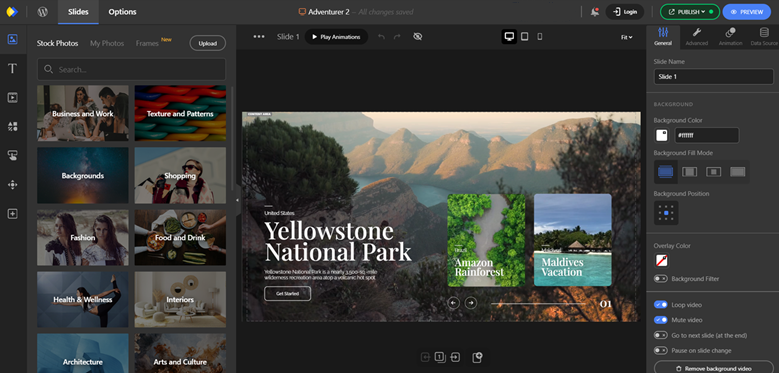
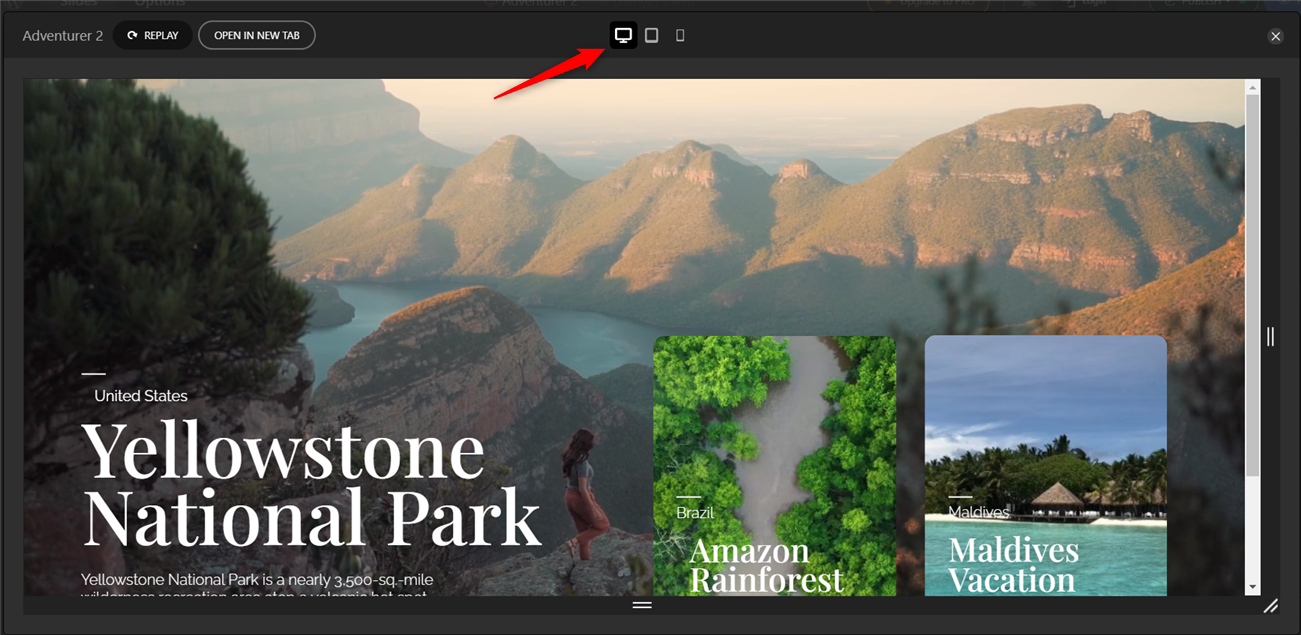
Another advantage of using Depicter Slider is the ability to preview your slider’s responsiveness across various screen sizes while still designing your slides.
Once you have completed all of your customizations for your slider, you are ready to publish it. Adding the slider to your page is very easy because Depicter supports all of the most popular WordPress page builders, such as Elementor, Gutenberg, Divi Builder, and Beaver Builder. Of course, Depicter also supports traditional WordPress methods, such as using shortcodes or PHP code.
Why use Depicter for your Sliders?
While it may be impossible to list all of the reasons why adding a slider to your website via the Depicter is an excellent choice, we will briefly introduce you to the advantages of Depicter in this article to give you a better understanding of this topic.
Depicter is a powerful WordPress slider choice for creating sliders due to its user-friendly interface, extensive customization options, and compatibility with WordPress staging environments.
Here’s a list of features that make Depicter the best WordPress slider plugin:
- Simplicity: Depicter is an intuitive drag-and-drop slider builder that is very easy to use.
- Responsive Design: Sliders built with Depicter look good on all devices and screen sizes.
- Customization options: Depicter offers various customization settings for colors, palettes, fonts, animations, navigation, etc.
- Transition effects: Depicter is packed with different smooth and attractive transition effects that can be applied between slides.
- Slider controls: Depicter doesn’t slack in the slider controls department. It offers easy-to-use navigation controls for users to interact with the slider.
- Image and video support: Depicter Slider supports various media types, such as images, gifs, and videos.
- Light Weight: The Depicter Slider is lightweight and optimized for speed, and it doesn’t slow down your website.
- Compatibility: Depicter Slider is compatible with other WordPress plugins, different hosting platforms, and WordPress staging environments.
It would be unfair not to mention Depicter’s unique and new features, namely Popup Builder and Notification bar Builder. As you explore these two features, you’ll quickly realize that Depicter is the ultimate solution for all your website’s slider needs and more.
Conclusion
To achieve professional results, we must use professional methods. One such method is utilizing WordPress staging capabilities. Sliders are a crucial visual tool for websites, and creating and optimizing sliders in a WordPress staging environment can elevate your results from subpar to exceptional.
In this article, we briefly introduced InstaWP and Depicter and explored how combining these two tools can create a WordPress staging website for producing professional sliders.
Leave Comment