Creating a website is only the beginning. The real challenge is getting people to actually visit it. The good news is that you don’t need a budget to get noticed, website promotion free strategies can truly make a difference when used consistently. With the right approach, you can boost visibility, attract organic traffic, and grow your audience without paying for ads.
In this guide, you’ll discover more than twenty effective methods on how to promote website for free and build long-term traffic results.
Before we dive into the methods, it’s worth mentioning a tool that can support your promotional efforts: Depicter.
Depicter is built to simplify marketing tasks for website owners. It helps you create visuals, banners, popups, lead-generation elements, and custom forms, all without needing design skills. You can personalize messages for visitors, highlight offers, and craft content that captures attention and boosts engagement.
Because many of the free promotion techniques rely heavily on visual content and user interaction, Depicter can play a powerful supporting role throughout your strategy.
20+ Free Ways to Promote Your Website
1. Improve Your SEO
Search engine optimization helps your site show up when users search for relevant topics. Focus on keywords, write strong titles and descriptions, and make sure your website structure is easy for search engines to understand.
2. Start a Blog
Publishing helpful articles on your site consistently brings long-term traffic. Every new post is a new opportunity to be found through search engines. Use Depicter to design visual elements that make your posts stand out, such as a website slider, Hero Section, Carousels, and more.
3. Diversify Your Content
Don’t rely only on text. Create videos, infographics, checklists, or short guides. Different people prefer different content types.
4. Build an Email List
Encourage visitors to subscribe to your newsletter. Sending useful updates brings people back to your site. Depicter lets you build attractive sign-up forms or popups that fit your brand to grow your email list.
5. Create a Lead Magnet
Offer value for free a guide, a template, a discount, or a tool, in exchange for an email. This increases your list and brings repeat visitors.
6. Use Social Media Actively
Choose platforms where your audience spends time. Share useful posts, visuals, stories, or short tips regularly.
7. Repurpose Your Content
Turn a blog post into multiple social-media posts, an infographic, or a short video. This saves time and increases reach.
8. Engage in Online Communities
Join forums, groups, and communities related to your topic. Answer questions, help people, and participate naturally. Over time, users will check out your website.
9. Guest Post on Other Websites
Write valuable articles for other blogs in your niche. This introduces you to new audiences and establishes your credibility.
10. Collaborate With Micro-Influencers
You don’t need big influencers. Smaller creators with engaged audiences can help spread your content in exchange for mutual benefits.
11. Host Webinars or Live Sessions
Live sessions, tutorials, or Q&A events attract interested people and give you a chance to direct viewers to your website. Depicter can help you in this area by creating an interactive survey to collect feedback from your users.
12. Add Your Website to Free Directories
If you have a business or service, add your website to local directories or industry-specific lists. This can bring steady referral traffic.
13. Improve Your Website’s Performance
A fast, mobile-friendly site keeps visitors longer and encourages them to explore more pages.
14. Add Social Sharing Buttons
Make it simple for visitors to share your pages on social media. More shares mean more traffic naturally.
15. Create Evergreen Content
Write about topics that stay relevant for years. These pieces continue attracting visitors long after the day you publish them.
16. Leave Helpful Comments on Industry Blogs
Thoughtful comments, not spam, can spark curiosity and send readers to your site.
17. Build Backlinks Through Partnerships
Collaborate with others, exchange guest posts, or provide quotes or insights. Quality backlinks boost your authority.
18. Add Your Site to Your Email Signature
Simple but effective. Every email you send becomes a small promotional opportunity.
19. Participate in Q&A Platforms
Answering questions on popular Q&A communities helps build authority. People naturally click on your profile and discover your website.
20. Use Strong Visual Content
Infographics, diagrams, charts, and branded images attract more attention and get shared often.
You can also rely on Depicter to create sliders, carousels, hero sections, and flexible visual combinations that help your website stand out at first glance. By mixing dynamic layouts with strong visual storytelling, it becomes easier to highlight key messages and guide visitors toward important content.
21. Offer Free Tools or Templates
If your niche allows it, create simple tools or ready-to-use templates. These often get shared widely and bring recurring visitors.
22. Update Your Old Content
Refresh outdated posts occasionally. Add new data, visuals, or examples. Up-to-date content performs better in search engines.
23. Improve Internal Linking
Connect your articles and pages together. This helps visitors discover more content and strengthens your site structure.
24. Encourage Reviews or Testimonials
If you offer services or products, invite your customers to share their experiences. Social proof builds trust and attracts new visitors.
25. Do Cross-Promotion With Other Creators
Partner with someone in your niche to exchange mentions, co-create content, or feature each other. Both audiences benefit.
Conclusion
Promoting a website for free is entirely possible and even powerful when done with consistency. With smart use of content, visuals, community engagement, SEO, and cross-platform activity, you can slowly and steadily grow your traffic. Depicter makes this process easier by giving you the ability to create marketing materials, visuals, and conversion-focused elements quickly and professionally. Choose a few methods, stay patient, and build your presence step by step.
Crafting a strong subject line is one of the simplest ways to capture attention fast, whether you are sending an email or showing a message on your website. With Depicter, these same subject line styles can power your WordPress Popup, slide-ins, and notification bars to boost engagement and clicks. In fact, there are so many things that you can do with Depciter:
A clear and compelling subject line sets the tone, builds curiosity, and tells people why they should stop and read. In this guide, you’ll learn the key elements of effective subject lines plus a big list of examples you can use or adapt.
What Makes a Good Subject Line
Here are the basics you should keep in mind:
Make it short and clear, so it’s fully visible on mobile.
Personalize when you can to make the email feel direct and relevant.
Show real value instead of vague promises.
Use urgency carefully when there is a real reason to act quickly.
Avoid clickbait because it damages trust and hurts long-term results.
Test your ideas because every audience responds differently.
Popular Subject Line Styles (With Examples)
Below you’ll find common categories of high-performing subject lines along with ready-to-use examples for each one.
1. FOMO and Scarcity
These work when something is presented as a limited-time offer or is expiring soon.
Only a few spots left
Final call to join
Last chance before it closes
Your access expires today
Almost gone, grab yours now
2. Curiosity and Mystery
These spark interest by teasing what’s inside.
You’ll want to see this
Something new just dropped
We have a surprise for you
Can you guess what changed
The story behind our latest update
3. Humor and Lighthearted Tone
Friendly, fun lines that make your email stand out.
Your inbox called, it misses us
Oops, we fixed something
A small joke to brighten your day
This email contains zero stress
Warning: this tip is addictive
4. Ego Appeal and Feeling Special
These make readers feel important or valued.
A special invite just for you
You’re on our priority list
For our top members only
You earned this
You deserve something better
5. Value and Benefit Driven
These say clearly what the reader will gain.
A simple way to improve your results
Your new shortcut to better productivity
Boost your conversions with this
A free guide you’ll actually use
Save hours this week with one small change
6. Pain Point Focused
These connect directly to a challenge your audience has.
Struggling with low engagement
Tired of slow results
Here is how to fix your workflow issues
What to do when sales stall
A solution for your biggest bottleneck
7. Personalized and Targeted
These feel tailored to one person or company.
Sarah, here’s a quick idea for you
A tip for your next project
Your custom recommendations
A smarter plan for your team
For your company: a better approach
8. Urgent and Time Sensitive
Useful for limited offers or deadlines.
Ends tonight, act now
24 hours left to save
Don’t miss this round
Time is almost up
Last day for 50 percent off
9. Simple and Straightforward
Clear, direct subjects that say exactly what the email contains.
Your report is ready
Can we schedule a quick call
Important update inside
Your monthly summary
Here is the file you requested
10. Follow Up and Check In
Perfect for sequences and conversation threads.
Just checking in
Any updates on this
Wanted to follow up
A quick question
Still interested
11. Internal Communication
Designed for teams and employees.
Team update, please read
Reminder for this week
Your feedback matters
New project details inside
Quick announcement for everyone
12. Welcome Emails
Warm, friendly subject lines for new subscribers. This can be used with a welcome Popup, too.
Welcome, here’s what to expect
Thanks for joining us
Your first steps inside
Great to have you with us
Start here, your resources are ready
Common Mistakes to Avoid
Making the subject too long
Not matching the message inside
Overusing urgency
Using clickbait wording
Ignoring mobile readers
When writing subject lines, a few common mistakes can quietly hurt your open rates. Long subjects often get cut off on mobile, and mismatched messaging creates disappointment that reduces trust over time. Using too much urgency makes your emails feel pushy, while clickbait wording might earn a quick open but damages credibility in the long run. It also helps to remember that most readers check email on their phones, so clarity and brevity matter more than ever. For example, instead of writing something vague and exaggerated like “You won’t believe what just happened to your account today!”, a clear, mobile-friendly line such as “Important update to your account settings” performs far better because it’s honest, relevant, and easy to read.
Final Thoughts
When writing subject lines, a few common mistakes can quietly reduce your results. Long subjects often get cut off on mobile, and mismatched messaging leads to confusion that slowly hurts trust.
Overusing urgency can make your emails feel pushy, while clickbait wording might earn a quick open but damages credibility over time. It’s also important to remember that most people read emails on their phones, so short, clear lines work best.
Depicter, an AI-powered plugin for WordPress, helps you test variations inside popups, slide-ins, and notification bars, making it easier to avoid these pitfalls. For example, instead of something vague like “You won’t believe what we found”, a simple line such as “Quick update you should see” keeps things relevant and mobile-friendly while staying honest.
Every season is a chance to refresh your website and connect better with your audience. Halloween is one of the best times to do this because people are in the mood for themed products, fun promotions, and limited-time offers. For WordPress and WooCommerce site owners, adding a seasonal touch, in this case a Halloween vibe can make the store stand out, increase engagement, and even boost sales.
Why Seasonal Marketing Matters
Seasonal marketing is powerful because it taps into the sense of urgency that holidays naturally create. When shoppers see Halloween-only offers or themed designs, they are more likely to act quickly.
It also improves your visibility since festive content is more shareable and aligns with the search behavior of customers. For WooCommerce store owners, this means more clicks, higher conversions, and a stronger brand presence during one of the busiest shopping months of the year.
Add a Halloween Vibe to Your Website
One of the easiest ways to prepare your site is by updating its look and feel.
For WordPress sites, this could mean switching to a dark and spooky color palette, adding banners with pumpkins and bats, or even using Halloween-themed hero images.
A WooCommerce store might redesign its homepage banner to feature products as part of a Halloween collection — for example, a “Spooky Sale” with themed visuals that make customers feel the holiday excitement as soon as they land on the site.
Thankfully, Depicter makes it easy to bring these seasonal touches to life. Instead of relying on multiple design tools or complex customization, you can create banners, sliders, and themed visuals directly inside WordPress.
We’ll cover this in detail later in the post, but the main advantage is speed and flexibility: with just a few clicks, you can apply Halloween-ready designs that grab attention and keep visitors engaged. This not only refreshes the look of your store but also shows customers that your brand is active and in tune with the season.
Create Special Halloween Offers
Halloween is the perfect time to launch creative deals that match the holiday mood.
You could add coupon codes with fun names like BOO20 for discounts, or create themed bundles such as a “Halloween Essentials Pack” in WooCommerce.
Limited-time flash sales are another effective option, giving customers a reason to buy right away. For example, a beauty shop might offer a “Halloween Glam Kit” bundle, while a digital product store might promote a “Trick or Treat Deal” available only during October.
With WooCommerce, you can easily set up coupons and schedule discounts for a limited period. Plugins like Depicter help you create urgency with countdown timers and other features.
Combining these tools with clear promotion banners ensures visitors don’t miss the deal. The real benefit is that seasonal offers not only increase conversions but also encourage repeat customers who return each year for similar holiday promotions.
Share Halloween-Themed Content
Content marketing can also play a big role in your Halloween strategy.
A WordPress blog is the perfect place to publish posts like “Top 10 Halloween Recipes,” “DIY Decorations for Your Party,” or product tutorials tied to the season. Even service providers can join in by writing about “Spooky Marketing Tips” or “Halloween Safety Ideas.”
The goal is to make your site feel connected to the holiday while showcasing your niche expertise.
Using WordPress makes content publishing straightforward, and you can pair it with SEO plugins like Yoast SEO or Rank Math to optimize seasonal keywords. Adding infographics or running interactive polls via Depciter makes your content more engaging. These efforts not only drive more organic traffic but also help position your site as fun, timely, and resourceful — making visitors more likely to trust and buy from you.
Prepare Your Store for Extra Visitors
Holiday promotions can mean traffic spikes, and the last thing you want is for your WooCommerce store to slow down or crash.
Before Halloween, make sure your site is optimized: compress large images, clean up unused plugins, and test your checkout process. Many stores also simplify their checkout flow to keep visitors from abandoning their cart — for example, by offering a one-page checkout or guest checkout option.
WordPress performance plugins like WP Rocket, W3 Total Cache, or image optimization tools such as Smush and ShortPixel help improve speed.
Using a CDN service like Cloudflare adds another layer of reliability. Not only do these optimizations keep your store running smoothly during busy Halloween traffic, but they also build trust: customers are more likely to complete a purchase if the site loads quickly and feels secure.
Spread the Word on Social Media
Your WordPress site should work hand-in-hand with your social media campaigns.
Leading up to Halloween, you can share themed posts, run contests like “Best Costume Challenge,” or promote your WooCommerce products with countdown teasers.
For example, a store could encourage customers to share their Halloween setups featuring products they purchased, rewarding them with discounts or gift cards.
This cross-channel approach builds community, encourages user-generated content, and drives more visitors back to your WooCommerce store — boosting both visibility and sales during the holiday season.
How to Do It with Depicter
Depicter is a WordPress plugin that builds sliders, popups, notification bars, hero sections, and carousels — all with a visual, code-free editor. It includes a large template library, responsive controls, and display rules (page/visitor targeting and triggers).
Depicter also supports WooCommerce product sliders and dynamic content, so you can display products or posts automatically.
If you haven’t installed Depicter yet, it’s very simple: go to your WordPress dashboard → Plugins → Add New, type Depicter in the search box, then click Install Now and Activate. If you prefer, here is a step-by-step documentation and video tutorials on how to install Depicter.
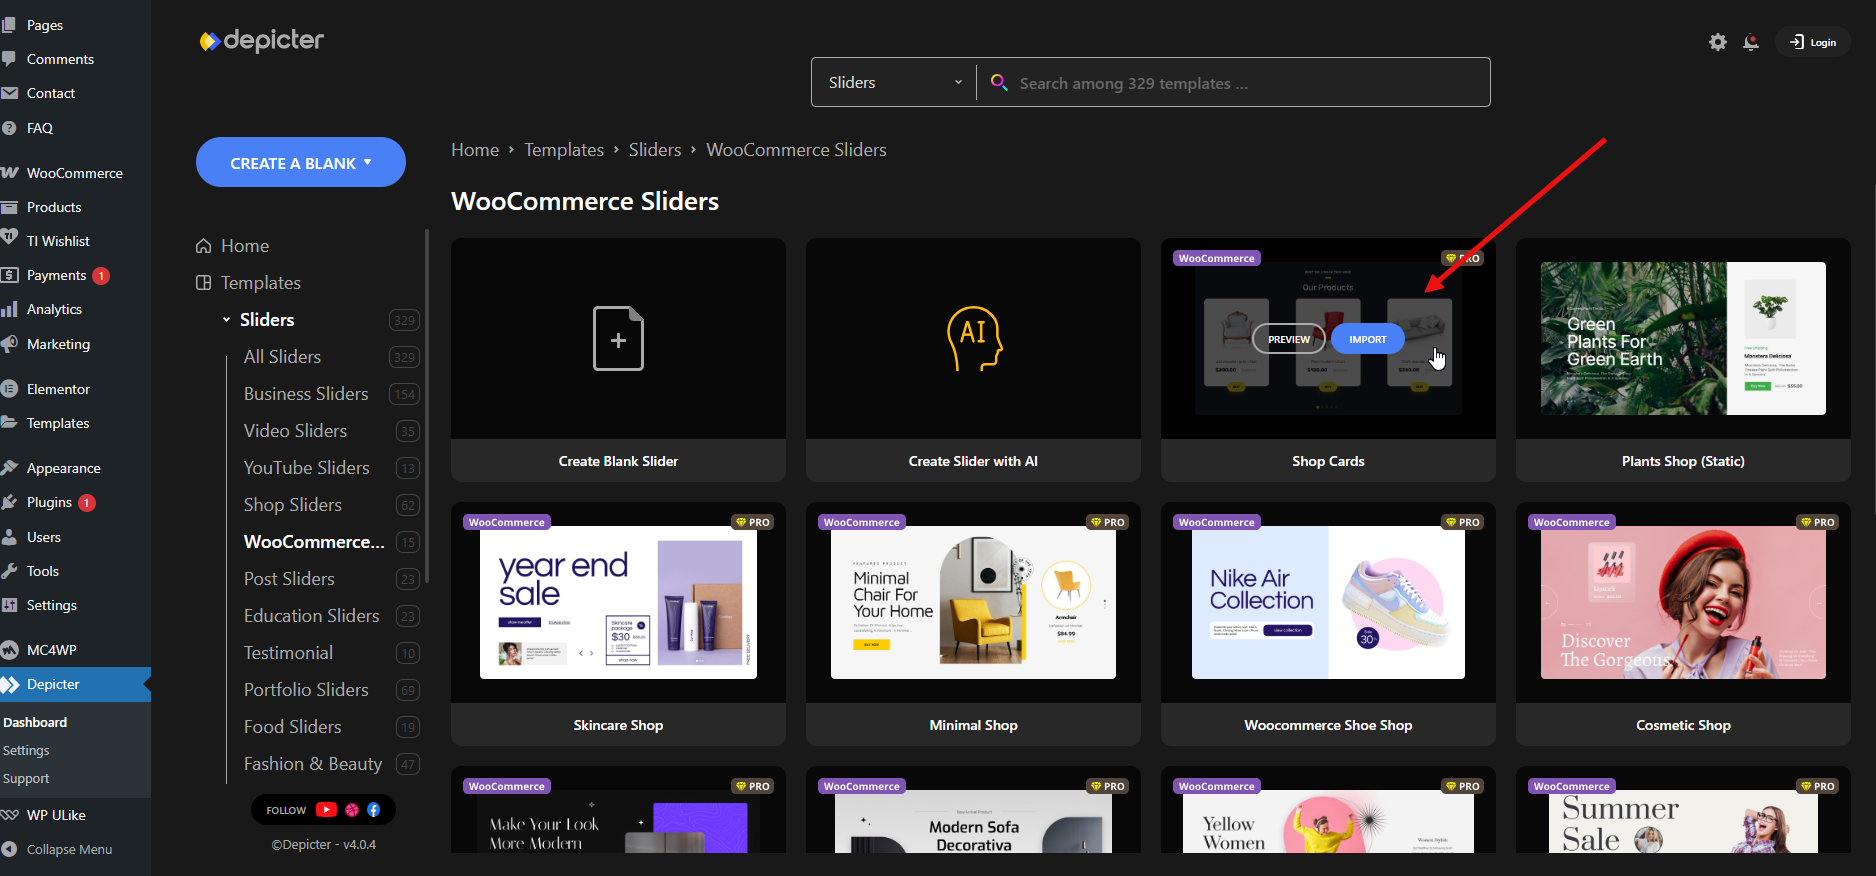
Use Sliders to Highlight Deals and Products
With Depicter sliders, you can create eye-catching product carousels, post sliders, or image slideshows that showcase Halloween collections, featured products, or limited-time deals.
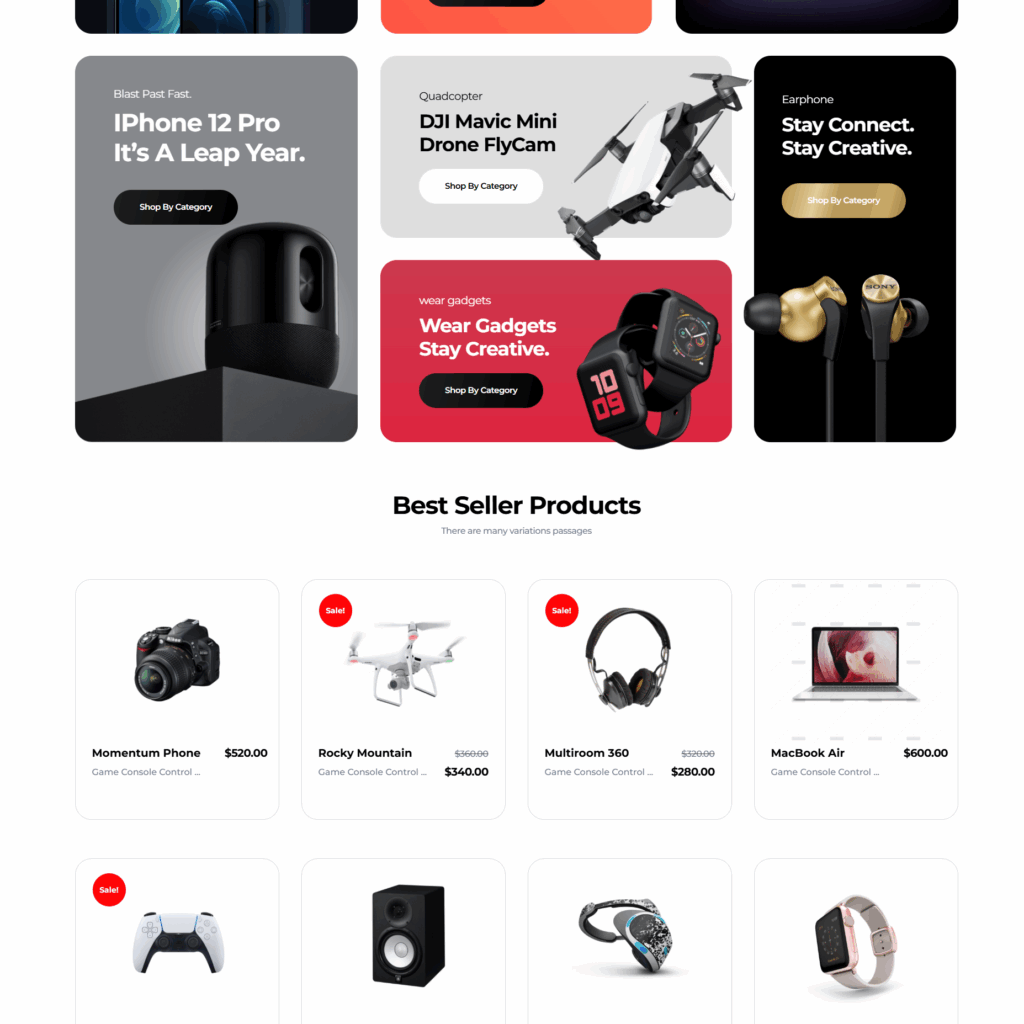
For WooCommerce stores, choose a product slider template and display a “Spooky Picks” carousel on the homepage or category pages to push sale items.
This is our online store where we plan to add a Halloween-themed slider.
After logging into the Depicter dashboard, go to Slider → Templates, and import one of the templates designed for WooCommerce products.
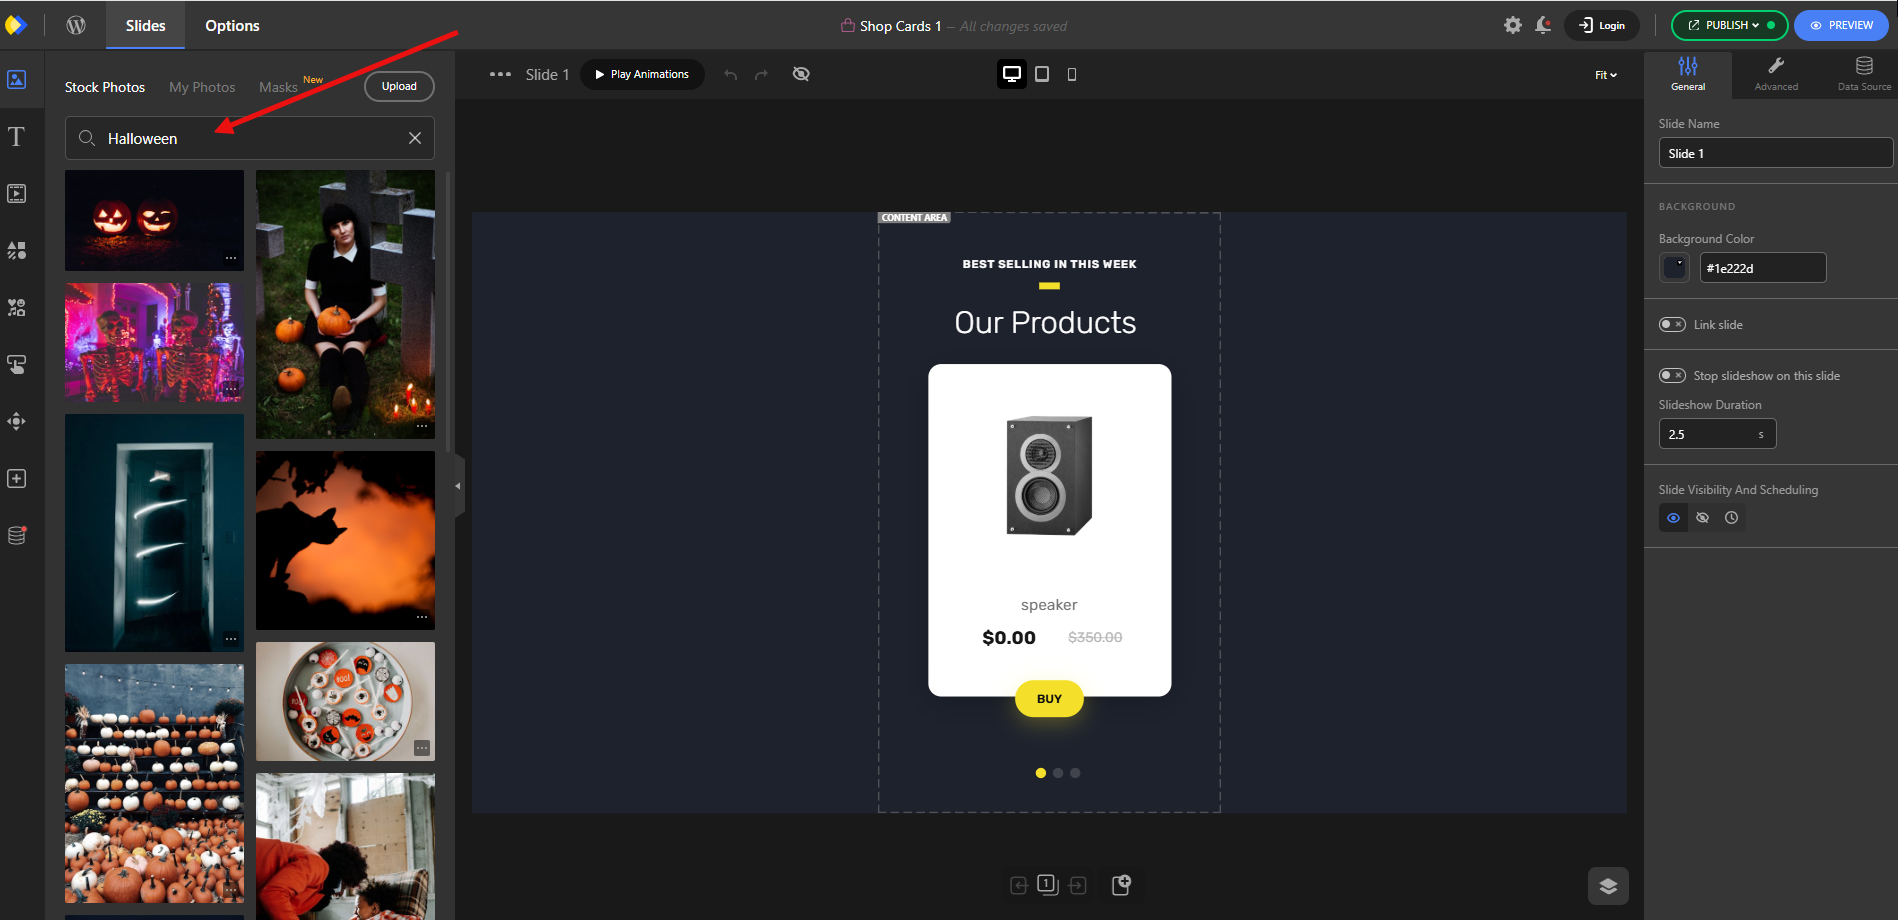
In the editor, you can find Halloween images in the Assets panel and add them to your slider.
Once you’ve made the changes, add the slider to your homepage.
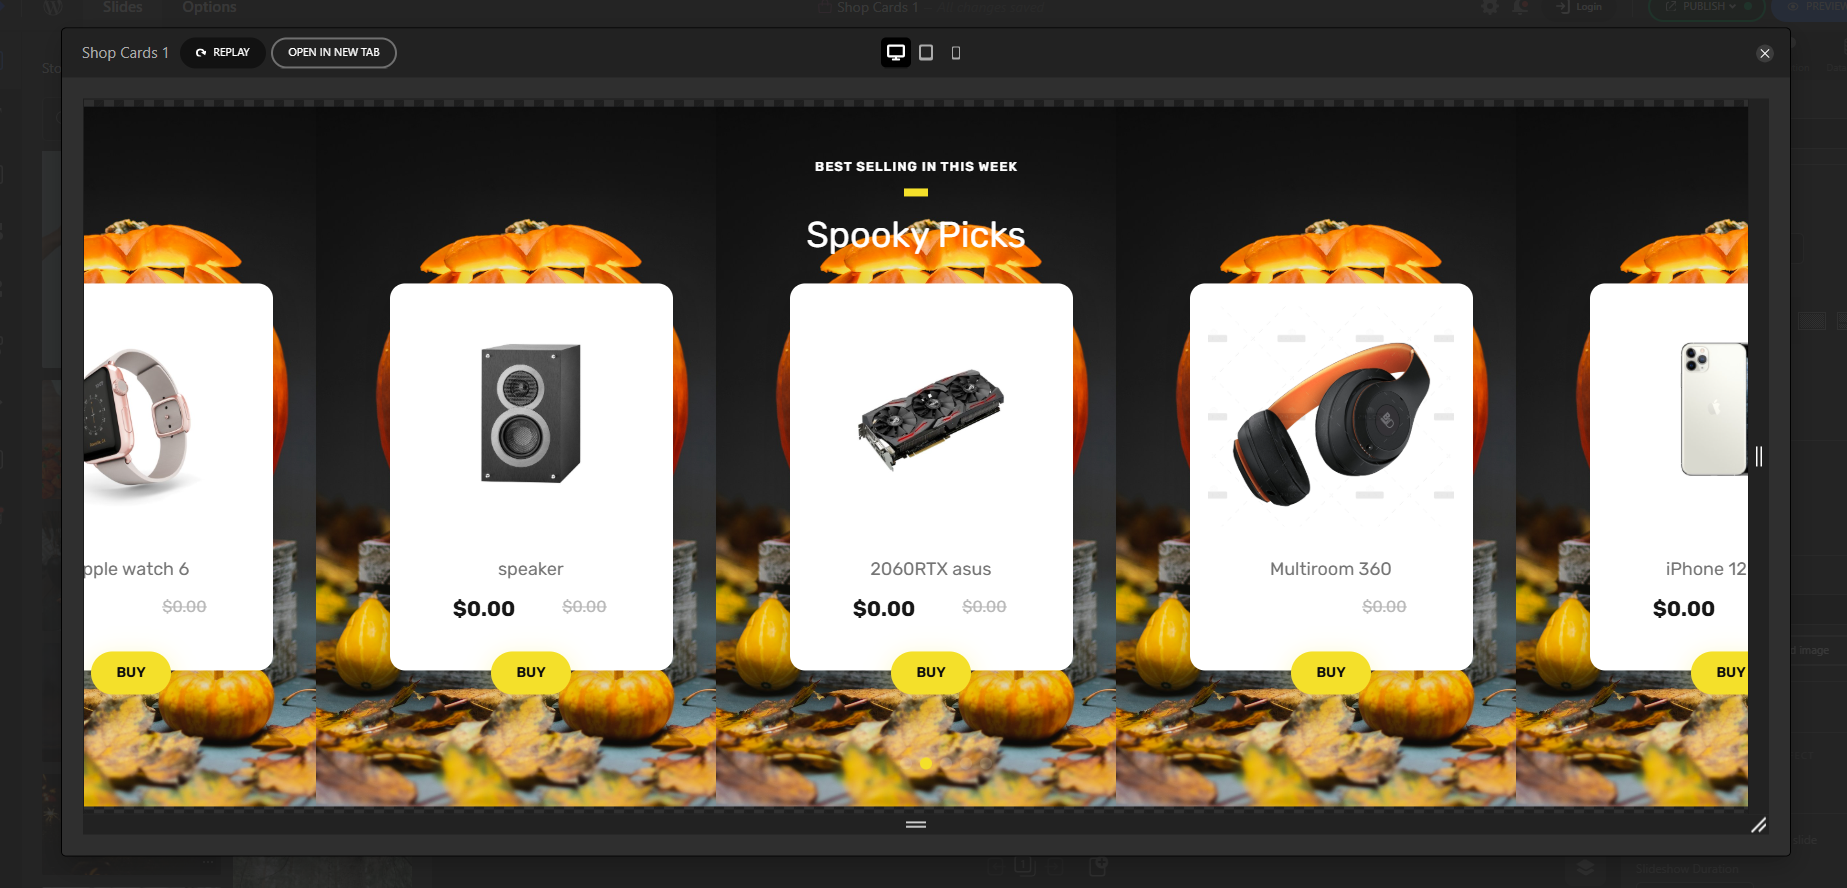
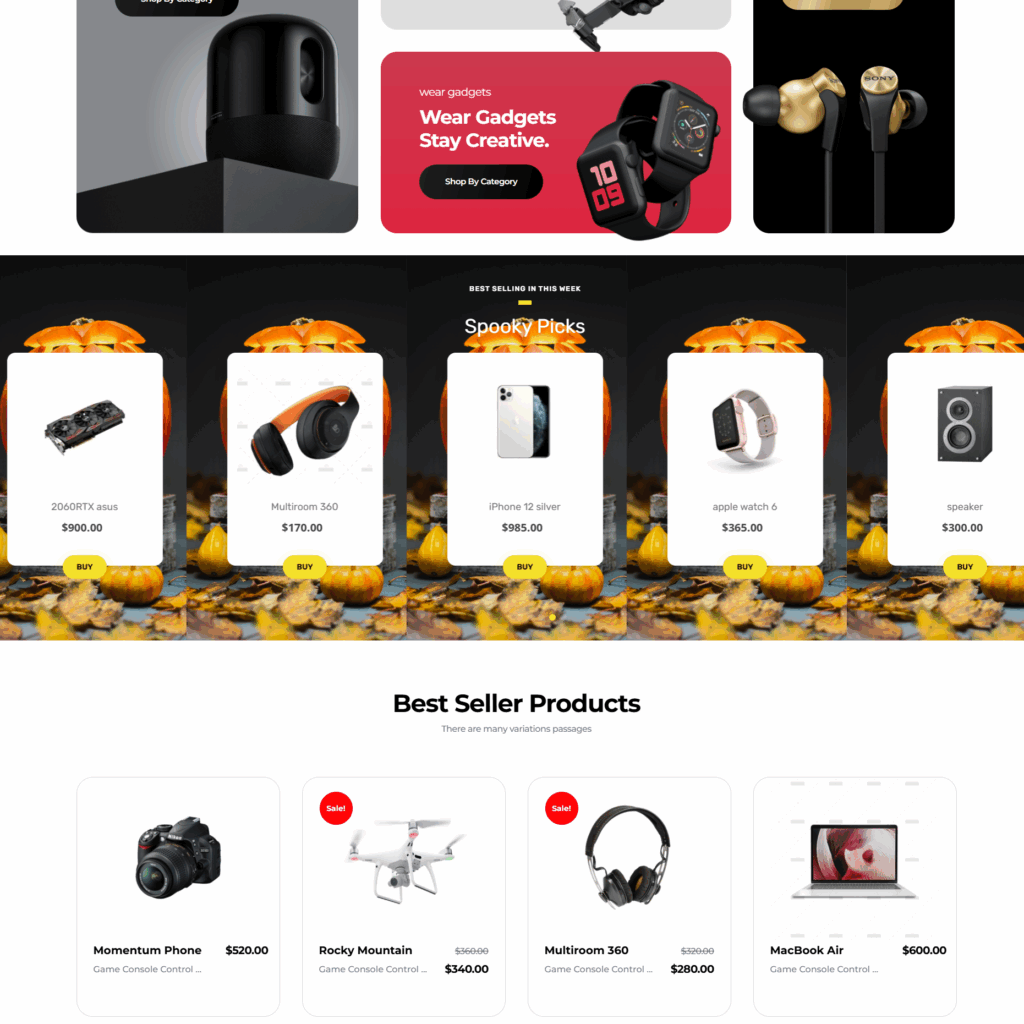
،he final result will look like this:
A WooCommerce product slider titled “Halloween Bestsellers” with sale badges and a CTA button can boost click-throughs from the homepage directly to product pages, shortening the path to checkout and increasing average order value.
Design a Hero Section with Halloween Graphics
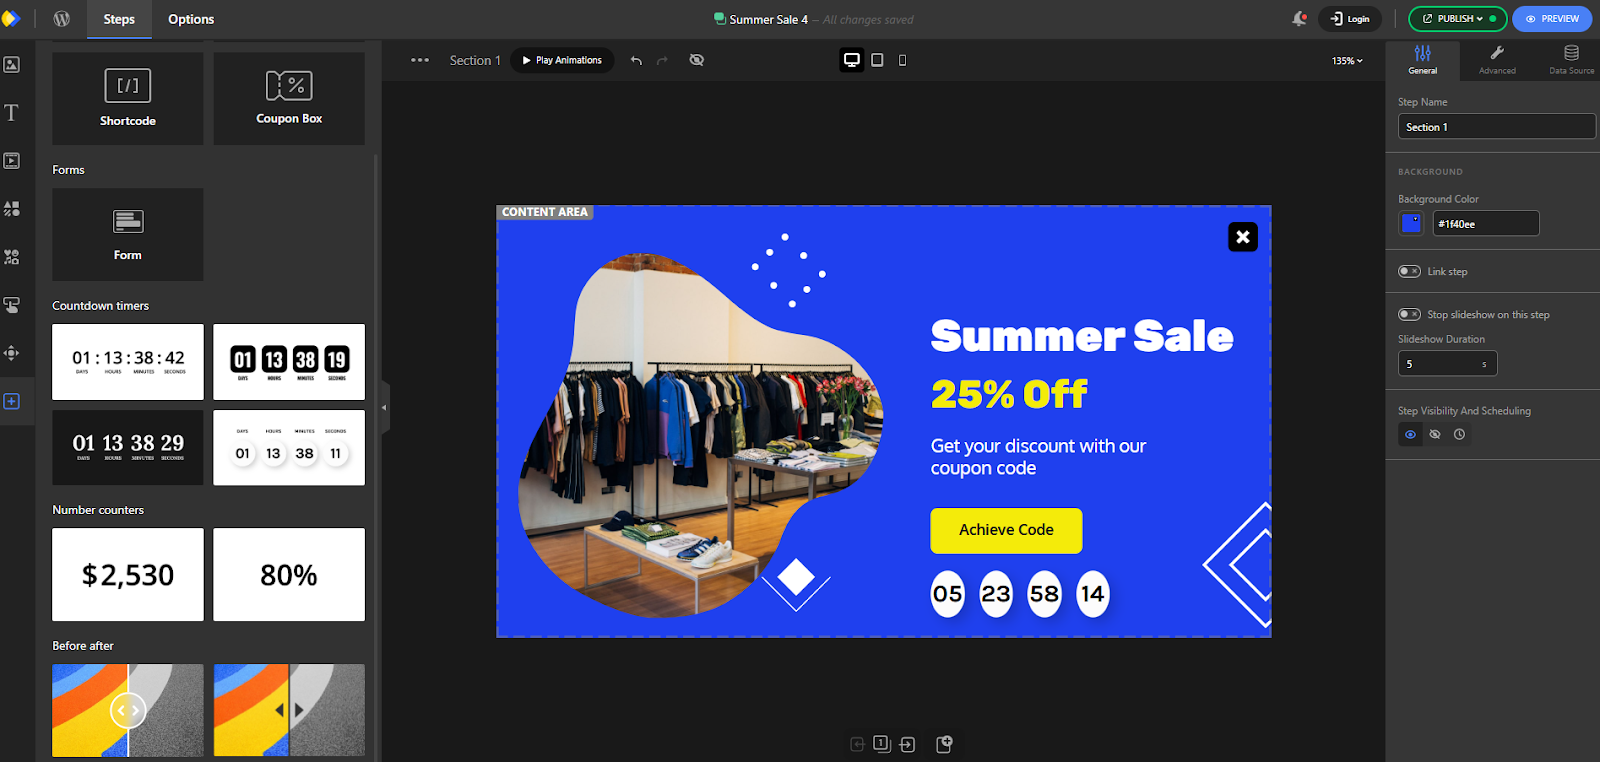
A hero section is the large top area of your homepage that makes the first impression. With Depicter, you can build a full-screen hero: a big Halloween image, a headline, a CTA button, and an optional countdown timer for your Halloween sale.
Because Depicter has templates and layout controls, you can create a strong visual without custom coding.
A hero that screams “Limited Halloween Sale — Ends Midnight Oct 31” with a visible countdown creates urgency and drives visitors straight to the sale collection — ideal for increasing conversion rate on the main landing page.
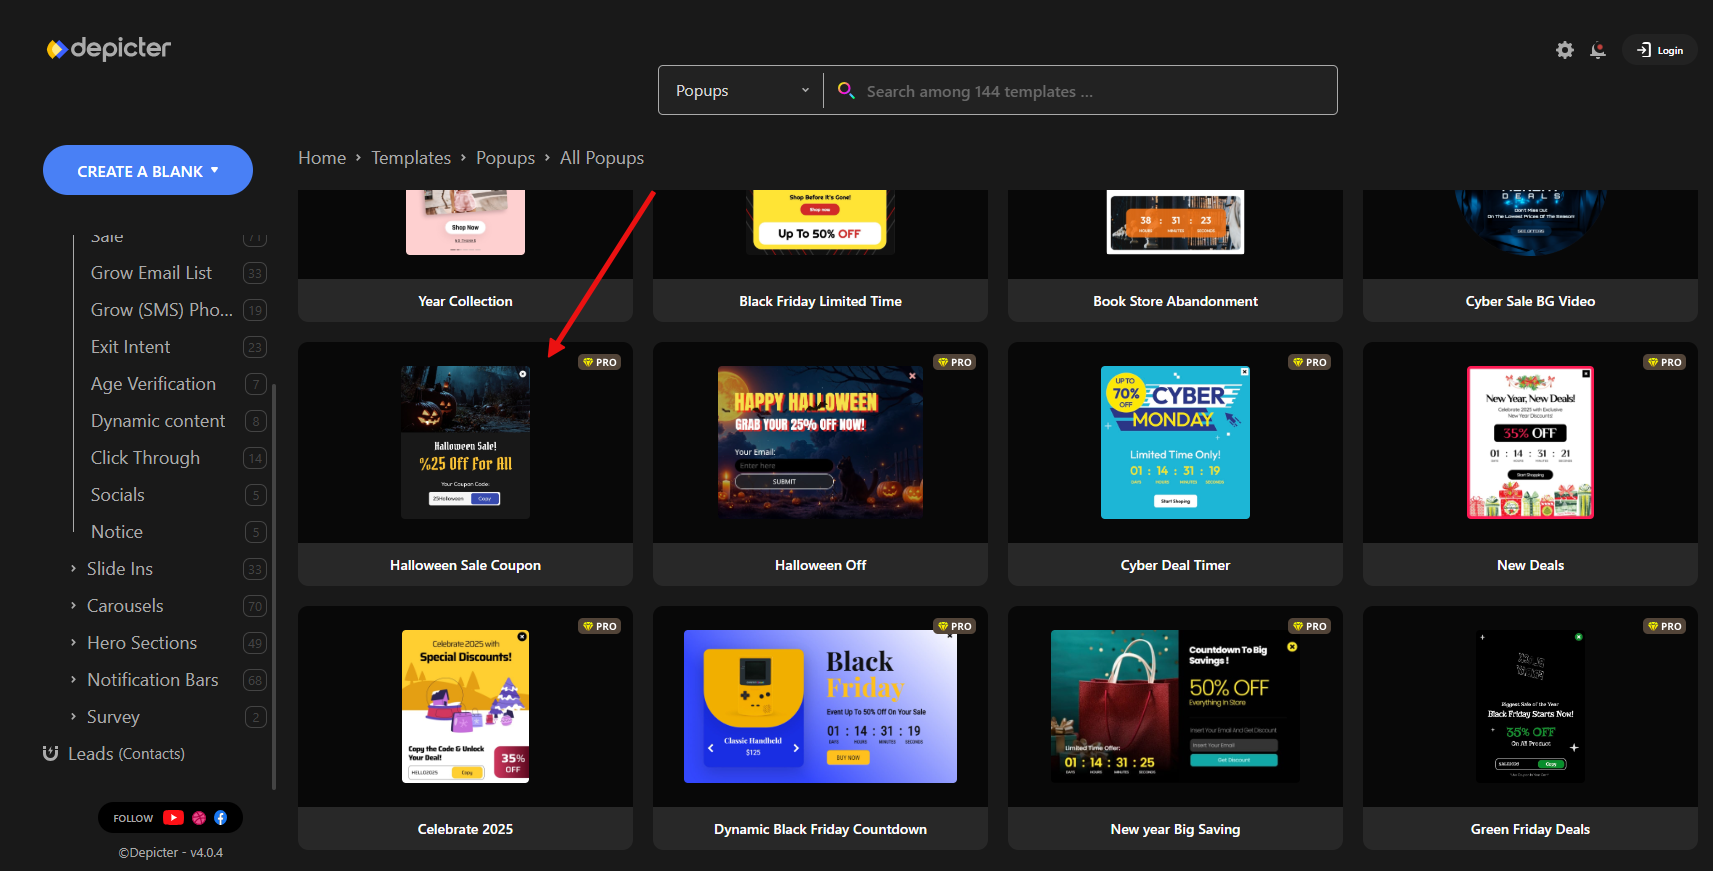
You can target popups by page type, device, referral, or behavior (time on page, scroll percent, exit intent) — great for capturing leads or recovering carts during Halloween campaigns.
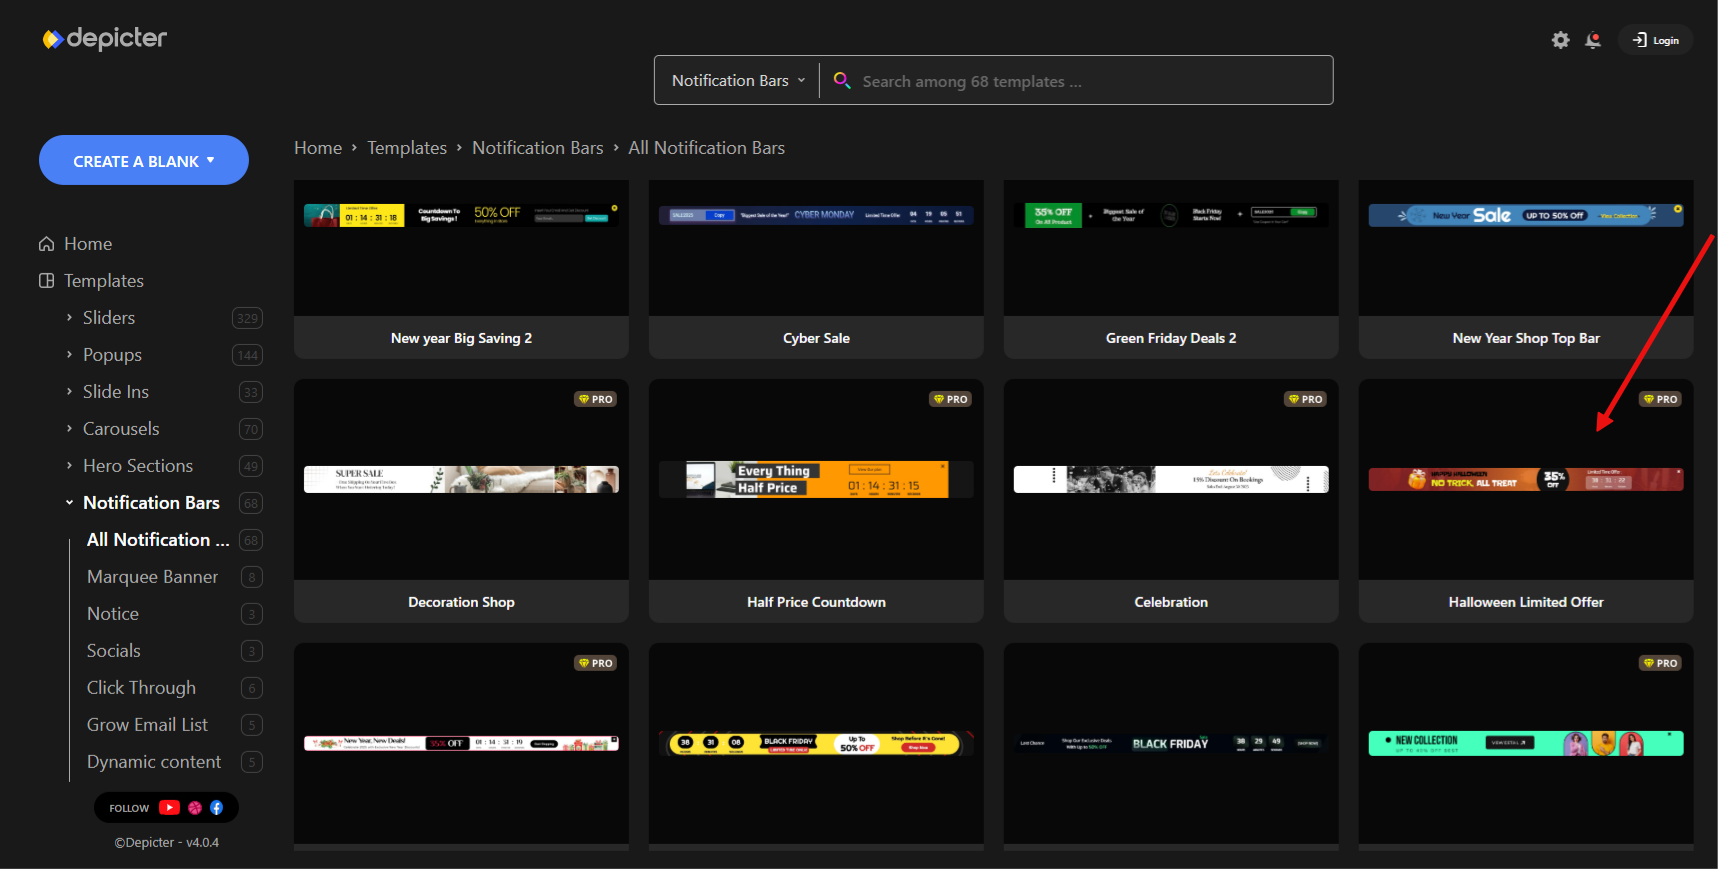
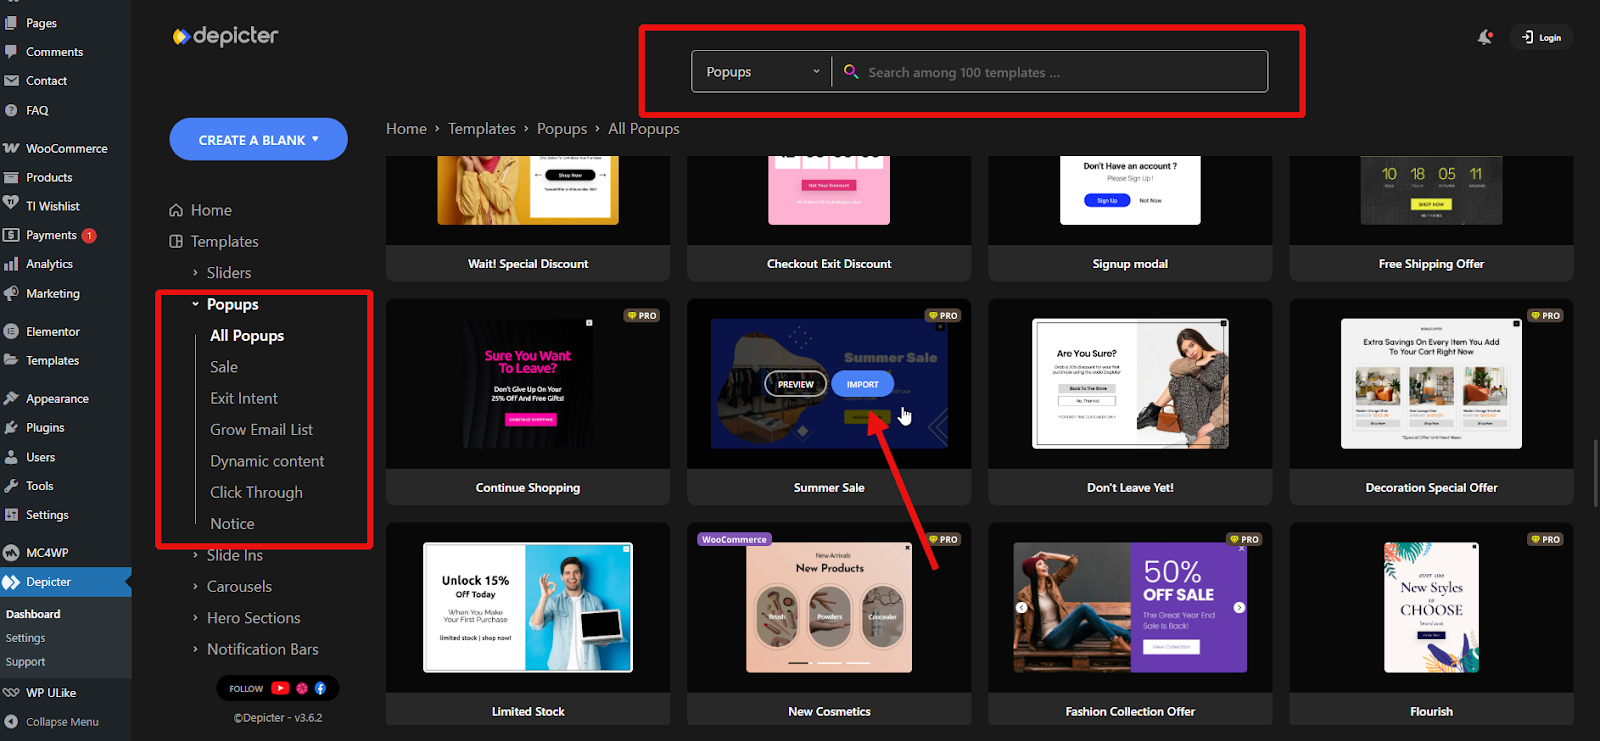
After logging into the Depicter dashboard, go to the Popup section, where you can find ready-made Halloween templates.
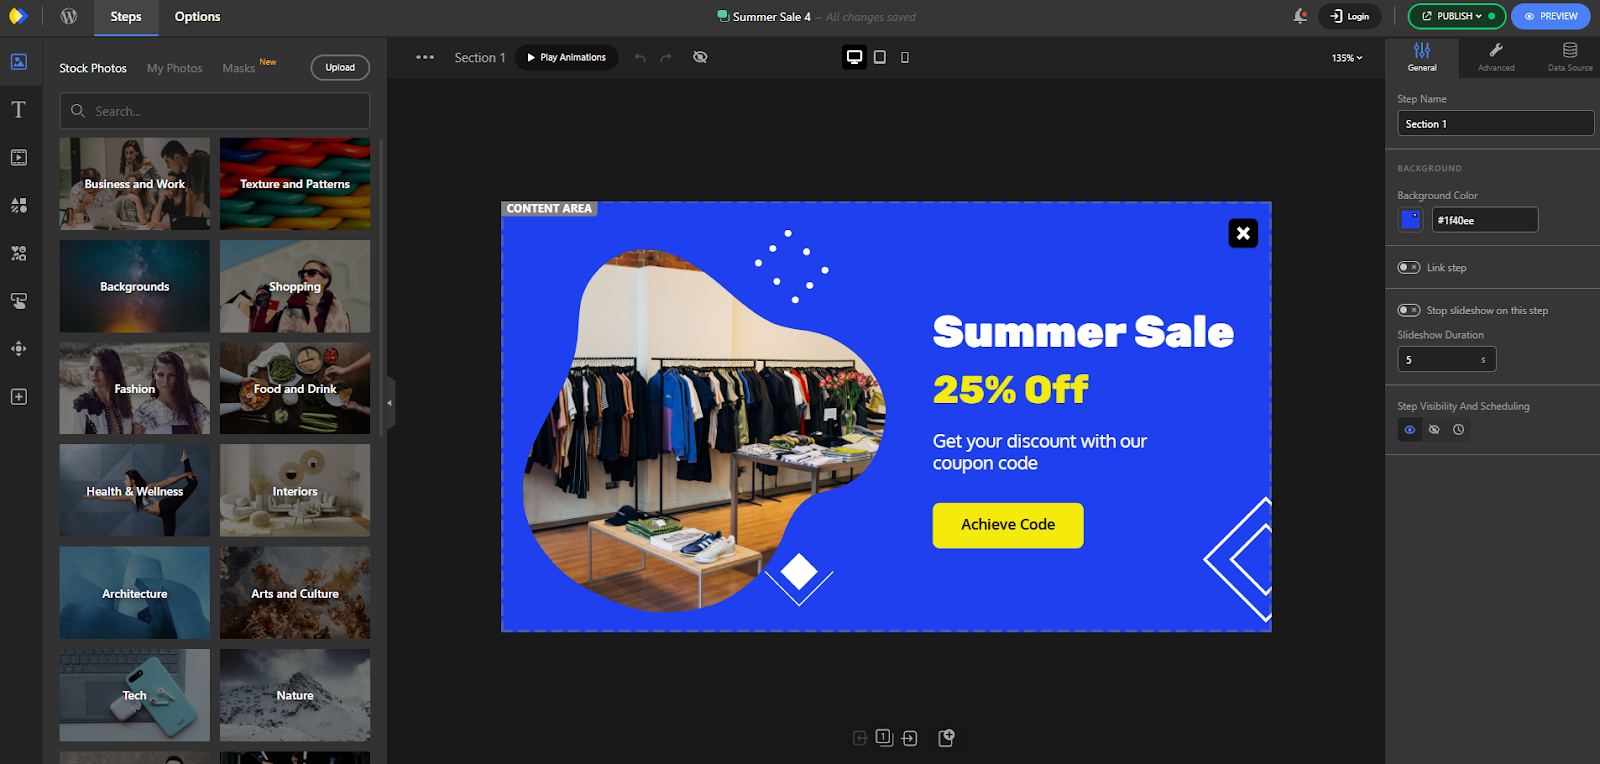
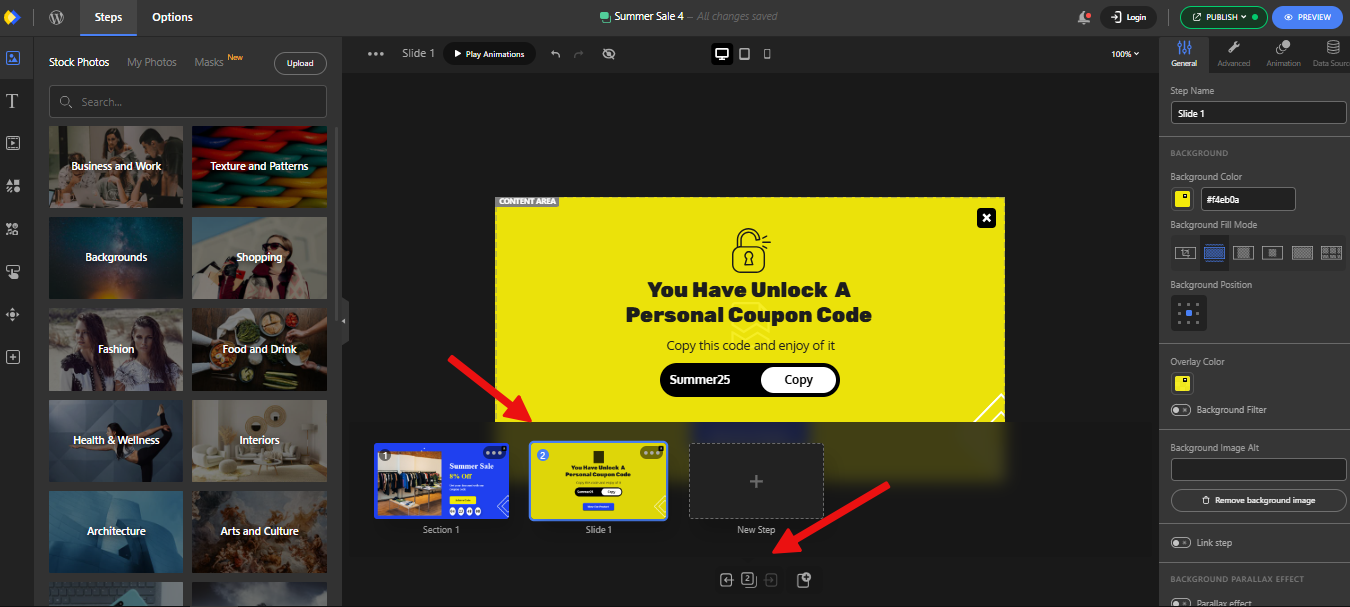
With a single click, import one and it will open in the editor. Here, you can edit and customize every detail.
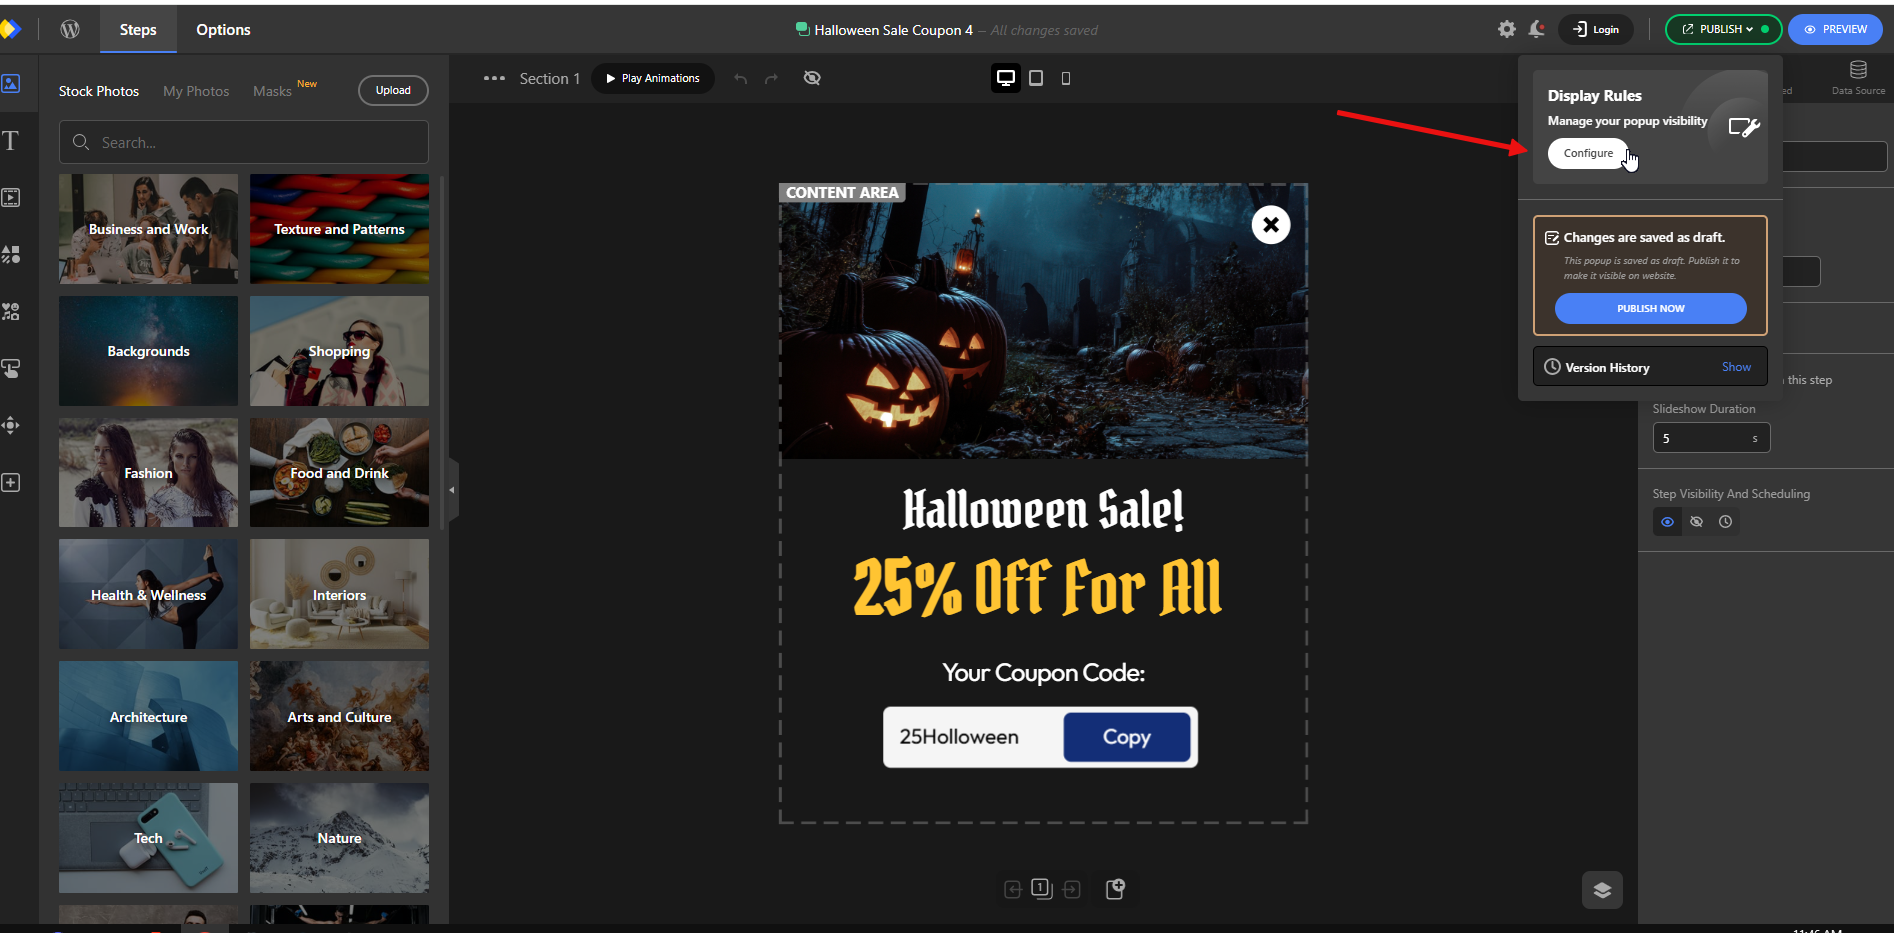
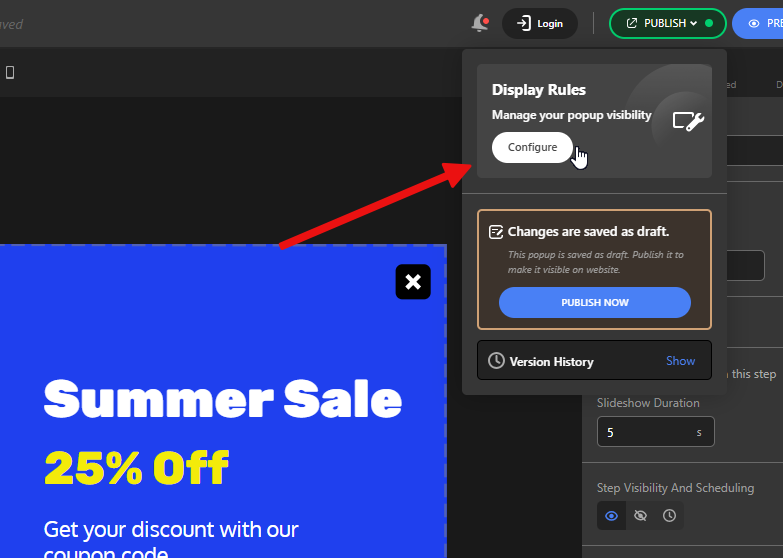
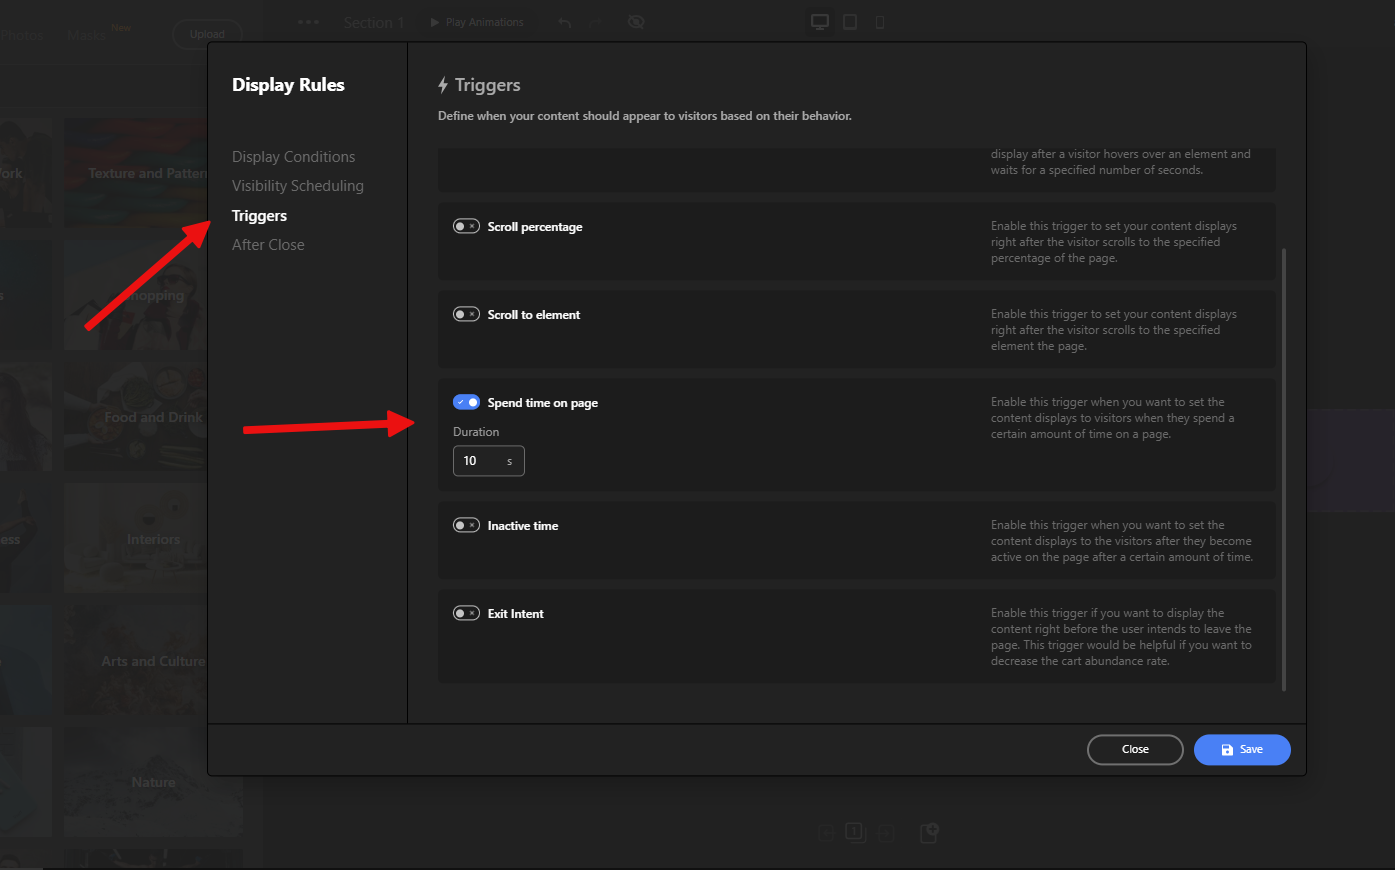
To set the display conditions — in this case, we want exit intent — click Publish, then go to Display Rules and hit Configure.
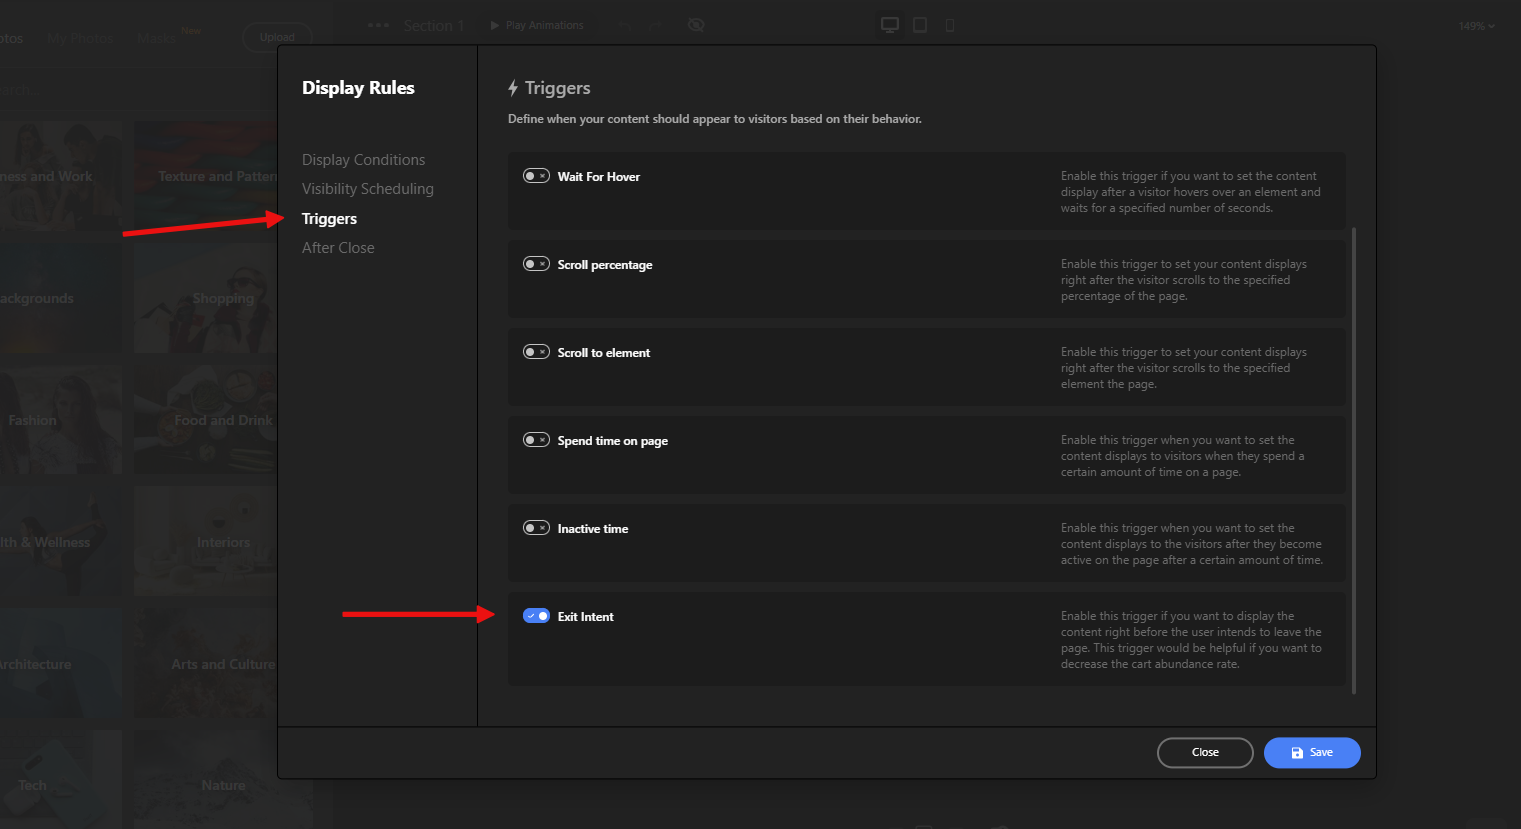
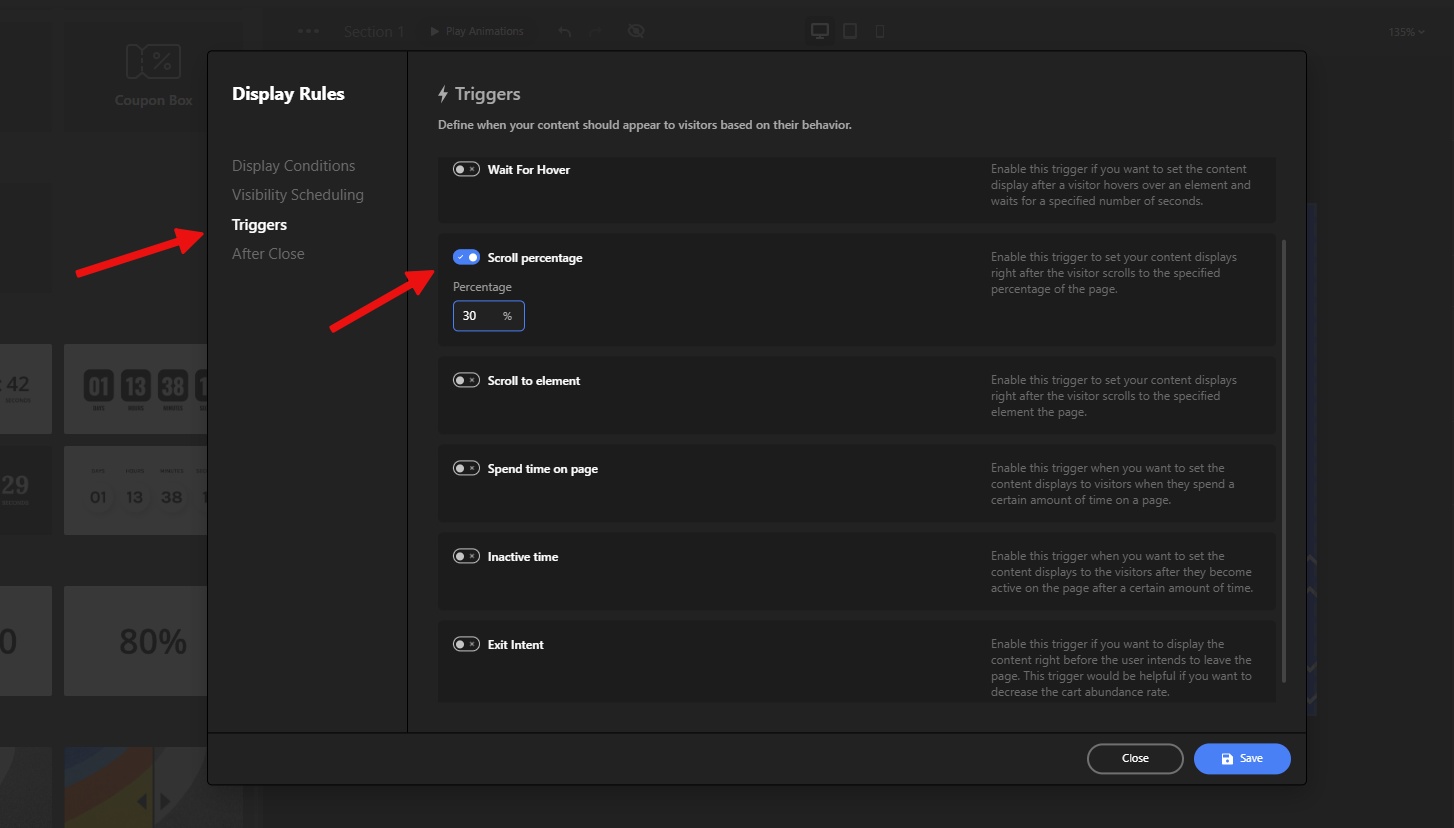
From the Triggers options, enable Exit Intent.
Now, whenever a visitor tries to leave the page, the popup will appear and grab their attention.
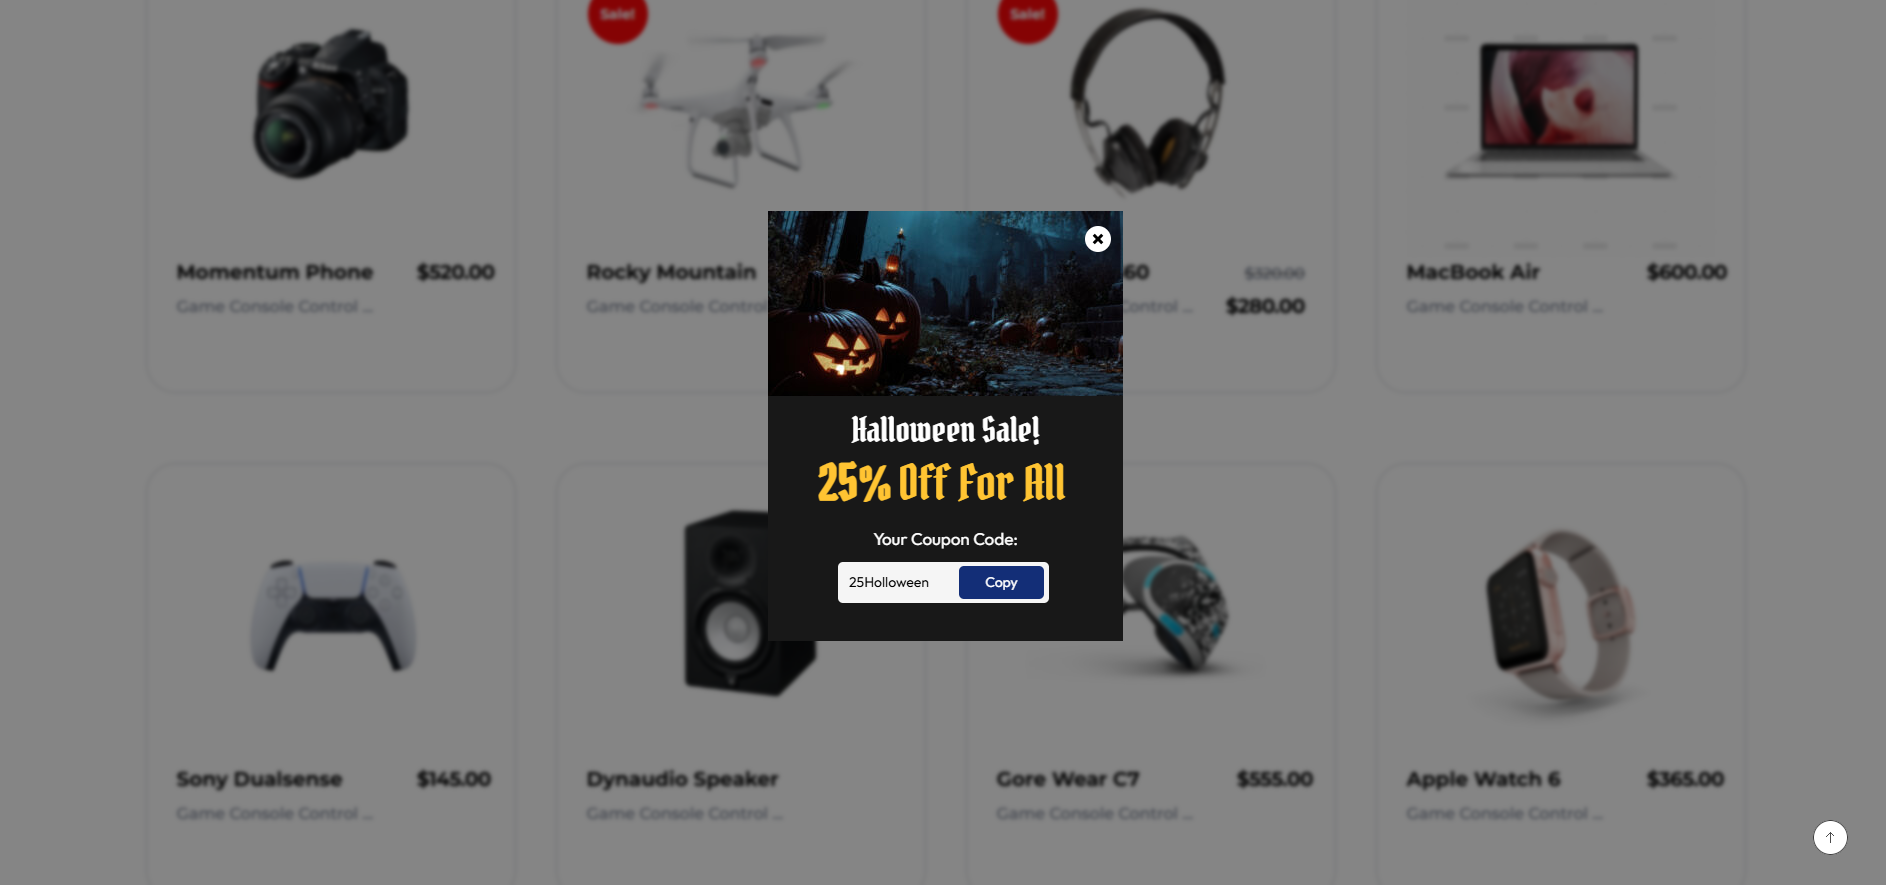
An exit-intent popup offering “Take 15% off now — use BOO15” when a customer tries to leave the cart can reduce abandonment and recover otherwise lost sales — especially useful for Halloween weekend promotions.
Add a Notification Bar for Quick Announcements
A notification bar (top or bottom) is a lightweight way to show short messages: sitewide Halloween sale, free shipping, or a limited-time promo.
Depicter’s notification bar builder offers templates, scheduling, and simple CTAs so you can communicate an urgent message without blocking content.
For the notification bar, the process is similar to creating a popup. Simply choose a suitable template from the available options and import it.
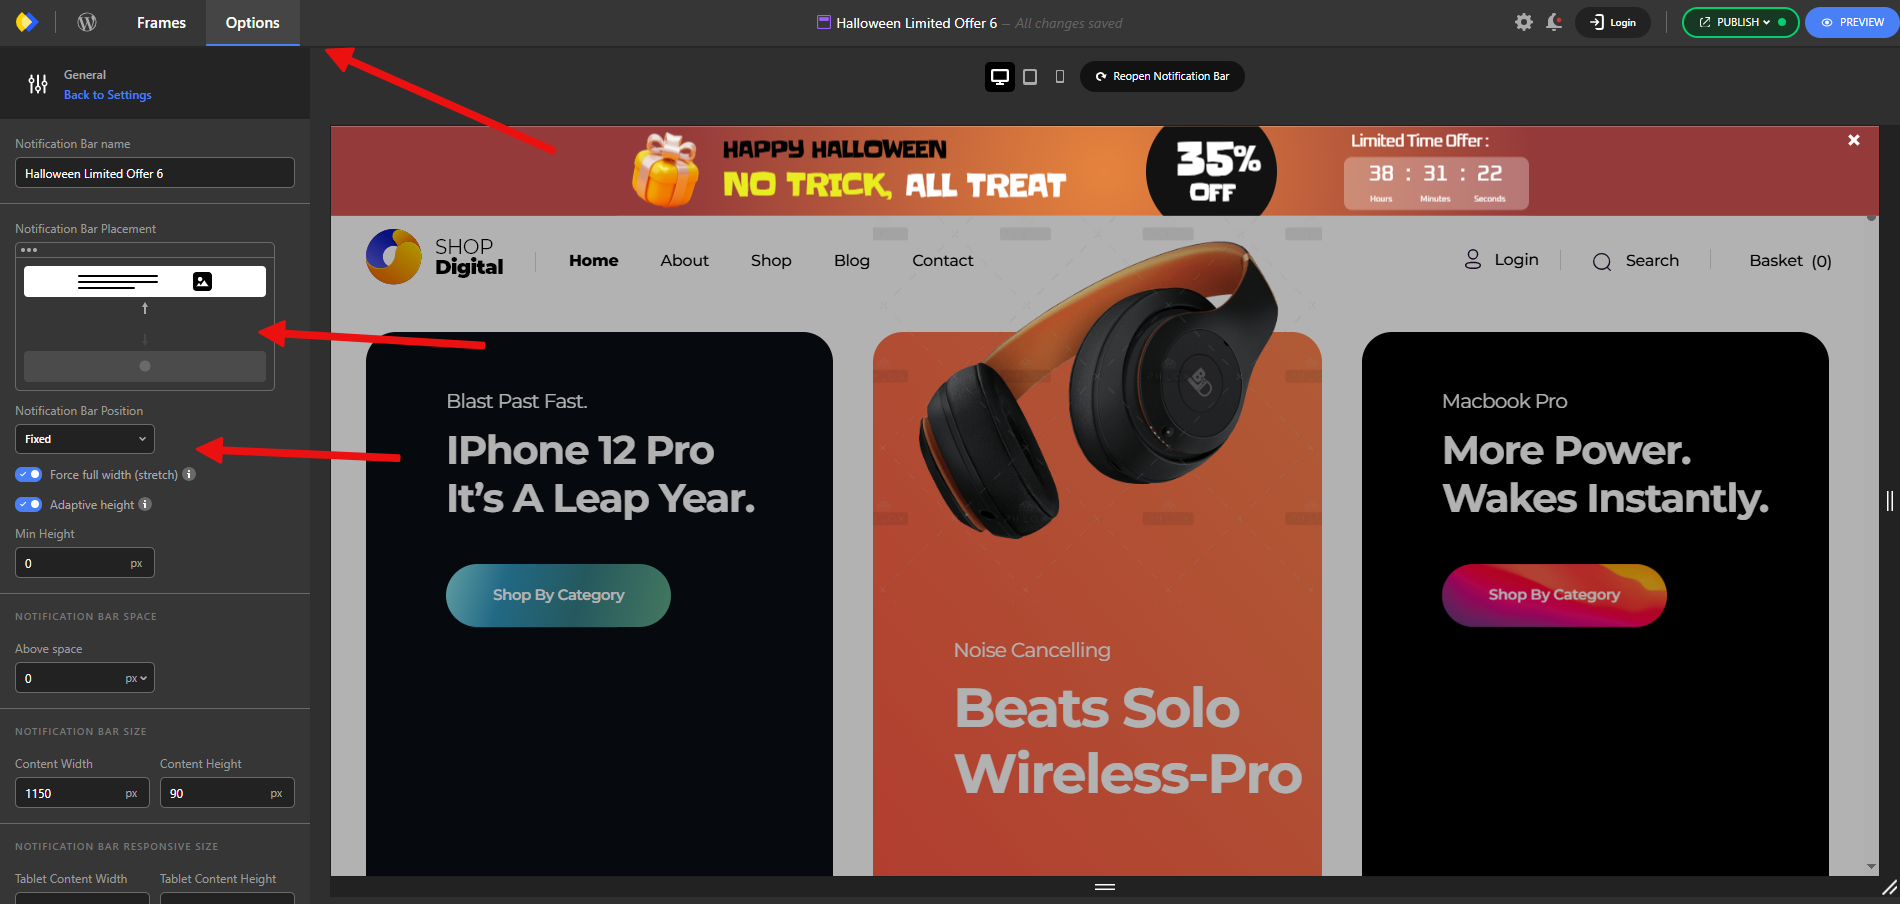
The main difference is that the key customization settings for a notification bar are usually about where it appears on the page and how it is displayed. You can adjust these from the Options menu.
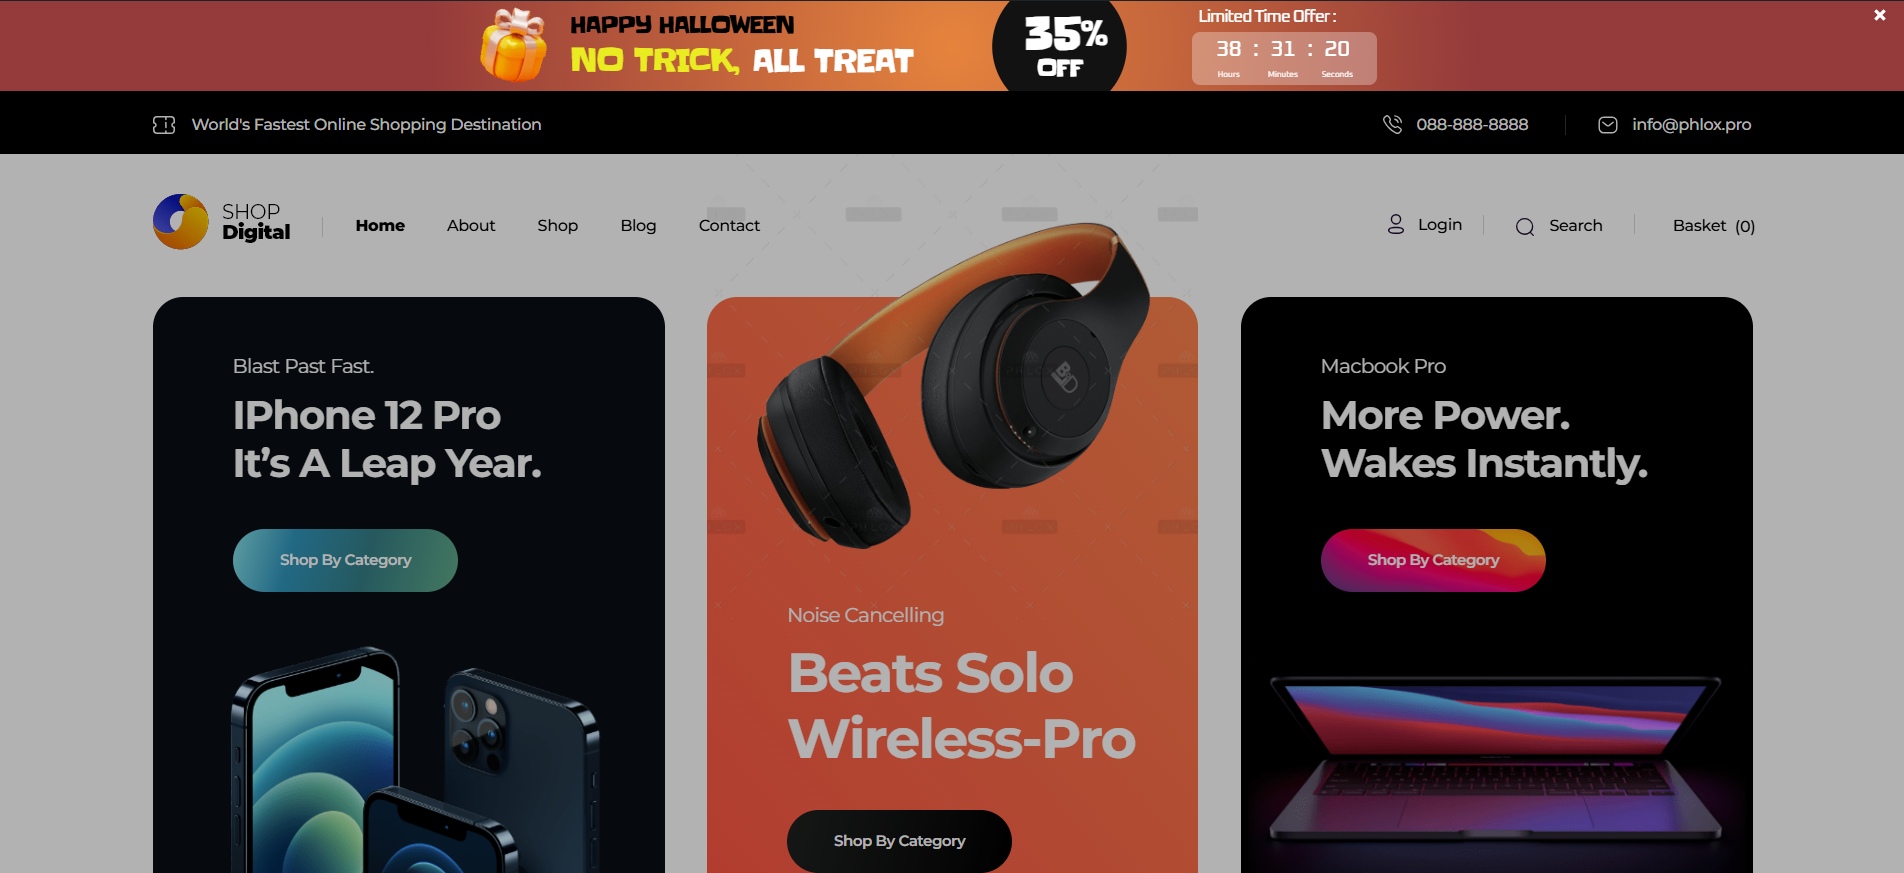
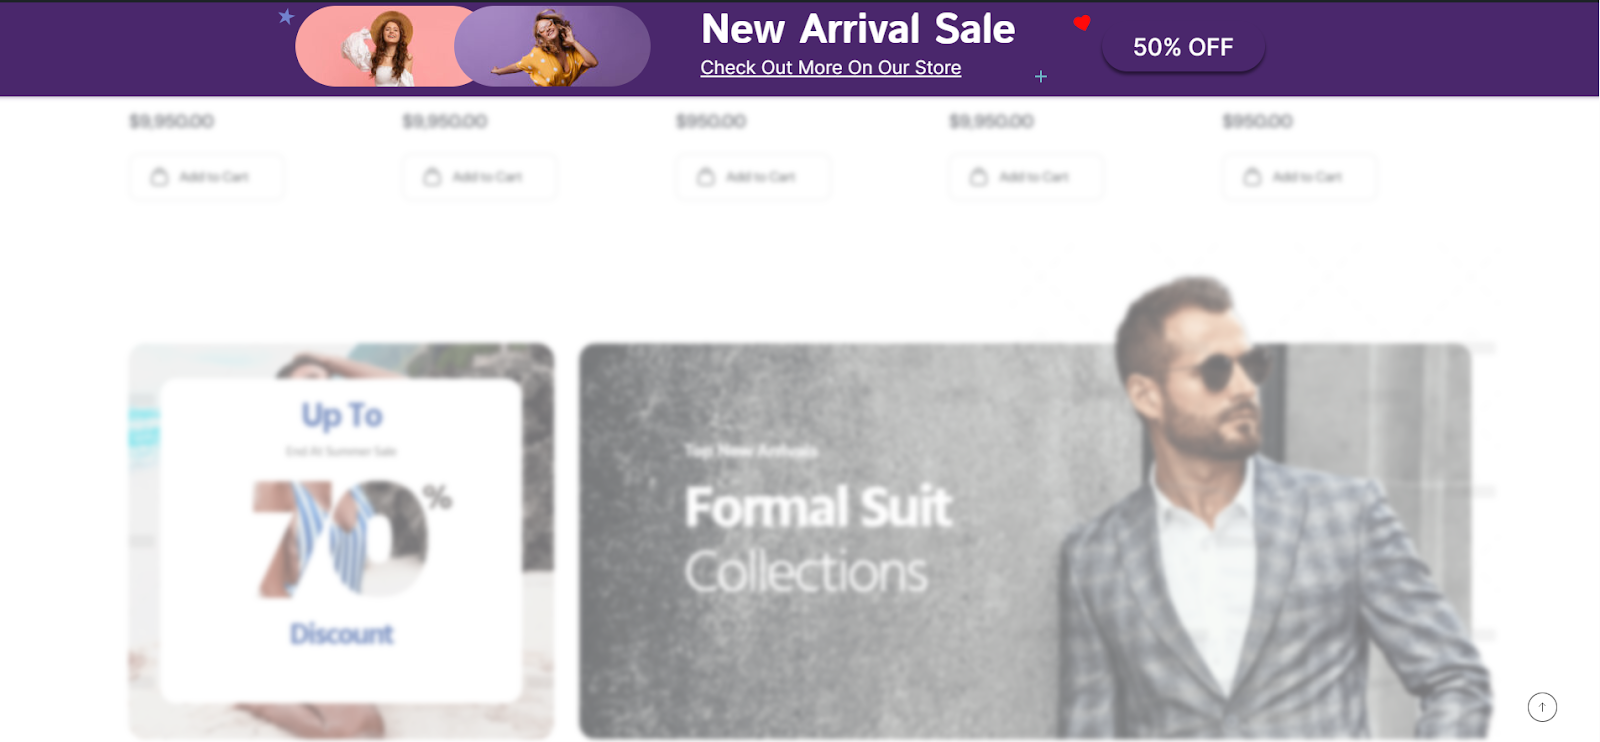
Once everything is set, your Halloween-themed notification bar will be displayed on your website like this.
A small top bar announcing “Free shipping for Halloween orders over $50” with a link to the sale collection keeps the message visible without being intrusive, nudging more users to click and convert.
Running a WooCommerce store is exciting. But turning visitors into paying customers is where the real challenge begins. Many store owners launch their site full of hope, only to realize sales don’t come in as easily as expected.
The good news? Boosting WooCommerce sales isn’t about luck. It’s about strategy. With the right tools, smart tweaks, and proven methods, you can turn your store into a sales machine.
In this guide, we’ll break down practical steps to increase your WooCommerce sales. So, without any further ado, let’s get started!
Key Takeaways
Audit First: Before making changes, audit your store’s performance. Understand key metrics like conversion rate and AOV, and benchmark them against industry standards to find your biggest opportunities.
Master SEO: Optimize your store for search engines by conducting thorough keyword research, perfecting on-page and technical SEO, and using content marketing to drive organic traffic.
Focus on CRO: Implement Conversion Rate Optimization (CRO) by analyzing your sales funnel, enhancing product pages with high-quality visuals and social proof, and streamlining your checkout process to reduce friction.
Increase AOV: Boost your Average Order Value (AOV) with strategic upsells and cross-sells on product pages, in the cart, and at checkout. Implement smart pricing like bundles and tiered discounts.
Leverage Email Marketing: Build and segment your email list to run automated workflows for abandoned carts, welcome series, and post-purchase follow-ups. Email provides one of the highest ROIs in marketing.
Prioritize Speed: A fast-loading store is crucial for sales. Optimize your site speed through quality hosting, caching, image optimization, and ensuring a seamless mobile experience.
6 Proven Steps to Skyrocket Your WooCommerce Sales
Want to sell more on your WooCommerce store? Follow these 6 proven steps to skyrocket your WooCommerce sales.
Audit Your WooCommerce Store’s Performance
Optimize Your WooCommerce Store for Search Engines
Work on Conversion Rate Optimization (CRO)
Increase Average Order Value (AOV)
Utilize Email Marketing
Speed Up Your WooCommerce Store
Each of these steps can give your sales a serious push. Now let’s break them down one by one and see how you can put them into action.
Step 1: Audit Your WooCommerce Store’s Performance
Before you can improve your WooCommerce sales, you must first understand where you stand. A thorough performance audit is the critical first step to identifying the leaks in your sales funnel and uncovering opportunities for growth.
1.1 Understanding Key E-commerce Metrics
Data provides the map for your optimization journey. Familiarize yourself with these essential Key Performance Indicators (KPIs) to track your store’s health:
Conversion Rate: The percentage of visitors who complete a purchase. This is a primary indicator of your store’s overall effectiveness
Average Order Value (AOV): The average amount spent each time a customer places an order. Increasing AOV is a direct path to higher revenue
Cart Abandonment Rate: The percentage of shoppers who add items to their cart but leave without completing the purchase. Plugins like StoreGrowth help with reducing cart abandonment, while ensuring higher AOV.
Customer Lifetime Value (CLV): The total revenue you can expect from a single customer over their entire relationship with your business. This metric shifts focus from single transactions to long-term profitability
Customer Acquisition Cost (CAC): The total cost of sales and marketing efforts needed to acquire a new customer
Depicter can also help reduce cart abandonment with exit-intent popups. By showing personalized offers or reminders right before a shopper leaves, you get a second chance to capture the sale and keep customers engaged.
1.2 Actionable Step: Compare Your Data to Industry Benchmarks
Once you have your numbers, see how they stack up. While performance varies, industry benchmarks provide a useful baseline.
In 2025, the average global e-commerce conversion rate hovers between 2% and 4%.
Industry
Average Conversion Rate (2025)
Personal Care
6.8%
Food & Beverages
4.9%
Electronics & Home Appliances
3.6%
Pet Care
2.32%
Cars & Automobile Parts
2.1%
Retail (Fashion, Jewelry)
1.9%
Home Decor
1.4%
Source: SpeedCommerce
Device-specific benchmarks are also crucial. While mobile drives the most traffic, desktop still boasts a higher conversion rate (4.8% vs. 2.9%), highlighting the need for a smooth experience on all platforms.
1.3 A Quick-Win Audit Checklist for Your WooCommerce Store
Perform these quick checks to identify immediate areas for improvement:
Speed Test: Use tools like Google PageSpeed Insights to analyze your load times. Your Largest Contentful Paint (LCP) should be under 2.5 seconds.
Checkout Flow: Go through the entire purchase process yourself. Is it simple? Are there any unnecessary fields or steps? Is guest checkout an option?
Mobile Experience: Test your store on multiple mobile devices. Are buttons large and easy to tap? Is navigation intuitive? Is the text legible without zooming?
Step 2: Optimize Your WooCommerce Store for Search Engines
Search Engine Optimization (SEO) is the art and science of making your store visible to customers actively searching for your products on Google and other search engines.
2.1 How to Do Keyword Research for Your WooCommerce Products
Effective SEO starts with understanding the exact words and phrases your customers use.
By uncovering the language they naturally type into Google, you’re not just optimizing for algorithms, you’re serving what shoppings are actually searching for; questions, and buying triggers.
Identify Your Target Market: Understand who your ideal customer is, their pain points, and the language they use.
Use “Google Suggest”: Start typing a product name into Google and see what autocomplete suggestions appear. These are long-tail keywords that real people are searching for.
Analyze Competitors: Use SEO tools to see which keywords are driving traffic to your competitors’ sites.
Focus on Search Intent: Determine the goal a user has when searching. For e-commerce, keywords with commercial intent (e.g., “buy red running shoes”) are highly valuable.
2.2 On-Page SEO for Product & Category Pages: A Complete Checklist
On-page SEO involves optimizing the individual pages of your store.
When each page is optimized, search engines can better understand what you’re selling, and customers are more likely to find you right when they’re ready to buy.
Title Tags: Include your primary keyword near the beginning of the title. Keep it under 65 characters to avoid it being cut off in search results.
Meta Descriptions: Write a compelling summary (under 150 characters) that includes your keyword and entices users to click.
Headings (H1, H2, etc.): Use a single, keyword-rich H1 tag for your page title. Use H2 and H3 tags to structure the rest of your content.
Product Descriptions: Write unique, benefit-driven descriptions. Don’t just copy from the manufacturer, as this can create duplicate content issues.
Image Alt Text: Add descriptive alt text to all product images. This helps search engines “see” your images and improves accessibility.
URLs (Slugs): Use short, descriptive URLs that include your main keyword (e.g., yourstore.com/womens-shoes/red-running-shoes).
2.3 Technical SEO Best Practices for WooCommerce
Technical SEO ensures your site’s foundation is solid, allowing search engines to crawl and index it efficiently.
Submit an XML Sitemap: A sitemap is a roadmap of your store. Use an SEO plugin to generate one and submit it to Google Search Console.
Use Schema Markup (Rich Snippets): Schema is a special code that helps search engines understand your product data (price, availability, reviews). This can result in “rich snippets”, enhanced search listings with star ratings and pricing, that dramatically increase click-through rates.
Ensure Mobile-Friendliness: A responsive design that adapts to all screen sizes is non-negotiable.
Fix Broken Links: Routinely scan your site for dead links and update or remove them to ensure a smooth user experience.
Secure Your Site with HTTPS: An SSL certificate is essential for protecting customer data and is a confirmed ranking factor.
2.4 Using Content Marketing and Link Building to Drive Traffic
Content marketing establishes your brand as an authority and attracts customers through valuable information.
Start a Blog: Write blog posts that answer your customers’ questions, offer solutions to their problems, and provide value beyond just selling a product. This can include “how-to” guides, buying guides, or industry news.
Create Video Content: Product demonstrations, tutorials, and behind-the-scenes videos can engage customers and be shared across social media.
Build Links: Earn backlinks from reputable sites in your industry by creating high-quality content, contributing expert quotes to media outlets, or appearing as a guest on podcasts.
2.5 Essential WooCommerce SEO Plugins and Tools
Make the most out of powerful plugins to simplify your SEO efforts:
All in One SEO (AIOSEO)
AIOSEO is designed for store owners who want powerful SEO without the steep learning curve. It guides you through optimizing titles, meta descriptions, and product content with built-in checklists.
Beyond on-page SEO, it automatically generates XML sitemaps, integrates with social media, and supports schema markup, helping search engines better understand your products and improving your chances of showing up in rich results
Rank Math
Known for its extensive free feature set, including basic WooCommerce SEO and internal link suggestions. It covers all the SEO basics (like meta optimization and breadcrumbs) while also providing WooCommerce-specific features such as product schema, advanced SEO analysis, and internal link suggestions.
For growing stores, it even includes features like 404 monitoring and redirection management, so you can keep your site healthy without extra plugins.
Yoast SEO
Yoast is trusted by millions of WordPress users. Its strength lies in content optimization, it analyzes your product pages and blog posts in real time, offering suggestions to improve readability and keyword use.
The dedicated WooCommerce SEO add-on takes it a step further by optimizing category pages, breadcrumbs, and structured data, making sure your products are not just listed, but showcased effectively in search results.
2.6 Local SEO for WooCommerce
For businesses with physical stores, Local SEO is a game-changer. It connects your digital presence with your physical locations, targeting high-intent customers searching for products “near me.”
Its WooCommerce add-on further optimizes category pages, breadcrumbs, and structured data so your products stand out in search results.
Optimize Your Google Business Profile (GBP)
This is your digital storefront on Google. Complete every field: business name, address, phone number (NAP), hours, and a detailed description.
Use precise categories (e.g., “Specialty Food Shop”) and add high-quality photos of your products and store. Enable messaging and post regular updates about new items or sales.
Create Location-Specific Landing Pages:
Each physical store should have its own dedicated page on your website. This page should include the store’s unique NAP, hours, local testimonials, and localized content (e.g., “Best Winter Coats for the Denver Climate”).
This helps each location rank independently in its geographic area.
Use Local Keywords
Optimize your location pages and content with local keywords. Instead of just “handmade furniture,” target “handmade furniture in Austin.”
This reduces competition and attracts highly qualified local buyers.
Integrate WooCommerce with Local Offerings
Use your WooCommerce setup to offer local pickup, same-day delivery within specific zones, or display in-store stock levels.
These features bridge the gap between your online and offline experiences, providing convenience that drives local sales.
Step 3: Work on Conversion Rate Optimization (CRO)
Conversion Rate Optimization (CRO) is the process of systematically improving your website to increase the percentage of visitors who make a purchase.
3.1 Using Funnel Analysis to Find and Fix Revenue Leaks
Use analytics tools to track the customer journey from the homepage to the thank you page.
Identify where users are dropping off – is it on a specific product page? Or during the checkout process? This data will reveal the friction points that need fixing.
3.2 How to Optimize Product Pages for Higher Conversions
The product page is your digital salesperson. Every element must work to persuade the visitor.
Use High-Quality Visuals: Display multiple high-resolution images and product videos to help customers visualize the item.
Write Persuasive Copies: Rather than selling your features, focus on the benefits derived from your product. Use clear, compelling language and a prominent call-to-action (CTA) button.
Leverage Social Proof: Displaying customer reviews and ratings is incredibly powerful. A product with just five reviews can see a 270% increase in its conversion rate compared to one with none. You can also use tools to display live sales notifications to build trust.
Offer a Quick View Option: Allow users to see product details and add items to their cart from the category page without a full page load, reducing friction. A Fly Cart can further streamline this experience.
3.3 Optimizing the WooCommerce Checkout Process to Reduce Abandonment
The checkout is where most sales are lost. Make it as frictionless as possible.
Eliminate Surprises: Be transparent about all costs, including shipping and taxes, upfront. Unexpected costs account for the majority of carts being abandoned.
Offer Guest Checkout: Any forceful action creates friction. By pushing users to create an account, a lot of customers will fall off the lead pipeline. 24% of shoppers will abandon a purchase if required to create an account.
Simplify Forms: Only ask for the absolute minimum information required to complete the order. Use a single-page checkout where possible.
Provide Multiple Payment Options: Accept major credit cards, digital wallets like PayPal and Apple Pay, and other popular payment gateways.
3.4 Using Trust Signals and Urgency to Increase Sales
Build confidence and motivate immediate action with psychological triggers.
Display Trust Seals: Show security badges (SSL certificates) and logos of accepted payment methods to reassure customers their data is safe
Create Urgency: Use limited-time offers and countdown timers to encourage customers to buy now rather than later.
Signal Scarcity: Display low-stock warnings (e.g., “Only 3 left!”) to create a fear of missing out (FOMO).
With Depicter, you can easily design time-limited offers like countdown timers, seasonal banners, or flash sale popups. These visuals push customers to act faster and directly improve your WooCommerce conversion rate.
3.5 How to A/B Test Your WooCommerce Store for Better Results
Don’t guess what works – test it. A/B testing (or split testing) involves comparing two versions of a page to see which one performs better.
What to Test: Experiment with different headlines, product descriptions, CTA button colors and text (“Add to Cart” vs. “Buy Now”), and checkout page layouts.
How to Test: Use tools like Google Optimize, VWO, or Optimizely to split your traffic between the two versions and measure the results.
Best Practices: Formulate a clear hypothesis for each test (e.g., “Changing the CTA button to red will increase clicks”) and run the test long enough to gather statistically significant data.
Step 4: Increase Average Order Value (AOV)
Increasing the amount each customer spends is one of the fastest ways to grow revenue without needing more traffic.
We like to optimize our WooCommerce stores with the StoreGrowth plugin, as its advanced features help to lift the AOV, decrease cart abandonment, and encourage customer loyalty.
4.1 Upsell and Cross-sell Strategies for WooCommerce
Upsells
Encouraging customers to purchase a more expensive, premium version of the product they are considering (e.g., a larger size, a more powerful model).
Cross-sells
Recommending complementary products that enhance the original purchase (e.g., suggesting batteries for an electronic toy or a case for a new phone).
Cart/Checkout Page: Use an “order bump” – a simple, one-click offer presented directly on the checkout form – to add a low-cost, high-margin item.
Post-Purchase: Use the “thank you” page or follow-up emails to offer a special discount on a related product.
Implementing effective upsells and order bumps is the fastest way to increase AOV. StoreGrowth’s one-click order bump module allows you to add irresistible offers directly on your checkout page.
A complete suite of tools can help you implement these powerful tactics. Plugins like StoreGrowth are designed to seamlessly integrate upselling and cross-selling into your store.
4.2 Implementing Smart Pricing Tiers and Packages
Product Bundling
Group several related products together and offer them at a discounted price compared to buying each item individually. This increases the perceived value and encourages larger purchases.
Volume Discounts
Offer tiered pricing that rewards customers for buying in bulk (e.g., “Buy 2 get 10% off, Buy 3 get 15% off”).
Step 5: Utilize Email Marketing
Email marketing is a powerful channel for building customer relationships and driving repeat purchases. In Digital Marketing, email marketing has always consistently delivered one of the highest ROI.
5.1 How to Build and Segment Your Email List
Capture Emails: Use pop-ups to offer a discount in exchange for an email address. Add a simple, GDPR-friendly checkbox at checkout to let customers opt-in to your newsletter.
Segment Your Audience: Group your subscribers based on their purchase history, browsing behavior, or demographics. This allows you to send highly relevant and personalized messages.
Depicter also makes it simple to grow your email list by creating eye-catching opt-in forms and popups. Instead of plain signup boxes, you can design engaging visuals that capture more leads and boost your WooCommerce email marketing results.
5.2 Setting Up Automated Email Workflows
Automation gives you the ability to talk directly with your prospects without all the manual work. By having a solid email automation system, you nudge the customers at the perfect time for them to take measurable actions.
Welcome Series: Send a series of emails to new subscribers, introducing your brand and offering a first-time purchase incentive.
Abandoned Cart Recovery: Automatically email customers who leave items in their cart, reminding them to complete their purchase. Including a small discount in the third email can be highly effective.
Post-Purchase Follow-up: Send order confirmations, shipping updates, and a request for a product review a week or two after delivery.
5.3 Running Effective Promotional Campaigns
Use your email list to announce sales, new product launches, and personalized offers based on a customer’s past purchases.
Create a sense of exclusivity by giving your email subscribers early access to sales or special list-only discounts.
5.4 How to Measure the ROI of Your Email Marketing
Track key metrics for each campaign, including open rate, click-through rate (CTR), and, most importantly, the conversion rate and revenue generated per email.
Tools like MailPoet or weMail can track this directly in your WordPress dashboard.
Step 6: Speed Up Your WooCommerce Store
In e-commerce, every second counts. If your pages take too long to load, you risk losing both users and visibility in search results.
6.1 Why Site Speed and Core Web Vitals Matter for Sales
Website speed plays a key role in delivering a smooth user experience and boosting SEO performance. Even a 0.1 second improvement in page load speed can boost conversions by 8.4%.
Google’s Core Web Vitals (LCP, INP, CLS) are metrics that measure the real-world user experience of your site, and they directly impact your rankings.
6.2 Key Optimization Tactics: Hosting, Caching, CDNs, and Code Cleanup
A fast, smooth shopping experience isn’t just nice to have, it directly impacts conversions and search rankings. By focusing on key technical optimizations like hosting, caching, CDNs, and code cleanup, you can keep your WooCommerce store running at peak performance.
High-Performance Hosting: Choose a managed WooCommerce host that offers server-level caching and HTTP support.
Caching: Use a caching plugin like WP Rocket to create static versions of your pages, reducing server load and speeding up delivery.
Content Delivery Network (CDN): A CDN stores copies of your assets (images, CSS, JS) on servers around the world, delivering them to users from the closest location.
Code Minification: Remove unnecessary characters from your CSS and JavaScript files to reduce their size.
Image Optimization: Compress images and use modern formats like WebP. Use lazy loading so images outside the initial view load only when visitors scroll down.
6.3 Mobile Optimization: Creating a Seamless Shopping Experience
With mobile commerce projected to account for 59% of all e-commerce sales in 2025, a flawless mobile experience is essential.
Use a Responsive Theme: Ensure your theme automatically adjusts to fit any screen size.
Simplify Navigation: Use a “hamburger” menu and ensure buttons are large enough (at least 44px) to be easily tapped.
Avoid Intrusive Pop-ups: Pop-ups that are difficult to close on a small screen can be a major source of frustration.
6.4 Specific Strategies for Checkout Speed Optimization
The checkout page needs to be as fast and light as possible.
Minimize Scripts: Limit the number of scripts and third-party integrations loading on the checkout page.
Use Lightweight Payment Gateways: Some payment gateways are lighter and faster than others. Test their impact on performance.
6.5 Continuous Performance Monitoring and Maintenance
Performance optimization is an ongoing process. Regularly monitor your Core Web Vitals and run speed tests to catch issues before they impact your sales.
Bonus: Advanced Strategies to Drive Even More Growth
7.1 Setting Up Google Analytics 4 for Enhanced E-commerce Tracking
Google Analytics 4 (GA4) provides deep insights into how users interact with your store. Use a plugin like ExactMetrics to easily set up enhanced e-commerce tracking, which allows you to monitor user lifetime value, funnel performance, and more without writing any code.
7.2 Using Heatmaps to Understand User Behavior on Your Store
Heatmaps are visual representations of where users click, move their mouse, and scroll on your site.
Tools like Hotjar or Microsoft Clarity can reveal which elements are getting attention and which are being ignored, providing invaluable insights for A/B testing and design improvements.
7.3 Integrating a CRM with WooCommerce for a 360-Degree Customer View
Integrating an email and SMS marketing platform that functions as a Customer Relationship Management (CRM) solution, like weMail or Omnisend, allows you to consolidate all customer data in one place. This enables highly personalized marketing based on a complete view of every interaction a customer has had with your brand.
7.4 Building Your Essential WooCommerce Plugin Stack
Beyond a great theme and an SEO plugin, your stack should include:
A Performance Plugin: A tool like WP Rocket for caching and file optimization.
An Analytics Plugin: A tool like MonsterInsights or ExactMetrics for easy GA4 integration.
A Sales Booster Plugin: A multi-functional sales booster plugin like StoreGrowth that handles CRO tactics like urgency timers, social proof notifications, and upsells.
Frequently Asked Questions (FAQ)
Q: How long does it take to see results from these WooCommerce optimization strategies?
The timeline for results varies. Technical changes like improving site speed can show an impact on user engagement and bounce rates within days.
SEO strategies typically take 3-6 months to yield significant results in organic traffic. CRO tactics like A/B testing can produce measurable lifts in conversion rates within a few weeks, depending on your traffic volume.
Q: What is the single most important metric to track for boosting WooCommerce sales?
While all metrics are important, the Conversion Rate is arguably the most critical. It directly measures how effectively your store turns visitors into paying customers.
Improving your conversion rate means you’re getting more value from the traffic you already have, making it a powerful lever for growth.
Q: Can I implement these strategies if I’m not a technical expert?
Absolutely. Many of these strategies can be implemented using user-friendly plugins. For SEO, plugins like AIOSEO or Rank Math guide you through the process.
For CRO and AOV, WooCommerce plugins like StoreGrowth are designed to add advanced features like countdown timers and upsells without any coding required. For site speed, caching plugins like WP Rocket automate much of the optimization process.
Q: Should I focus on acquiring new customers or retaining existing ones?
Both are important, but retaining existing customers is often more cost-effective. It can cost 5 to 25 times more to acquire a new customer than to keep a current one.
Strategies like email marketing, loyalty programs, and excellent customer service (covered in Step 5) are key to increasing Customer Lifetime Value (CLV) and building a sustainable business.
Conclusion: Your Roadmap to Sustainable E-commerce Growth
Boosting your WooCommerce sales is a marathon, not a sprint. It requires a strategic and continuous cycle of auditing, optimizing, testing, and refining. By building a strong technical foundation, understanding the psychology of your customers, and leveraging the right tools, you can create a powerful engine for sustainable growth.
Each step in this guide – from speeding up your site and mastering SEO to optimizing your checkout and nurturing customer loyalty – is a crucial piece of the puzzle. Implementing these strategies will not only increase your conversions but also build a resilient business that thrives in the competitive e-commerce landscape.
Ready to implement these powerful conversion tactics without touching a line of code? StoreGrowth ties it all together with urgency timers, social proof, and a frictionless checkout, so you can focus on growing your store.
Want more expert WooCommerce tips delivered straight to your inbox? Join our newsletter and get exclusive guides, strategies, and updates.
In this guide, we’ll show you how to grow newsletter subscribers using proven, actionable strategies that work for both beginners and seasoned marketers.
Growing your newsletter subscriber list is one of the most effective ways to build a loyal audience and generate consistent engagement for your brand.
But first, let’s clarify what a newsletter actually is: it’s a recurring email that delivers valuable content, updates, or offers directly to your audience’s inbox, helping you stay top-of-mind and build lasting relationships.
While social media platforms can be useful for reaching new people, email marketing gives you a direct line to your audience, without the limitations of algorithms or third-party platforms.
Unlike casual website visitors, email subscribers have already shown interest in your content, products, or services. This means they’re far more likely to read your updates, engage with your offers, and eventually become paying customers.
Whether you’re starting from scratch or looking to scale your list, these tips, combined with the tools that Depicter Popup Builder provides, will help you attract more subscribers and keep them engaged for the long term.
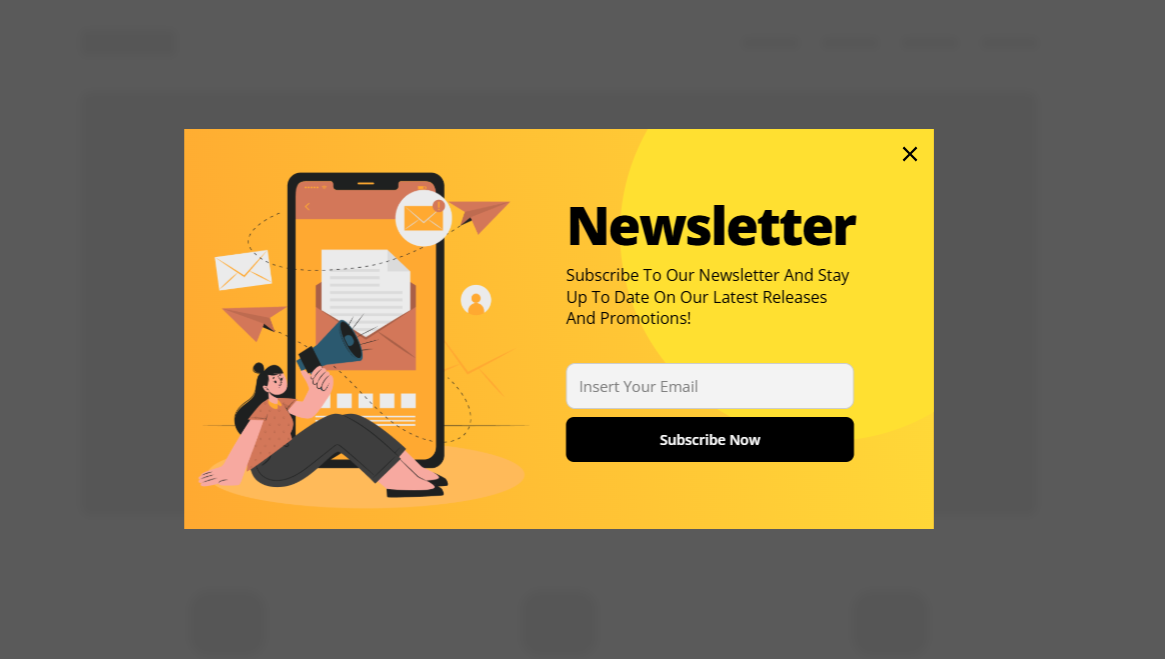
Use High-Converting Popups
Popups are one of the fastest and most effective ways to turn visitors into subscribers. The key is using the right type of popup at the right time so you capture attention without being disruptive.
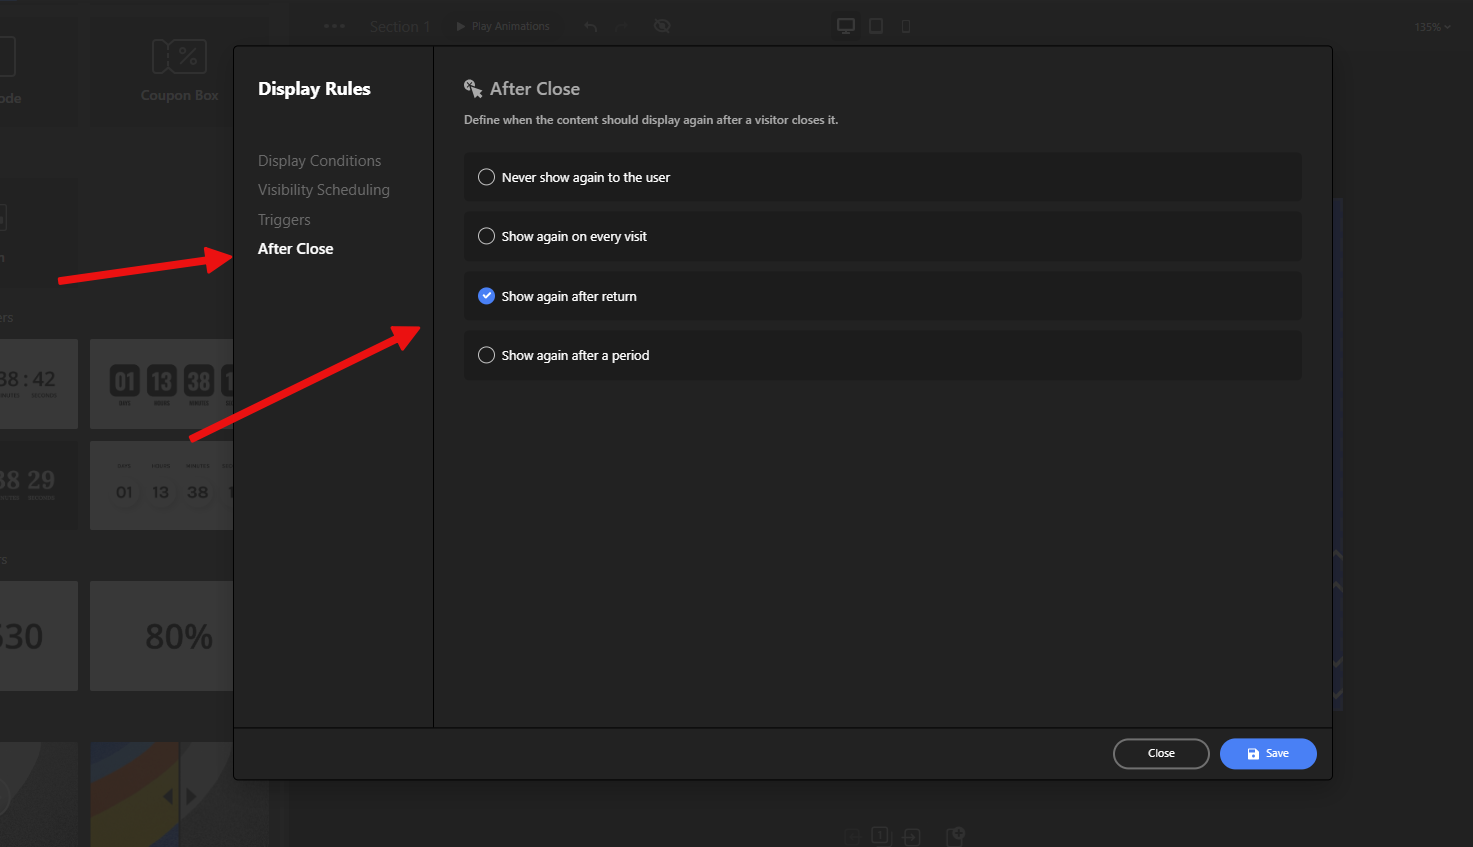
These appear when a visitor is about to leave your site, giving you one last chance to capture their interest. They work well for offering discounts, free resources, or exclusive content in exchange for an email address.
These popups appear after a visitor has scrolled a certain percentage down the page. They target people who are already engaged with your content, increasing the likelihood they’ll subscribe.
Triggered after a visitor has been on your site for a set period, these give people time to browse before asking for their email. This approach feels less pushy and can result in higher conversion rates.
Instead of showing a form right away, these popups use a button or link that, when clicked, reveals the signup form. This small “micro-commitment” increases engagement and can lead to more signups.
With Depicter, you can easily create and customize all of these popup types without coding — and match them perfectly to your brand’s style.
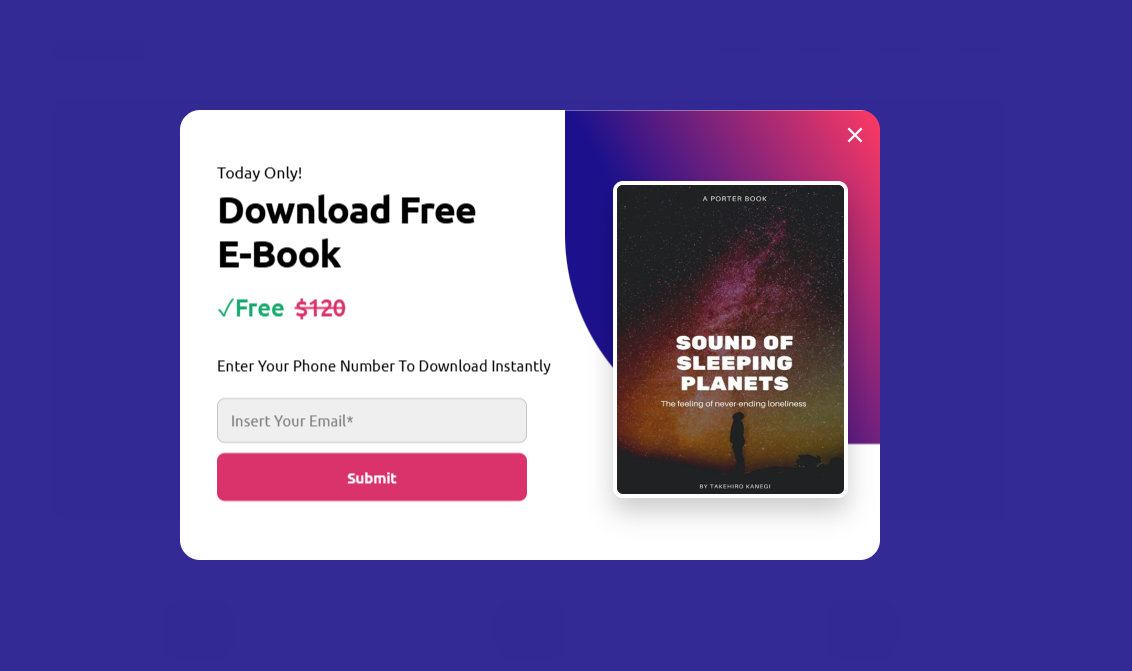
Offer a Valuable Lead Magnet
Visitors are much more likely to give you their email address if they’re getting something valuable in return. A lead magnet is that value, and it can make a huge difference in your signup rate.
Ebooks and Guides
A free downloadable guide on a relevant topic can position your brand as an expert and give subscribers something they can immediately use.
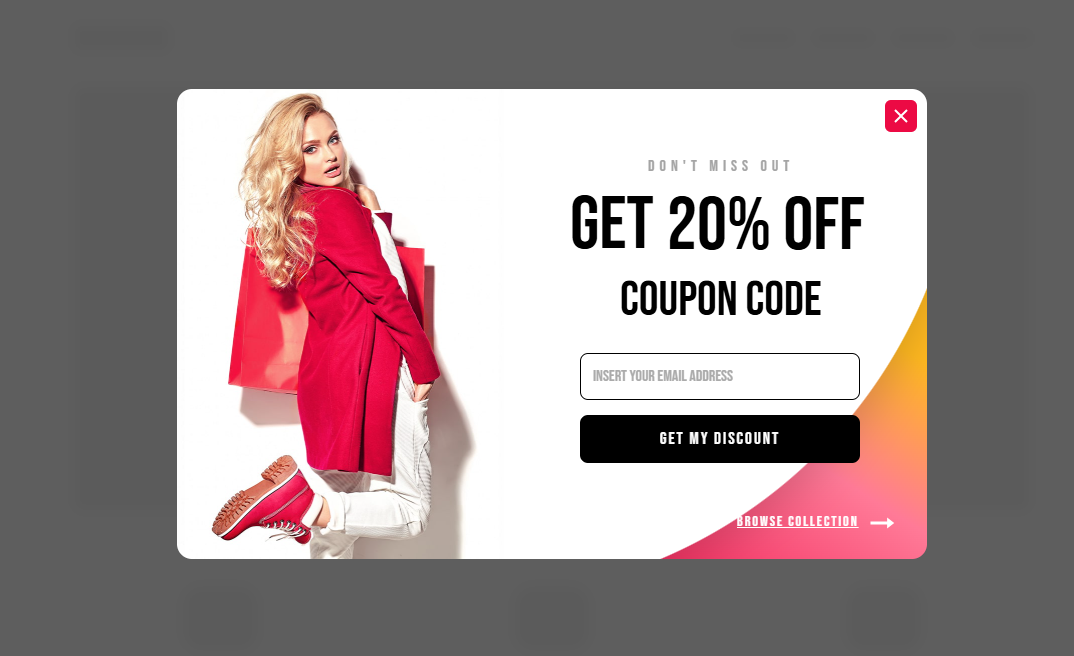
Discount Codes or Special Offers
If you’re in eCommerce, offering a discount in exchange for an email is one of the most effective tactics. It works especially well in welcome or exit-intent popups.
Mini Email Courses
Delivering a short email course over a few days is a smart way to build trust. It keeps new subscribers engaged and gives them ongoing value right after signing up.
Depicter makes it easy to promote and deliver lead magnets. You can design high-converting popups, automatically trigger downloads or redirect users after they sign up, and make every offer feel personalized.
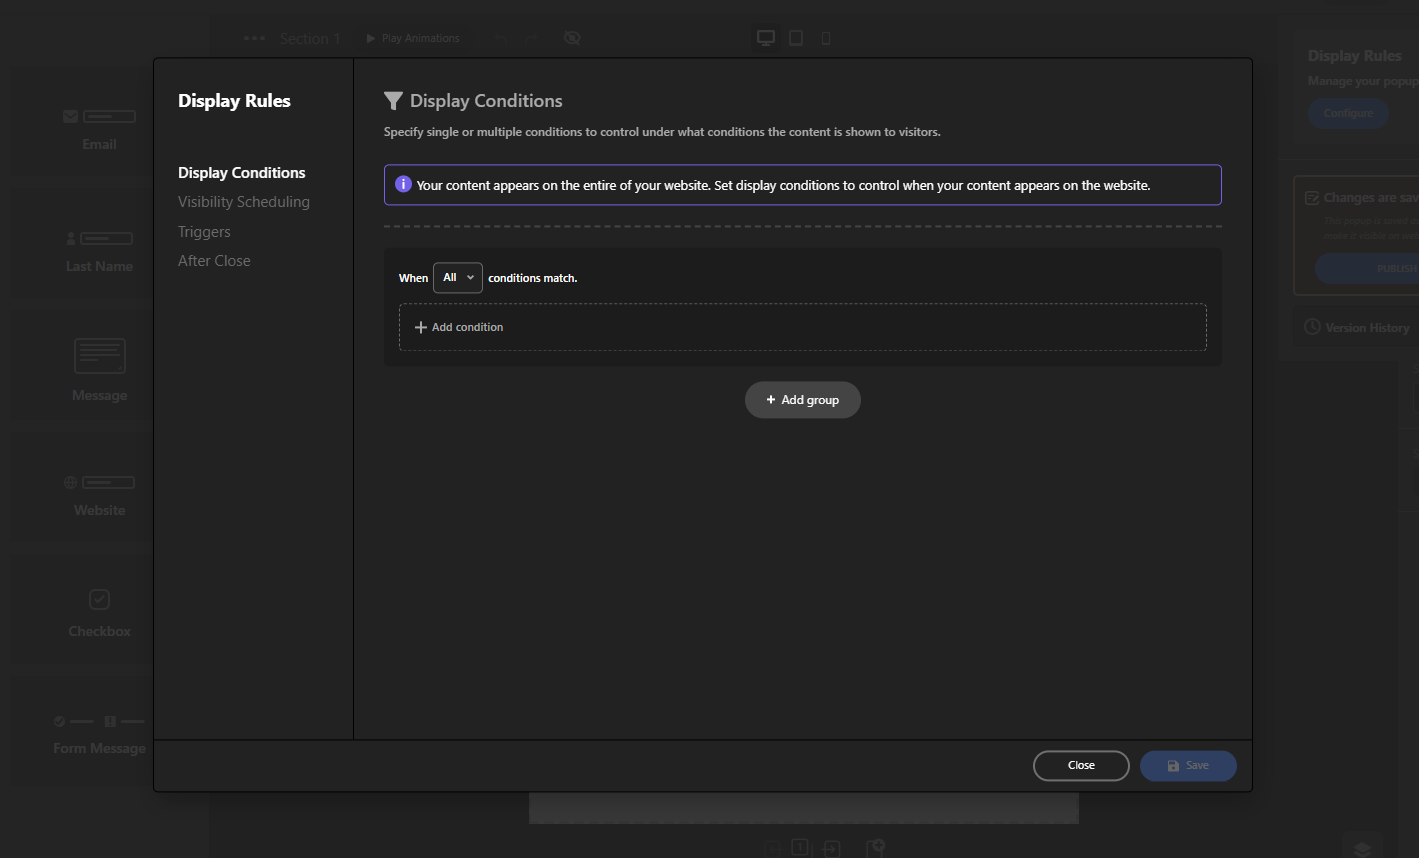
Create Targeted Offers With Display Rules
Not every visitor is the same. So why show everyone the exact same popup? By creating targeted offers based on user behavior or conditions, you can show more relevant messages and significantly improve your signup rates.
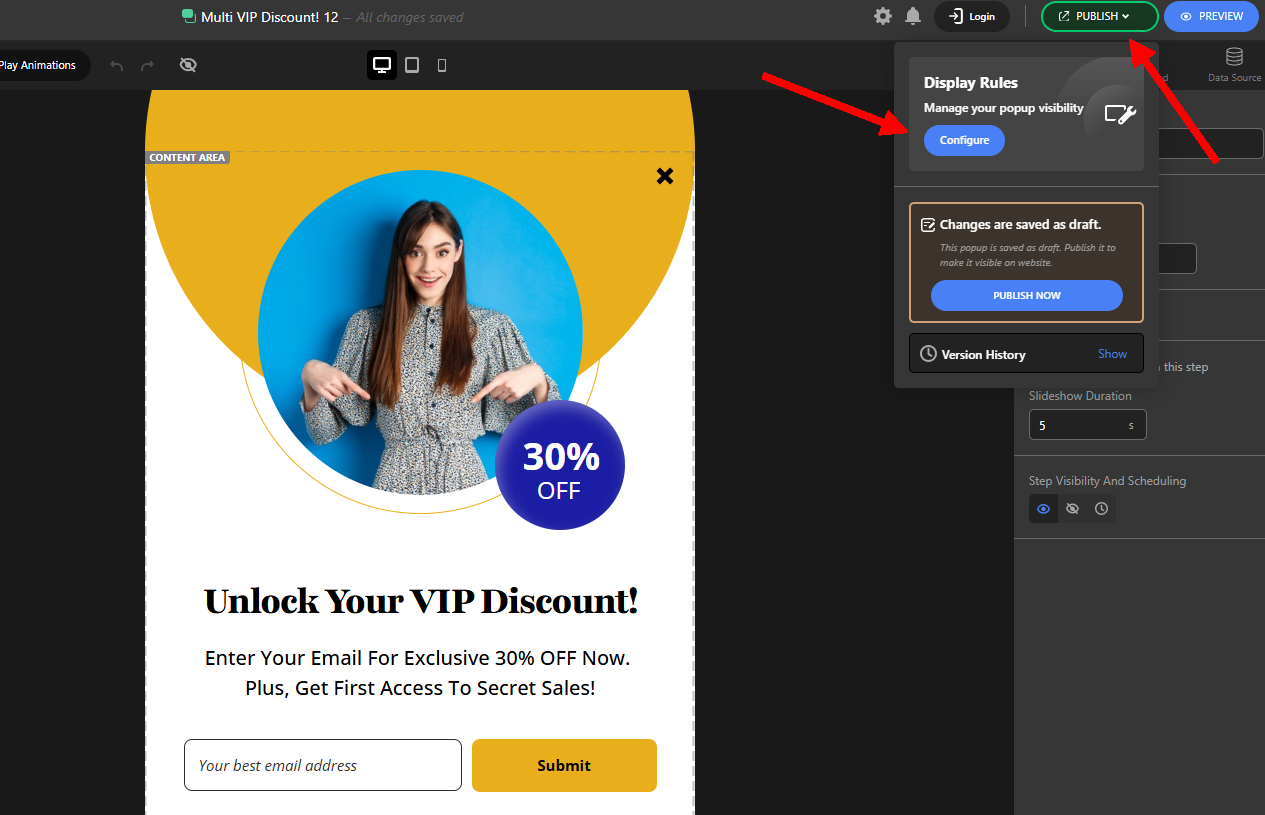
In Depicter, targeting options are available under the Display Rules panel. To access them:
Open your popup project in the Depicter editor
Click on the Publish Button tab in the right-side panel
Under the Display Rules section click on the Configure button
This gives you full control over who sees what, when, and how, without writing a single line of code.
Here are some of the most useful targeting rules:
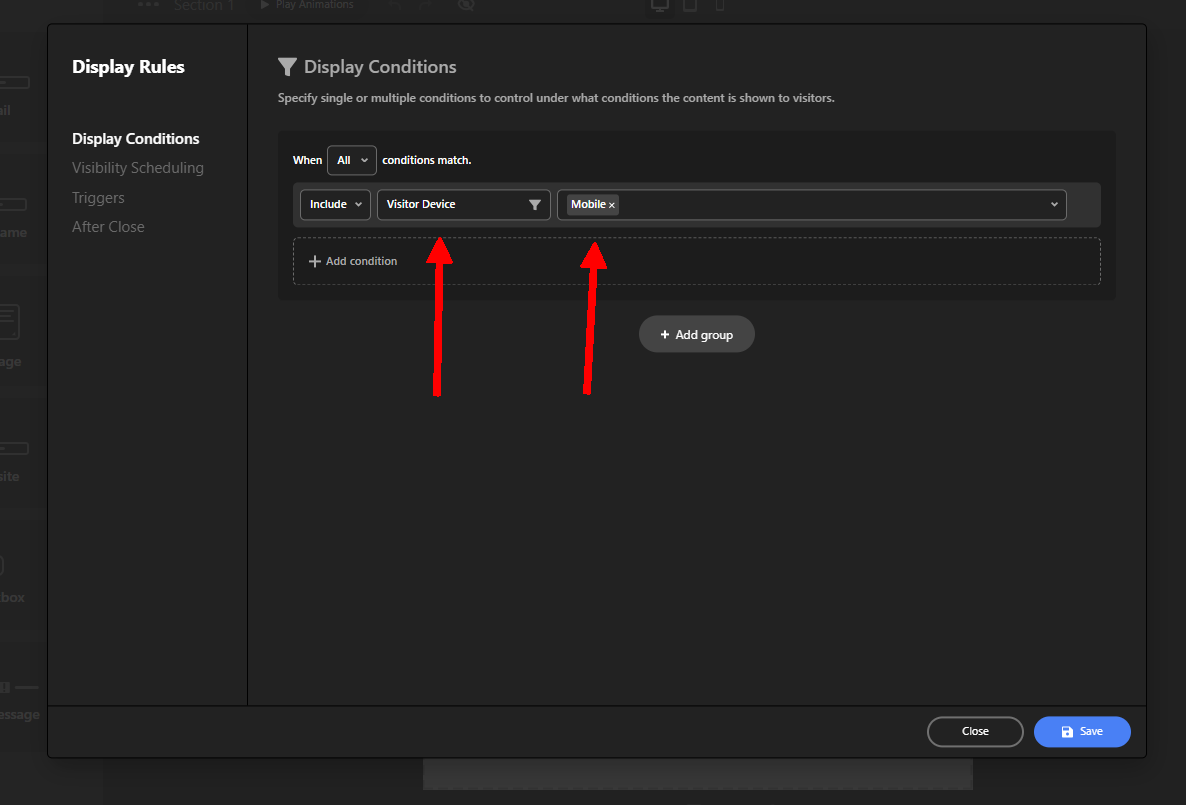
Device Type Targeting
You can choose to show different popups on mobile, tablet, or desktop devices. This ensures that your design and message fit perfectly on every screen and don’t disrupt the mobile experience.
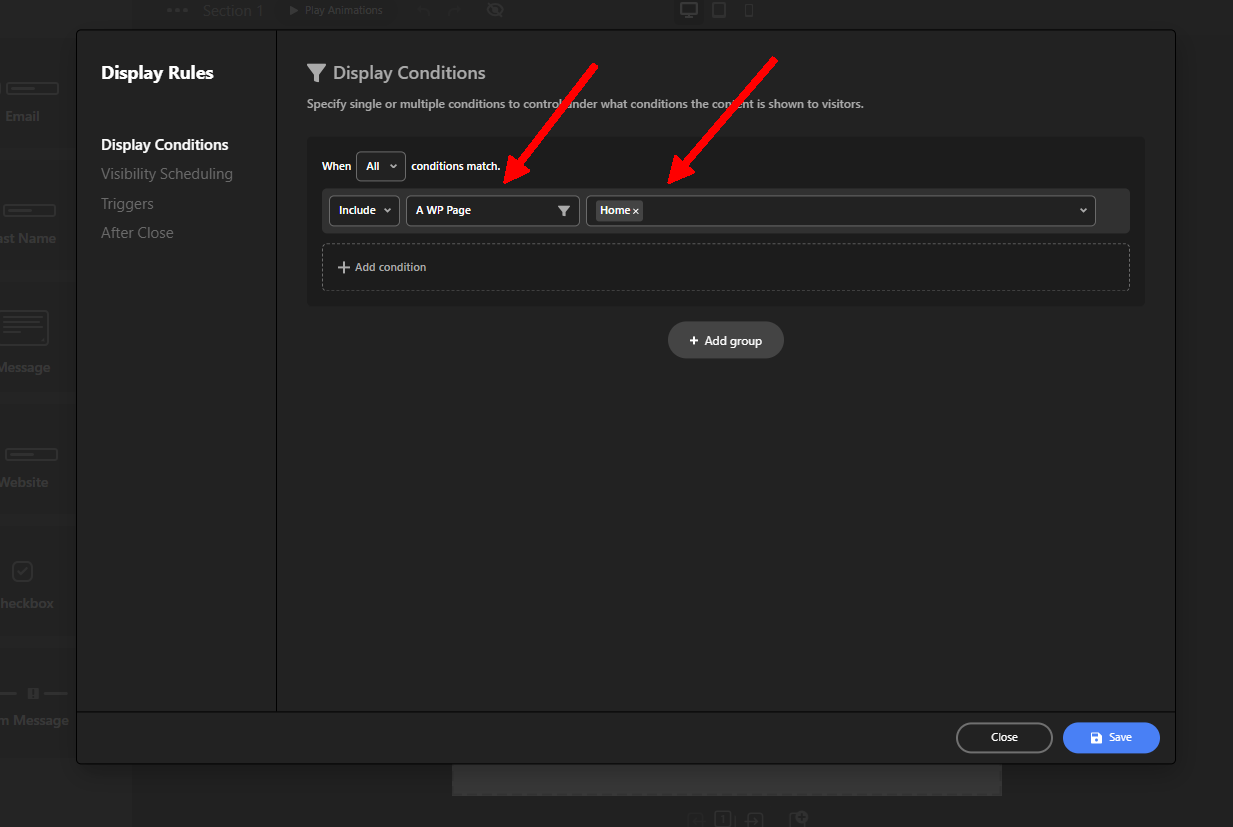
URL-Based Targeting
Display your popup only on specific pages or paths. This is great when you want to offer content that’s relevant to a specific product, blog post, or landing page.
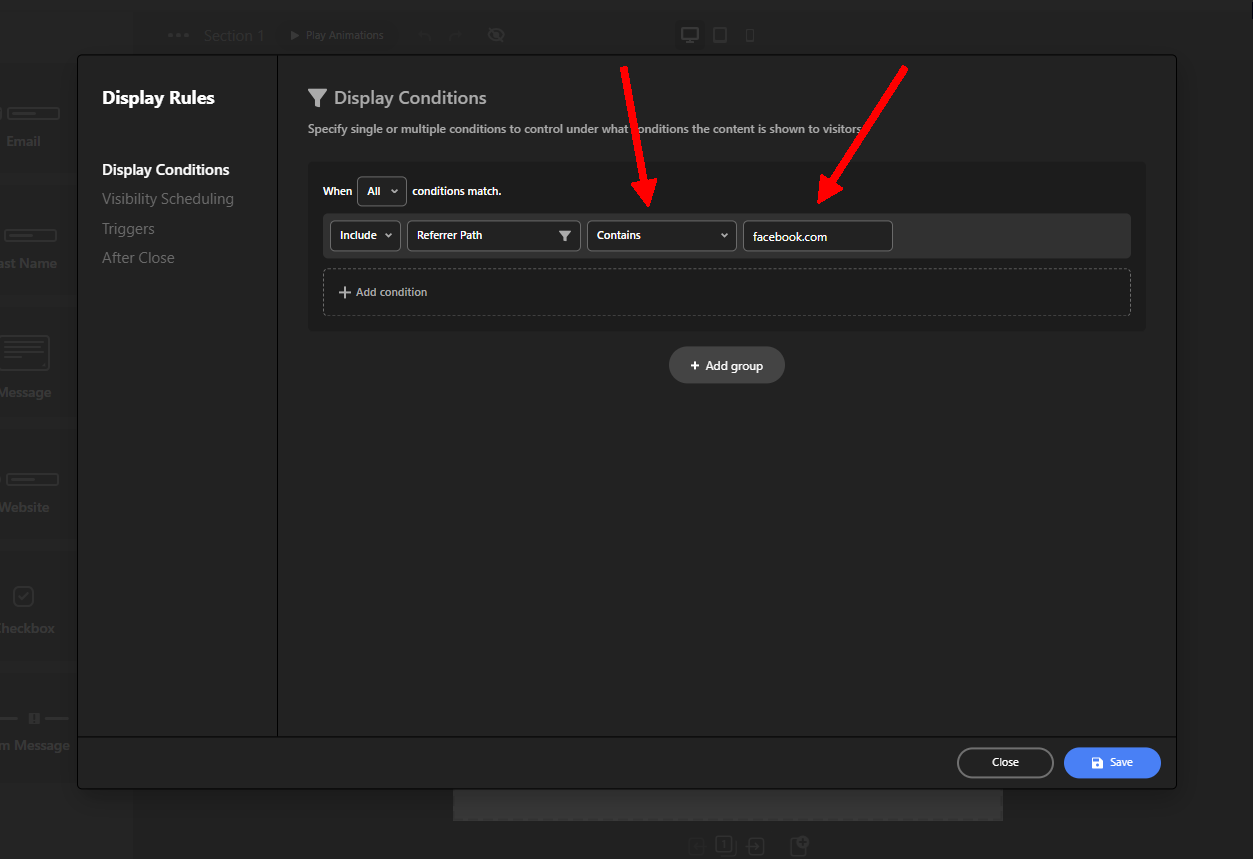
Referral Source Targeting
You can set a popup to appear only if the visitor comes from a certain source (like Facebook, Google Ads, or an affiliate link). This allows you to customize your message based on where the visitor came from.
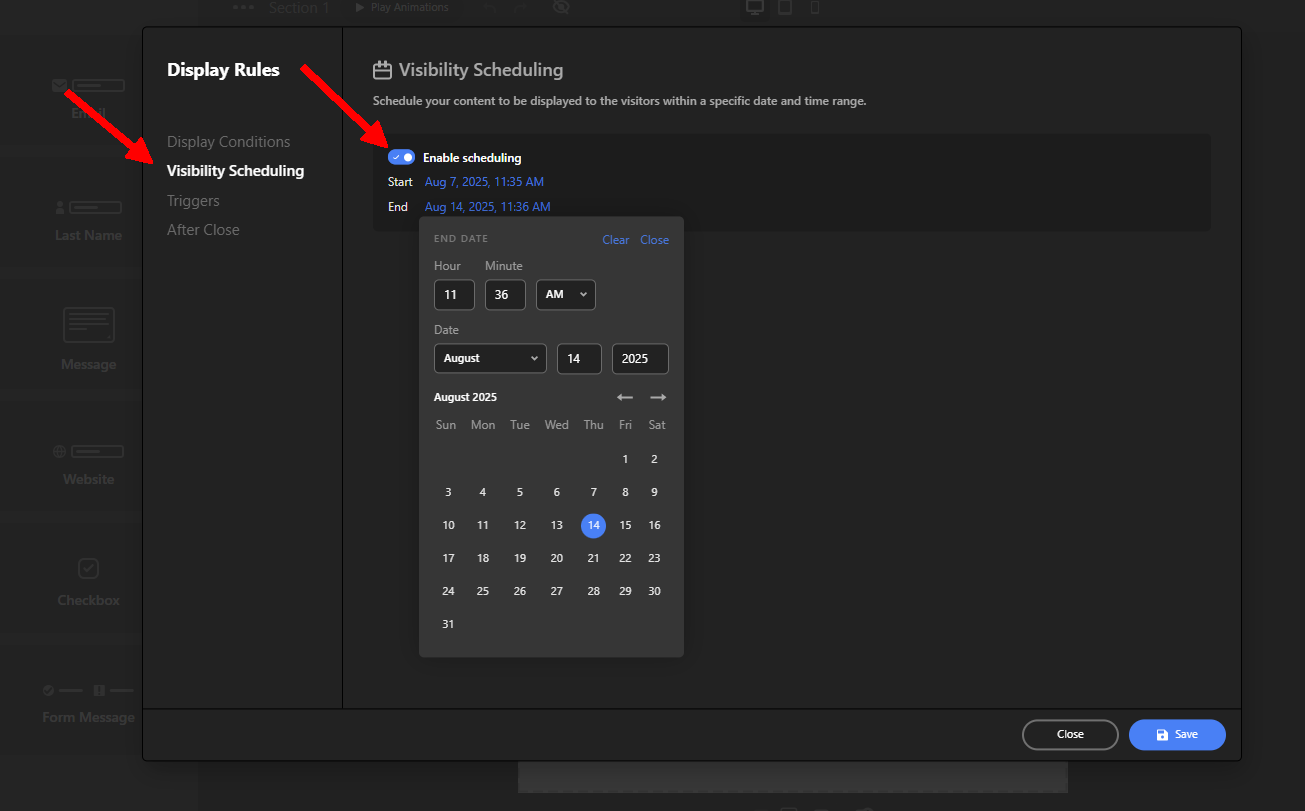
Time or Date Scheduling
Schedule your popup to appear only during specific times of day, days of the week, or within a defined date range.
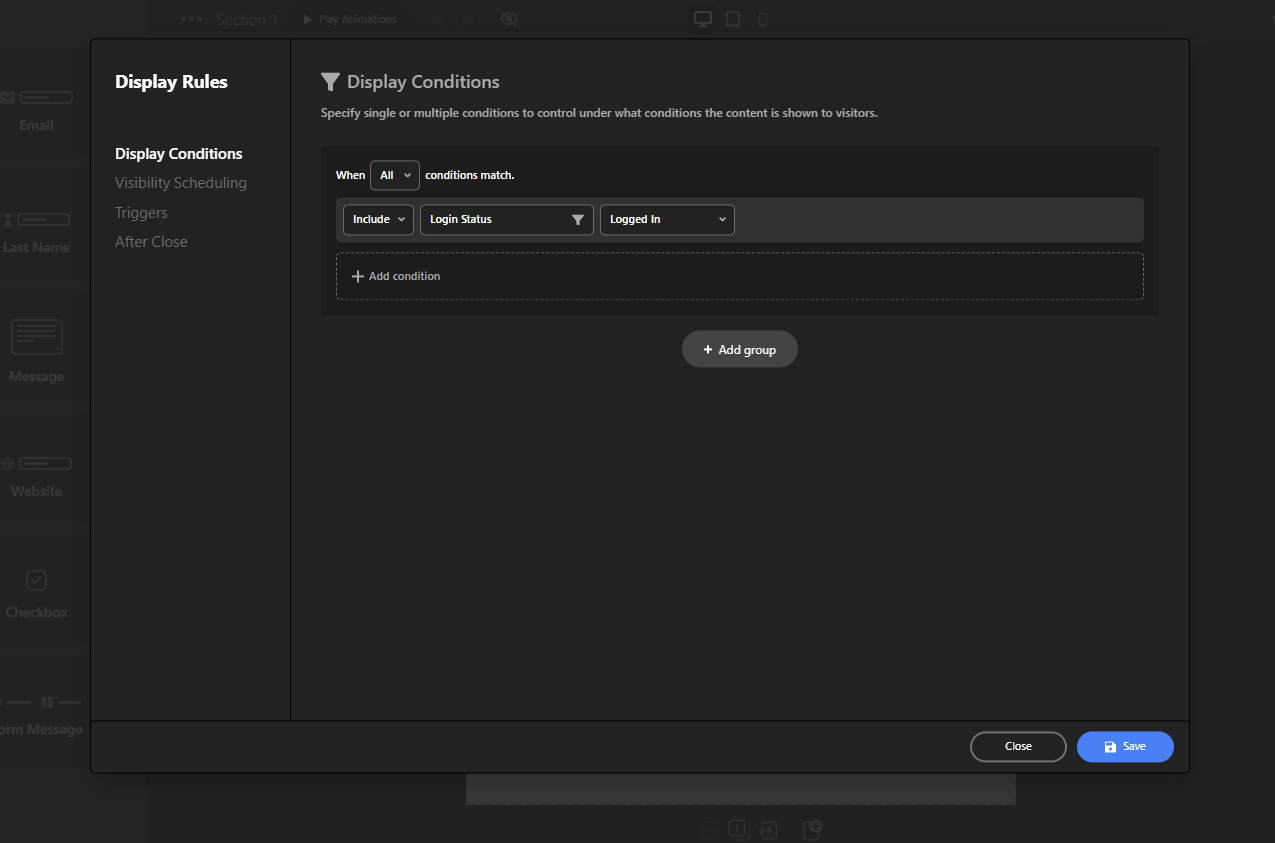
Logged-in vs. Guest Users
Target users based on whether they’re logged into your website or not. This is especially useful for membership sites, online stores, or any platform with registered users.
With Depicter’s Display Rules, you don’t have to settle for one-size-fits-all messaging. Instead, you can build smarter, more personalized experiences — and turn more visitors into subscribers, based on exactly who they are and what they need.
Bonus: Newsletter Content Ideas That Keep Subscribers Engaged
Getting someone to subscribe to your newsletter is just the first step — keeping them engaged is where the real value comes in. Consistent, relevant, and interesting content helps you build trust, drive traffic, and increase conversions over time.
Here are a few tried-and-true content types to include in your email newsletter strategy:
Tips & How-To Guides
Practical advice related to your audience’s interests keeps your emails useful. Whether it’s a short tip or a full guide, educational content builds trust and positions you as an expert.
Product Updates or Feature Highlights
Let subscribers know what’s new with your product or service. This keeps your community informed and makes sure they’re aware of features they might not be using yet.
Exclusive Offers or Discounts
Send limited-time deals or subscriber-only promo codes. People love feeling like insiders — and this type of email often leads to quick conversions.
Organized Content
Share a roundup of interesting blog posts, videos, or tools your audience would find valuable — even if they’re not yours. This shows you understand their interests and adds value without being overly promotional.
Behind-the-Scenes Updates
Let your audience in on what’s happening inside your brand — upcoming projects, team moments, lessons learned. It adds personality and builds deeper connections.
Community Highlights
Feature user stories, testimonials, or showcase how customers are using your product. This adds social proof and shows appreciation for your audience.
Event or Webinar Invitations
If you’re hosting (or joining) an event, invite your subscribers. It’s a great way to move the relationship from passive reading to active participation.
Ask for Feedback or Input
Use your newsletter to ask readers what they want next — whether it’s a new feature, content idea, or product improvement. This makes them feel heard and involved.
Sample Newsletter Email
Subject: Quick Win: 3 Ways to Improve Your Homepage Engagement
Body:
Hi [First Name],
Want more visitors to stick around on your homepage? Here are 3 quick strategies you can try today:
Add a strong headline — Make sure it’s clear who you help and what problem you solve.
Use a visual popup — Highlight a lead magnet or limited-time offer using Depicter to draw attention.
Simplify your layout — Remove distractions and guide users toward one clear action.
Want more website tips like this? Stay tuned — we’ve got a full guide coming next week.
To your success, The [Your Brand] Team
Conclusion
Growing your newsletter subscriber list doesn’t have to be complicated, but it does require the right tools and strategies. By using targeted popups, valuable lead magnets, personalized display rules, and engaging newsletter content, you can turn casual visitors into loyal subscribers and long-term customers. The Depicter Popup Builder makes the whole process easier, more effective, and fully customizable — no coding required.
Start small, test consistently, and focus on providing value at every step. Your list will grow faster than you think.
FAQs
What is a newsletter and why is it important?
A newsletter is a recurring email sent to your subscribers that includes updates, promotions, or valuable content. It’s important because it helps build trust, drive traffic, and create long-term engagement with your audience — without relying on social media algorithms.
How do I start growing my newsletter subscribers?
Start by offering a clear incentive (like a discount or free guide), use a high-converting popup (like exit-intent or scroll-triggered), and make sure the signup process is simple. Depicter makes it easy to do all of this visually and without code.
What makes a good lead magnet?
A good lead magnet solves a specific problem or delivers quick value — examples include ebooks, checklists, discount codes, or free mini-courses. It should feel relevant and desirable to your target audience.
How can I personalize my popups?
Using Depicter’s Display Rules, you can show different messages based on device type, referral source, logged-in status, page URL, and more. This helps make each visitor’s experience more relevant and effective.
How often should I send newsletters?
There’s no one-size-fits-all answer, but once a week is a good starting point. Focus on consistency and value — quality matters more than frequency.
Cold email vs cold call – which one works better in 2025?
It’s a common question for sales teams, marketers, and founders trying to reach new leads. Both strategies still work, but they work in different ways.
Cold emailing is when we send a message to someone we’ve never contacted before. It’s easy to scale, cost-effective, and lets people respond on their own time.
On the other hand, cold calling is more direct. It gives us real-time feedback and a chance to build trust instantly if the prospect answers.
In this post, we’ll break down the numbers, pros, cons, and best use cases of both methods. You’ll leave with a clear idea of what works and why.
Is Email Marketing Better Than Cold Calling?
When we compare cold email vs cold call we’re really comparing how modern sales teams start conversations. Both methods still work. But they work differently.
Email gives us reach. We can contact hundreds of prospects a day using smart tools. Cold calling offers real-time feedback. We hear the tone, objections, and interest immediately. One is passive and scalable. The other is active and personal.
In terms of building trust and email feels safer. It gives the reader space. They can click a link, check our site, or forward it to their team. A call feels direct. It can build trust fast or lose it just as quickly.
Here’s a quick comparison between cold email and cold calling:
Factor
Cold Email
Cold Call
Scalability
High (100s per day with tools)
Low (manual, one-by-one)
Response Rate
8–20% (with strong personalization)
2–5% pick-up rate, but higher conversions
Interruptive
No
Yes
Cost
Low (email tools + domains)
Medium (tools, reps, call time)
Best For
SaaS, B2B services, agencies, consultants
Recruitment, real estate, insurance
Follow-Up Strategy
Easy to automate follow-up email sequence
Requires manual callbacks or CRM setup
For example, a sales prospecting email in a SaaS company might spark interest after two touches. A recruiter might still rely on phone calls to close faster.
So, is email marketing more effective than cold calling? It depends on the goal. If you want scale, low cost, and flexibility then email wins. If you want speed and real-time objections then the phone still holds power.
Let’s break that down further below.
Why Is Email Marketing King?
We’re big fans of cold email. And there’s a reason many modern sales teams rely on it.
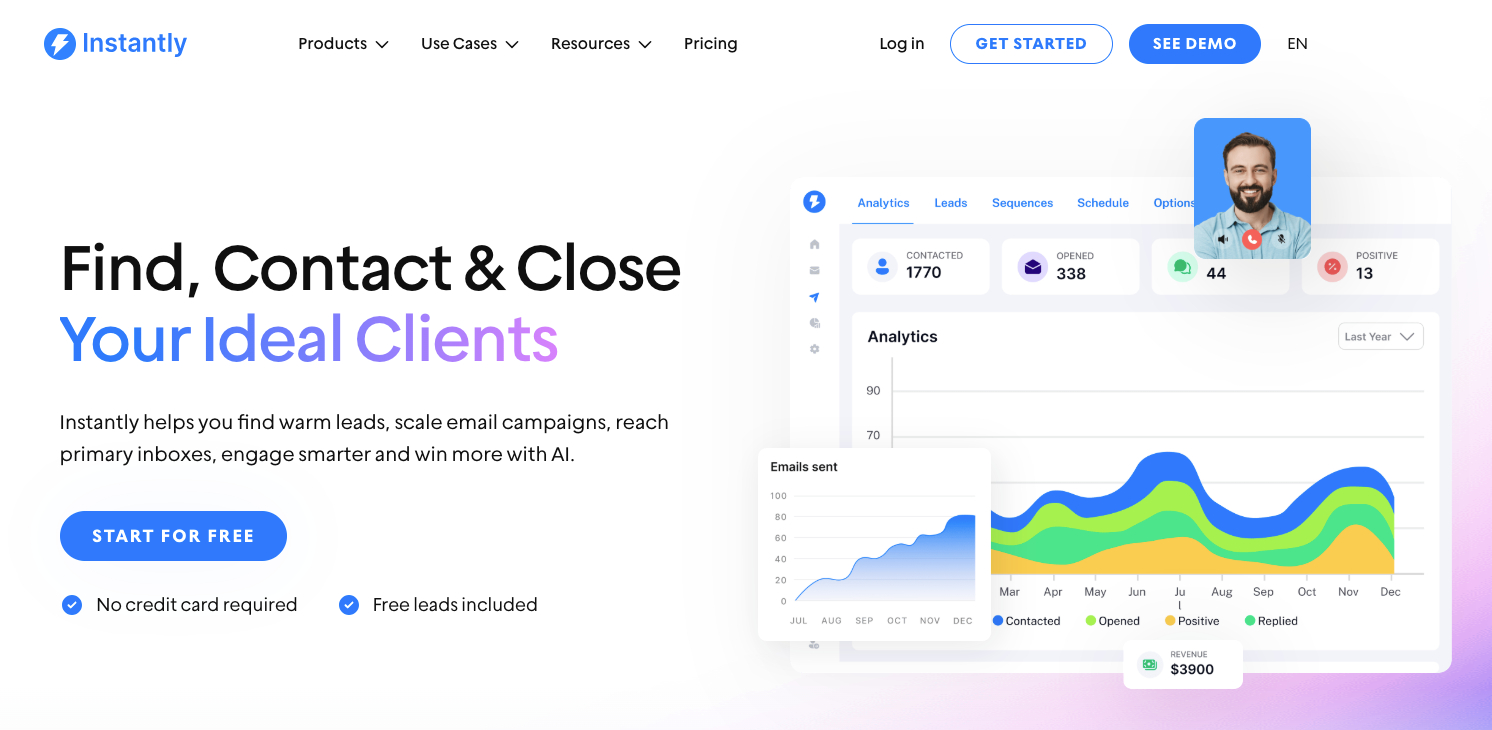
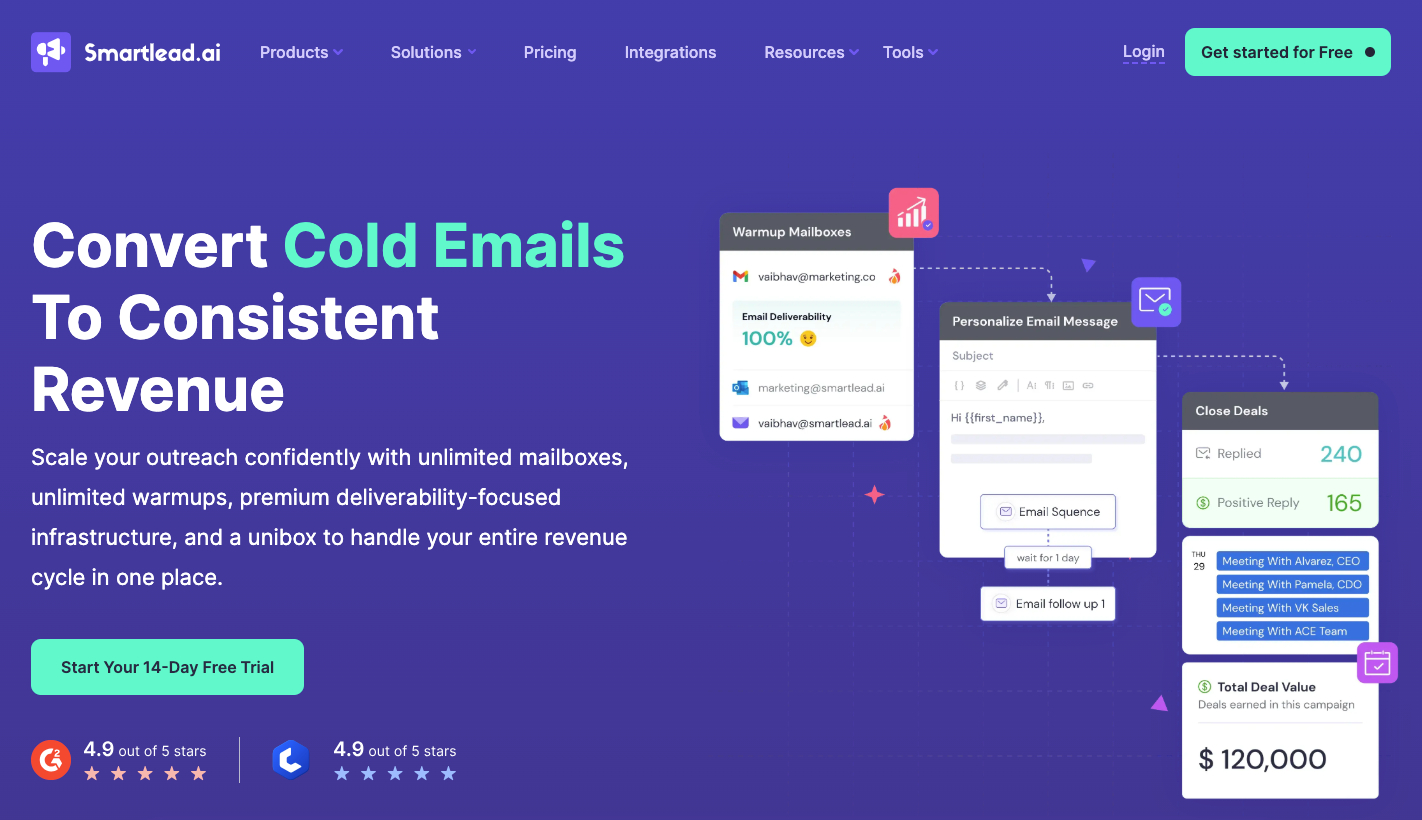
First, it scales fast. We can reach hundreds of leads with personalized cold emails using tools like Instantly or Smartlead. These tools use smart sending rules and help avoid spam filters.
Second, it gives high ROI. According to Campaign Monitor’s 2025 B2B ROI report, email delivers up to $36 for every $1 spent. That includes cold email sequences in outbound campaigns.
Third, it’s low-pressure. People can read your email, click the link, or forward it. You’re not forcing a decision at the moment. That helps build trust. Works great in B2B.
And most importantly you control the pace. You can stay top of mind without being pushy with smart follow-ups. That’s something phone outreach can’t always do.
Is Email Marketing the Future?
Cold calling is getting harder. People don’t answer unknown numbers. Some get annoyed when you interrupt their day.
That’s why cold emailing vs cold calling is tilting in favor of email in 2025.
Here’s what’s changing:
AI-personalized emails are faster and better than ever.
Smart cold email sequences adapt based on opens and replies.
Inbox warmup tools keep domains healthy and out of spam.
Gen Z and younger buyers often prefer asynchronous communication.
According to LinkedIn’s B2B Buyer Report, 65% of buyers prefer email as the first point of contact. That number is up from 51% in 2022.
Phone outreach still has a place but email is leading the way for most B2B teams in 2025.
Should I Email or Cold Call First?
This is the question we get all the time: Should I email first or just pick up the phone and call?
When we look at cold email and cold calling, the answer isn’t one-size-fits-all. It depends on the industry, the type of offer, and the personality of the buyer you’re reaching out to.
If you’re selling something simple and fast-moving like a local service then cold calling might work better. But email outreach is better for high-ticket B2B offers. It gives prospects time to think, click, and forward the message internally.
In many cases, the best move isn’t choosing one over the other rather it’s using both. A multichannel outreach strategy gets higher response rates than using just one channel alone.
Here’s how you can do it:
Start with a personalized cold email.
Follow up with a short call after 2–3 days.
Use LinkedIn to add a soft touchpoint.
Repeat the process until we get a clear yes or no.
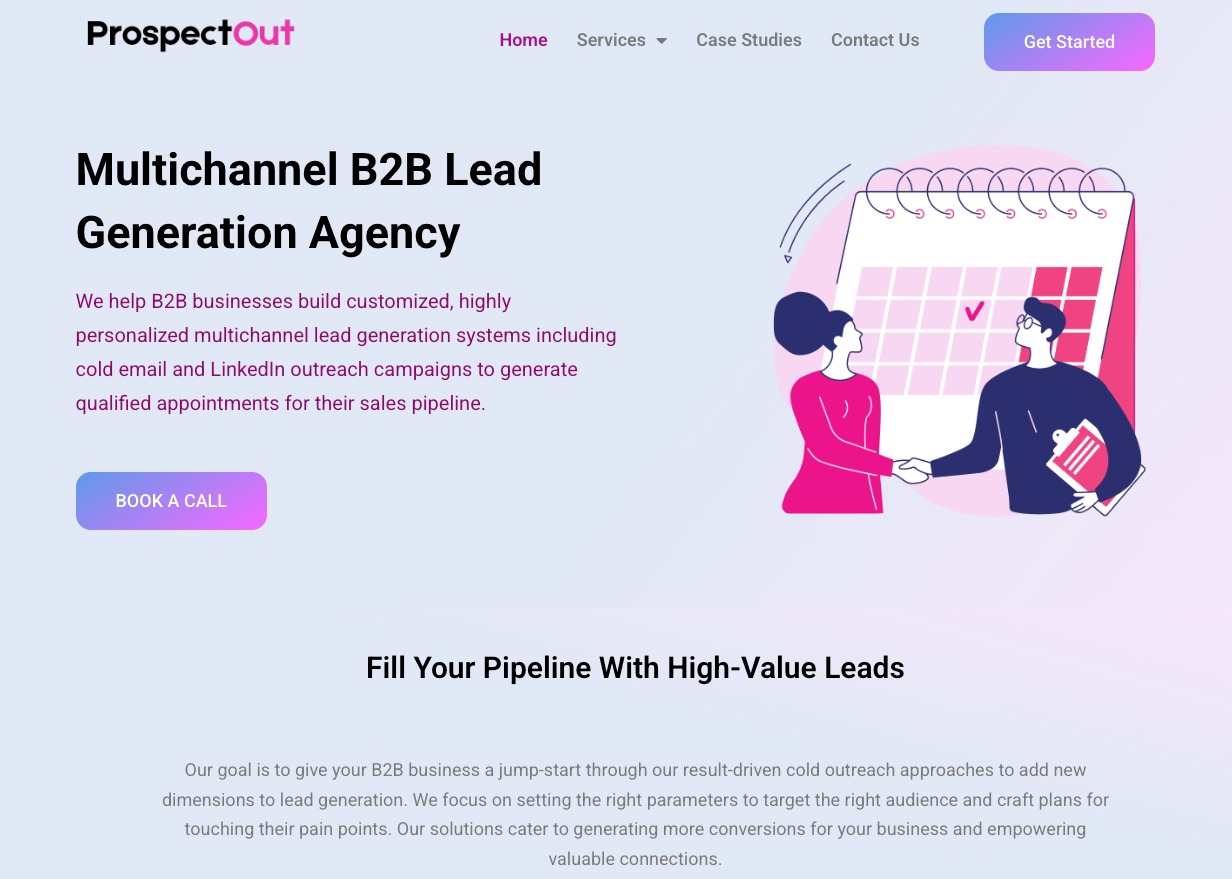
You can also contact a professional B2B cold outreach company like Prospectout. They helps B2B companies book more qualified meetings through cold email.
Phone Call vs Email Statistics
Data helps us decide what works best when comparing phone call vs email outreach.
In 2025, here’s what recent studies show:
Metric
Cold Email
Cold Call
Open Rate
45–60% (with a good subject line)
N/A
Cold Email Response Rate
8–20%
N/A
Cold Call Pick-Up Rate
2–5%
2–5%
Cold Call Success Rate
1–3% conversion to meeting
1–3%
Touchpoints to Book a Call
5–9 (avg. for B2B)
5–9 (multi-channel works best)
Cold emails win on volume and asynchronous communication. But calls still convert better when you manage to connect live.
Tip: Use tools like Instantly for smart email sequences and Aircall for cloud calling to make both easier.
Cold Email vs Cold Call: Pros and Cons Breakdown
Now let’s put it all on one page. Here’s a side-by-side look at the pros and cons of cold email vs cold call. This is done based on our experience, data, and what works in 2025.
Factor
Cold Email
Cold Call
Cost
Low (email tools and domains)
Medium (time, tools, phone)
Speed
Fast to send, delayed replies
Instant feedback if answered
Interruptive
No – they read when ready
Yes – we interrupt their day
Interruptive
No – they read when ready
Yes – we interrupt their day
Response Rate
Medium – varies by subject and timing
High – but only if they pick up
Scalability
Very high – can reach 100s daily
Low – limited to rep availability
Ideal For
B2B SaaS, Agencies, Consultants
Recruiters, Local Businesses, High-ticket Sales
Tools You Need in 2025 for Cold Email and Cold Calling
No matter which channel you prefer — tools make a big difference.
Cold Email Tools
These help you scale without sounding robotic:
Instantly.ai – Smart cold email sending
Smartlead.ai – AI-powered cold email sequences
Lemlist – Personalization at scale
Hunter.io / Apollo.io – Email finder + lead data
Cold Calling Tools
Modern calling isn’t just dialing numbers. These tools help with timing, tracking, and connecting:
Aircall – Cloud phone for sales teams
Dialpad – Business calling with CRM integration
Outreach.io – Full sequencing + call + email
LeadIQ – Enrich phone numbers and build qualified lists
Now, if you’ve decided that cold email is the better fit for your outreach strategy then the next step is setting up the right tools to make it work.
Understand what sales campaigns are and how they help achieve specific business goals.
Learn how to set measurable objectives and align your strategy with your audience’s needs.
Follow a structured approach to launching campaigns with compelling content and timing.
Discover proven promotional tactics like flash sales, referrals, and loyalty programs.
Get practical guidance on using Depicter to build effective popups and notification bars.
Capturing your audience’s attention and converting interest into action is more important than ever. That’s where sales campaigns come in. Whether you’re launching a new product, clearing out seasonal stock, or simply trying to drive more traffic to your website, a well-planned campaign can make all the difference.
But creating a campaign is just the beginning. The real challenge lies in promotion. How do you promote sales in a way that actually drives results? That’s where strategy comes in, and tools like popups and notification bars can be powerful ways to boost visibility and conversions.
In this guide, you’ll learn what makes a successful sales campaign, how to plan one strategically, and how to amplify your results using Depicter.
1. What Is a Sales Campaign?
A sales campaign or sales promotion is a short-term, focused effort that businesses use to boost interest in their products or services and drive more sales within a specific period. It’s a step-by-step plan that helps reach the right people, often through methods like emails, calls, ads, or social media, and encourages them to take action.
Whether the goal is to launch a new product, clear out extra inventory, or hit sales targets before a deadline, these campaigns are designed to make an impact quickly.
A good sales campaign not only brings in new customers but also keeps existing ones engaged.
It’s more than just pushing a product—it’s about offering something that feels timely, useful, and even exciting for buyers, while giving the sales team clear goals and tools to succeed.
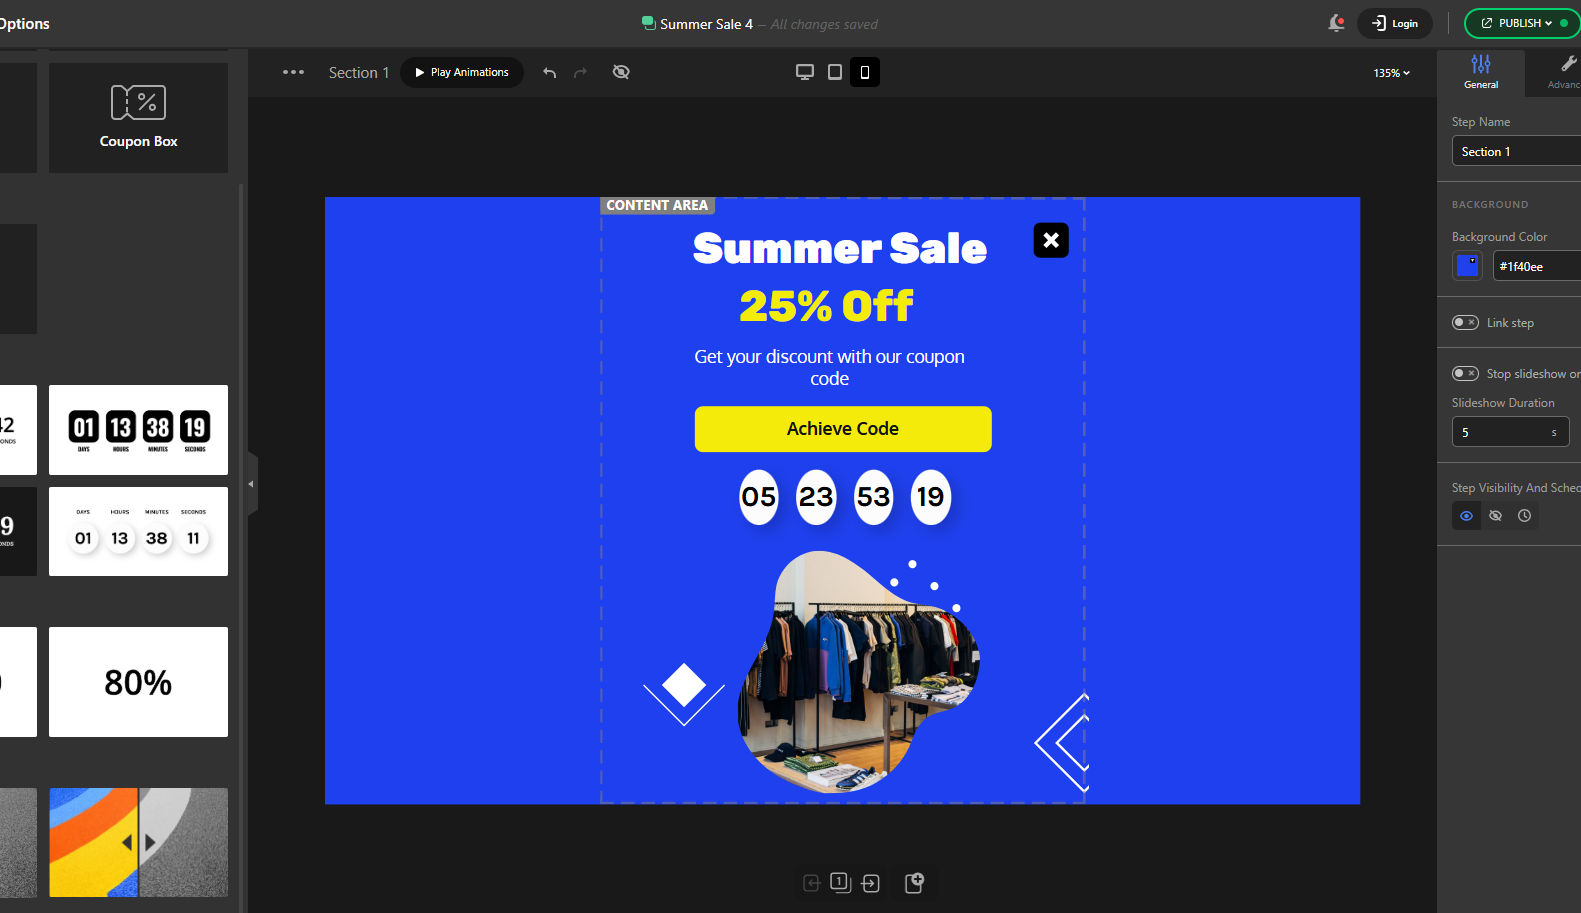
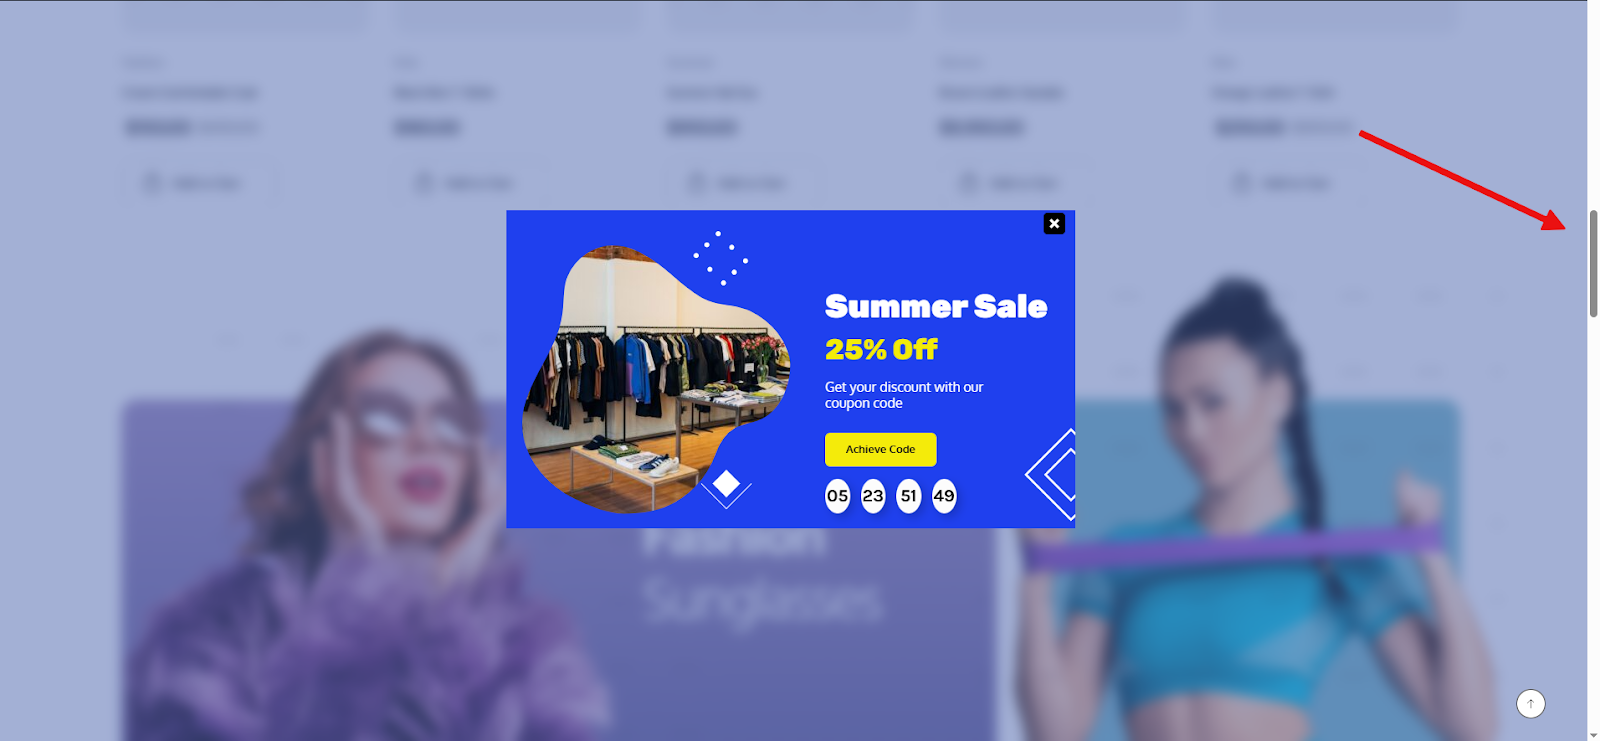
For example, an online clothing store might run a “Summer Flash Sale” where everything is 30% off for 48 hours to clear out seasonal stock. They promote it through email and social media, driving urgency with a countdown timer.
Another case could be a tech store launching a “Back to School” campaign, offering student discounts on laptops and free shipping for a limited time. These kinds of campaigns use specific timing, clear offers, and targeted communication to increase engagement and sales quickly.
2. Planning for a Successful Campaign
Launching a sales or promotional campaign that truly delivers results takes more than just a good idea — it requires thoughtful planning, a clear direction, and a deep understanding of your audience. Below is a step-by-step guide to help you organize a campaign that not only catches attention but also drives meaningful results.
Set Specific and Measurable Goals
Start by defining what you want to achieve. Are you looking to clear out seasonal inventory, increase revenue during a slow period, bring in new customers, or simply get your brand more exposure? Avoid broad goals like “increase sales.” Instead, choose measurable targets such as “increase website purchases by 20% over the next three weeks.” These clear benchmarks help you and your team stay focused and assess how well the campaign is working.
Know Your Audience Inside Out
Understanding who you’re targeting is just as important as what you’re offering. Start by creating detailed customer profiles based on real data, such as age, interests, buying habits, and location. Segmenting your audience allows you to customize your offers. For example, young parents might respond well to baby product bundles, while frequent online shoppers might be more interested in free shipping. Use tools like surveys, purchase history, and social media analytics to gather insights that shape your approach.
Choose the Right Promotional Strategy
The method you choose to deliver your offer can greatly affect your campaign’s impact. There are three common strategies:
Push Strategy: Offer incentives to retailers or distributors to stock your product — ideal for B2B and retail-focused campaigns.
Pull Strategy: Focus on end customers by creating demand directly through promotions like flash sales or giveaways.
Hybrid Strategy: Combine both push and pull methods — for instance, give your distributors a bonus while also offering a buy-one-get-one deal to consumers.
Match your strategy to your product’s lifecycle. New products often benefit from pull tactics like samples or influencer promotion, while well-established ones may perform better with a push approach.
Develop a Detailed Campaign Plan
A structured plan ensures smooth execution. Lay out your campaign elements in advance, including:
Timeline: Set start and end dates to build urgency. Short durations (like 48-72 hours) can motivate quicker responses.
Budget: Decide how much to invest in areas such as ads, discounts, influencer fees, or giveaways.
Channels: Choose where to promote — email, social media, website banners, or even physical displays — based on where your audience is most active.
A well-timed offer aligned with holidays or shopping seasons can also increase relevance and boost performance.
Craft a Compelling Launch
How you present your offer can make or break the campaign. Pay attention to:
Messaging: Use clear, catchy headlines and action-driven phrases like “Ends Soon” or “Grab Yours Now.”
Visuals: Eye-catching graphics and clean design help your message stand out on crowded platforms.
Multi-Channel Distribution: Don’t rely on just one outlet. Combine social media posts, email blasts, website banners, SMS alerts, and influencer collaborations to maximize visibility.
It’s also smart to test variations of your content, such as different images or headlines, to see what performs best before scaling it across all platforms.
A successful campaign doesn’t happen by chance. It’s the result of clear goals, audience awareness, a solid strategy, and strong execution.
When all these pieces work together, you’re more likely to see results that matter — whether it’s more sales, new customers, or stronger brand presence.
3. Proven Campaign Promotion Strategies
Running effective promotions helps online stores attract new customers, increase sales, and build brand loyalty. While there are many ways to do this, here are five of the most popular strategies:
1. Buy One, Get One Free (BOGO)
Why it works: Shoppers love getting something for free—it feels like a reward. BOGO promotions also help move excess stock quickly.
Example:
Kraft Heinz used BOGO offers to increase sales of slower-moving products. This helped clear out their inventory while giving customers extra value for their money.
2. Flash Sales
Why it works: These limited-time offers create urgency. People don’t want to miss out, so they’re more likely to buy right away.
Example:
Amazon Prime Day is a huge flash sale event. For a limited time, customers get deep discounts on popular products, resulting in a massive spike in purchases and engagement.
3. Email Marketing
Why it works: Email lets you talk directly to your customers. You can send targeted messages, offer discounts, and follow up on abandoned carts.
Example:
Grammarly’s Black Friday campaign offered a “55% Off” deal exclusively through email. The urgency and savings pushed many free users to upgrade to paid plans.
4. Referral Programs
Why it works: People trust recommendations from friends. Offering a reward for sharing your brand encourages loyal customers to spread the word.
Example:
Many brands use the classic “Give $5, Get $5” offer. It motivates customers to invite others while earning a bonus themselves, growing the customer base through word of mouth.
5. Loyalty Programs
Why it works: Customers who get rewarded are more likely to come back. Points, discounts, and special perks help build long-term relationships.
Example:
LEGO’s Insiders program gives points for every purchase. Customers can use points for rewards, access members-only content, and feel like part of a special club.
While these five strategies are widely used and highly effective, there are many others worth exploring, like giveaways, cashback deals, product bundles, free trials, and even charitable donations linked to purchases.
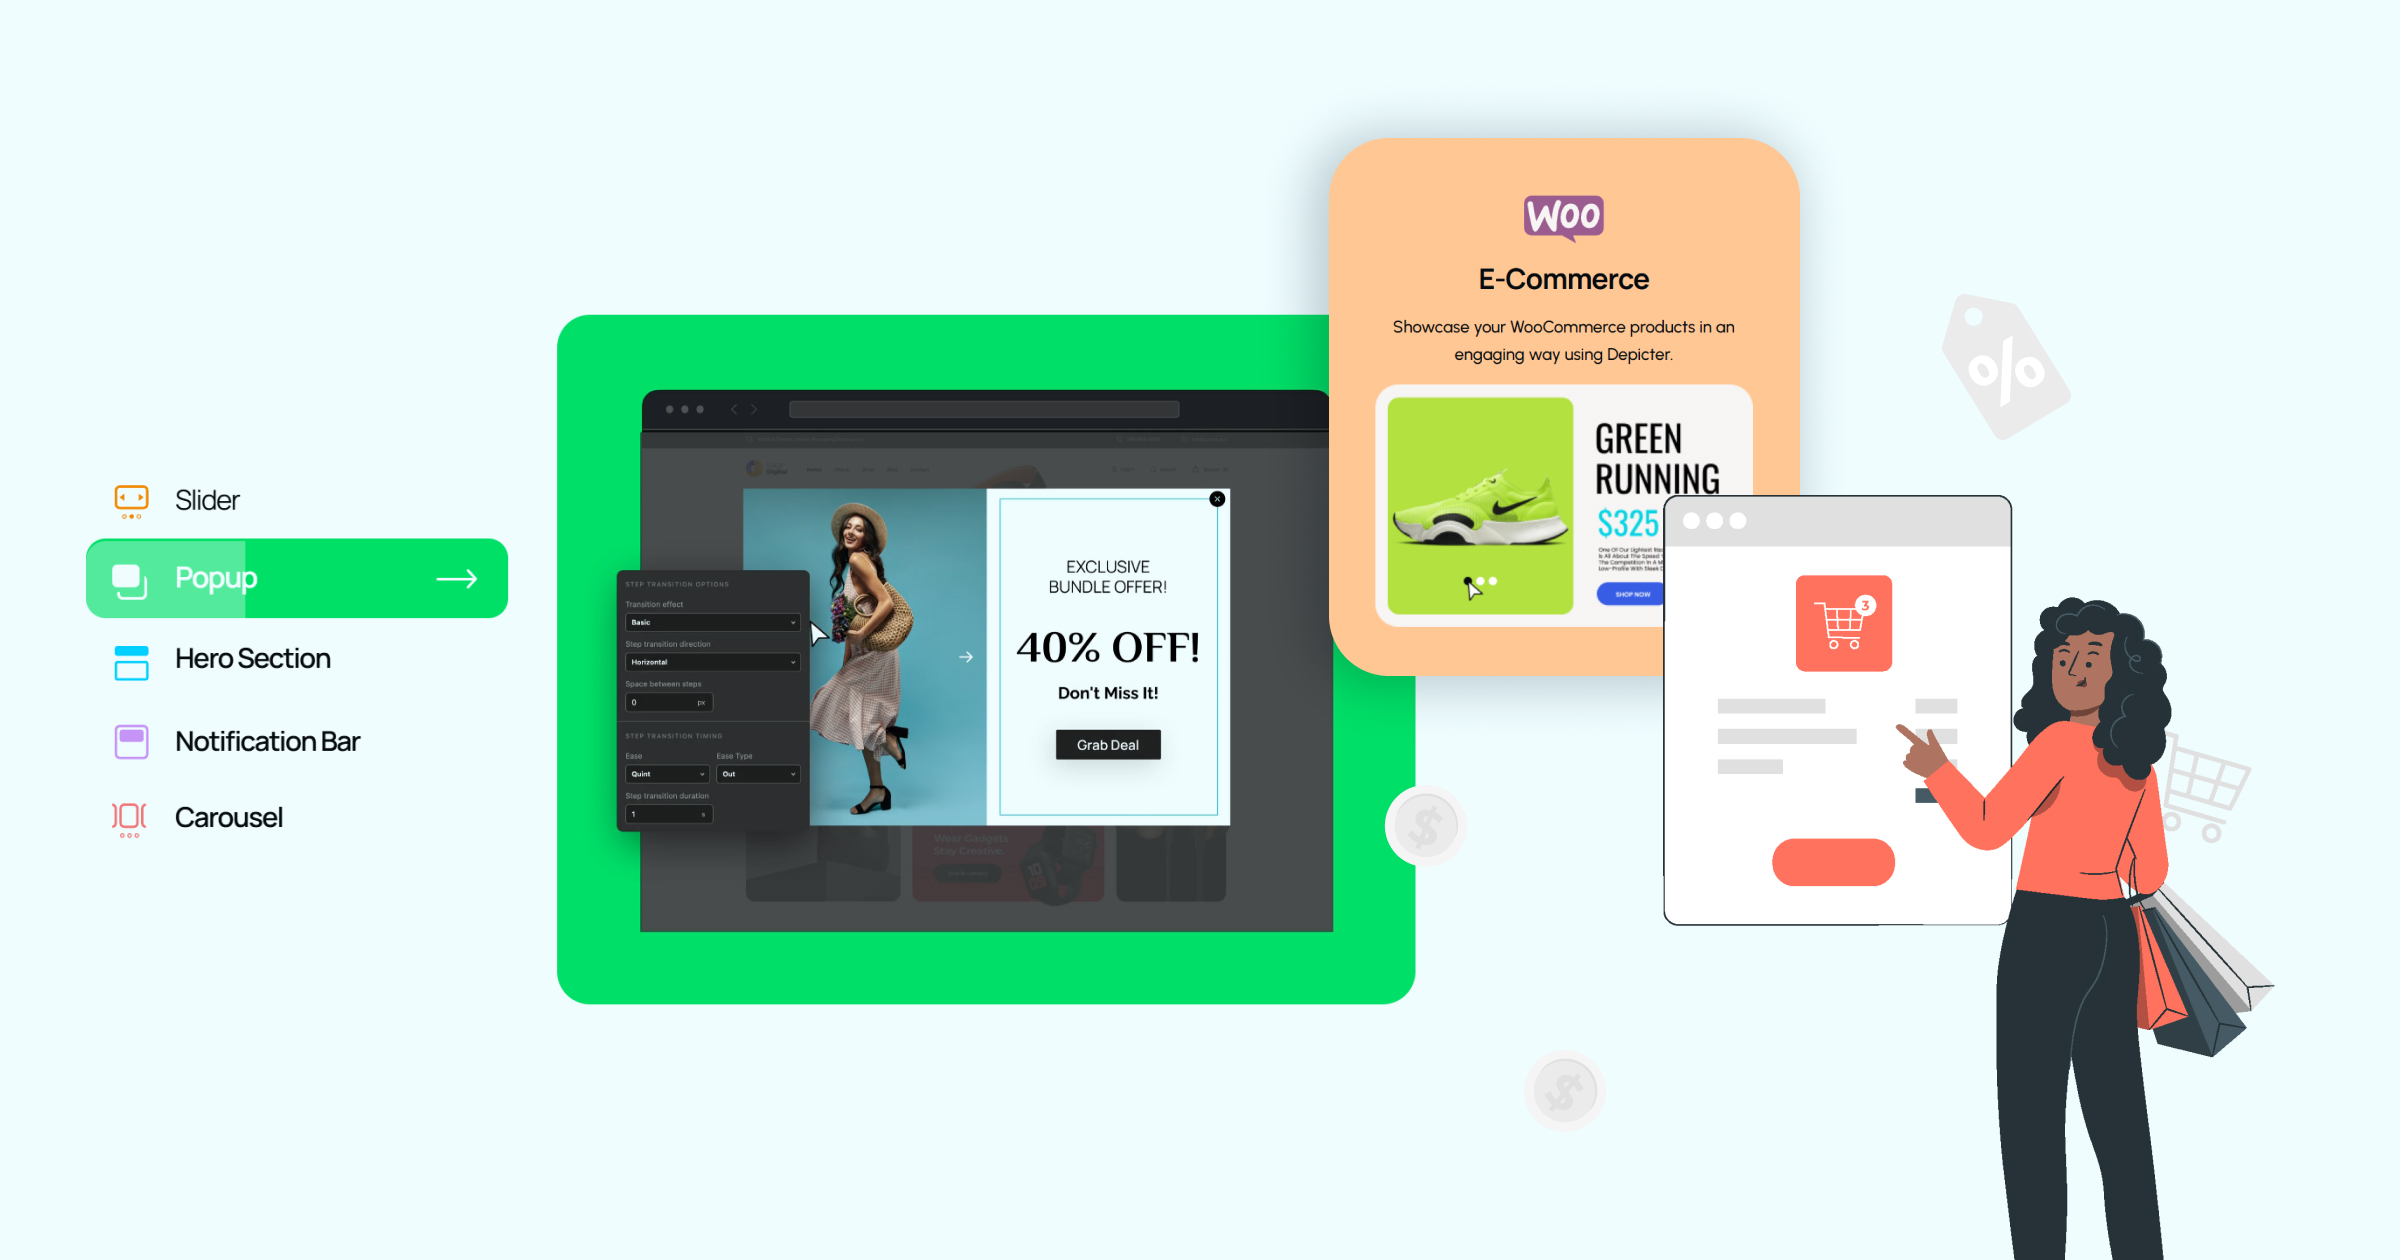
4. Use Popups and Notification Bars to Maximize Reach
Popups: Timed and Targeted Engagement
Popups are effective for delivering timely messages, such as special offers or email sign-up prompts. To ensure they enhance rather than hinder user experience, consider the following best practices:
Timing Is Crucial: Deploy popups based on user behavior. For instance, use exit-intent popups to retain visitors about to leave, or display them after a certain time on the page to engage interested users.
Clear and Concise Messaging: Keep the content straightforward, highlighting the value proposition and including a compelling call-to-action (CTA).
Design for Clarity: Ensure the popup is visually appealing but not overwhelming. Use contrasting colors for visibility and make it easy to close to respect user autonomy.
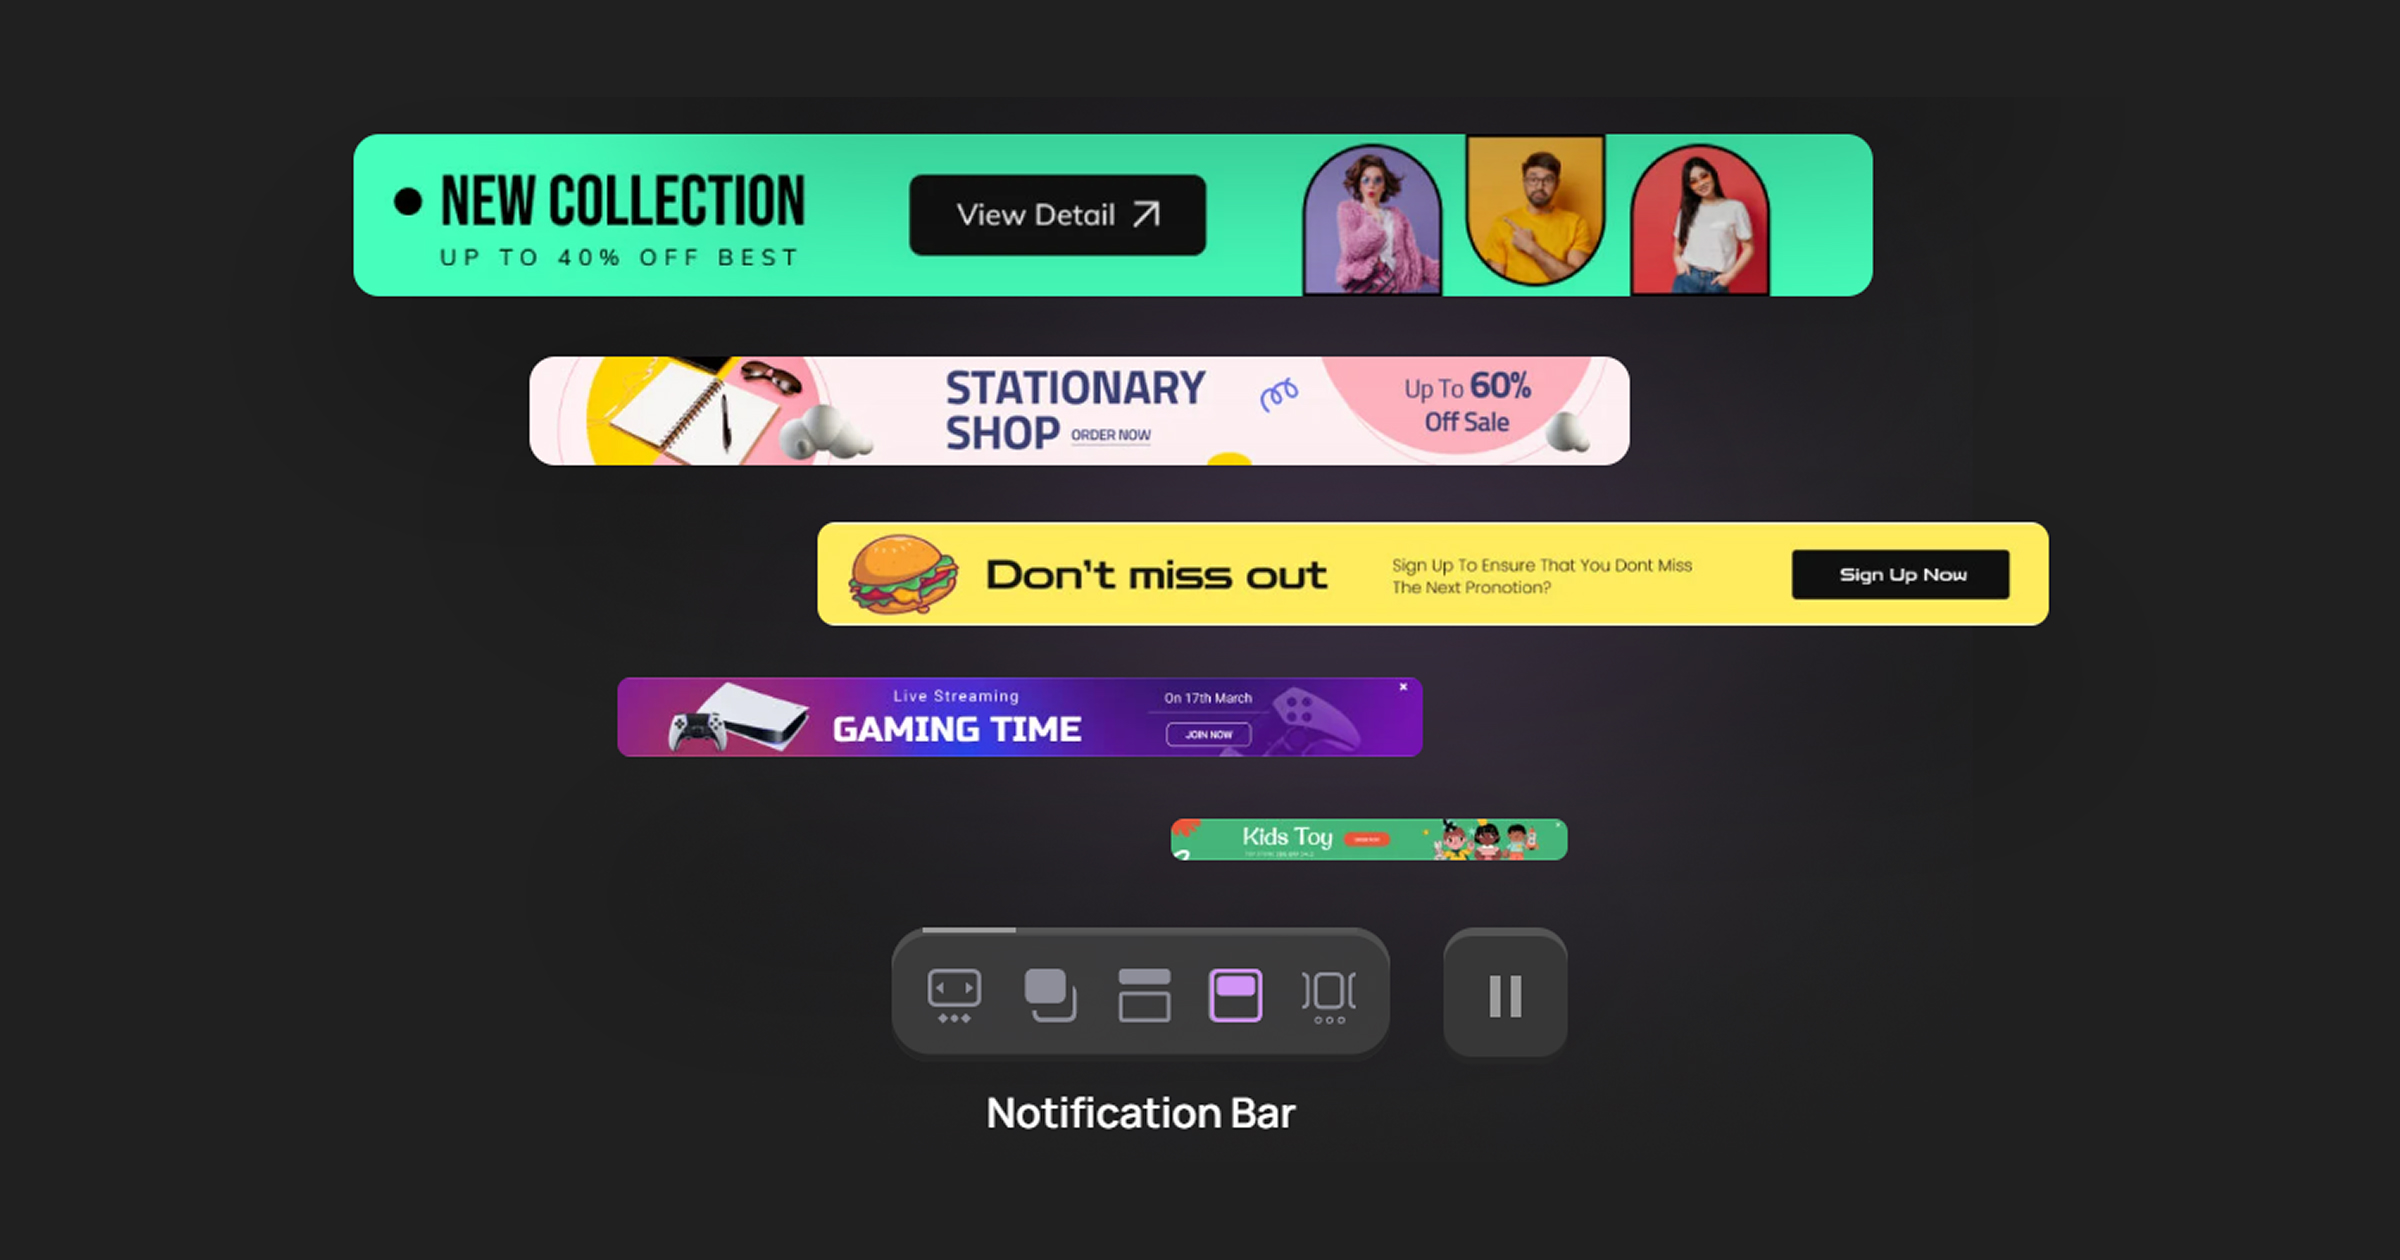
Notification Bars: Subtle Yet Effective
Notification bars, also known as sticky bars or announcement bars, sit at the top or bottom of a webpage and provide persistent, unobtrusive messaging. They are ideal for:
User Experience Stack Exchange
Announcing Promotions: Highlight ongoing sales, discounts, or special offers. For example, a bar stating Offering free shipping on orders over $50 can encourage customers to spend more to qualify for the deal.
Sharing Important Updates: Inform visitors about new product launches, upcoming events, or changes in service.
Encouraging Sign-Ups: Prompt users to subscribe to newsletters or join loyalty programs with concise messages and clear CTAs.
Design Tips:
Keep It Simple: Use brief, impactful text to convey your message without clutter.
Use Contrasting Colors: Ensure the bar stands out against your site’s background to grab attention.
Strategic Placement: Place the bar in a spot that’s easy to see, usually at the top of the page, without covering up any important content.
5. How to Create Campaign Popups with Depicter
Depicter is a visual Popup builder and Notification Bar builder for WordPress that provides many features as part of marketing or promotional campaigns. It offers a user-friendly interface with a range of pre-designed templates, allowing users to quickly implement customized messages without writing code. Depicter’s tools include flexible display rules, responsive design options, and behavior-based triggers, making it suitable for creating targeted interactions such as limited-time offers, email capture forms, and general site announcements.
We will be creating a simple popup-based sales campaign designed to quickly boost sales through a pull strategy and a flash sale. The goal is to create urgency and excitement by offering a limited-time discount to all website visitors. The popup will appear based on user behavior to avoid interrupting the browsing experience and will include a countdown to drive fast action.
[The website full image]
Campaign Details
Campaign Goal: Increase purchases by 25% within 48 hours by promoting summer clothing through a time-sensitive offer.
Strategy:
Pull Strategy: Reaching out directly to customers visiting your website
Flash Sale: Creating urgency with a two-day discount event
Target Audience: All visitors to the website, with no special segmentation for this general campaign
Depicter Popup Content
Headline: Summer Sale
Body Text: 25% Off
Get your Discount with our coupon code
Countdown Timer
Call to Action Button: Achieve code
Popup Settings:
Trigger Timing:
Show popup after 10 seconds on the homepage
Or on scroll (30% down the page)
Frequency Control:
Show once per session to avoid annoying users
Design Notes:
Colors: Use brand-aligned and eye-catching colors that draw attention without overwhelming the user.
Appropriate Images: Include visuals that reflect the user’s interests to increase relevance and engagement.
Responsive Design: Ensure the popup adjusts smoothly across all devices and screen sizes.
Close Button: Always provide a clear and accessible close button so users can easily dismiss the popup.
Install Depicter
Before getting started, make sure the Depicter plugin is installed on your site. You can quickly find it by searching for “Depicter” in the Plugins section of your WordPress dashboard. Need help? Check out our step-by-step guide with a video tutorial here.
Importing a Template
After going to the Depicter dashboard, click on the Popup section.
There are two ways to create our desired popup:
One is to start from scratch with a blank popup and build everything manually, or we can use one of the ready-made templates provided by Depicter.
Depicter offers a large and diverse collection of popup templates, covering everything from newsletter signups and promotions to exit-intent messages and seasonal offers.
Having access to such a wide variety is a huge advantage for any popup builder — it saves you a significant amount of time, ensures professional design quality, and helps you get started quickly without the need to build layouts from scratch.
Even better, every template is fully customizable, so you can easily apply your own design, branding, and content to make it truly your own.
You can browse these templates, use the targeted categories on the left side, or filter the popup list using the search bar at the top with relevant keywords.
After selecting the desired popup, simply click the Import button. Within a few seconds, the template will be imported and you’ll be taken to the Depicter editor.
It’s worth noting that our popup has two steps. You can switch between them by clicking on the Steps Panel.
Visitors can click the CTA button on the first step to be directed to the second step, where the campaign’s discount code is displayed.
Customizing the Popup
Here, using the tools and features provided by Depicter, you can customize every aspect of the popup — from how it looks to how it functions.
For example, we’ve added a Countdown Timer element to the popup here.
When it comes to responsive design, although all of Depicter’s ready-made templates are fully responsive by default, you still have access to all the tools and options needed to fine-tune the popup’s appearance for standard responsive sizes.
The next step is configuring how the popup is displayed. This section includes all the settings that determine
under what conditions the popup will appear to make sure that it displays at the right time and in the right place. After clicking the Publish button, go to the Display Rules section and click on Configure.
Configuring the Display Rules
Based on what we decided in the details of our campaign, the popup should appear after the user has scrolled down 30% of the page. To do this, go to the Triggers section, activate the “Scroll percentage” option, and set the value to 30 seconds.
Also, for the popup to reappear, it should only show up again if the visitor returns to the site, and not more than once during the same session. To set this up, go to the After Close section and select the “Show again after return” option.
Everything is done, and the result will be that when a user scrolls through 30% of the webpage, our popup will appear.
According to our design, when the user clicks the specified CTA button, the discount code will be
6. Adding Notification Bars with Depicter
When deciding between popups and notification bars, it’s important to consider the nature of your message and how intrusive it should be.
Notification bars are ideal for subtle, ongoing promotions or general announcements, like highlighting free shipping thresholds, new product launches, or seasonal hours.
They sit quietly at the top or bottom of your page, making them perfect for keeping users informed without disrupting their experience.
On the other hand, popups are more attention-grabbing and should be used when you need to drive action, like collecting emails, promoting a limited-time offer, or re-engaging users about to leave the site.
In short, use notification bars when you want to inform, and popups when you want to convert.
We’re not going to go over all the campaign scenario details here—instead, we’ll just walk through how to create a notification bar.
Here is a video that shows the whole process of creating a Notification Bar with Depicter:
In the Depicter dashboard, click on the Notification Bar option.
From the available templates, choose one and click Import to start the import process.
After a few seconds, it’s done and you’ll be taken into the Depicter dashboard, where you can make any changes you want before finalizing your notification bar.
To configure how it’s displayed—similar to what we did for the popup—go to the Display Rules section.
This time, for the notification bar, we’ll set it to appear a few seconds after the visitor lands on the page by enabling the Spend time on page option and setting it to 10 seconds.
Finally, once a visitor has spent 10 seconds on our site, the notification bar will appear like this.
Conclusion
A sales promotion is an essential tool for any business looking to drive results in a competitive market. But without the right promotional tactics, even the best campaign ideas can go unnoticed. By combining smart planning with high-converting tools like popups and notification bars, you can maximize reach, create urgency, and guide visitors toward taking action.
Depicter makes it easy to launch visually appealing, behavior-based popups and subtle yet effective notification bars—no coding required. Whether you’re running a flash sale, collecting emails, or announcing new products, using these tools strategically can dramatically increase your chances of campaign success.
Remember: Good timing, targeted messaging, and clear design are the keys to getting the results you want.
Let me know in the comments if this article helped you start a campaign.
FAQs
1. What’s the difference between a sales campaign and a regular promotion?
A sales campaign is typically a more structured and time-bound initiative with a clear goal, such as increasing revenue or clearing out inventory. A promotion is one part of a campaign—like offering a discount, running a giveaway, or launching a flash sale.
2. When should I use a popup instead of a notification bar?
Use popups when you want to grab immediate attention or drive a specific action, like collecting email sign-ups or promoting limited-time deals. Notification bars are best for subtle messaging that doesn’t interrupt the user experience, like announcing free shipping or a product launch.
3. How often should I show a popup to users?
To avoid annoying users, limit the frequency. Best practice is to show a popup once per session or only when specific behavior triggers it (e.g., after scrolling or before exit). Depicter allows you to control this easily with built-in display rules.
4. Can I customize popup templates in Depicter?
Yes! All templates in Depicter are fully customizable. You can change the colors, text, layout, and even add features like countdown timers or multi-step flows to match your brand and campaign goals.
5. Do popups and notification bars work on mobile devices?
Absolutely. Depicter templates are responsive by default, and you can fine-tune their appearance on different screen sizes to ensure a seamless mobile experience.
6. What makes a popup effective?
An effective popup is:
Timed well (not shown too early)
Visually appealing
Clear in its message
Action-oriented (strong CTA)
Easy to dismiss
When done right, it adds value without disrupting the user’s journey.